- Как установить GNOME на Linux Mint 20
- Что мы имеем:
- 1) Установите GNOME на Linux MINT с помощью команды apt
- 2. Установите Gnome Desktop с помощью tasksel
- Удалить среду GNOME с Linux Mint
- Заключение
- Как установить gnome в Ubuntu / Debian
- Установка:
- Подробная информация о пакете:
- Зависимости:
- How to Install GNOME on Linux Mint 20
- Prerequisites
- 1) Install GNOME on Linux MINT using apt
- 2. Install GNOME Desktop Using tasksel
- Remove GNOME on Mint
- Conclusion
- How to Install GNOME Desktop Environment on Linux Mint?
- Linux Mint Supported Desktop Environments
- Features of GNOME Desktop
- Pre-Requisites to Install GNOME on Linux Mint
- Install GNOME Desktop on Linux Mint
- Check GNOME Desktop version
- Install GNOME Tweaks
- Uninstall GNOME Desktop
- Conclusion
Как установить GNOME на Linux Mint 20
Установка дополнительной среды рабочего стола позволяет получить больше пользовательского опыта без установки другого дистрибутива Linux.
Gnome — это среда рабочего стола по умолчанию для многих дистрибутивов Linux. Gnome основан на GTK+ и обновляется каждые 6 месяцев.
Linux Mint по умолчанию имеет среду рабочего стола Cinnamon, MATE или Xfce. Cinnamon и Mate — это тоже что и GNOME с кодовой базой GNOME 3 и GNOME 2 соответственно.
В этой статье я расскажу, как установить рабочий стол GNOME 3 (gnome-shell) в вашем Linux Mint 20.
Что мы имеем:
- Установленный Linux Mint (Cinnamon, MATE или Xfce)
1) Установите GNOME на Linux MINT с помощью команды apt
Во-первых, вам нужно обновить все пакеты в системе Linux Mint. Для этого откройте терминал и выполните следующую команду:
Теперь установите все пакеты, которые имеют новые версии:
Для установки среды Gnome необходимо установить gnome-session и gdm3. Используйте команду apt для их установки.
$ sudo apt install gnome-session gdm3-y
Когда появится окно информации просто примите его. Нажмите кнопку ОК.
 Для установки GNOME нажмите OK
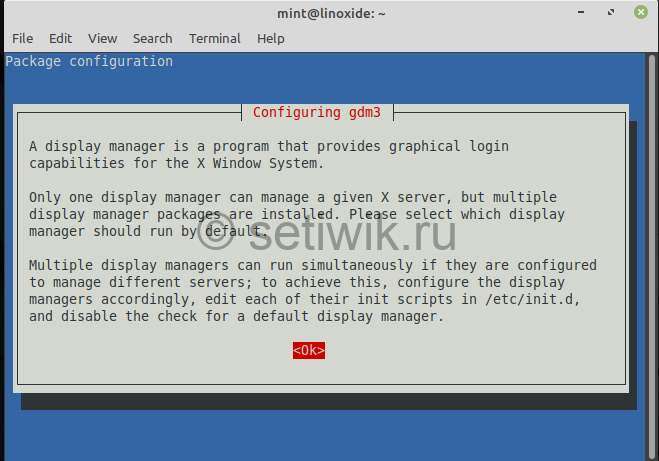
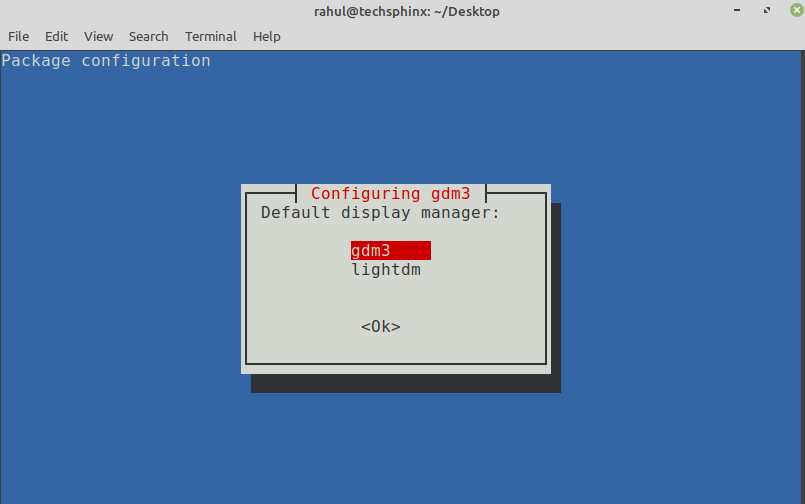
Далее появится новая подсказка. Выберите либо gdm3, либо lightdm.
Gdm3 — это GNOME display manager, который обеспечивает графический вход в систему и обрабатывает аутентификацию пользователя. Он использует минимальную версию gnome-shell, благодаря которой вы установите сеанс GNOME3.
lightdm — это кросс-настольный дисплейный менеджер, который очень легкий. А так же поддерживает различные технологии отображения.
Установка всех зависимостей и пакетов может занять некоторое время. Когда все закончится, перезагрузите систему.
Когда появится экран входа в систему, выберите Gnome и введите свой пароль.
 Требуется выбрать GNOME
Ваш рабочий стол должен быть изменен, как показано на рисунке ниже.
 Изменить среду окружения Linux Mint
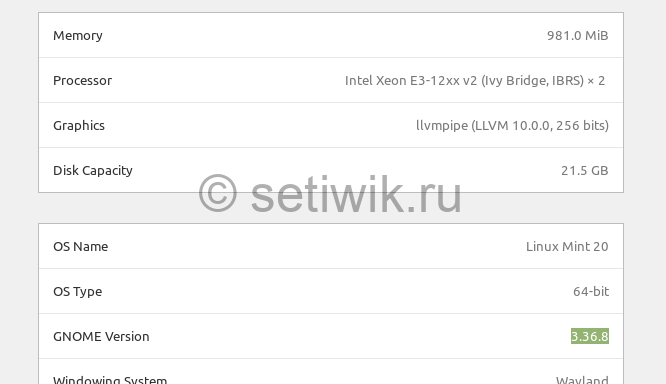
Чтобы проверить версию Gnome требуется:
- Перейдите в Настройки
- Откройте Панель подробности о программе.
Из репозитория была установлена версия Gnome 3.36.8.
 Проверка версии GNOME
Чтобы проверить версию с терминала, введите:
2. Установите Gnome Desktop с помощью tasksel
Альтернативный способ установки Gnome — это использование tasksel. Если tasksel не установлен в вашей системе, сначала установите его с помощью:
Теперь, чтобы установить Ubuntu desktop (gnome 3), введите команду:
$ sudo tasksel install ubuntu-desktop
Удалить среду GNOME с Linux Mint
Если вы хотите удалить GNOME из Mint 20, тогда сделайте следующее.
- Войдите в другую среду рабочего стола. Если не изменить среду рабочего стола, то удалить GNOME не получится.
- Для удаления GNOME выполните следующую команду.
$ sudo apt purge gnome-сессия gdm3-y
$ sudo apt autoremove-y
Заключение
Многие дистрибутивы Linux, такие как Ubuntu, Fedora, Debian, POP OS, по умолчанию используют GNOME. Вы можете легко установить Gnome, если он не поставляется вместе с дистрибутивом.
В этой статье вы узнали, как установить Gnome на Mint Linux 20.
Пожалуйста, если вы найдете ошибки или неточности в тексте, сообщите пожалуйста мне. Используя форму комментария ниже.
Источник
Как установить gnome в Ubuntu / Debian
Установка:
Для установки gnome в Ubuntu / Linux Mint / Debian, введите в Терминал :

Подробная информация о пакете:
Полная рабочая среда GNOME, с дополнительными компонентами
Зависимости:
Аварийный демон mDNS /DNS-SD
Инструмент для съемки и видео с веб-камеры
Помощник PolicyKit для настройки чашек с мелкозернистыми привилегиями
Общие файлы для рабочего стола Debian
Пакет групповой работы с почтовым клиентом и организатором
Стандартные плагины для Evolution
Менеджер архивов для GNOME
Набор плагинов для gedit
Программа манипулирования изображениями GNU
Приложение календаря для GNOME
Простое приложение GNOME с поддержкой секундомера, таймера и мирового времени
Интеграция управления цветом для среды рабочего стола GNOME
Рабочая среда GNOME — основные компоненты
Менеджер документов для GNOME
Помогите новому пользователю начать работу в GNOME
Приложение карты для GNOME
Музыка — новое приложение для воспроизведения музыки GNOME
Приложение для скриншотов для GNOME
Простой и современный диктофон для GNOME
Минималистический менеджер личных задач, предназначенный для размещения рабочего стола GNOME
Инструмент для настройки расширенных настроек конфигурации для GNOME
Доступ к текущим условиям и прогнозам
Плагины GStreamer из «уродливого» набора
Векторная программа рисования
Библиотека структурированных файлов — программы
Интерфейс Perl для серии 2.x библиотеки Gimp Toolkit
Автоматическая библиотека управления конфигурацией прокси (плагин Network Manager)
Офисный пакет — таблица
Офисный пакет — интеграция с GNOME
Офисный пакет — презентация
Офисный пакет — текстовый процессор
Легко отправлять файлы по электронной почте из Nautilus
Инфраструктура сетевого управления (интерфейс GNOME)
Музыкальный плеер и организатор для GNOME
Плагин для музыкального плеера rhythmbox
Плагины для музыкального плеера rhythmbox
Услуги GNOME UPnP/DLNA — плагин GStreamer Media Renderer
Услуги GNOME UPnP/DLNA — плагин Tracker
GNOME передняя часть для GnuPG
Организатор цифровых фотографий
Приложение для доступа, организации и обмена фотографиями с GNOME
Простая утилита сканирования
Плагины для медиатеку Totem
Клиент удаленного рабочего стола для рабочего стола GNOME
Сервер VNC для GNOME
Инструмент для управления хорошо известными пользовательскими каталогами (расширение Gtk)
Источник
How to Install GNOME on Linux Mint 20

Installing an additional desktop environment allows more user experience without installing another Linux distro. Gnome is the default desktop environment for many Linux distributions. Gnome is based on GTK+ and has a new release every 6 months.
Linux Mint by default supports Cinnamon, MATE, or Xfce desktop environment. Cinnamon and Mate are a fork of GNOME with a codebase of GNOME 3 and GNOME 2 respectively. Switching desktop
In this article, I will guide how to install the GNOME 3 (gnome-shell) desktop in your Linux Mint 20.
Prerequisites
- Linux Mint installed ( Cinnamon, MATE, or Xfce)
1) Install GNOME on Linux MINT using apt
First, you need to upgrade all packages in the Linux Mint system. So, open the terminal and issue the following command.
Get a list of all available packages and their versions:
Now install all packages that have new versions:
In order to install the Gnome environment, you need to install gnome-session and gdm3. Use apt to install them.
Just accept the message information. Click on ok
Again another screen prompt, choose either gdm3 or lightdm. Gdm3 is GNOME display manager that provides graphical login and handles user authentication. It uses a minimal version of gnome-shell due to which you will feel GNOME3 session. Similarly, lightdm is a cross-desktop display manager which is lightweight and supports different display technologies.
Here, I’m going to choose gdm3.
It can take some time to install all the dependencies and packages. When everything finishes, reboot your system.
When the login screen appears, choose Gnome and enter your password.
Your desktop should be changed as shown in the below picture.

To check gnome version go to Settings and open Details/About panel. From the repository, it has installed Gnome 3.36.8 version.

To check version from the terminal, type:
2. Install GNOME Desktop Using tasksel
An alternative way to install Gnome is by using tasksel. If tasksel is not installed on your system, first install it using:
Now, to install Ubuntu desktop (gnome 3), type:
Remove GNOME on Mint
If you want to remove GNOME from Mint 20 then follow the procedure.
- Log in to another desktop environment.
- Issue following command to remove GNOME package.
Conclusion
Many Linux distributions such as Ubuntu, Fedora, Debian, POP OS use GNOME by default. You can easily install Gnome if it doesn’t come with the distribution.
In this article, we learned how to install Gnome on Mint Linux 20. Please feel free to comment on your experience and give us valuable feedback.
Источник
How to Install GNOME Desktop Environment on Linux Mint?
This post may contain affiliate links/ads and I may earn a small commission when you click on the links/ads at no additional cost to you. As an Amazon Affiliate, I earn from qualifying purchases. You can read my full disclaimer here.
This tutorial will show you how to install GNOME 3 Desktop on Linux Mint.
GNOME 3 is also the default desktop environment for many popular Linux distros like RedHat Enterprise Linux, Fedora, CentOS, Ubuntu, Tails etc.
If you have used GNOME desktop before, you may want the same desktop experience on your Mint system too.
Linux Mint Supported Desktop Environments
Before talking about GNOME, let me mention other desktop environments that are officially supported by Linux Mint.
Cinnamon
Cinnamon is a modern, innovative and full-featured desktop environment. It is a continuation of GNOME 3 but with many customizations.
Linux Mint ships with Cinnamon as its principle desktop environment but you can also find cinnamon as an optional desktop environment for many other Linux distros.
The MATE Desktop Environment is the continuation of GNOME 2. It is an intuitive and attractive desktop environment and more stable than Cinnamon desktop (In my opinion).
Although the development of MATE is slower than Cinnamon, the devs are continuously adding support to new technologies without compromising the traditional desktop experience.
It is one of the 3 main desktop environments that Linux Mint ships with but you can also install MATE on many popular Linux distros like Fedora, Arch, Debian, Slackware, OpenSuse, Ubuntu etc.
Ubuntu also has an official flavour that ships with MATE as its default desktop environment. It is known as Ubuntu Mate .
Xfce is one of the most lightweight desktop environment available for UNIX-like operating systems. It is very stable and consumes fewer system resources.
If you ever need a fast and lightweight desktop environment, then there’s nothing better than Xfce.
Xfce is the default desktop environment for many Linux distros and also available as optional desktop environments for almost every popular Linux Distro.

As you can see, the two desktop environments that Mint ships with (Cinnamon and Mate) are the continuation of GNOME. You can try these desktop environments if you are planning to install Linux Mint.
If you have already installed Linux Mint and just want to change the desktop environment to GNOME, then follow along with this post.
Features of GNOME Desktop
Let’s look at some of the awesome features that GNOME 3 desktop provides out-of-the-box.
Note: Here, I am mentioning features of Vanilla GNOME Desktop (which you see in RedHat, CentOS etc.). Some Linux distros (like Ubuntu) uses GNOME Desktop with their own custom modifications.
Top bar
The top bar is the go-to place for everything – from launching applications, enabling/disabling network to log off or shutting down the system. After you log in to GNOME desktop, the top bar is usually the only thing you’ll see apart from the currently running application.
Because of the top bar, you’ll get a clean and clutter-free desktop which is another great feature of the Gnome Desktop Environment.
Clean desktop
GNOME provides a minimalist and clean environment by showing only the necessary items on the desktop, everything else is hidden and can be accessed from the top bar. This helps to reduce distractions and allows the user to focus on the task at hand.
Built-in Screenshot and Screencast
With the screenshot program, you can take screenshots of the errors caused by the applications and send them to maintainers for quick resolutions or use screenshots to make tutorial posts (like I Do).
You have options while taking screenshots to capture the whole screen, a window or a specific region on the desktop. This way you don’t have to go with the hassle of cropping screenshots afterwards.
There is also a screencast application that allows you to record your screen. This is useful if you want to make tutorial videos for online courses.
Whatever your use case may be, having a built-in screenshot and screencast tool is a necessity nowadays.
Easy to use
GNOME is designed with user’s productivity in mind, therefore it features a simple and easy-to-use user interface without too much added functionality.
It is completely intuitive for beginners and also has a help program to make users familiar with the desktop environment via short descriptive manuals and videos.
Compatibility
GNOME is a popular desktop environment and as I mentioned above many desktop environments like Cinnamon and Mate are the continuation of GNOME. Because of this, many apps that are made for other desktop environments are compatible with GNOME.
Pre-Requisites to Install GNOME on Linux Mint
- Linux Mint Installed and Running. I am using Linux Mint 20 Cinnamon Edition in this post.
- Active Internet connection to download GNOME packages.
- Sudo Privileges
Install GNOME Desktop on Linux Mint
Before installing GNOME Desktop on Linux Mint, it is recommended to update software repositories.
Now, you can either install the GNOME desktop with only necessary packages or install full GNOME with all its packages.
To install GNOME with necessary packages run the following command:
Alternatively, to install full GNOME desktop on Linux Mint run the following command:
During installation, you will be prompted with an option to configure a default display manager. Choose GDM3 if you want to set GNOME as the default display manager. This will give you the gnome login screen after system startup.
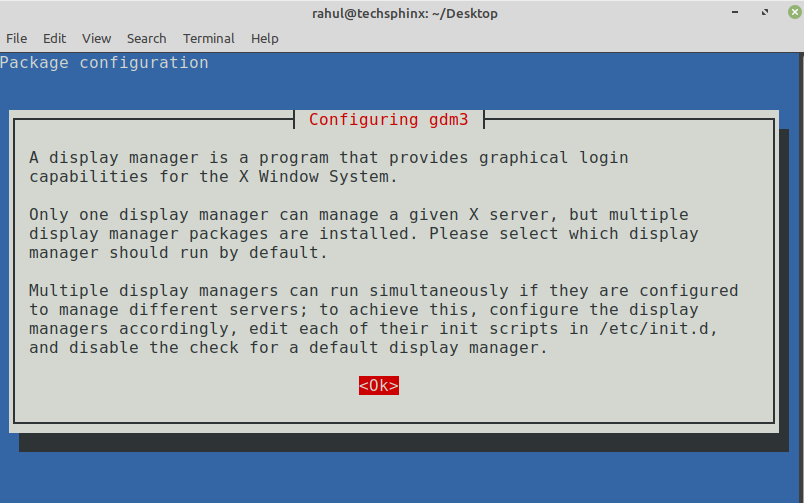
However, if you prefer to use your old login manager you can choose to set Lightdm as default.
After configuring default display manager, the installation will continue. Wait for it to finish, then restart your Linux Mint system.
If you selected gdm3 as default display manager, then you’ll be greeted with the gnome login manager.
Now, you can login to GNOME Desktop.
If you wish to use a different desktop environment, then click on the username and click the wheel icon on the bottom right corner of the screen and select a different desktop environment before logging in.
Check GNOME Desktop version
You can check your details of your system using “screenfetch” utility.
In Screenfetch output, you’ll see desktop environment (DE) is GNOME and its version is 3.36.4 among other information about your Linux Mint system.
Install GNOME Tweaks
GNOME Tweaks allows you to customize and tweak the GNOME desktop environment according to your taste.
It provides many tweaks related to the following categories:
- Appearance
- Extensions
- Fonts
- Keyboard and Mouse Settings
- Start-up Applications
- Top Bar customizations
- Window Title bars
- Windows settings
- Workspace settings
To install Gnome Tweaks on Linux Mint run the following command:
Now, you can start gnome tweaks using the command:
Uninstall GNOME Desktop
If you wish to uninstall GNOME Desktop from Linux Mint for any reason, then restart your system and choose any desktop environment other than GNOME and login to your system.
Now, run the following commands in order to uninstall GNOME Desktop:
The above commands will remove GNOME Desktop from your Linux Mint system, but you’ll also need to restore the default Linux Mint login manager.
Lightdm is the default display manager for Linux Mint, which was replaced by Gdm when you installed GNOME Desktop.
Reconfigure the default display manager back to Lightdm using the following command:
Finally, restart the system.
After restarting, you’ll see your old Linux Mint login manager and if you try to change desktop environment before login (by clicking on the icon next to your username), you’ll see that GNOME is no longer there.
Conclusion
I hope this tutorial helped you to install GNOME Desktop Environment on Linux Mint without any problems.
I have also shown how you can customize GNOME Desktop by installing GNOME tweaks, in case you don’t like vanilla GNOME.
So, which desktop environment you prefer on your Mint system?
Источник


