- GnuRadio и все все все
- Блог о ЦОС. И не только.
- Обзор HackRf One: Часть 2 Настройка софта
- Ethical hacking and penetration testing
- InfoSec, IT, Kali Linux, BlackArch
- How to start with HackRF and gqrx
- How to Install Driver, HackRF Tools and SDR Utilities
- Linux
- Assembly from source
- Where to buy HackRF
- How to check HackRF
- Step-by-step instructions for updating the HackRF One firmware
- How to receive a signal with HackRF
- How to listen to FM radio with HackRF
GnuRadio и все все все
Блог о ЦОС. И не только.
Обзор HackRf One: Часть 2 Настройка софта
Мы подключили HackRf к ноутбуку, и увидели что он определяется корректно. Настала пора разобраться с программной частью. Для начала нам нужно установить ПО для HackRf. К счастью все необходимое ПО уже имеется в репозитории Ubuntu. Посмотрим что там есть.
igor@ghost64:
$ apt-cache search hackrf
gqrx-sdr — Software defined radio receiver
hackrf — Software defined radio peripheral
libhackrf-dev — Software defined radio peripheral
libhackrf0 — Software defined radio peripheral
gqrx — Software defined radio receiver
gr-osmosdr — Gnuradio blocks from the OsmoSDR project
Давай разберемся кто есть кто.
hackrf — утилиты для взаимодействия с приемником
libhackrf0 — библиотека для поддержки управления HackRf сторонними приложениями
libhackrf-dev — пакет содержащий заголовочные файлы, и прочие вещи, необходимые нам, если мы сами захотим скомпилировать какую-нибудь программу с поддержкой HackRf
Нам потребуется это все. Устанавливаем ПО командой:
$ sudo apt-get install hackrf libhackrf0 libhackrf-dev
Посмотрим что за утилиты мы установили. Пакет hackrf содержит следующие программы:
hackrf_info — вывод информации о устройстве.
hackrf_spiflash — программа для обновления прошивки в контроллере
hackrf_cpldjtag — программа для обновления прошивки в CLPD микросхеме.
hackrf_transfer — многофункциональная программа для передачи/приема данных
hackrf_max2837, hackrf_rffc5071, hackrf_si5351c — насколько я понял, данные программы служат для модификаций значений регистров в микросхемах. Возможно они нужны для разработиков прошивок в отладочных целях.
Запустим уже что-нибудь? Что попроще, к примеру hackrf_info
$ hackrf_info
Found HackRF board.
Board ID Number: 2 (HackRF One)
Firmware Version: 2014.08.1
Part ID Number: 0x00584f5e 0x00584f5e
Serial Number: 0x00000000 0x00000000 0x15d463dc 0x186ca825
Вся информация о оборудовании как на ладони. Наиболее полезное тут для нас это Firmware Version. Сейчас в HackRf прошита самая последняя версия 2014.08.1. Проверять наличие новых прошивок нужно тут http://sourceforge.net/projects/hackrf/files/
Если в результате запуска команды вы получили ошибку:
hackrf_open() failed: HACKRF_ERROR_NOT_FOUND (-5)
то причины могут быть в следующем:
1. Отсутствие прав доступа к USB устройствам у текущего пользователя.
Проверить это можно запустив утилиту hackrf_info от имени root пользователя. Если от имени рута программа успешно считывает информацию с HackRf, а от пользователя не хочет, то значит проблема с правами. Исправить это можно, написав правило для udev
Создайте файл /etc/udev/rules.d/52-hackrf.rules , и впишите в него следующие правила:
ATTR
, MODE=»660″, GROUP=»plugdev»
ATTR
«660», GROUP=»plugdev»
ATTR
«660», GROUP=»plugdev»
Сохраните файл, и либо перезагрузите компьютер, либо перезапустите демон udev командой udevadm control —reload-rules . Как вы уже догадались, этими тремя правилами мы задаем для устройств с определенными VendorID и ProductID права доступа 660, и доступ членам группы plugdev.
2. Другая причина — устаревшая версия программ и библиотек для HackRf
HackRf One поддерживается ПО версии 2014.04.1 и новее. Может получиться так, что в репозитории окажется старая версия ПО. Проверить версию установленного ПО в Debian/Ubuntu можно при помощи команды apt-cache show hackrf
Вот небольшая иллюстрация.
Ноут с Ubuntu 14.04 LTS
$ cat /etc/lsb-release
DISTRIB_ID=Ubuntu
DISTRIB_RELEASE=14.04
DISTRIB_CODENAME=trusty
DISTRIB_DESCRIPTION=»Ubuntu 14.04.2 LTS»
В репозитории — устаревший софт.
$ apt-cache show hackrf
Package: hackrf
Priority: extra
Section: universe/libs
Installed-Size: 120
Maintainer: Ubuntu Developers
Original-Maintainer: A. Maitland Bottoms
Architecture: i386
Version: 2013.07.1.16.d5cebd-2 — с этой версией жизни нет!
Depends: libhackrf0 (= 2013.07.1.16.d5cebd-2), libc6 (>= 2.7)
Filename: pool/universe/h/hackrf/hackrf_2013.07.1.16.d5cebd-2_i386.deb
Size: 29708
MD5sum: e4e8542460419a3c0e577dbd6f26ffe9
SHA1: 777ef6d304f2c5606d755291dc123c7c800ab42e
SHA256: 3200d2819cf3f67614f3dd1d2b81fe7adb5443be89e577d0499ae464ab931b21
А вот другой ноут с относительно свежей системой
$ cat /etc/lsb-release
DISTRIB_ID=Ubuntu
DISTRIB_RELEASE=14.10
DISTRIB_CODENAME=utopic
DISTRIB_DESCRIPTION=»Ubuntu 14.10″
$ apt-cache show hackrf
Package: hackrf
Priority: extra
Section: universe/libs
Installed-Size: 124
Maintainer: Ubuntu Developers
Original-Maintainer: A. Maitland Bottoms
Architecture: i386
Version: 2014.04.1-2 — тут в репозитории свежая версия.
Depends: libhackrf0 (= 2014.04.1-2), libc6 (>= 2.7)
Filename: pool/universe/h/hackrf/hackrf_2014.04.1-2_i386.deb
Size: 26718
MD5sum: 2658d15c2d09328049850cc41fb4e643
Выхода из этой ситуации два: либо ждать когда обновят софт в репозитории (ждать этого можно вечно ) или собрать свежий софт самому.
Собираем его так:
1. Ставим нужный для сборки софт
sudo apt-get install build-essential cmake libusb-1.0-0-dev
2. Удаляем неактуальный софт.
sudo apt-get remove hackrf libhackrf-dev libhackrf0
3. Получаем свежие версии исходников:
git clone https://github.com/mossmann/hackrf.git
4. Идем в папку host
cd hackrf/host/
5. Выполняем следующие команды
mkdir build
cd build
cmake ../ -DINSTALL_UDEV_RULES=ON
make
sudo make install
sudo ldconfig
6. Теперь попытаемся выполнить команду hackrf_info (если у вас на эту команду bash выругался что-то вроде «команда не найдена», то просто откройте новое терминальное окно, и выполните в нем)
$ hackrf_info
Found HackRF board.
Board ID Number: 2 (HackRF One)
Firmware Version: 2014.08.1
Part ID Number: 0xa000cb3c 0x00584f5e
Serial Number: 0x00000000 0x00000000 0x15d463dc 0x186ca825
Ура! Работает!
Итак, софт мы поставили, и оборудование успешно определяется. Настала пора попробовать использовать HackRf как источник сигнала в GnuRadio.
Поддержку HackRf в GnuRadio обеспечивает OsmoSDR source (тот самый, что используется для работы с RTL донглами). Даже если у вас он уже был установлен ранее, то его надо будет пересобрать для поддержки HackRF. Сборка выполняется по инструкции из этой статьи . При сборке следует обратить внимание на вывод команды cmake. В ней он указывает какие компоненты он обнаружил и активировал. Запись о HackRF должна присутствовать в разделе «gr-osmosdr enabled components»
— ######################################################
— # gr-osmosdr enabled components
— ######################################################
— * Python support
— * FUNcube Dongle
— * IQ File Source
— * Osmocom RTLSDR
— * RTLSDR TCP Client
— * HackRF Jawbreaker
— * RFSPACE Receivers
После пересборки/установки OsmoSDR можно попробовать проверить работу HackRF с GnuRadio послушав FM станции с помощью графа приемника fm_radio_rx.grc Не забудьте поменять в этом графе частоту семплирования с 5 миллионов, до 8 (минимально поддерживаемую HackRF)
 Вот как-то так оно работает. Не следует удивляться уровню сигнала, так как это принималось все квартире на антенну от Baofeng.
Источник
Ethical hacking and penetration testing
InfoSec, IT, Kali Linux, BlackArch
How to start with HackRF and gqrx
This is the first introduction to HackRF and gqrx.
The issues of analysis of radio broadcasting, beyond Wi-Fi, Bluetooth and BLE, are quite new to me. Therefore, when I received my HackRF in the mail, I had a question – what should I do with it? This article focuses on exactly this – how to test and receive radio signal with HackRF for the first time. For clarity, we will just listen to the FM radio. Something more serious will be in the following tutorials.
If you are also a beginner, then HackRF is a radio (Software-defined radio), a device that can send and receive radio waves in a very wide range. And gqrx is one of the programs for working with data received through HackRF (or other similar devices). This program has a graphical interface and is very suitable for the very first acquaintance with SDR.
Remember that HackRF should not be turned on, and especially being used to transmit or receive data if no antenna is connected to it!
How to Install Driver, HackRF Tools and SDR Utilities
This section contains software installation tips for specific Linux operating systems and distributions.
Most users are strongly advised, if you do not pursue the goal of developing or testing new features for HackRF, use the packages built for your system and install them using the package manager available for your operating system.
Linux
Kali Linux, Ubuntu, Debian, Linux Mint
Fedora / Red Hat
Arch linux, BlackArch
OS X (10.5+)
Windows
Executables are provided as part of the PothosSDR project, which can be downloaded here: https://downloads.myriadrf.org/builds/PothosSDR/
Freebsd
You can use the binary package:
You can build and install with ports:
Assembly from source
Linux / OS X / *BSD
First, make sure that your system is updated using the update method provided on your operating system.
- Installation using PyBOMBS
The GNU Radio project has an assembly system that covers key libraries, drivers for SDR hardware, and many of the tree modules. PyBOMBs take care for you in installing dependencies.
- Building HackRF tools from source
Get the source code for the HackRF tools from either the release archive or git:
After downloading the source code, the host tools can be compiled as follows:
If you have HackRF, then you may need to update the firmware to match the version of the host tools.
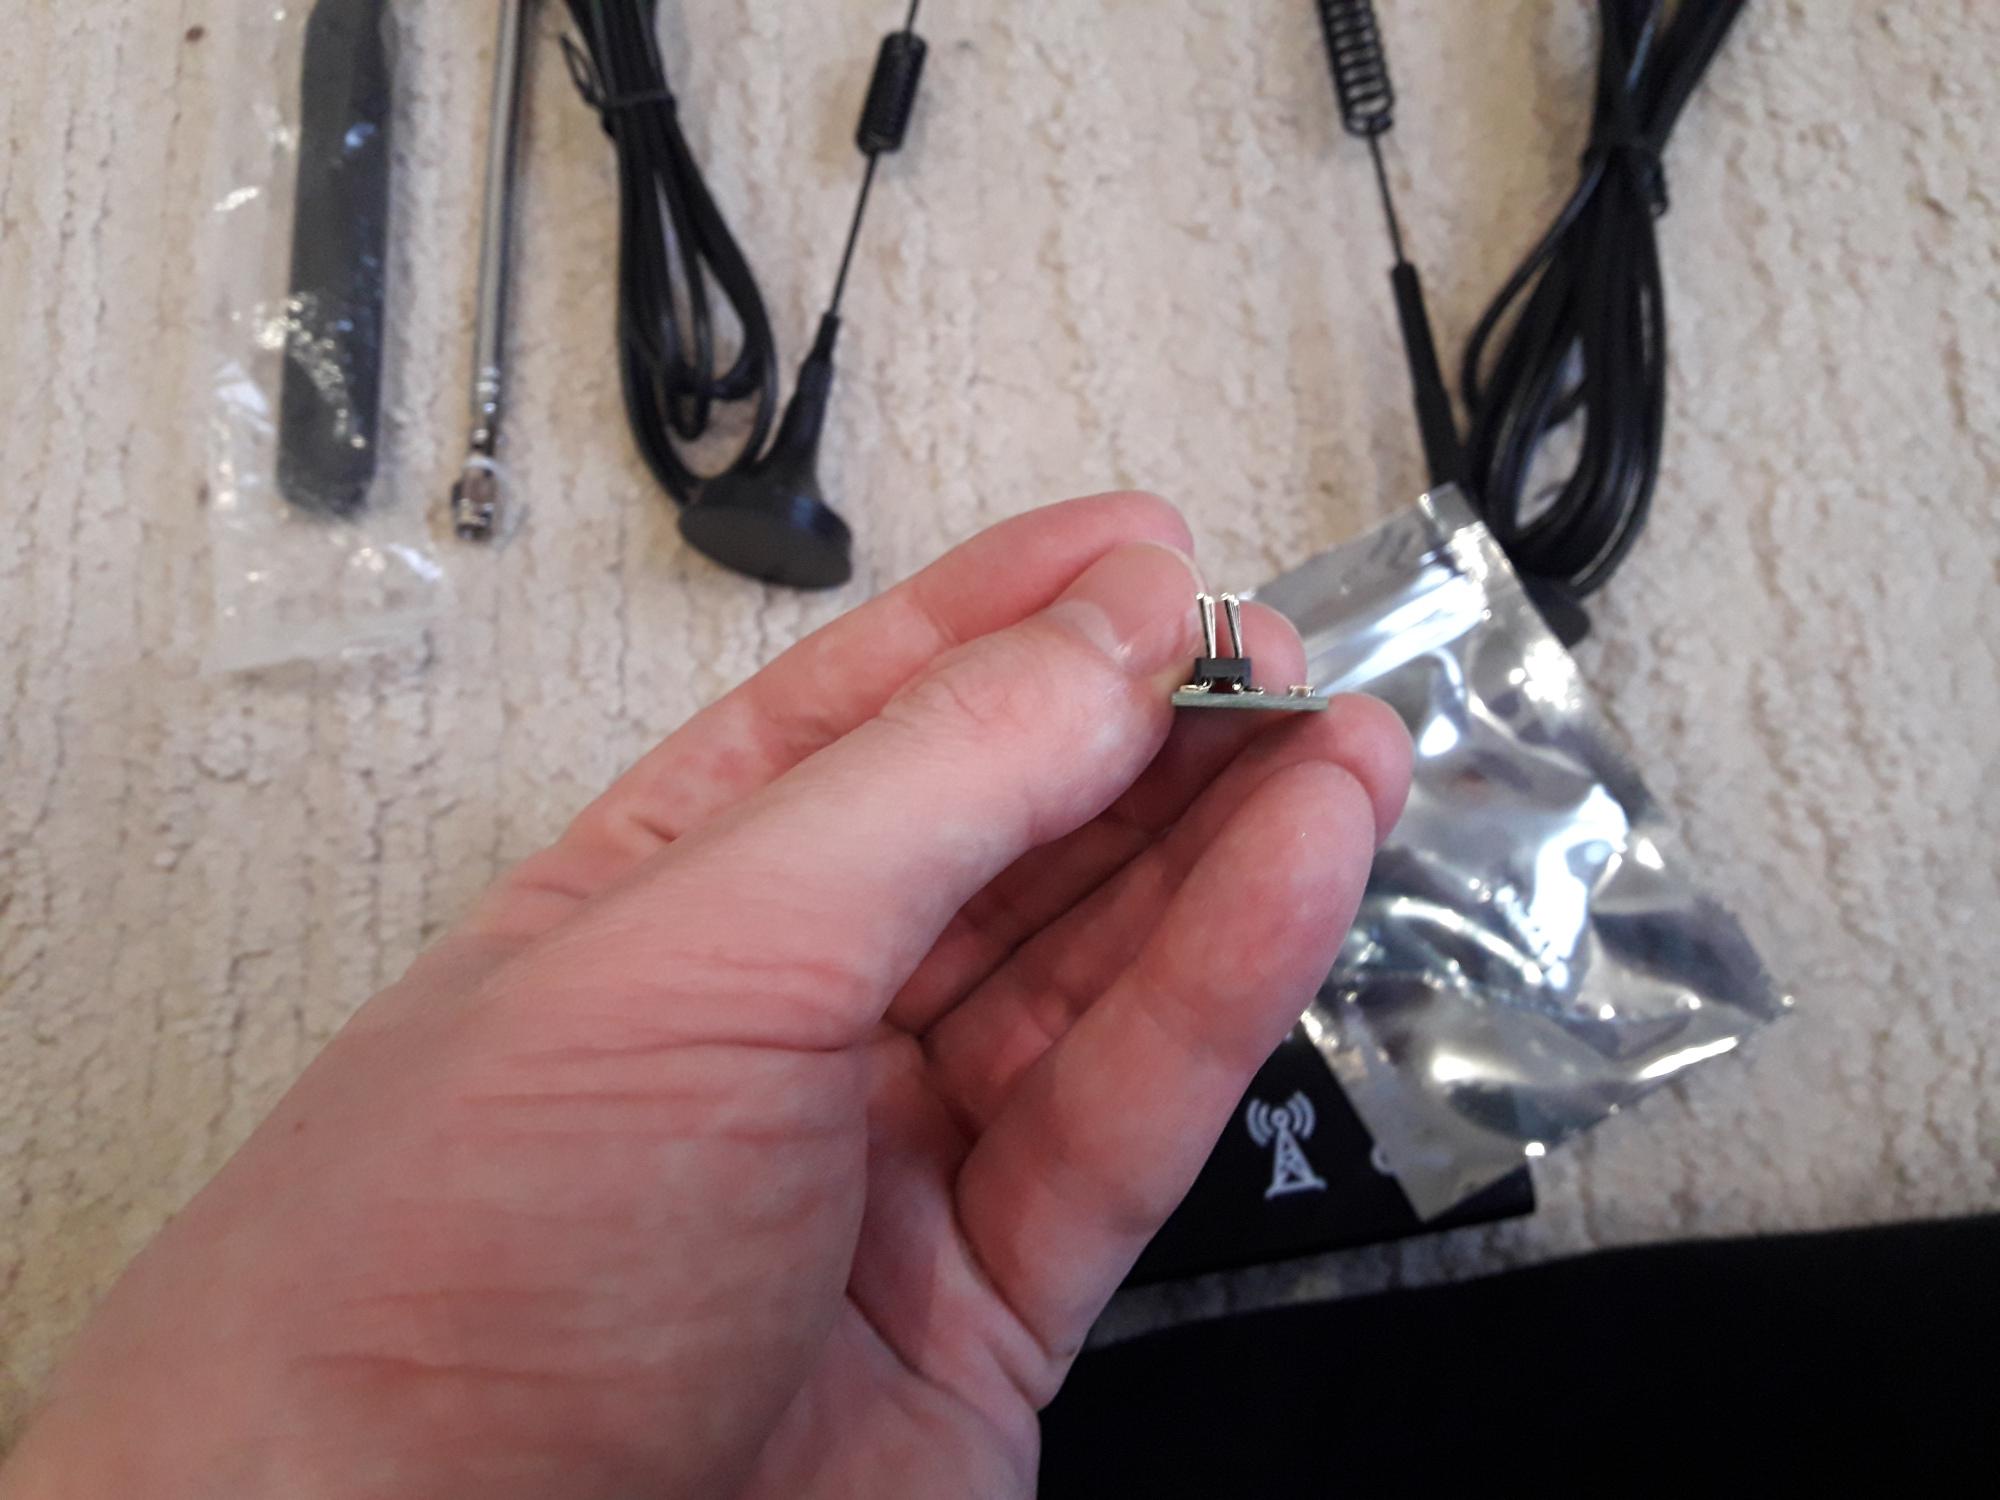
Where to buy HackRF
I bought from this seller. The peculiarity of buying a HackRF is that there are many configuration options:
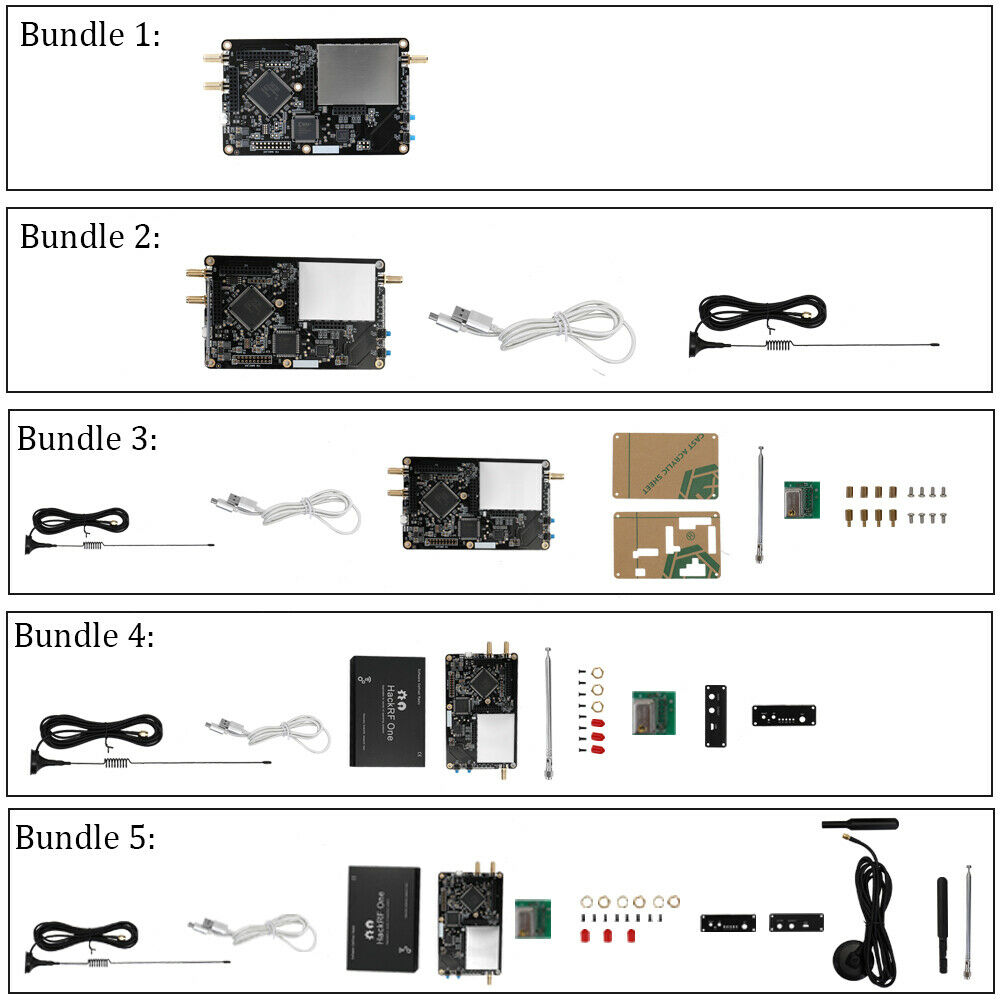
You can buy a board, even without a USB power cable, or you can buy it with a case (Alloy Shell) and several antennas. The types of shells also vary. You also need to be careful, and not confuse the case without a board with the board itself – some cases (with a screen and a built-in battery) can cost as much as the board itself.
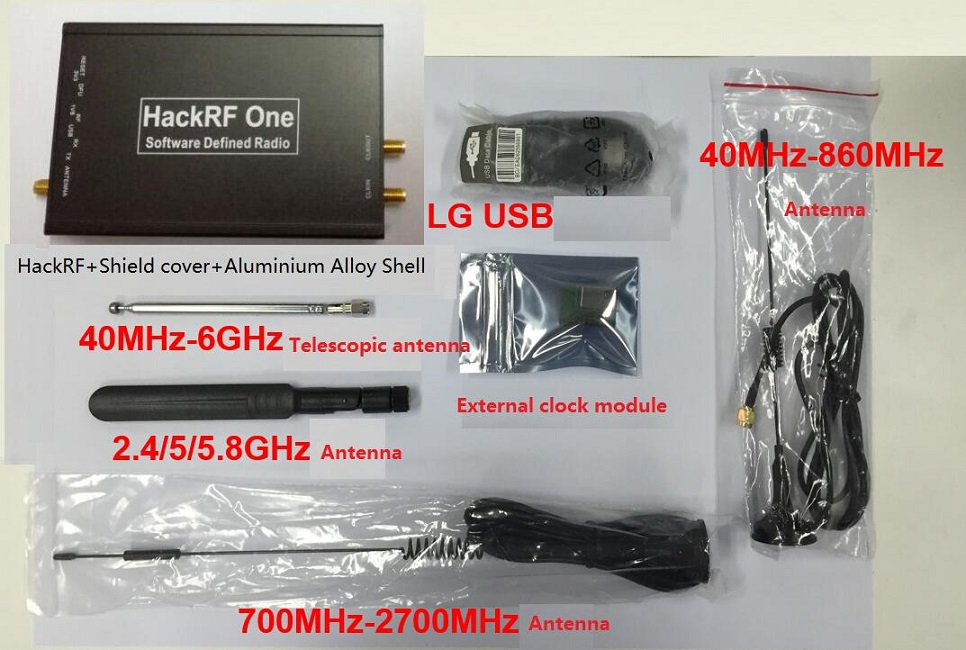
- 1 x HackRF One Software Defined Radio with Aluminum Alloy Shell
- 4 x HackRF SMA Antennas (40MHz-6GHz antenna;2.4G/5/5.8G antenna;70MHz-2700MHz antenna;40MHz-860MHz antenna)
- 1 x HackRF One special Shield cover(welded on the board)
- 1 x HackRF TCXO PPM0.1 GPS Clock module
- 1 x LG Micro USB cable
I liked that because there are several antennas for different needs.
The box came to me very crumpled form and while I was coming from the post office I was quite worried for the board:
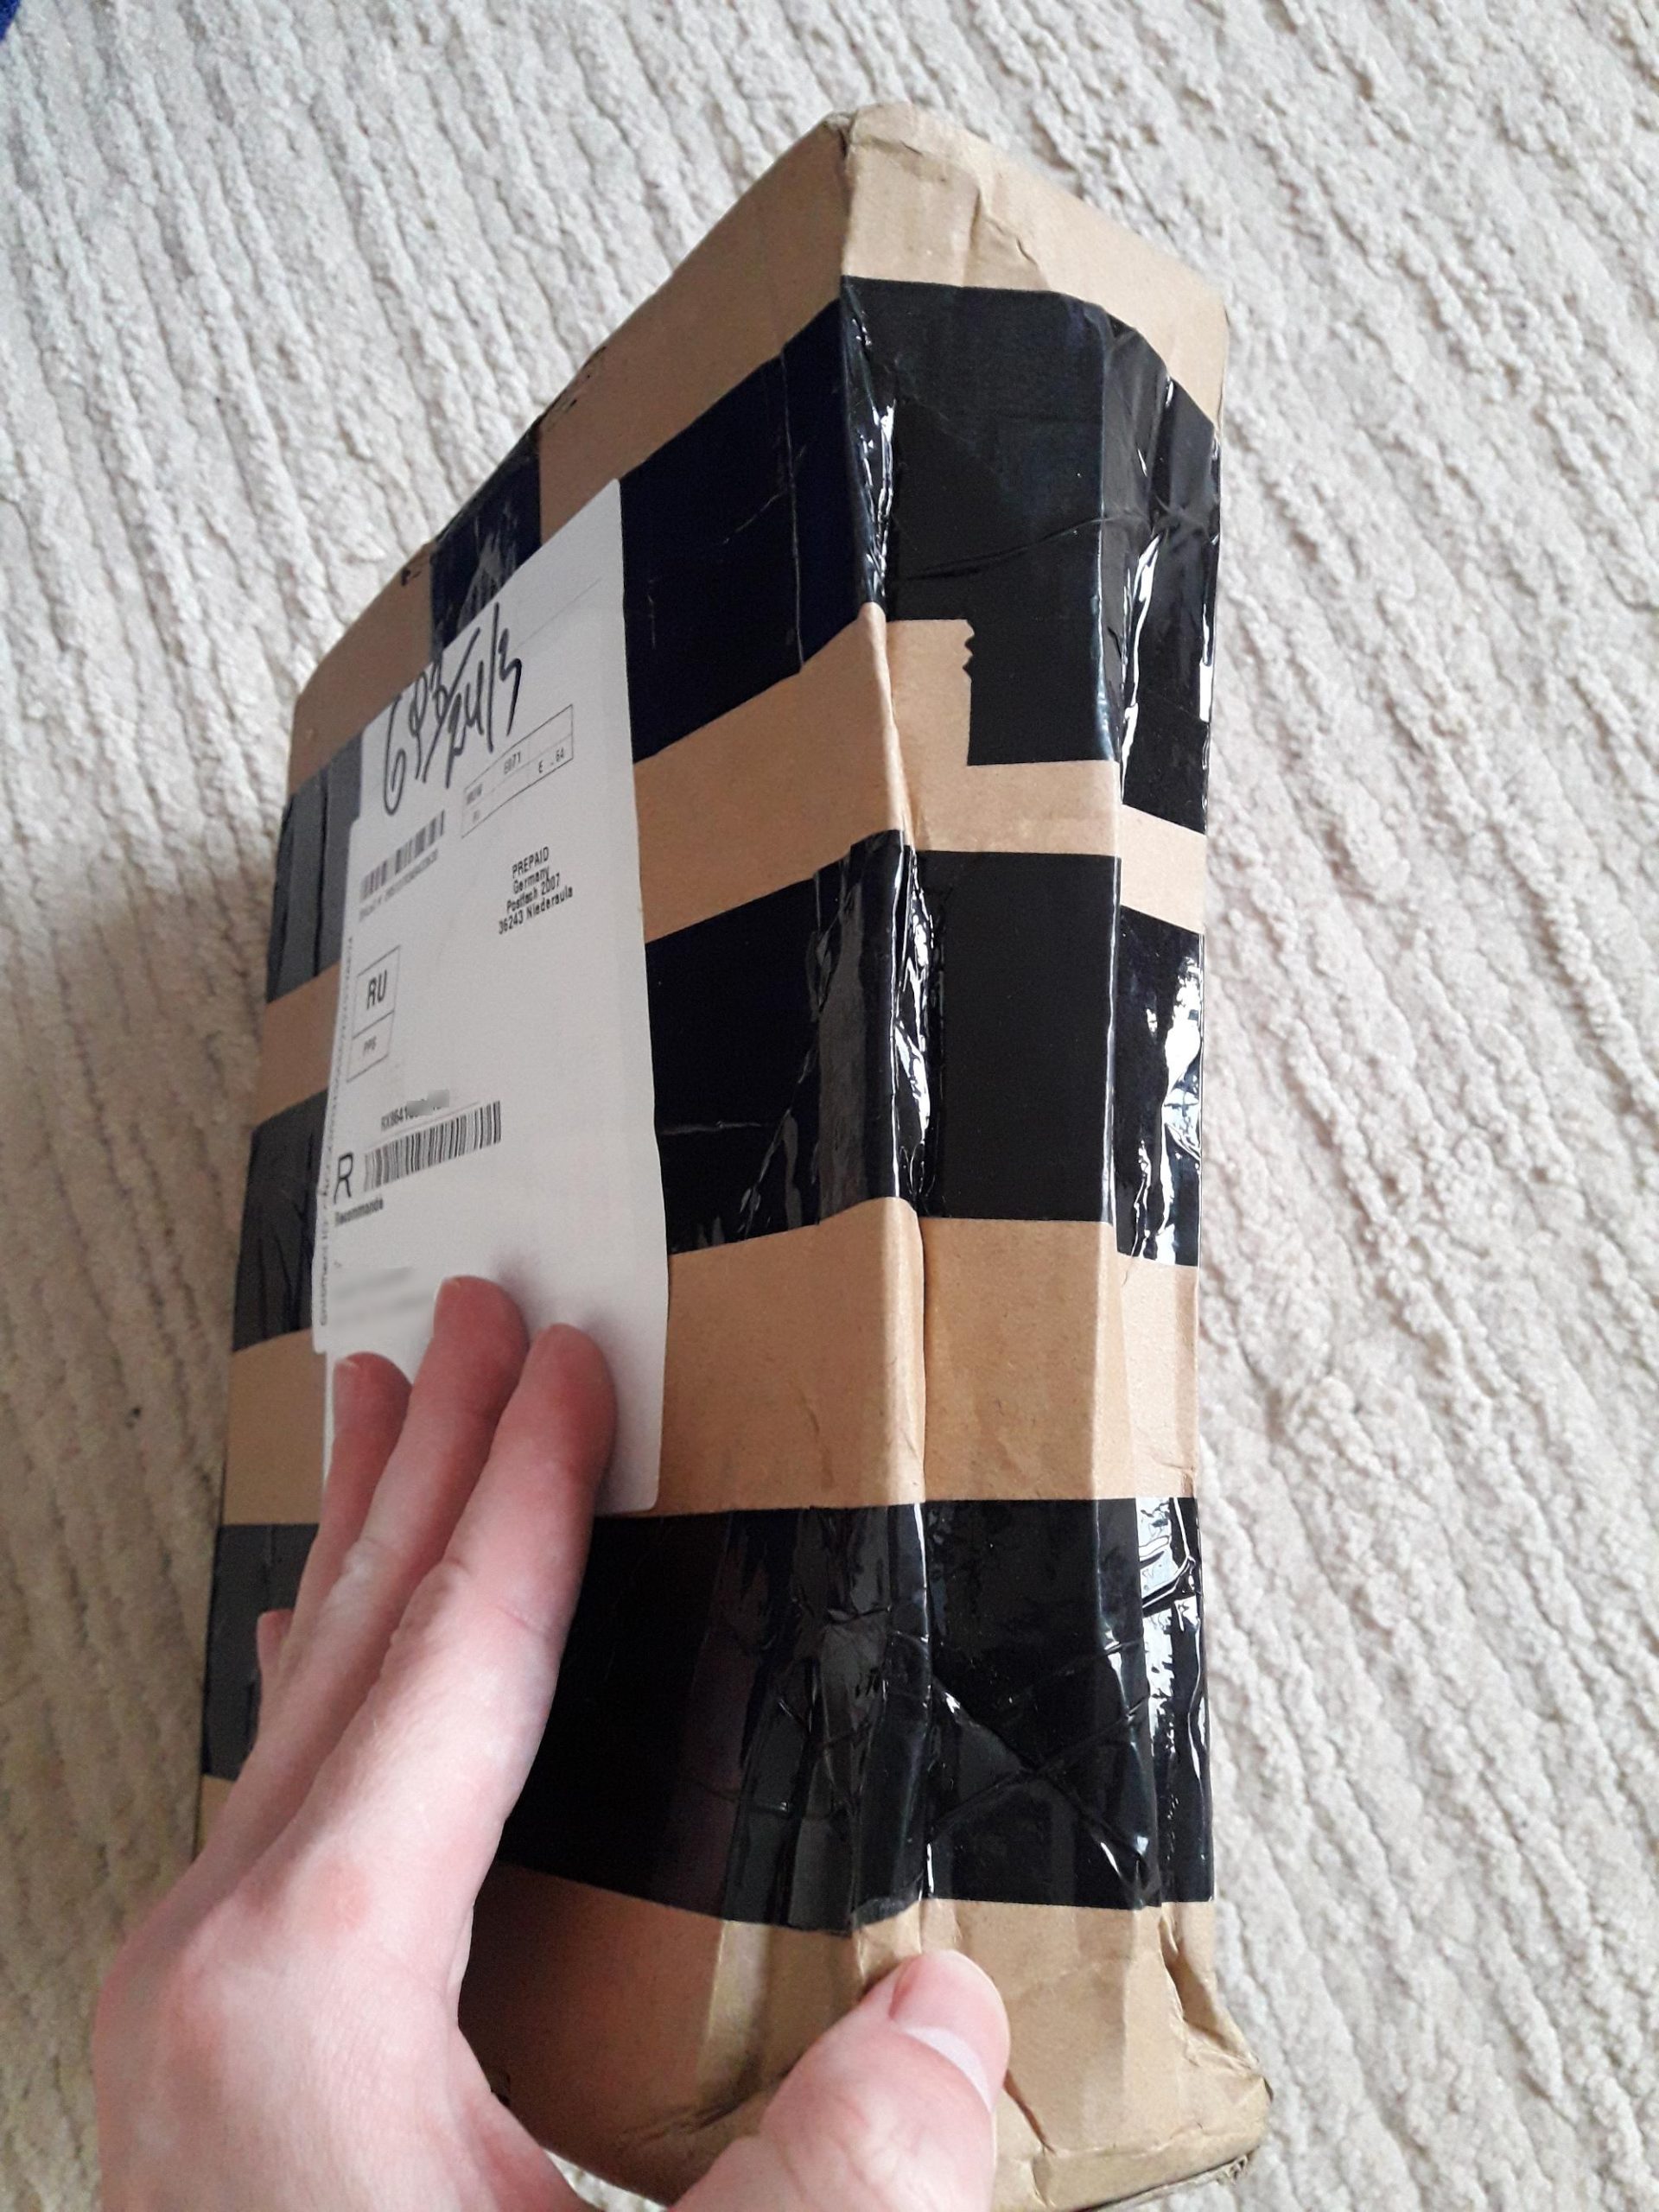
Fortunately, the board was already in the case, and the case is quite strong and there was not a scratch on it.

The antennas look very fragile, but they turned out to be in perfect order – not bent or broken. Only the HackRF TCXO PPM0.1 GPS Clock module was unlucky, when the box was deformed, the legs pierced the package:
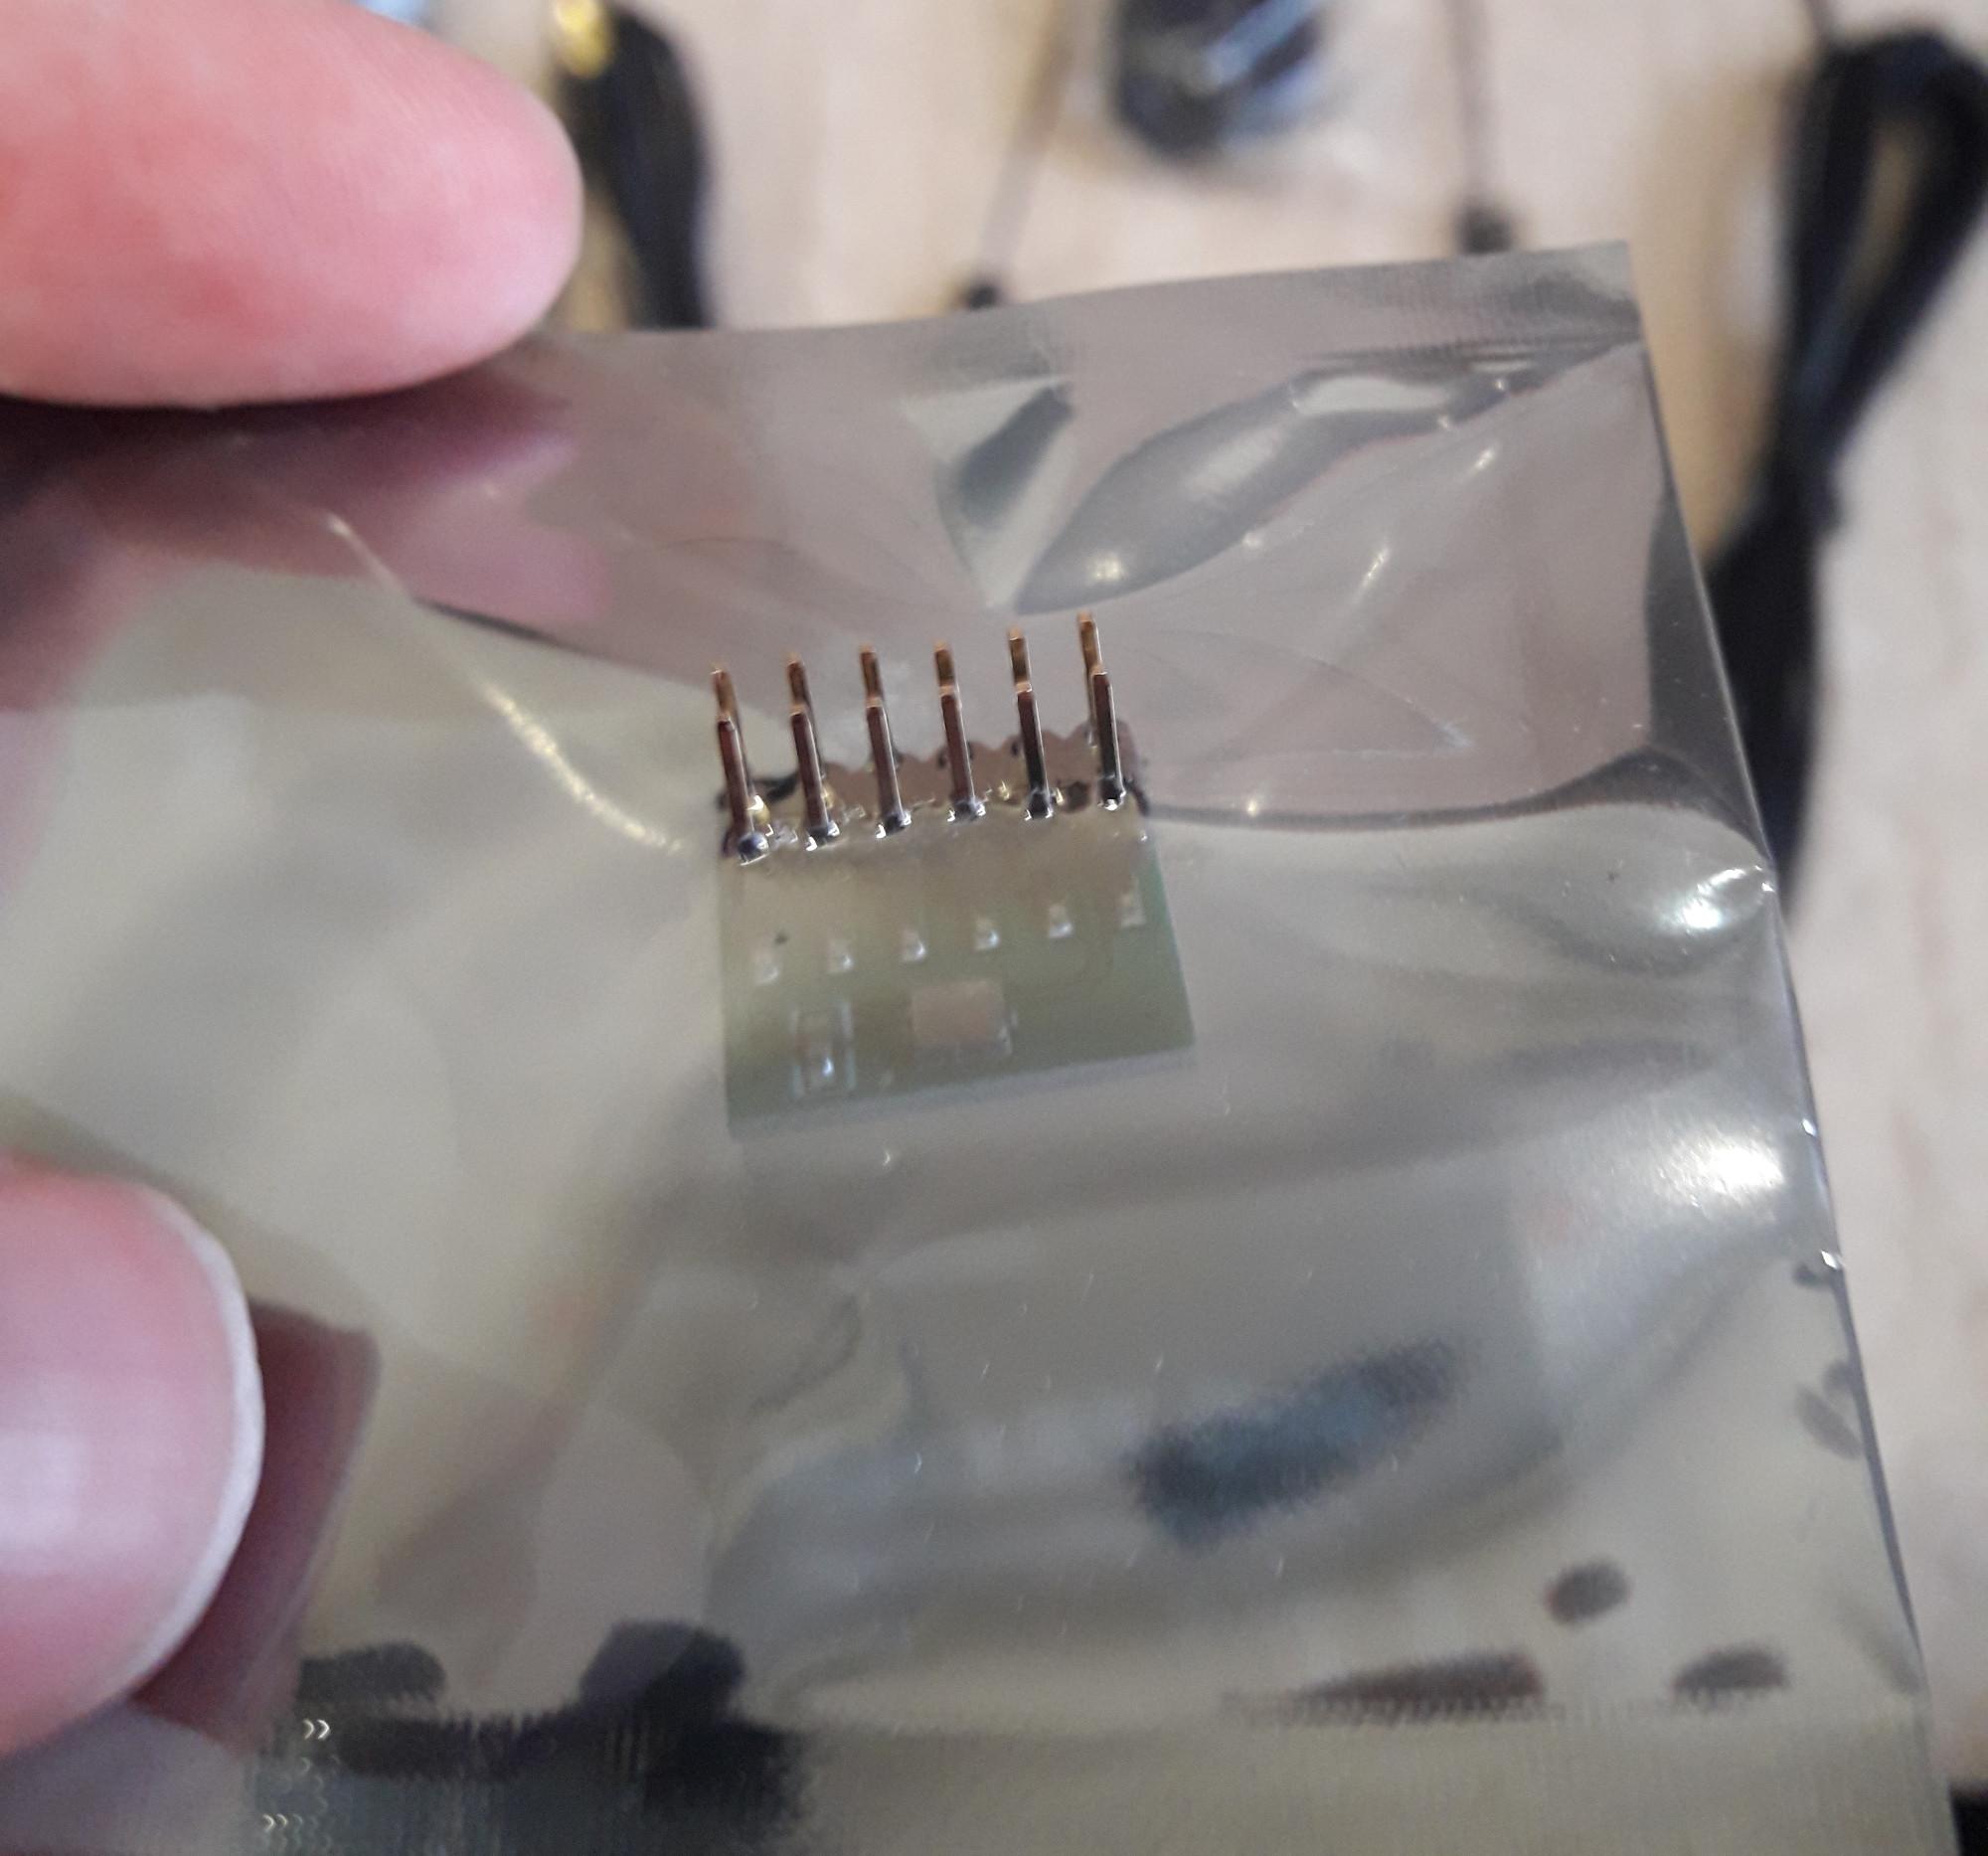
The legs themselves were also bent.
I straightened the legs with a flat screwdriver and installed this module on the HackRF board. I forgot to take a photo (and I’m too lazy to take it apart), and besides, I’m not sure I installed it correctly. Therefore, about the HackRF TCXO PPM0.1 GPS Clock module, why it is needed and how to use it will be in some subsequent article.
How to check HackRF
When HackRF is connected to a Linux computer, practically nothing happens – only the indicators on the board light up. The system itself does not have any built-in applets for connecting to HackRF.
Let’s see the information:
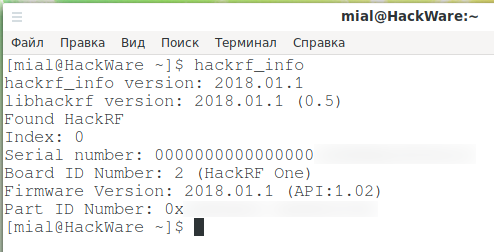
Firstly, the device is detected, and the firmware 2018.01.1 is installed on it. The latest firmware version can be checked here: https://github.com/mossmann/hackrf/releases/. There is the same version, that is, an update is not required (how to update HackRF is written here).
Let’s try to get data at maximum speed:
![]()
Let’s try to send the data:
![]()
At least the basic tests passed – despite the crumpled box, the device was not damaged.
Step-by-step instructions for updating the HackRF One firmware
Since this writing, there has been a software update for HackRF One, including a firmware update for HackRF.
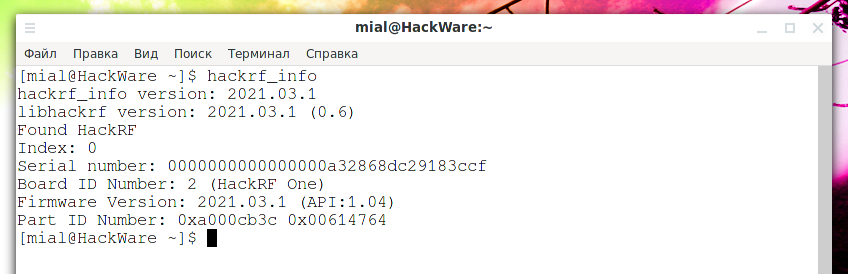
To check the version of the installed software and HackRF firmware, run the command:
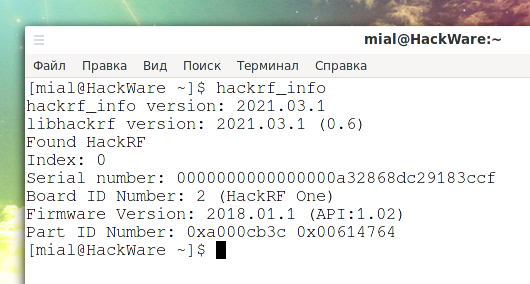
As you can see, the version of the software installed on this computer is now 2021.03.1:
And firmware version 2018.01.1:
You can make sure that this is the latest software version on this page: https://github.com/mossmann/hackrf/releases/

In the same place, we learn that starting with release 2021.03.1, CPLD bitstreams are now included in the firmware and are automatically loaded with it during an update. You no longer need to update the CPLD separately.
This section will show you step by step how to upload the new firmware to the HackRF.
The firmware file comes with libhackrf and hackrf-tools. The name of specific packages can be different on different Linux distributions. See above How to Install Driver, HackRF Tools and SDR Utilities for details.
That is, you need to wait for these packages to be updated in the repositories of your distribution, or you can compile them yourself.
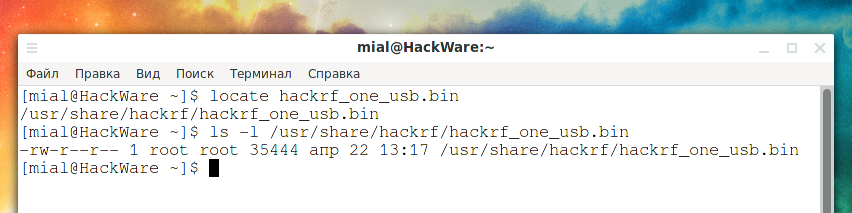
The file with the firmware is called hackrf_one_usb.bin, let’s find the path to it in the system:
In my case, this is /usr/share/hackrf/hackrf_one_usb.bin.
Although the updated libhackrf and hackrf-tools should mean that the firmware file is also new, check that the file has a fresh creation date.
To start the update process, use a command of the form:

Turn HackRF off and on for changes to take effect (disconnect from USB cable).
Let’s check the software version again:
The HackRF firmware is now updated!
How to receive a signal with HackRF
Install the gqrx program; for this, in Kali Linux, Debian, Linux Mint, Ubuntu and their derivatives, run the command:
On BlackArch and Arch Linux, run the command:
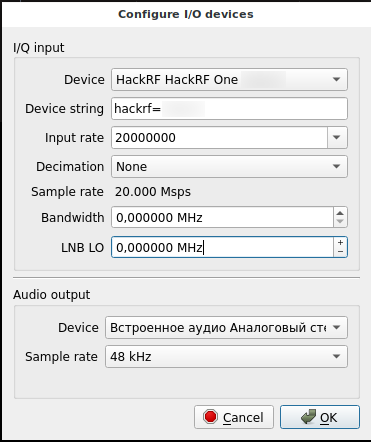
When you first start the setup window will appear, in it you can select the source of the received data and the sound output device. As a Device, I selected HackRF, and also increased the Input rate to a maximum value of 20000000.
Gqrx main window:
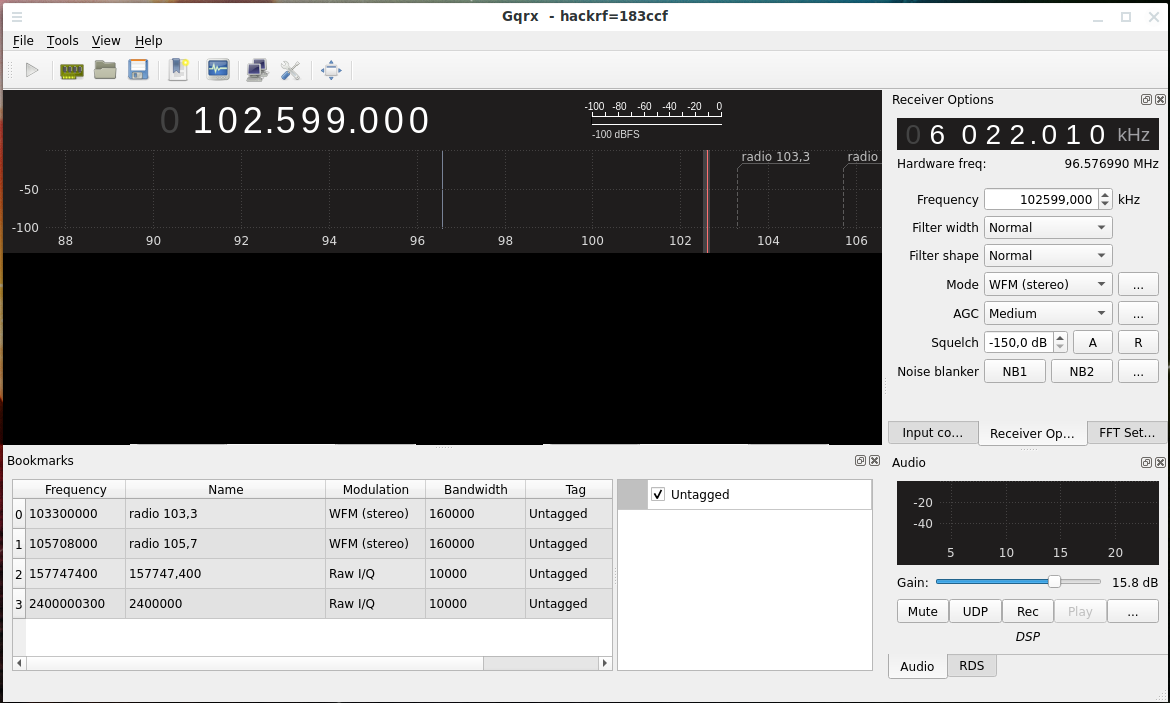
To start receiving a signal, click the “Start DSP processing” button, and to change the frequency, you can specify it in the “Frequency” window, or set it on the panel with numbers. The panel can be moved, for this grab the bottom row of numbers:
To stop receiving a signal, press the “Stop DSP processing” button (formerly the “Start DSP processing” button). If you want to unplug HackRF (for example, to change the antenna), then it is better to exit gqrx, because I had this program freeze after reconnecting HackRF.
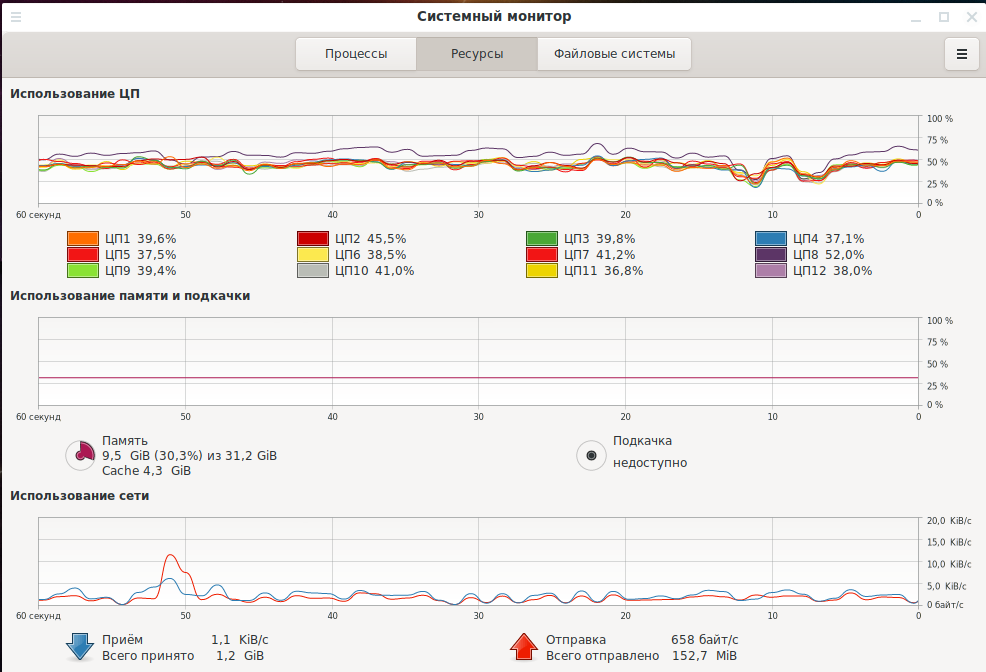
While receiving the signal, the CPU load is rather high, probably due to the fact that I chose a high Input rate:
How to listen to FM radio with HackRF
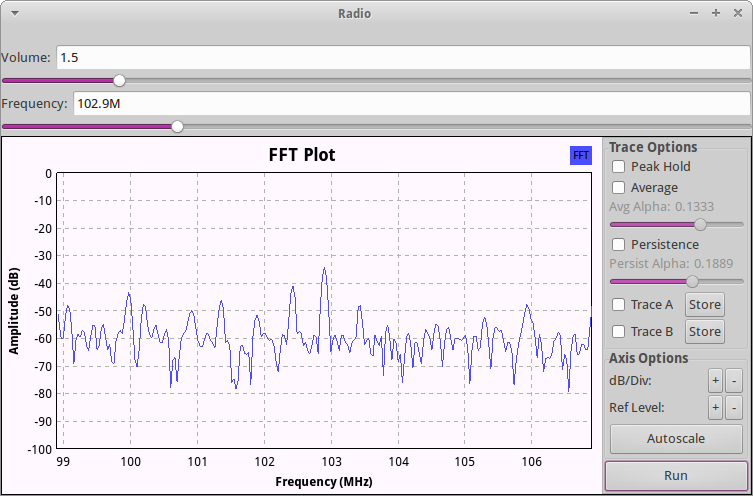
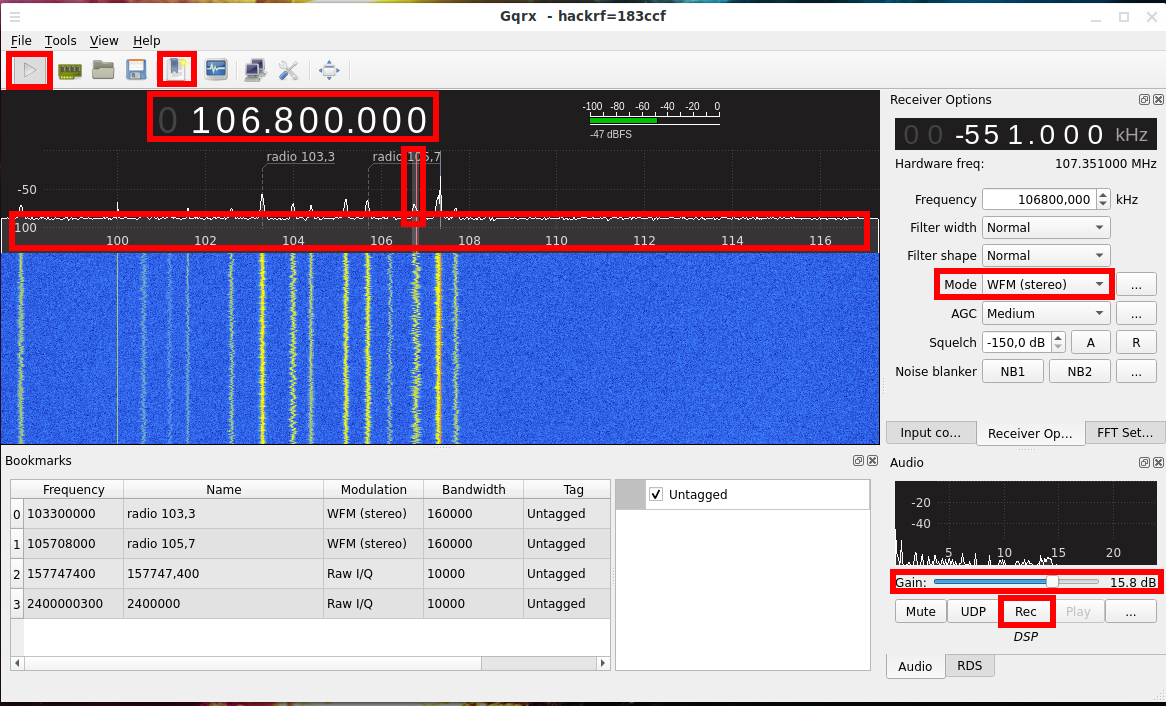
The FM bands are 92.1-107.1 MHz. Since the frequency in the “Frequency” window is indicated in kHz (kilohertz), then we need to go to about 100000 kHz:
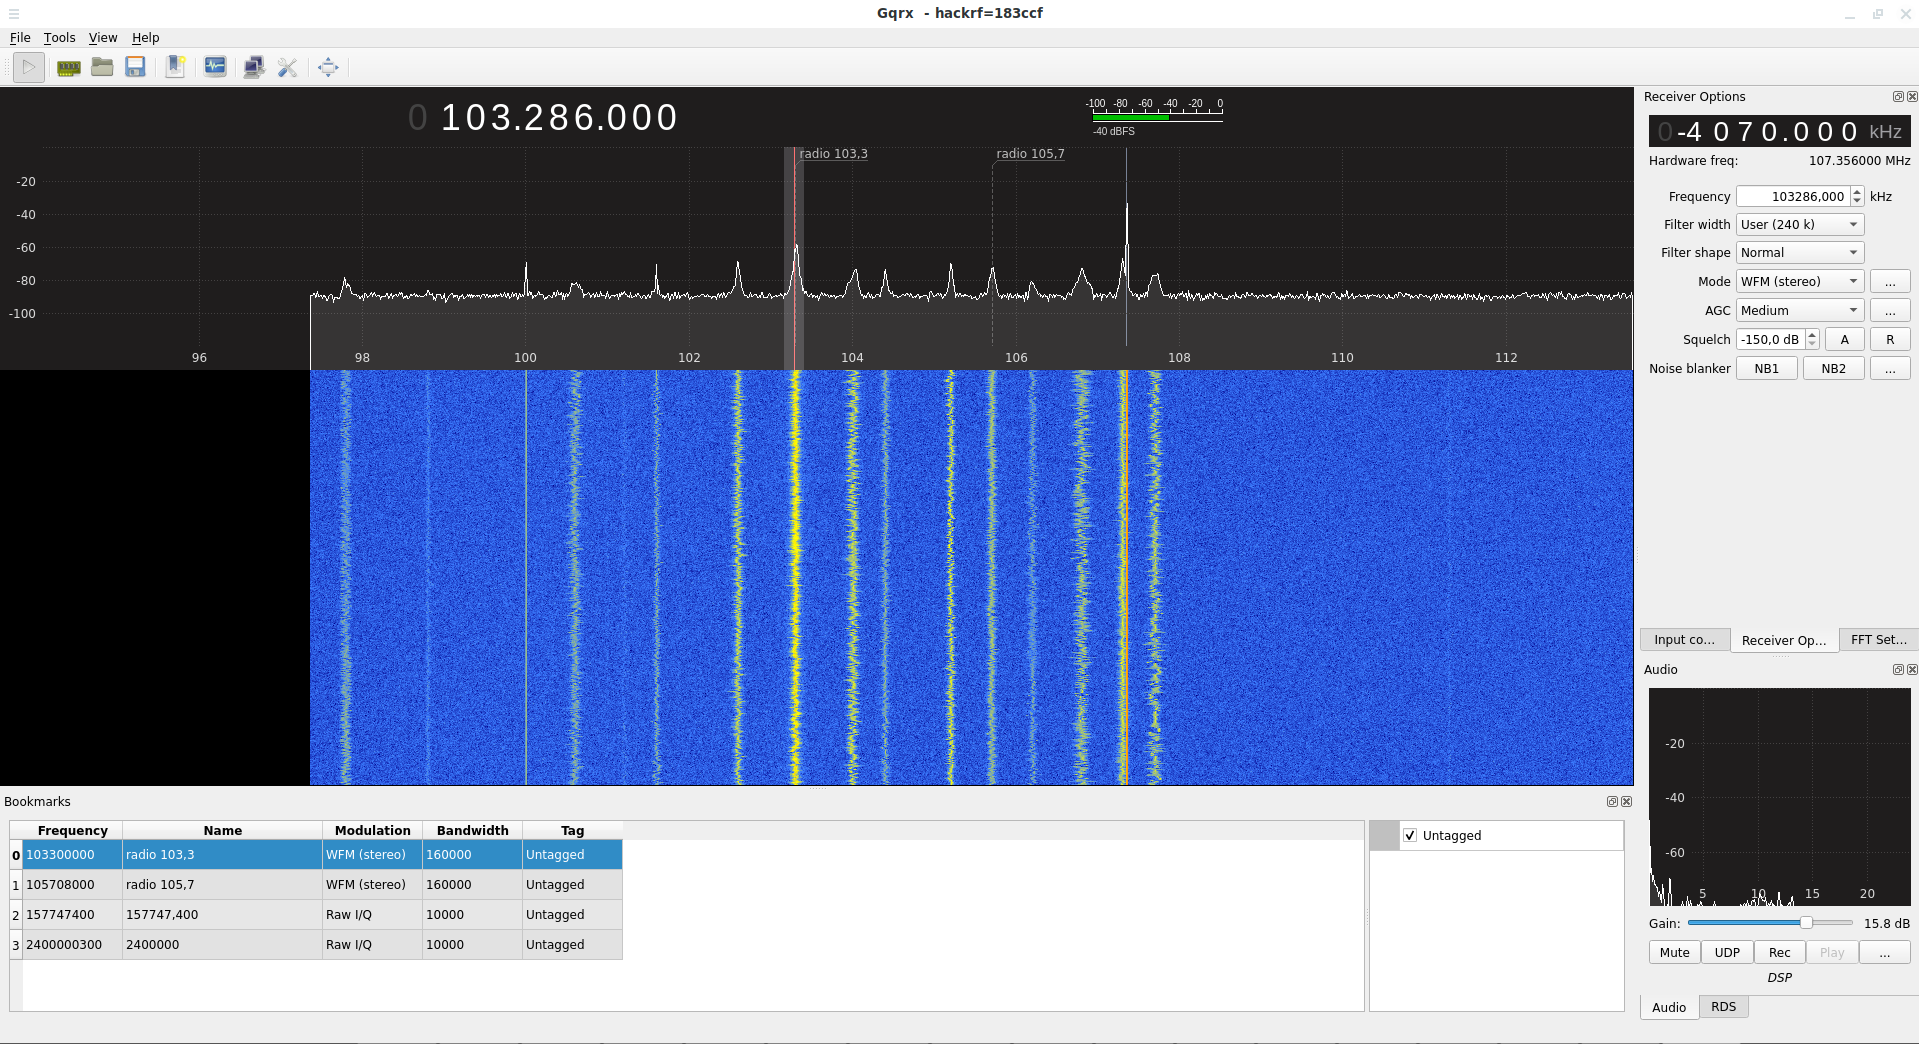
You can see that in this range there are many peaks – this is the broadcasts of radio stations.
For “Mode”, select “WFM (stereo)”.
Increase the “Gain” value, otherwise it will be too quiet.
By clicking on the “Bookmark” button, you can save frequencies to bookmarks.
If you click on the “Rec” button, then you can record audio.
A short video where I learn the gqrx interface:
This is just the beginning! Next, we will deal with signal sources and methods for decoding them. With HackRF, you can detect a variety of devices: from wireless doorbells to bugs, hidden cameras and radars. Some types of signals can be decrypted: walkie-talkies, outdated telephone standards, etc. Some types of signals can only be traced: Wi-Fi, modern telephone standards, etc. In any case, the world of radio waves is very vast and interesting!
Источник


