- Kubernetes в Windows Kubernetes on Windows
- Испытайте Kubernetes в Windows Try out Kubernetes on Windows
- Планирование контейнеров Windows Scheduling Windows containers
- Развертывание Kubernetes в Windows в Azure Deploying Kubernetes on Windows in Azure
- Диагностика Troubleshooting
- 12 Step tutorial to setup Kubernetes on your Windows 10 laptop
- Minikube
- Hyper-V
- Pre-requisites:
- Install and Set Up kubectl on Windows
- Before you begin
- Install kubectl on Windows
- Install kubectl binary with curl on Windows
- Install with PowerShell from PSGallery
- Install on Windows using Chocolatey or Scoop
- Install on Windows as part of the Google Cloud SDK
- Verify kubectl configuration
- Optional kubectl configurations
- Enable shell autocompletion
- What’s next
- Feedback
- How to install Kubernetes on Windows 10
- Intro
- Step 1: Install & Setup Hyper-V
- Step 2: Install Docker for Windows
- Step 3: Install Kubernetes on Windows 10
- Step 4: Install Kubernetes Dashboard
- Step 5: Access the dashboard
- Finally
Kubernetes в Windows Kubernetes on Windows
Хотите узнать, какие функции Kubernetes поддерживаются в Windows сегодня? Curious to find out which Kubernetes features are supported on Windows today? Дополнительные сведения см. в официально поддерживаемых функциях и Kubernetes в стратегии Windows . Please see officially supported features and the Kubernetes on Windows roadmap for more details.
На этой странице представлены общие сведения о начале работы с Kubernetes в Windows. This page serves as an overview for getting started with Kubernetes on Windows.
Испытайте Kubernetes в Windows Try out Kubernetes on Windows
Инструкции по ручной установке Kubernetes в Windows в выбранной среде см. в разделе Deploying Kubernetes on Windows . See deploying Kubernetes on Windows for instructions on how to manually install Kubernetes on Windows in the environment of your choice.
Планирование контейнеров Windows Scheduling Windows containers
Рекомендации и рекомендации по планированию контейнеров Windows в Kubernetes см. в разделе Планирование контейнеров Windows в Kubernetes . See scheduling Windows containers in Kubernetes for best practices and recommendations on scheduling Windows containers in Kubernetes.
Развертывание Kubernetes в Windows в Azure Deploying Kubernetes on Windows in Azure
Это легко сделать с помощью контейнеров Windows в Azure Kubernetes Service Guide. The Windows containers on Azure Kubernetes Service guide makes this easy. Если вы хотите самостоятельно развертывать все компоненты Kubernetes и управлять ими, ознакомьтесь с нашим пошаговым руководством с помощью средства с открытым кодом AKS-Engine . If you are looking to deploy and manage all the Kubernetes components yourself, see our step-by-step walkthrough using the open-source AKS-Engine tool.
Диагностика Troubleshooting
Предлагаемый список решений и решения для известных проблем см. в разделе Устранение неполадок Kubernetes . Please see Troubleshooting Kubernetes for a suggested list of workarounds and solutions to known issues.
Для получения дополнительных ресурсов для самостоятельной помощи также можно воспользоваться руководством по устранению неполадок Kubernetes Networking for Windows. For additional self-help resources, there is also a Kubernetes networking troubleshooting guide for Windows available here.
12 Step tutorial to setup Kubernetes on your Windows 10 laptop

Getting started with Kubernetes on a vanilla linux installation can be overwhelming considering the number of steps and the repetitions involved in setting up master and worker nodes. In this post I intend to explain how to set up Minikube with Hyper-V on your windows 10 laptop so you can play around with it easily.
Minikube
Minikube is a tool that makes it easy to run Kubernetes locally. Minikube runs a single-node Kubernetes cluster inside a VM on your laptop for users looking to try out Kubernetes.
Hyper-V

A component of Windows Server Microsoft Hyper-V , codenamed Viridian and formerly known as Windows Server Virtualization, is a native hypervisor. It can create virtual machines on x86–64 systems running Windows.
Pre-requisites:
Step 1: Open Windows Power Shell with Admin Privileges ( Right Click -> Run as Administrator )
Step 2: Install the package minikube using chocolatey package manager
Step 4: Post Successful installation verify if your Powershell prints an output like this

Step 5: Install the Kubernetes Command Line Interface that will help you access any kubernetes cluster ( Local or otherwise )

Step 6: Change settings of Hyper-V to work around a bug of minikube.

Step 7: Open Hyper-V and go to Virtual Switch
Step 8: Click on New virtual network switch on the right hand side, select External for the network type, and then click the Create Virtual Switch button.

Step 9: Name the network Minikube v switch and then set it as an external network

Step 10: Run the following command in command prompt with admin privileges to start the minikube VM and configure it to be used with kubectl

Step 11: Open a new command window, this time as a normal user and run the following command
You should see the following result

Step 12: If you are a kubernetes dashboard person, you can open that up by typing in the following command in the command line window with the same privileges that you started minikube
Install and Set Up kubectl on Windows
Before you begin
You must use a kubectl version that is within one minor version difference of your cluster. For example, a v1.2 client should work with v1.1, v1.2, and v1.3 master. Using the latest version of kubectl helps avoid unforeseen issues.
Install kubectl on Windows
The following methods exist for installing kubectl on Windows:
Install kubectl binary with curl on Windows
Or if you have curl installed, use this command:
Validate the binary (optional)
Download the kubectl checksum file:
Validate the kubectl binary against the checksum file:
Using Command Prompt to manually compare CertUtil ‘s output to the checksum file downloaded:
Using PowerShell to automate the verification using the -eq operator to get a True or False result:
Add the binary in to your PATH .
Test to ensure the version of kubectl is the same as downloaded:
Install with PowerShell from PSGallery
If you are on Windows and using the PowerShell Gallery package manager, you can install and update kubectl with PowerShell.
Run the installation commands (making sure to specify a DownloadLocation ):
The installer creates $HOME/.kube and instructs it to create a config file.
Test to ensure the version you installed is up-to-date:
Install on Windows using Chocolatey or Scoop
To install kubectl on Windows you can use either Chocolatey package manager or Scoop command-line installer.
Test to ensure the version you installed is up-to-date:
Navigate to your home directory:
Create the .kube directory:
Change to the .kube directory you just created:
Configure kubectl to use a remote Kubernetes cluster:
Install on Windows as part of the Google Cloud SDK
You can install kubectl as part of the Google Cloud SDK.
Run the kubectl installation command:
Test to ensure the version you installed is up-to-date:
Verify kubectl configuration
In order for kubectl to find and access a Kubernetes cluster, it needs a kubeconfig file, which is created automatically when you create a cluster using kube-up.sh or successfully deploy a Minikube cluster. By default, kubectl configuration is located at
Check that kubectl is properly configured by getting the cluster state:
If you see a URL response, kubectl is correctly configured to access your cluster.
If you see a message similar to the following, kubectl is not configured correctly or is not able to connect to a Kubernetes cluster.
For example, if you are intending to run a Kubernetes cluster on your laptop (locally), you will need a tool like Minikube to be installed first and then re-run the commands stated above.
If kubectl cluster-info returns the url response but you can’t access your cluster, to check whether it is configured properly, use:
Optional kubectl configurations
Enable shell autocompletion
kubectl provides autocompletion support for Bash and Zsh, which can save you a lot of typing.
Below are the procedures to set up autocompletion for Zsh, if you are running that on Windows.
The kubectl completion script for Zsh can be generated with the command kubectl completion zsh . Sourcing the completion script in your shell enables kubectl autocompletion.
To do so in all your shell sessions, add the following to your
If you have an alias for kubectl, you can extend shell completion to work with that alias:
After reloading your shell, kubectl autocompletion should be working.
If you get an error like complete:13: command not found: compdef , then add the following to the beginning of your
What’s next
- Install Minikube
- See the getting started guides for more about creating clusters.
- Learn how to launch and expose your application.
- If you need access to a cluster you didn’t create, see the Sharing Cluster Access document.
- Read the kubectl reference docs
Feedback
Was this page helpful?
Thanks for the feedback. If you have a specific, answerable question about how to use Kubernetes, ask it on Stack Overflow. Open an issue in the GitHub repo if you want to report a problem or suggest an improvement.
How to install Kubernetes on Windows 10
Intro
Kubernetes is made for managing your cloud resources and build scalable apps. It’s considered the most popular tool for automating, deploying, and scaling your whole cloud. It runs on all major operating systems and it is the most popular open source tool in the cloud market. Kubernetes can scale your whole infrastructure, check the health of each service, work as a load balancer, automate deployments and many more. You can install & setup as many nodes (clusters) as you want, and deploy your pods (docker containers) and services across the cloud. In this tutorial you will learn how to setup Kubernetes and deploy the official web GUI dashboard where you can manage and monitor everything but first you have to install Hyper-V & Docker in order to use Kubernetes.
Step 1: Install & Setup Hyper-V
Windows as we all know, have their own virtualization software and it’s called Hyper-V which is basically something like VirtualBox on steroids. Hyper-V can manage your virtual machines (VM) using the default GUI tool provided by Microsoft for free, or through command line. Enabling Hyper-V can be easily done but first, make sure your PC meets the following requirements: Your OS should be Windows 10 (Enterprise, Pro or Education) with minimum 4GB RAM and CPU Virtualization support, although you have to double check if it’s enabled in your BIOS settings.
You can remove or add features that don’t come up pre-installed during the installation of Windows, like Hyper-V. Always remember that some of the features require internet access to download extra components from Windows Update. Follow the next steps to enable Hyper-V on your machine.
- Go to Control Panel
- On your left panel, click on Programs
- Then click Programs and Features followed by Turn Windows features on and off.
- Check Hyper-V and Windows Hypervisor Platform
- Click OK

Your system will now start installing Hyper-V on the background, it may need to reboot a couple of times until everything is configured properly. Don’t expect any notification or something! Run the following command as Administrator on powershell and verify if Hyper-V is installed successfully on your machine: Get-WindowsOptionalFeature -Online -FeatureName Microsoft-Hyper-V
Step 2: Install Docker for Windows
Kubernetes is build on top of Docker, theoretically is just a tool that communicate with your Docker containers and manage everything at an enterprise level. To install Docker just go to https://hub.docker.com/editions/community/docker-ce-desktop-windows and click Get Docker Desktop for Windows (stable) . Follow the setup’s instructions and after you click Finish , Docker already setup a Linux virtual machine on top of Hyper-V and start all the necessary services without manually configure anything. After the installation, you can either «communicate» with Docker using the CLI tool docker or running HTTP requests though its API.
Step 3: Install Kubernetes on Windows 10
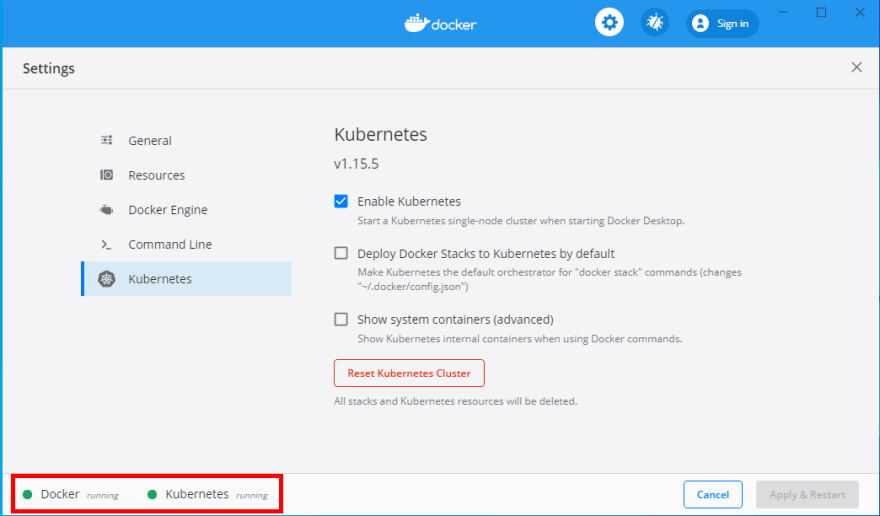
Docker comes with a handy GUI tool where you can modify some settings or install & enable Kubernetes. Follow the following instructions, WARNING! If Docker is installed successfully and you can’t locate its tray icon, you have to reboot your system. If the problem persists, check the official troubleshooting guide here https://docs.docker.com/docker-for-windows/troubleshoot/. Now follow the instructions to install Kubernetes.
- Right-click the Docker tray icon
- Click «Settings»
- On the left panel click «Kubernetes»
- Check Enable Kubernetes and click «Apply»
During installation, Docker is going to install additional packages and dependencies. It may take around 5
10 minutes and the installation time depends on your Internet speed and your PC performance. Wait until the ‘Installation complete!’ popup message is shown up. After installing Kubernetes you can make sure that everything is working fine using the Docker app. If both services (Docker & Kubernetes) are running successfully without any errors then both icons at bottom left will go green.
Step 4: Install Kubernetes Dashboard
Kubernetes Dashboard is the official web-based UI where you can manage Kubernetes resources. It’s not installed by default. Deploying applications with Kubernetes can be easily managed using the cli tool called kubectl where you can interact with your cloud and manage your Pods, Nodes, or Clusters. If you pass the apply argument followed by your YAML configuration file you can easily create or update Kubernetes resources. Run the following commands to deploy & enable the Kubernetes Dashboard using the following commands.
- Download the yaml configuration file from https://raw.githubusercontent.com/kubernetes/dashboard/v2.0.0-rc7/aio/deploy/recommended.yaml
- Deploy it using kubectl apply -f .\recommended.yaml
- Verify that it’s running using the following command: kubectl.exe get -f .\recommended.yaml.txt
Step 5: Access the dashboard
There are two ways to access the dashboard with tokens, the first one is using the default token that was crated during the installation of Kubernetes and the second (more secure) way is by creating users, giving them permissions, and then get the generated token. In the name of simplicity, we will use the first way.
- Run the following command powershell (not cmd) ((kubectl -n kube-system describe secret default | Select-String «token:») -split » +»)[1]
- Copy the generated token
- Run kubectl proxy .
- Open the following link on your browser: http://localhost:8001/api/v1/namespaces/kubernetes-dashboard/services/https:kubernetes-dashboard:/proxy/
- Select Token & paste the generated token
- Sign In
Finally
If everything is configured properly you’ll be able to see the dashboard and your cloud resources. From there you can do almost all the «hard» work without dealing with the CLI every time. You may sometimes get your hands dirty with the command line but if you don’t understand the concept of Docker and Kubernetes or you don’t have time to for maintaining your own cloud, it’s better to stick with some PaaS providers that can cost you a fortune.


