- Установка Linux из под Windows: пошаговая инструкция, характеристики
- Установка Linux из под Windows
- Способ 1: через загрузочную флешку
- Способ 2: с помощью программы Wubi
- Установка «Виндовс 7» из-под Linux
- Способ 1: через загрузочный накопитель
- Способ 2: с помощью программы Qemu
- Установка
- Установка Linux на флешку из-под Windows
- Windows Subsystem for Linux Installation Guide for Windows 10
- Simplified Installation for Windows Insiders
- Manual Installation Steps
- Step 1 — Enable the Windows Subsystem for Linux
- Step 2 — Check requirements for running WSL 2
- Step 3 — Enable Virtual Machine feature
- Step 4 — Download the Linux kernel update package
- Step 5 — Set WSL 2 as your default version
- Step 6 — Install your Linux distribution of choice
- Install Windows Terminal (optional)
- Set your distribution version to WSL 1 or WSL 2
- Troubleshooting installation
Установка Linux из под Windows: пошаговая инструкция, характеристики

Ввиду того, что существует сразу несколько концептуально отличающихся друг от друга операционных систем (ОС), пользователь в какой-то момент захочет установить другую. Тем более данное действие можно произвести, не удаляя предыдущую ОС. Дальше по тексту будет рассказано, как произвести установку Linux из под Windows и наоборот. В конце также вы узнаете, как установить полноценную операционную систему на Flash-накопитель.
Установка Linux из под Windows
В большинстве случаев пользователи устанавливают в качестве основной ОС на компьютер Windows, поэтому более актуальней является тема установки Linux из под «Виндовс», эту ситуацию и рассмотрим. Забегая вперед, скажем, что существует два способа: традиционный, подразумевающий использование накопителя с образом установщика Linux, и особый – с помощью программы Wubi.
Способ 1: через загрузочную флешку
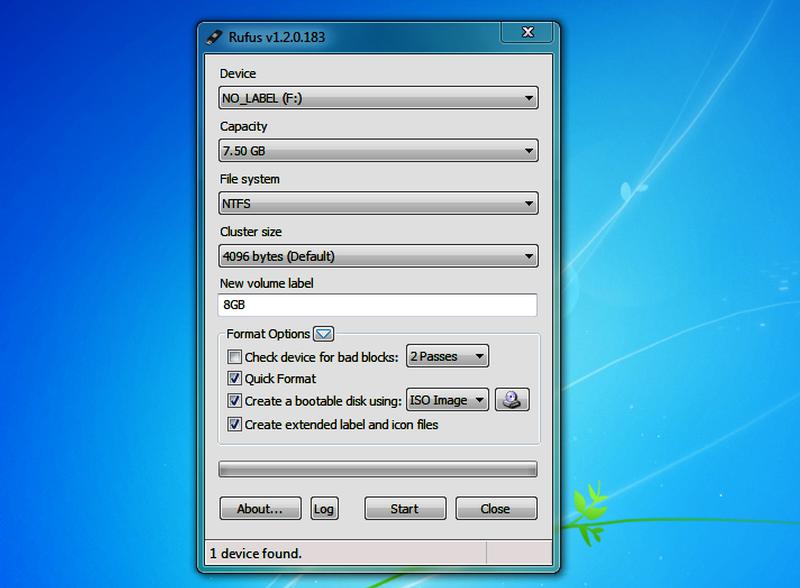
Если вы хотите установить Linux Mint из под Windows традиционным методом, то вам необходимо первым делом создать загрузочную флешку с нужным дистрибутивом. Для этого будем использовать программу Rufus.
- Запустите приложение.
- Нажмите по кнопке с изображением диска.
- В «Проводнике» выберите образ Linux, который нужно предварительно загрузить на компьютер.
- Из списка «устройства» выберите вашу флешку.
- Схему раздела и тип системного интерфейса оставьте по умолчанию.
- Также по умолчанию оставьте файловую систему и размер кластера.
- Все остальные настройки не изменяйте.
- Нажмите кнопку «Старт».
После этого начнется процесс записи. Дождитесь его окончания и закройте программу. Флешка готова, теперь необходимо с нее запуститься. Для этого перезагрузите компьютер и в момент его запуска нажимайте кнопку F9 или F8, пока не появится специальное меню. В нем выберите вашу флешку. После этого запустится установщик Linux Mint или же другого дистрибутива, который вы выбрали.
- В меню выберите строку «Запустить».
- Войдя на рабочий стол ОС, запустите ярлык Install Linux.
- Откроется установщик, в котором, следуя инструкции, произведите инсталляцию операционной системы Linux.
Вот так просто можно установить Linux под Windows 10 или любую другую версию ОС от компании Microsoft.
Способ 2: с помощью программы Wubi
Закончив разбираться, как установить Linux с флешки, перейдем к нестандартному способу, который подразумевает использование специальной программы, которая, по факту, сделает все за вас, нужно лишь задать необходимые параметры. Приложение это, как можно догадаться, исходя из подзаголовка, называется Wubi, поэтому произведите его загрузку и установку на компьютер, прежде чем выполнять дальнейшие действия инструкции.
Стоит сразу сказать, что с ее помощью можно установить из под Windows Linux Ubuntu, других дистрибутивов, к сожалению, нет. Но не зацикливаясь на нюансах приложения, перейдем непосредственно к ее руководству по использованию.
Запустив приложение, вы увидите шесть настроек, которые вам предлагается изменить или задать. Давайте рассмотрим их подробнее:
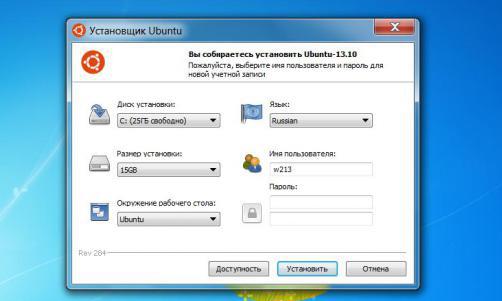
- Диск установки. Здесь вам нужно выбрать диск или раздел, на который будет установлена Linux. Примечательно, что можно выбирать даже системный, никаких сбоев в работе Windows наблюдаться не будет.
- Размер установки. Многие удивятся, что максимум для Linux можно выделить 30 гигабайт на ранее выбранном диске, однако в будущем этот объем можно будет увеличить.
- Окружение рабочего стола. Те, кто знаком с Linux, сразу разберутся, остальным же рекомендовано выбирать Unity.
- Язык. Здесь выбираете локализацию ОС.
- Имя пользователя. Вводите свое имя, которое будет отображаться в системе.
- Пароль. Вводите и подтверждаете пароль, который необходим для входа в систему.
После этого нажмите кнопку «Установить», а в дальнейшем дайте разрешение на это действие. Подождите завершения всех необходимых процессов и перезапустите компьютер. После этого появится рабочий стол Linux, на котором будет производиться распаковка всех файлов ОС. После окончания компьютер перезагрузится и в загрузчике вам будет предложен выбор запуска Linux.
Установка «Виндовс 7» из-под Linux
Теперь перейдем непосредственно к тому, как установить «Виндовс» из-под Linux. Как и в приведенном ранее способе, это можно произвести через загрузочную флешку, однако способ ее создания во многом отличается от ранее рассмотренного метода. В любом случае, если вам покажется, что выполнить все действия инструкции сложно, вы можете воспользоваться вторым способом, который также предусмотрен. Он подразумевает использование уже другого приложения, которое носит название Qemu.
Способ 1: через загрузочный накопитель
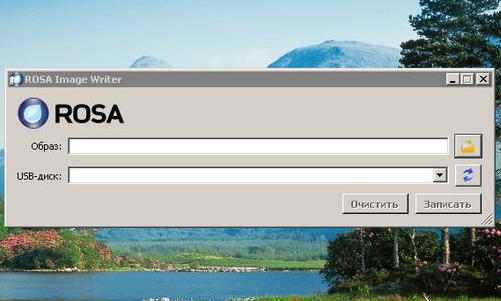
Рассматривая, как установить Linux из под Windows, мы обозначили способ с использованием флешки. Рассмотрим его же, только внутри операционной системы на базе ядра Linux. Понадобится для этого программа под названием ROSA Image Writer, поэтому загрузите ее на компьютер и установите. Также не забудьте скачать образ операционной системы Windows, который вы будите устанавливать.
- Запустите программу.
- В поле «Образ» введите путь к образу Windows. Это же можно сделать через файловый менеджер, нажав по кнопке с изображением папки.
- Из списка «USB-диск» выберите флешку, которая на данном этапе уже должна быть вставлена в компьютер.
- Нажмите кнопку «Запись».
После этого начнется создание флешки. Дождитесь завершения этого процесса и закройте программу. Перезапустите компьютер и во время его загрузки нажимайте кнопку F9 или F8, а в появившемся меню выберите накопитель в качестве устройства, с которого будет запускаться компьютер. Появится установщик Windows, выполняя инструкции, прописанные в нем, вы произведете инсталляцию ОС.
Способ 2: с помощью программы Qemu
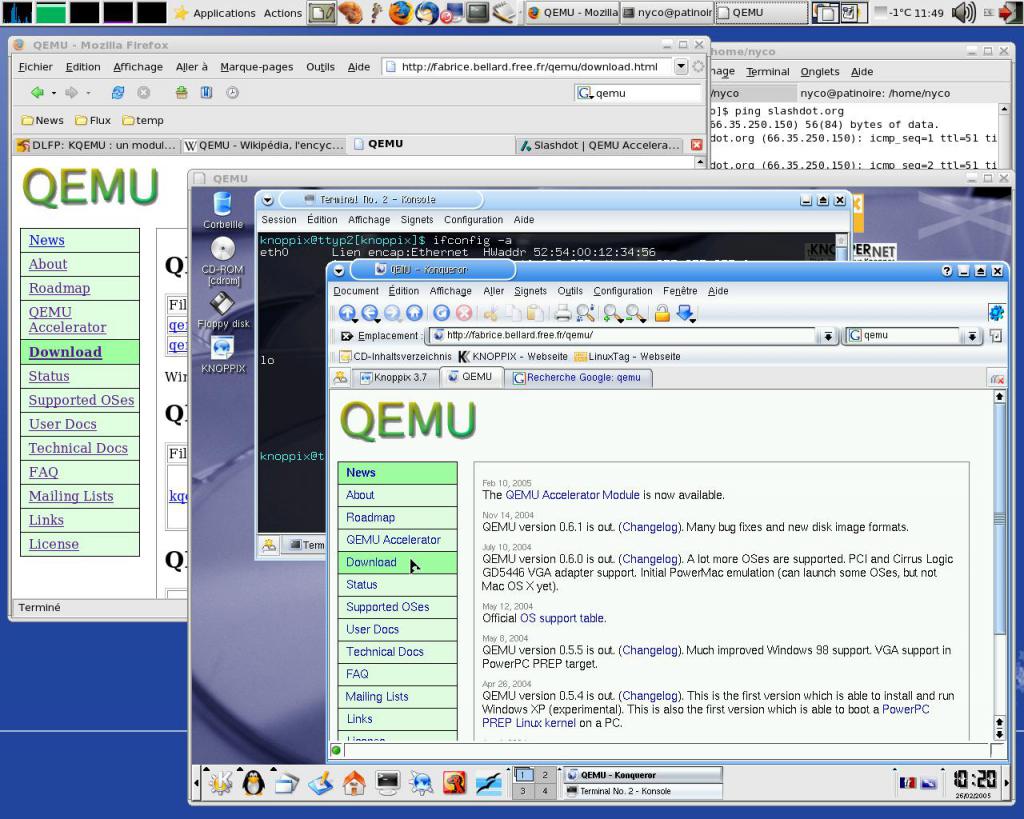
Что, если вы используете специфический дистрибутив, в котором не работает программа ROSA? В этом случае можно воспользоваться приложением Qemu. Именно его рекомендуют на сайте Habr для установки Windows из под Linux. Забегая вперед, стоит сказать, что для многих пользователей этот метод может не подойти, так как он не подразумевает использование графического окружения, напротив, все действия будут выполняться непосредственно в «Терминале».
- Установите программу, прописав в «Терминале» команду sudo apt install qemu.
- Загрузите на компьютер образ Windows.
- Получите в «Терминале» права суперпользователя, выполнив команду sudo su и введя после этого ваш пароль.
Установка
Теперь можно переходить непосредственно к основному процессу. Все, что вам необходимо сделать, – выполнить одну команду: qemu -boot d -cdrom /dev/sdb -m 1536. Обратите внимание, что /dev/sdb – это раздел, где будет храниться проприетарный софт, а m 1536 – объем оперативной памяти, которая будет выделена под управление операционной системы.
Выполнив нужную команду, запустится процесс копирования установочных файлов, после окончания которого вам необходимо перезапустить компьютер и отключить программу Qemu, сделать это вы можете, например, через «Системный монитор».
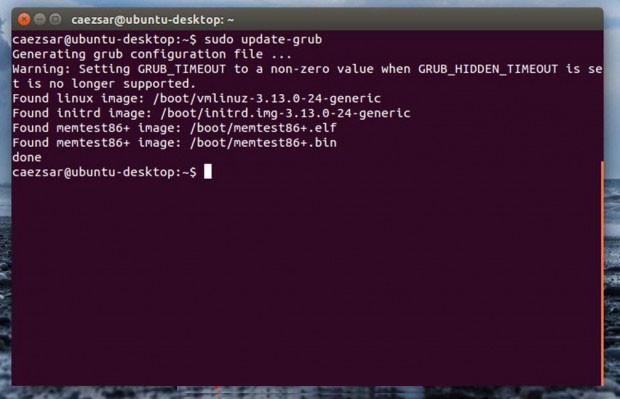
Теперь необходимо обновить загрузчик GRUB, делается это одной командой: update-grub, после этого в нем появится новая запись, необходимая для запуска на компьютере Windows. Однако порой этого недостаточно, чтобы она появилась, так бывает в случаях, когда загрузчик Windows затирает GRUB. В этом случае выполните одну из команд: grub-install или dpkg-reconfigure grub.
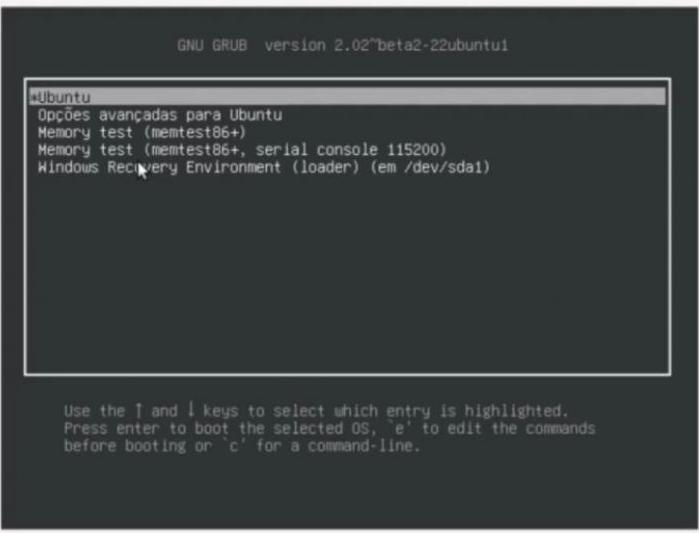
После всего проделанного необходимо снова перезапустить компьютер, а в меню GRUB выбрать строку с упоминанием Windows. Запустится непосредственно установщик операционной системы, в котором, следуя всем инструкциям, вы выполните инсталляцию ОС.
Установка Linux на флешку из-под Windows
Вот мы и рассмотрели, как можно установить Linux из-под «Виндовс» или «Виндовс» из под Linux, но что, если вы хотите иметь, так сказать, портативную операционную систему? В этом случае вы без труда можете установить Linux на свою флешку и загружаться с нее при любом удобном случае. К сожалению, такое же с «Виндовс» сделать куда сложнее, по крайней мере, официальными методами.
Итак, чтобы установить Linux на флешку, вам необходимо сделать следующее:
- Подготовить две флешки. Одна должна быть минимум на 2 Гб, а вторая — больше 8 Гб, так как именно на нее будет установлена операционная система.
- На флешку объемом от 2 Гб запишите образ желаемого дистрибутива Linux.
- Запустите компьютер с этой флешки и начните установку Linux.
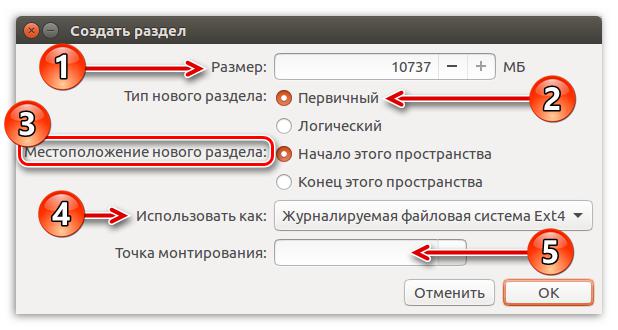
- При разметке диска укажите в качестве места установки вашу флешку размером от 8 Гб.
После этого начнется распаковка файлов на флешку. Дождитесь окончания и перезапустите компьютер. Вот так просто можно установить ОС на USB-накопитель.
Windows Subsystem for Linux Installation Guide for Windows 10
There are two options available for installing Windows Subsystem for Linux (WSL):
Simplified install (preview release): wsl —install
The wsl —install simplified install command requires that you join the Windows Insiders Program and install a preview build of Windows 10 (OS build 20262 or higher), but eliminates the need to follow the manual install steps. All you need to do is open a command window with administrator privileges and run wsl —install , after a restart you will be ready to use WSL.
Manual install: Follow the six steps listed below.
The manual install steps for WSL are listed below and can be used to install Linux on any version of Windows 10.
If you run into an issue during the install process, check the Troubleshooting installation section at the bottom of this page.
Simplified Installation for Windows Insiders
The installation process for Windows Subsystem for Linux has been significantly improved in the latest Windows Insiders preview builds of Windows 10, replacing the manual steps below with a single command.
In order to use the wsl —install simplified install command, you must:
- Join the Windows Insiders Program
- Install a preview build of Windows 10 (OS build 20262 or higher).
- Open a command line windows with Administrator privileges
Once those requirements are met, to install WSL:
- Enter this command in the command line you’ve opened in Admin mode: wsl.exe —install
- Restart your machine
The first time you launch a newly installed Linux distribution, a console window will open and you’ll be asked to wait for files to de-compress and be stored on your PC. All future launches should take less than a second.
CONGRATULATIONS! You’ve successfully installed and set up a Linux distribution that is completely integrated with your Windows operating system!
The —install command performs the following actions:
- Enables the optional WSL and Virtual Machine Platform components
- Downloads and installs the latest Linux kernel
- Sets WSL 2 as the default
- Downloads and installs a Linux distribution (reboot may be required)
By default, the installed Linux distribution will be Ubuntu. This can be changed using wsl —install -d . (Replacing with the name of your desired distribution.) Additional Linux distributions may be added to your machine after the initial install using the wsl —install -d command.
To see a list of available Linux distributions, enter wsl —list —online .
Manual Installation Steps
If you are not on a Windows Insiders build, the features required for WSL will need to be enabled manually following the steps below.
Step 1 — Enable the Windows Subsystem for Linux
You must first enable the «Windows Subsystem for Linux» optional feature before installing any Linux distributions on Windows.
Open PowerShell as Administrator and run:
We recommend now moving on to step #2, updating to WSL 2, but if you wish to only install WSL 1, you can now restart your machine and move on to Step 6 — Install your Linux distribution of choice. To update to WSL 2, wait to restart your machine and move on to the next step.
Step 2 — Check requirements for running WSL 2
To update to WSL 2, you must be running Windows 10.
- For x64 systems: Version 1903 or higher, with Build 18362 or higher.
- For ARM64 systems: Version 2004 or higher, with Build 19041 or higher.
- Builds lower than 18362 do not support WSL 2. Use the Windows Update Assistant to update your version of Windows.
To check your version and build number, select Windows logo key + R, type winver, select OK. Update to the latest Windows version in the Settings menu.
If you are running Windows 10 version 1903 or 1909, open «Settings» from your Windows menu, navigate to «Update & Security» and select «Check for Updates». Your Build number must be 18362.1049+ or 18363.1049+, with the minor build # over .1049. Read more: WSL 2 Support is coming to Windows 10 Versions 1903 and 1909. See the troubleshooting instructions.
Step 3 — Enable Virtual Machine feature
Before installing WSL 2, you must enable the Virtual Machine Platform optional feature. Your machine will require virtualization capabilities to use this feature.
Open PowerShell as Administrator and run:
Restart your machine to complete the WSL install and update to WSL 2.
Step 4 — Download the Linux kernel update package
Download the latest package:
If you’re using an ARM64 machine, please download the ARM64 package instead. If you’re not sure what kind of machine you have, open Command Prompt or PowerShell and enter: systeminfo | find «System Type» . Caveat: On non-English Windows versions, you might have to modify the search text, for example, in German it would be systeminfo | find «Systemtyp» .
Run the update package downloaded in the previous step. (Double-click to run — you will be prompted for elevated permissions, select вЂyes’ to approve this installation.)
Once the installation is complete, move on to the next step — setting WSL 2 as your default version when installing new Linux distributions. (Skip this step if you want your new Linux installs to be set to WSL 1).
Step 5 — Set WSL 2 as your default version
Open PowerShell and run this command to set WSL 2 as the default version when installing a new Linux distribution:
Step 6 — Install your Linux distribution of choice
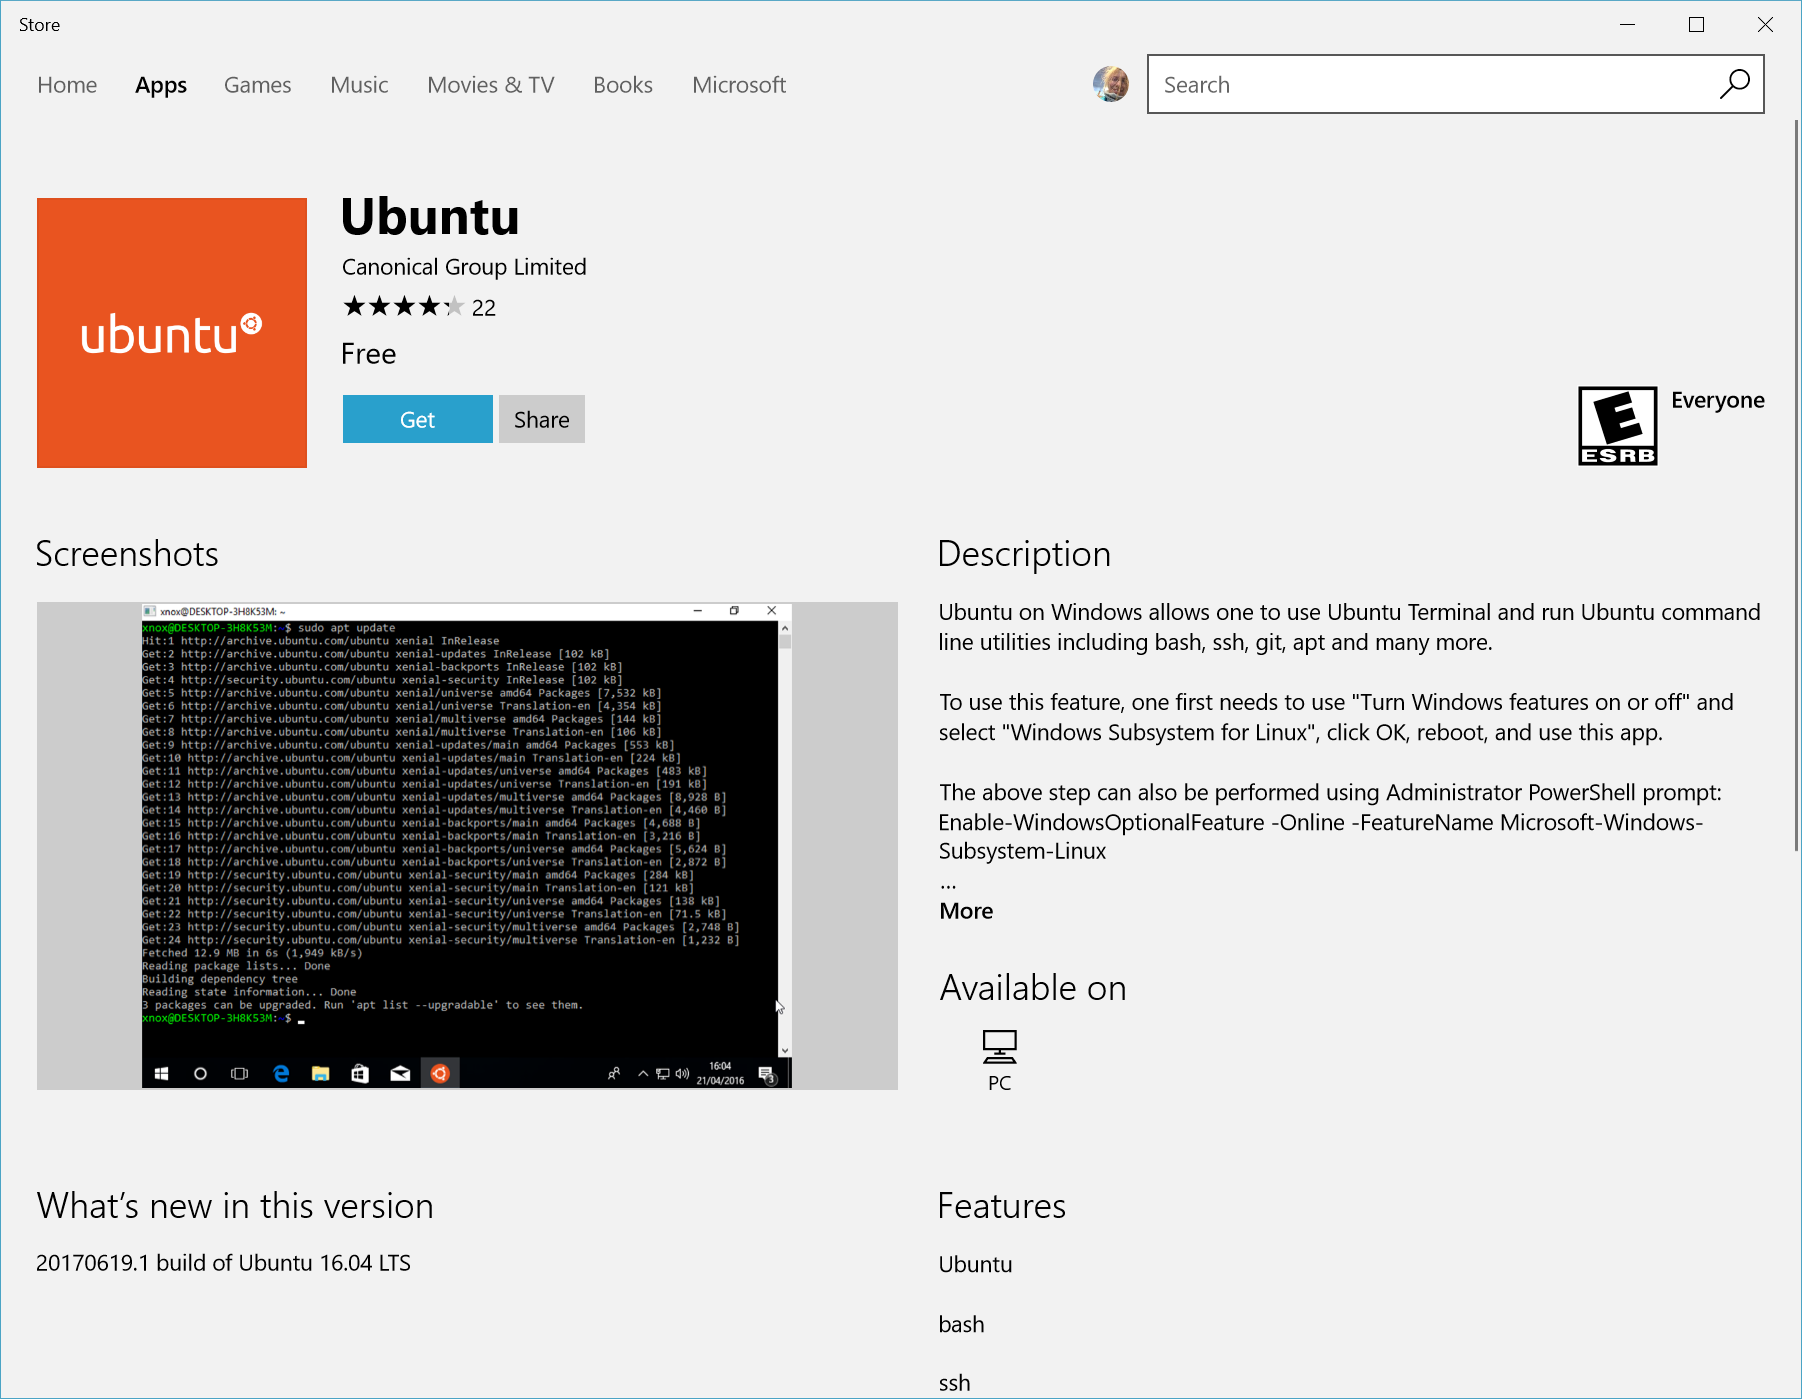
Open the Microsoft Store and select your favorite Linux distribution.

The following links will open the Microsoft store page for each distribution:
From the distribution’s page, select «Get».
The first time you launch a newly installed Linux distribution, a console window will open and you’ll be asked to wait for a minute or two for files to de-compress and be stored on your PC. All future launches should take less than a second.

CONGRATULATIONS! You’ve successfully installed and set up a Linux distribution that is completely integrated with your Windows operating system!
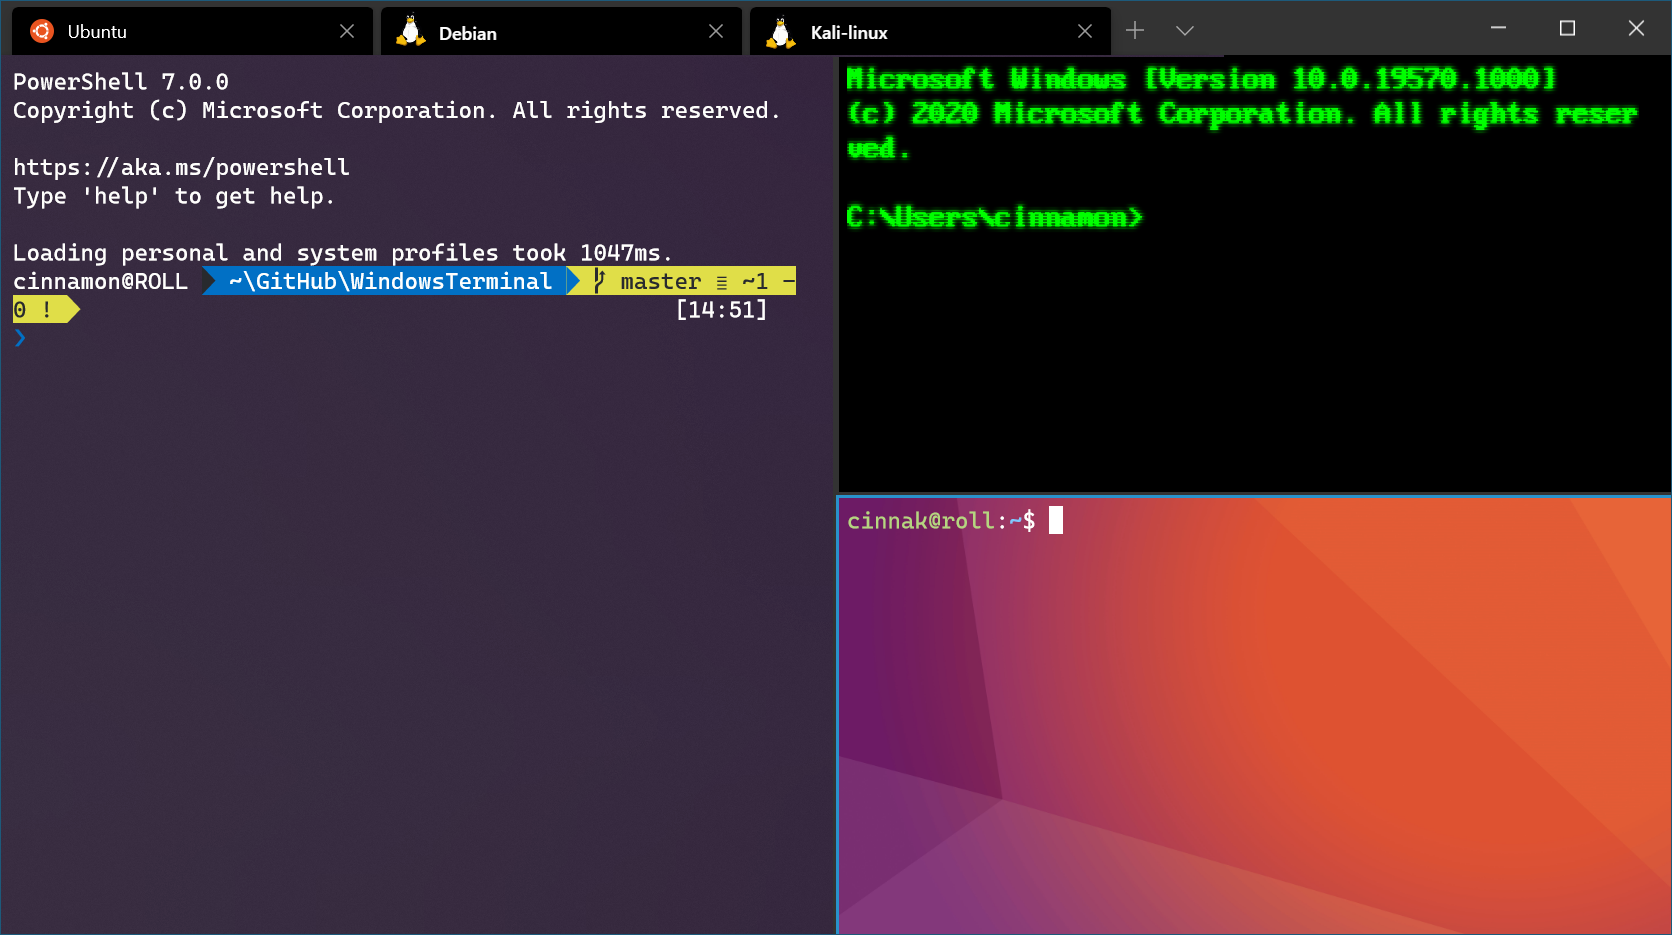
Install Windows Terminal (optional)
Windows Terminal enables multiple tabs (quickly switch between multiple Linux command lines, Windows Command Prompt, PowerShell, Azure CLI, etc), create custom key bindings (shortcut keys for opening or closing tabs, copy+paste, etc.), use the search feature, and custom themes (color schemes, font styles and sizes, background image/blur/transparency). Learn more.
Set your distribution version to WSL 1 or WSL 2
You can check the WSL version assigned to each of the Linux distributions you have installed by opening the PowerShell command line and entering the command (only available in Windows Build 18362 or higher): wsl -l -v
To set a distribution to be backed by either version of WSL please run:
Make sure to replace with the actual name of your distribution and with the number ‘1’ or ‘2’. You can change back to WSL 1 at anytime by running the same command as above but replacing the ‘2’ with a ‘1’.
The update from WSL 1 to WSL 2 may take several minutes to complete depending on the size of your targeted distribution. If you are running an older (legacy) installation of WSL 1 from Windows 10 Anniversary Update or Creators Update, you may encounter an update error. Follow these instructions to uninstall and remove any legacy distributions.
If wsl —set-default-version results as an invalid command, enter wsl —help . If the —set-default-version is not listed, it means that your OS doesn’t support it and you need to update to version 1903, Build 18362 or higher. If you are on Build 19041 for ARM64, this command may fail when using PowerShell in which case you can use a Command Prompt instead to issue the wsl.exe command.
If you see this message after running the command: WSL 2 requires an update to its kernel component. For information please visit https://aka.ms/wsl2kernel . You still need to install the MSI Linux kernel update package.
Additionally, if you want to make WSL 2 your default architecture you can do so with this command:
This will set the version of any new distribution installed to WSL 2.
Troubleshooting installation
Below are related errors and suggested fixes. Refer to the WSL troubleshooting page for other common errors and their solutions.
Installation failed with error 0x80070003
- The Windows Subsystem for Linux only runs on your system drive (usually this is your C: drive). Make sure that distributions are stored on your system drive:
- Open Settings -> **System —>Storage ->More Storage Settings: Change where new content is saved


WslRegisterDistribution failed with error 0x8007019e
- The Windows Subsystem for Linux optional component is not enabled:
- Open Control Panel ->Programs and Features ->Turn Windows Feature on or off -> Check Windows Subsystem for Linux or using the PowerShell cmdlet mentioned at the beginning of this article.
Installation failed with error 0x80070003 or error 0x80370102
- Please make sure that virtualization is enabled inside of your computer’s BIOS. The instructions on how to do this will vary from computer to computer, and will most likely be under CPU related options.
- WSL2 requires that your CPU supports the Second Level Address Translation (SLAT) feature, which was introduced in Intel Nehalem processors (Intel Core 1st Generation) and AMD Opteron. Older CPUs (such as the Intel Core 2 Duo) will not be able to run WSL2, even if the Virtual Machine Platform is successfully installed.
Error when trying to upgrade: Invalid command line option: wsl —set-version Ubuntu 2
- Enure that you have the Windows Subsystem for Linux enabled, and that you’re using Windows Build version 18362 or higher. To enable WSL run this command in a PowerShell prompt with admin privileges: Enable-WindowsOptionalFeature -Online -FeatureName Microsoft-Windows-Subsystem-Linux .
The requested operation could not be completed due to a virtual disk system limitation. Virtual hard disk files must be uncompressed and unencrypted and must not be sparse.
- Deselect “Compress contents” (as well as “Encrypt contents” if that’s checked) by opening the profile folder for your Linux distribution. It should be located in a folder on your Windows file system, something like: USERPROFILE%\AppData\Local\Packages\CanonicalGroupLimited.
- In this Linux distro profile, there should be a LocalState folder. Right-click this folder to display a menu of options. Select Properties > Advanced and then ensure that the “Compress contents to save disk space” and “Encrypt contents to secure data” checkboxes are unselected (not checked). If you are asked whether to apply this to just to the current folder or to all subfolders and files, select “just this folder” because you are only clearing the compress flag. After this, the wsl —set-version command should work.
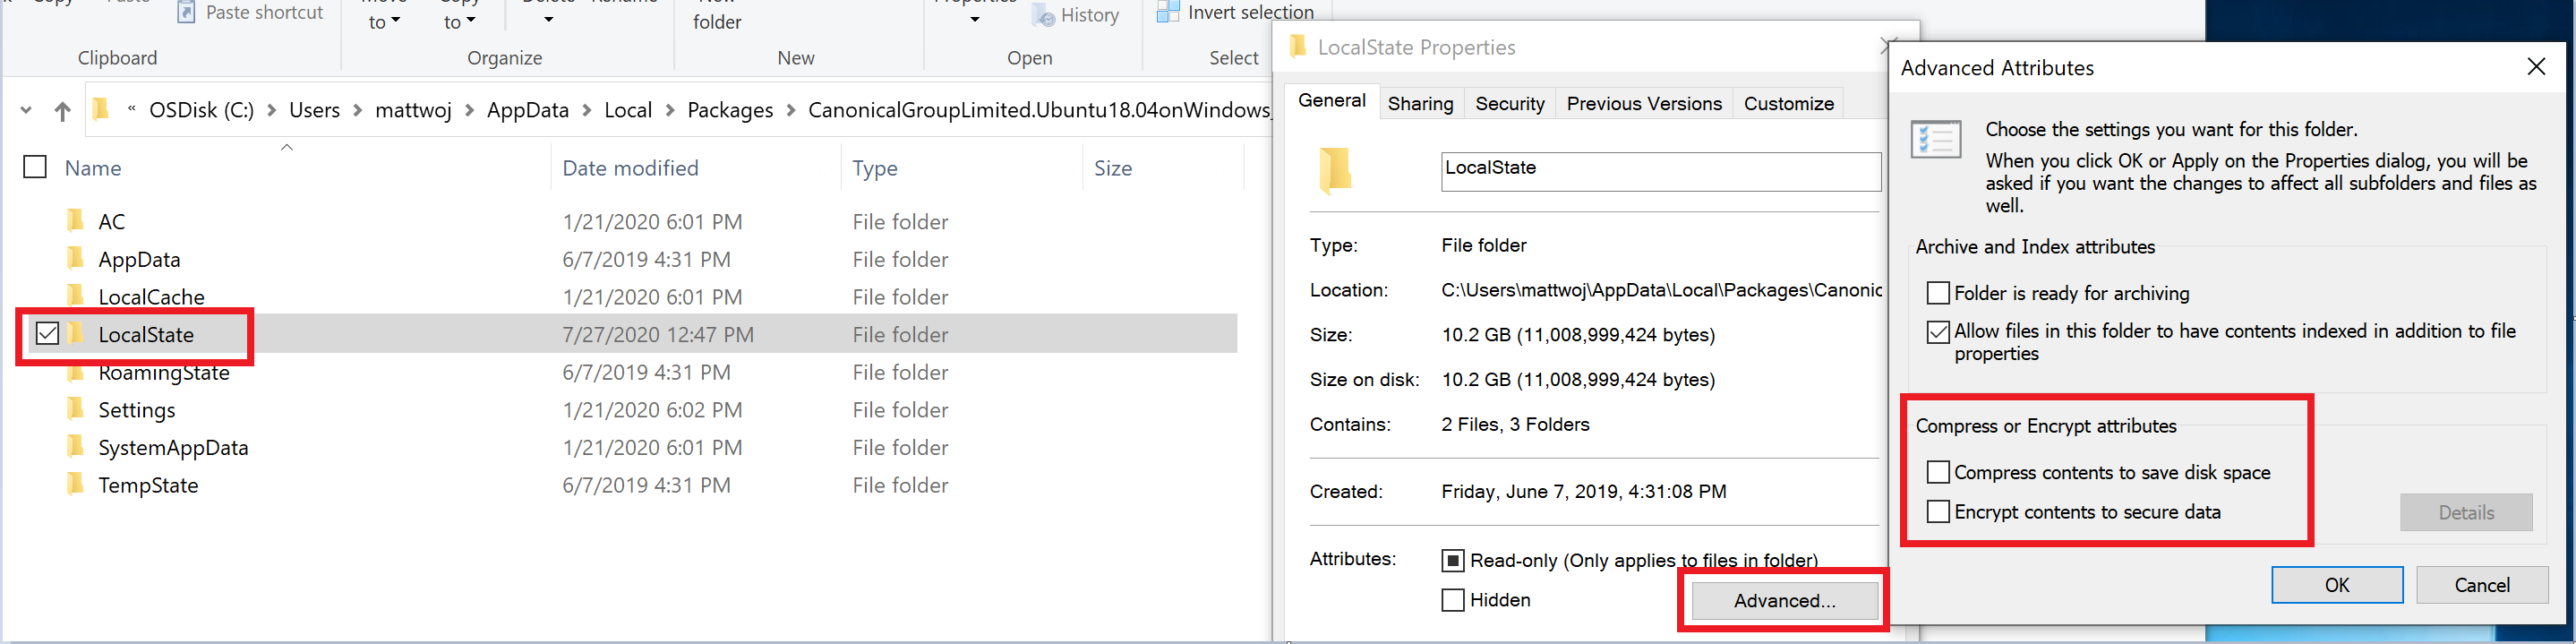
In my case, the LocalState folder for my Ubuntu 18.04 distribution was located at C:\Users \AppData\Local\Packages\CanonicalGroupLimited.Ubuntu18.04onWindows_79rhkp1fndgsc
Check WSL Docs GitHub thread #4103 where this issue is being tracked for updated information.
The term ‘wsl’ is not recognized as the name of a cmdlet, function, script file, or operable program.
- Ensure that the Windows Subsystem for Linux Optional Component is installed. Additionally, if you are using an ARM64 device and running this command from PowerShell, you will receive this error. Instead run wsl.exe from PowerShell Core, or Command Prompt.
Error: This update only applies to machines with the Windows Subsystem for Linux.
- To install the Linux kernel update MSI package, WSL is required and should be enabled first. If it fails, it you will see the message: This update only applies to machines with the Windows Subsystem for Linux .
- There are three possible reason you see this message:
- If the Linux kernel package is missing in the %SystemRoot%\system32\lxss\tools folder, you will encounter this error. Resolve it by installing the Linux kernel update MSI package in step #4 of these installation instructions. You may need to uninstall the MSI from ‘Add or Remove Programs’, and install it again.
You are still in old version of Windows which doesn’t support WSL 2. See step #2 for version requirements and links to update.
WSL is not enabled. You will need to return to step #1 and ensure that the optional WSL feature is enabled on your machine.
After you enabled WSL, a reboot is required for it to take effect, reboot your machine and try again.
Error: WSL 2 requires an update to its kernel component. For information please visit https://aka.ms/wsl2kernel .
—>


