- ITSolutionDesign
- … a virtual place for virtual resources …
- Installing macOS Mojave 10.14 on Proxmox 5.2
- Requirements
- First step: Create an installation ISO
- Prepare a Clover image
- Fetch the OSK authentication key
- Create the VM
- Configure Proxmox
- Install Mojave
- Make the Clover install permanent
- Sleep management
- Editing your Clover/EFI settings
- USB passthrough
- Установка macOS в Proxmox
- Зачем устанавливать macos на обычный компьютер?
- Подготовка установочного iso образа macos
- Создание виртуальной машины для MacOS
- Установка MacOS на Proxmox
- Видео установки macOS
- Заключение
ITSolutionDesign
… a virtual place for virtual resources …
Installing macOS Mojave 10.14 on Proxmox 5.2
This tutorial for installing macOS Mojave has been adapted for Proxmox 5.2 from Kholia’s GitHub project for installing into vanilla KVM. There is more documentation there which will help out with enabling extra features and diagnosing problems!
Requirements
I’ll assume you already have Proxmox 5.2 installed. You also need a real Mac available in order to download Mojave from the App Store and build the installation ISO.
Your Proxmox host computer must have an Intel CPU (I believe you would need a custom Mac kernel in order to use an AMD CPU). Your CPU must be at least as new as Nehalem, which was the first CPU generation to bear the “Core” i5/i7 branding. Older CPUs will cause the finder to repeatedly crash after installation completes (with an Illegal Instruction exception in the graphics code).
First step: Create an installation ISO
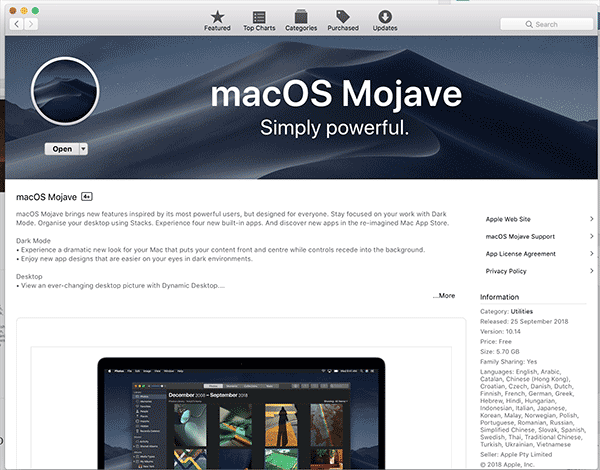
On a Mac machine, use the App Store to download the Mojave 10.14 installer:
Now run this script in order to create Mojave.iso from the installer. The ISO should get saved to your desktop. Upload the ISO to your Proxmox server’s ISO store (typically /var/lib/vz/template/iso).
Note: Apparently if the Mac you’re using for the download is already running Mojave, this won’t let you download the installer properly. There is some advice and workarounds in this Reddit thread.
Prepare a Clover image
We’ll be using Clover as a bootloader for Mojave.
Download this Clover disk image (that I built using kholia’s build script from Clover r4674), unpack it, and upload it to Proxmox’s ISO store at /var/lib/vz/template/iso. Although it has a .iso file extension, this is actually a hard disk image. (I do it this way because Proxmox has nicer tools for storing and picking .iso files for us)
Fetch the OSK authentication key
macOS checks that it is running on real Mac hardware, and refuses to boot on third-party hardware. You can get around this by reading an authentication key out of your real Mac hardware (the OSK key). Run the first bit of C code from this page (you’ll need XCode installed) and it’ll print out the 64 character OSK for you. Make a note of it.
Every Mac uses the same OSK, so don’t be surprised if it doesn’t look like a random string!
Create the VM
From the Proxmox web UI, create a new virtual machine as shown below.
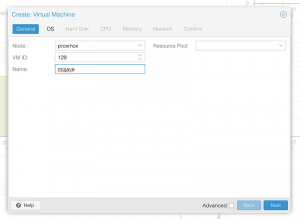 Keep a note of your VM’s ID
 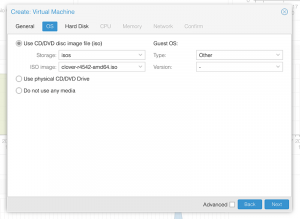 Select the Clover ISO you uploaded and set OS type to “Other”
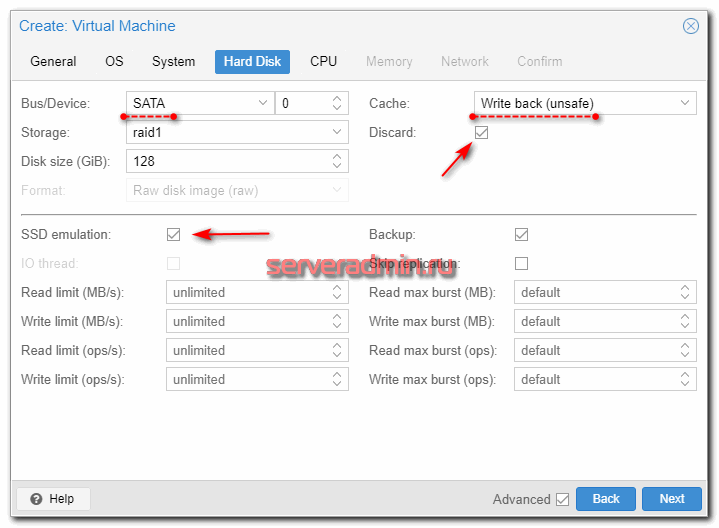
 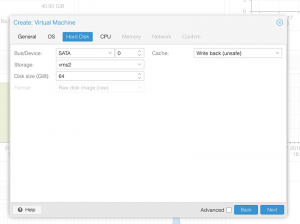 Set the size of the hard disk (I chose 64GB). Attach it to SATA0
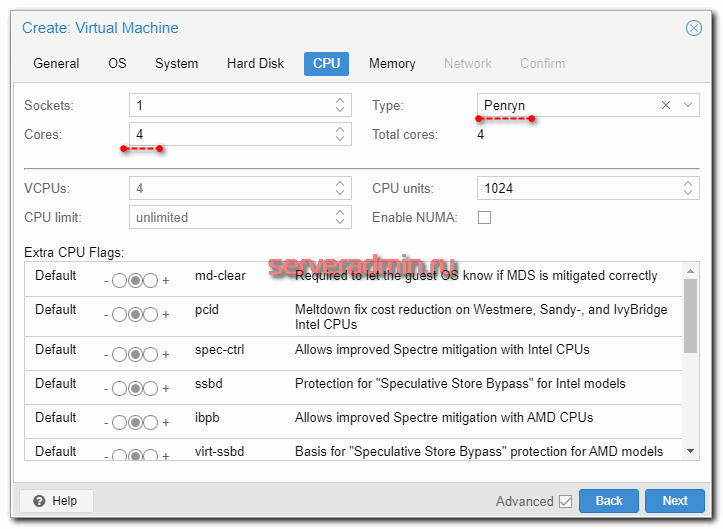
 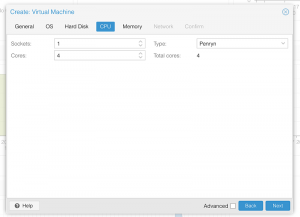 Set the number of cores for the VM, I chose 4. Set the CPU to Penryn.
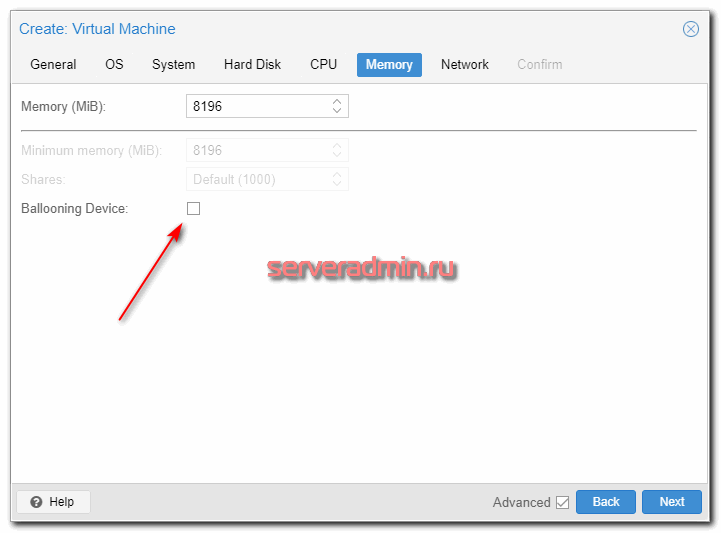
 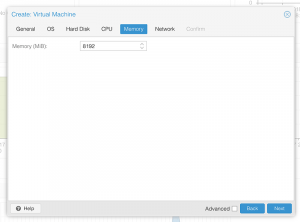 I chose a fixed memory of 8192MB. I don’t think ballooning or automatic allocation works.
 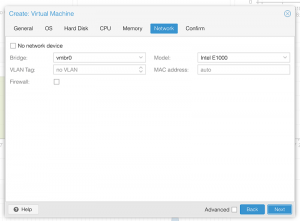 Choose e1000 for the network model
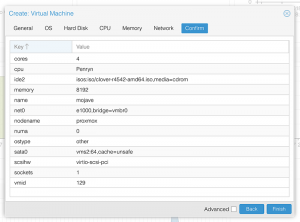
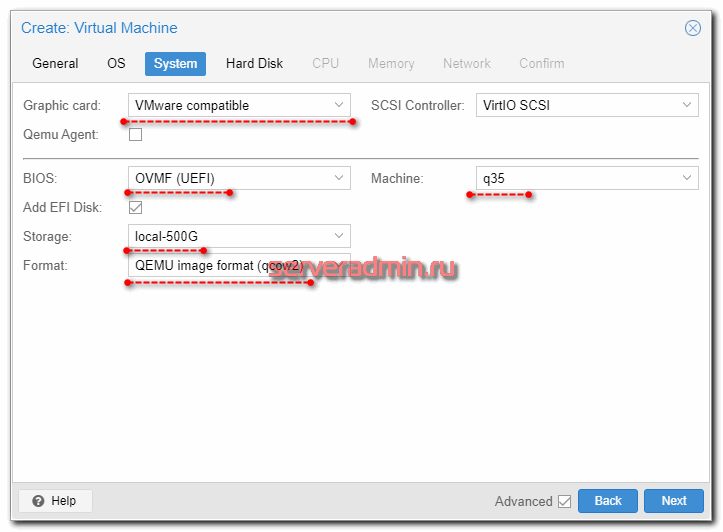
In the Options page for the VM, make sure “use tablet for pointer” is set to “Yes”. Change “BIOS” to “OVMF (UEFI)”.
In the Hardware page for the VM, change the the Display to Standard VGA (std). Add a second DVD drive at IDE0, set it to use your Mojave.iso. Add an “EFI Disk” too.
Don’t try to start the VM just yet. First, SSH into your Proxmox server so we can make some edits to the configuration files.
Edit /etc/pve/qemu-server/YOUR-VM-ID-HERE.conf (with nano or vim). Add these two lines, being sure to subtitute the OSK you extracted earlier into the right place:
We’re telling macOS that the CPU is Penryn (it doesn’t seem to like booting otherwise), but we’re enabling all the new CPU features found in Nehalem which macOS will require, plus some optional features found in later generations (AVX/AES).
Find the line that defines the Clover ISO (ide2), and remove the “,media=cdrom” part from it. Add “,cache=unsafe” in its place.
On the net0 line, change “e1000” to “e1000-82545em”. This variant is supported by OS X.
Save your changes, return to the Options tab, and change the boot order to put IDE2 (the Clover image) first.
Configure Proxmox
On Proxmox, run “echo 1 > /sys/module/kvm/parameters/ignore_msrs” to avoid a bootloop during macOS boot. To make this change persist across Proxmox reboots, run:
Install Mojave
Now start up your VM.
Go to the Console tab, quickly hit Escape at the Proxmox logo to enter the OVMF configuration. If your keyboard doesn’t work, leave the Console tab, stop the VM, start the VM, then re-enter the console tab. If pressing escape still doesn’t enter the menu, make sure you are using “machine: pc-q35-2.11” in your VM config and you do not have a USB keyboard defined in pve-q35.cfg (it seems that the OVMF menu only supports the default PS/2 keyboard at the moment).
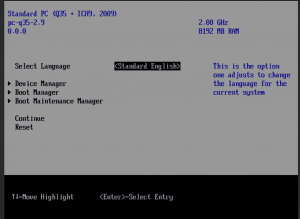 Select Device Manager
 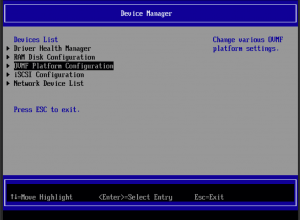 Select OVMF platform configuration
 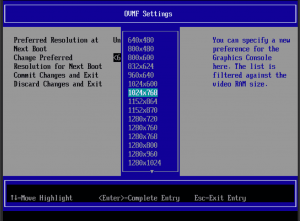 Change the Preferred Resolution to 1024×768
 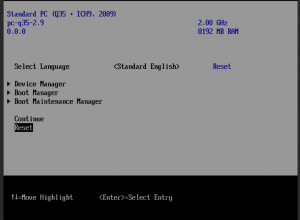 Save changes, then Reset
Follow the steps above to set the screen resolution to 1024×768 and “reset” to apply the new settings (not “continue”). This step is required to avoid scrambled graphics on boot and a hang (Clover resolution must match OVMF resolution).
Mojave doesn’t support QEMU’s PS2 keyboard and mouse, but it does support the USB tablet we’ve selected on the Options page. Edit /usr/share/qemu-server/pve-q35.cfg and add a USB keyboard to the bottom of the file to replace the PS/2 one it would provide by default:
(Port 1 is occupied by the USB tablet that Proxmox will provide for us)
We’ve added this to the config file instead of to the VM’s args directly. If we were to add it to the VM’s args, then when Proxmox constructs its call to KVM to launch the VM, the device definition would appear before the pve-q35.cfg file is included, which defines the USB busses. However, the device definition must appear after the definition of the USB bus that it refers to.
Note that this file is whitespace-sensitive, make sure you don’t add any blank lines that have extraneous spaces on them.
Stop the VM and start it again to pick up this new keyboard config. It should now boot into Clover.
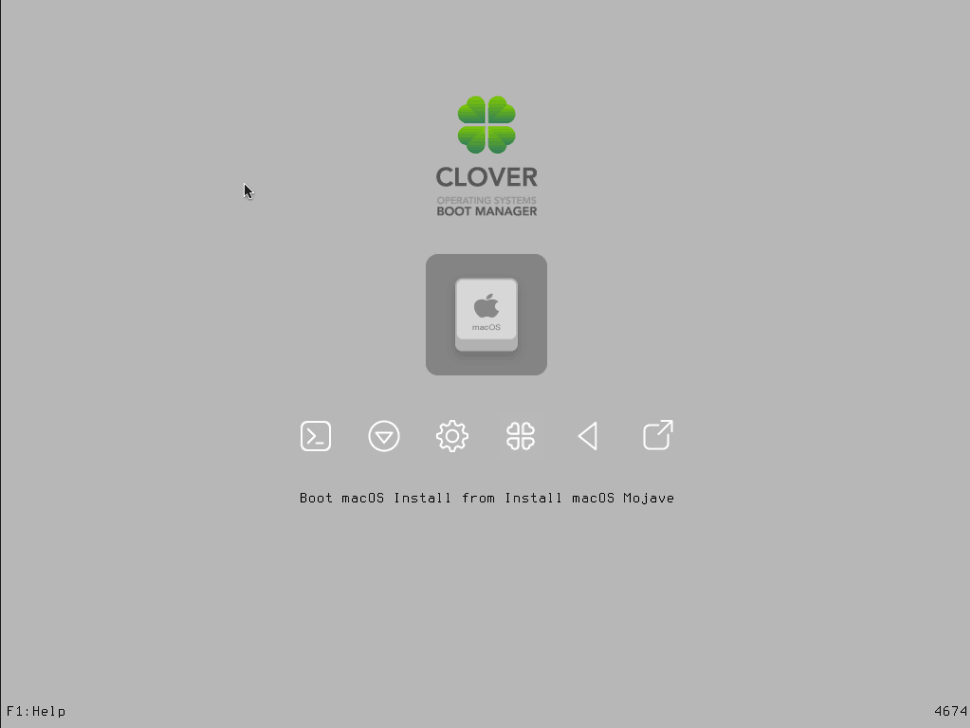 Clover boot screen
Press enter to boot the “Boot macOS Install from Install macOS Mojave” entry and the installer should appear. Choose your language.
Our virtual hard drive needs to be erased/formatted before we can install to it, so select the Disk Utility option. Follow the steps below to format the disk:
 Select Disk Utility
 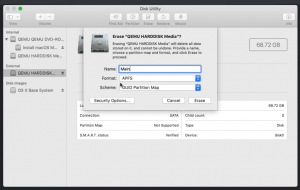 Erase the main disk (it’ll appear as an external drive). Choose APFS. I called mine “Main”
Now we’re ready to begin installation!
 Choose the option to install
 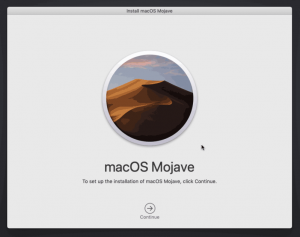 Continue…
 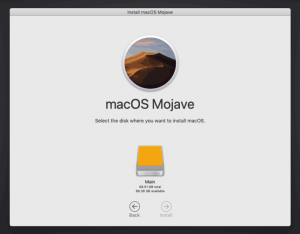 Chose the disk you erased
 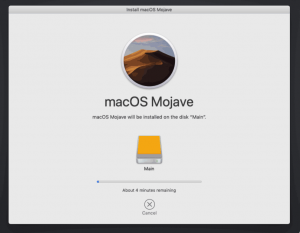 It’s installing!
After the first stage of installation, the VM should reboot itself and automatically continue installation by booting from the hard drive, then reboot itself a second time and automatically boot from “filevault prebooter”.
Answer the initial install questions, and you’ll be logged on! (Note that you’ll probably want to hold off on logging into your iCloud account until you’ve configured your SMBIOS to your liking in Clover Configurator)
 Answer the install questions
 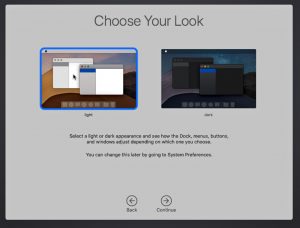 Ooh, new dark theme!
Make the Clover install permanent
We’re currently booting using Clover from the attached CD image. Let’s install that to the hard drive instead. Pop open Terminal and run “diskutil list” to see what drives we have available.

Use “sudo dd if= of= ” to copy the “EFI” partition from the Clover CD and overwrite the EFI partition on the hard disk. The Clover CD is the small disk with the “linux filesystem” on it, and the main hard disk is the one with the large Apple_APFS “Container” partition on it.
In my case these EFI partitions ended up being called disk1s1 and disk0s1 respectively, so I ran “sudo dd if=/dev/disk1s1 of=/dev/disk0s1” (N.B. if you get these names wrong, you will erase the wrong disk and you’ll have to start the installation over again!).
Now shut down the VM, and remove both the Clover and the Mojave CDROM drives from the Hardware tab. On the Options tab, edit the boot order to place SATA0 as the first disk. Boot up. If everything went well, you should see the Clover boot menu, and you can select “Boot macOS from Main” to boot Mojave.
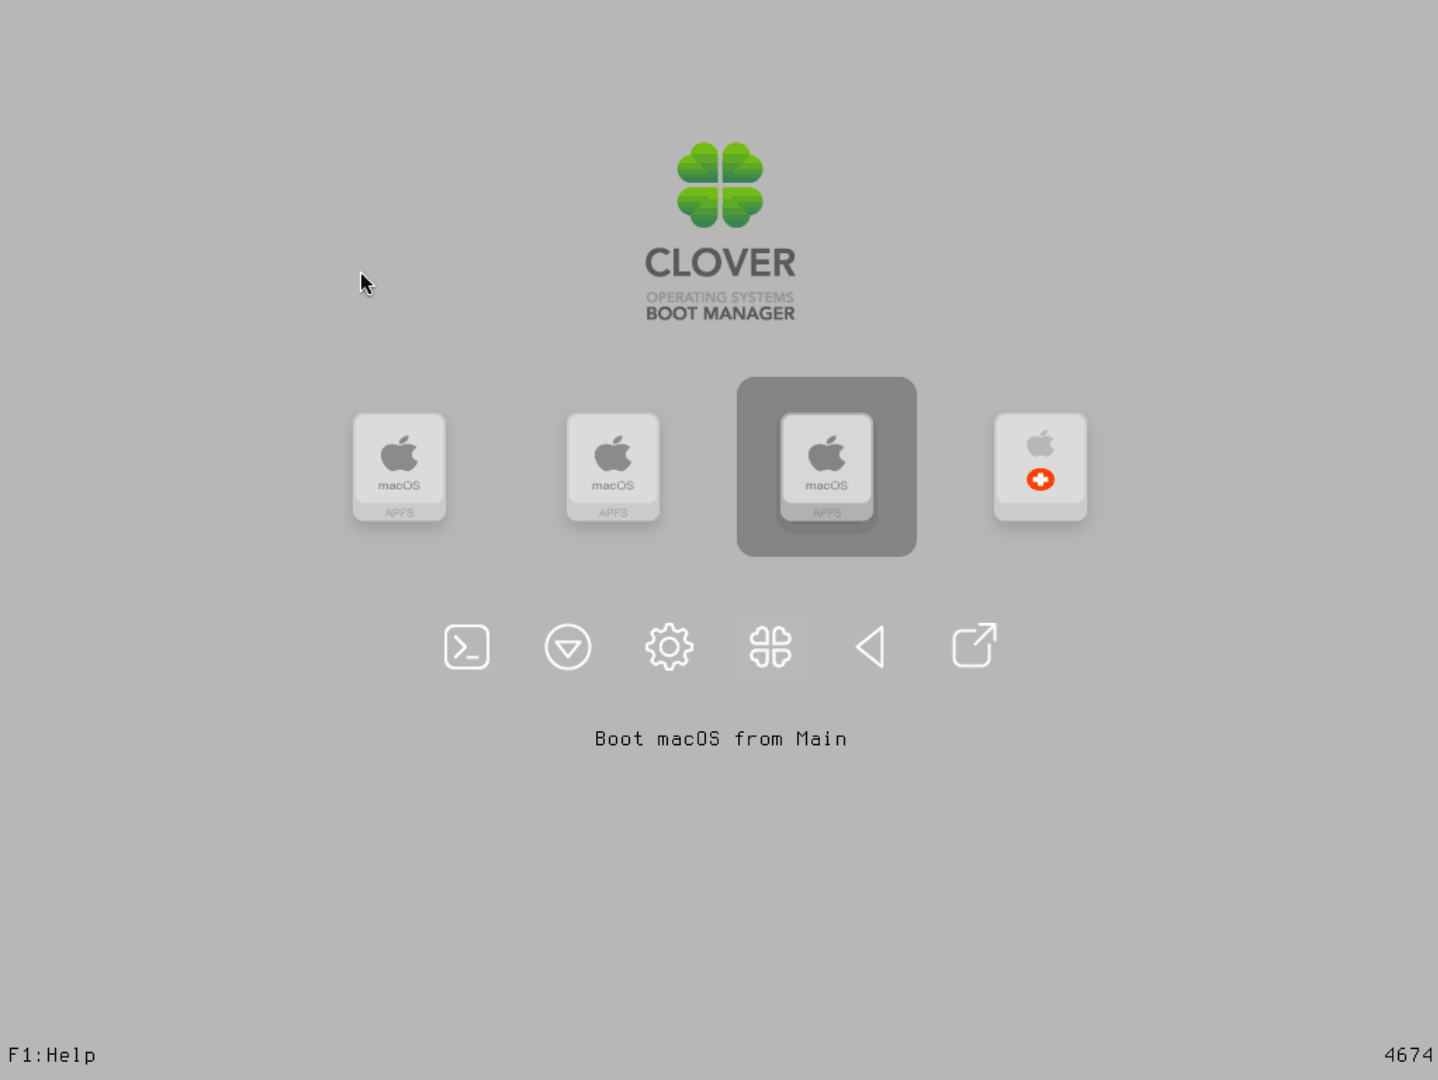 Choose “boot macOS from Main”
Sleep management
I found that I was unable to wake Mojave from sleep using my mouse or keyboard. You can either disable system sleep in Mojave’s Energy Saver settings to avoid this, or you can manually wake the VM up from sleep from Proxmox by running:
Editing your Clover/EFI settings
You can use the Clover Configurator tool (Global Edition) to edit your Clover “config.plist” configuration file, which is stored in the hard drive’s EFI partition. This tool should mount the EFI partition for you. If you want to mount it without using Clover Configurator, first check the device name of the EFI partition in the terminal:
Then you can mount it like so:
USB passthrough
Since I want to use this as my primary computer, I want to use a USB keyboard and mouse plugged directly into Proxmox, rather than sending my input through the web VNC console.
Proxmox has good documentation for USB passthrough. Basically, run “qm monitor YOUR-VM-ID-HERE”, then “info usbhost” to get a list of the USB devices connected to Proxmox:
In this case I can add my keyboard and mouse to USB passthrough by quitting qm, then running:
This saves the devices to the VM configuration for you. It’s possible to hot-add USB devices, but I just rebooted my VM to have the new settings apply.
You can also pass through USB devices by passing through an entire USB controller using Proxmox’s PCIe passthrough feature.
Источник
Установка macOS в Proxmox
Возникла у меня идея посмотреть на современную систему компании Apple для PC, не покупая само устройство, так как большой надобности в этом нет. Далее расскажу, как установить систему MacOS на виртуальную машину гипервизора KVM под управлением Proxmox. Пришлось немного поразбираться, так как актуального пошагового руководства не нашел.
Зачем устанавливать macos на обычный компьютер?
В данном случае под обычным компьютером я имею ввиду то, что не относится к железу от Apple, на котором, и только на котором, должна работать MacOS. Как известно, существует проект Hackintosh, который позволяет установить macos не только на виртуальные машины, но и обычные ноутбуки и pc. Видел даже услугу под ключ, где вам на чистый ноут поставят hackintosh. Только нужно будет купить железо, которое гарантированно поддерживается.
Мне, для удовлетворения любопытства, не нужно отдельное железо, поэтому я решил поставить MacOS на виртуальную машину Proxmox. Каких-то практических целей я не преследую. Чистое любопытство, получится или нет. В пятницу сидел, дела делать не хотелось, решил поразбираться немного. В итоге у меня всё получилось, поэтому решил поделиться информацией.
Сразу скажу, что способов практического использования подобной системы не много, так как без графического ускорителя macos работает очень плохо. Вся анимация тормозит. Я не прорабатывал вопрос проброса видеокарты в виртуальную машину с macos. Мне он видится очень нетривиальным и без большой надобности разбираться с этим не захотелось. Но при этом нормально работает сеть, к системе можно подключаться по ssh, так что кому-то может и пригодится.
Я все операции проделывал на гипервизоре Proxmox 7.0, работающем на базе процессора Intel i5.
Подготовка установочного iso образа macos
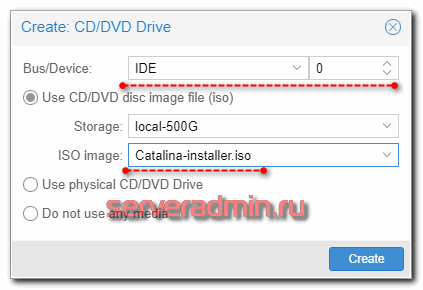
Начнём с того, что подготовим 2 iso образа для установки macos:
- OpenCore.iso — качаем его из этого репозитория. Данный образ будет загрузочным. Он каким-то образом убеждает установщик самой системы, что работает на железе apple. Это его основная функция.
- Catalina-installer.iso — стандартный установщик macos. Его мы подготовим далее.
Для того, чтобы начать установку macos, нам нужно подготовить образ системы. Для этого копируем себе репозиторий — https://github.com/kholia/OSX-KVM.
В корне проекта есть python скрипт fetch-macOS-v2.py. Запускаем его и выбираем установку Catalina.
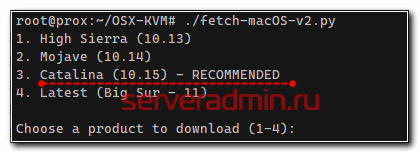
Скрипт скачает базовый образ BaseSystem.dmg. Нам нужно будет его сконвертировать в iso.
Оба образа — OpenCore.iso и Catalina-installer.iso копируем в репозиторий образов proxmox.
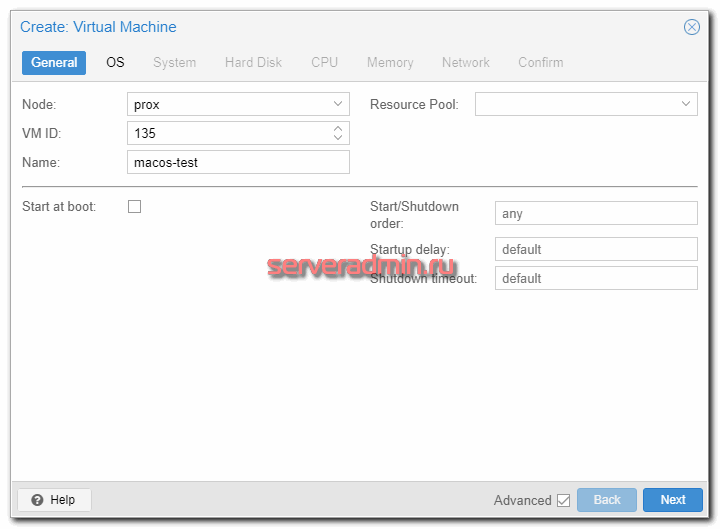
Создание виртуальной машины для MacOS
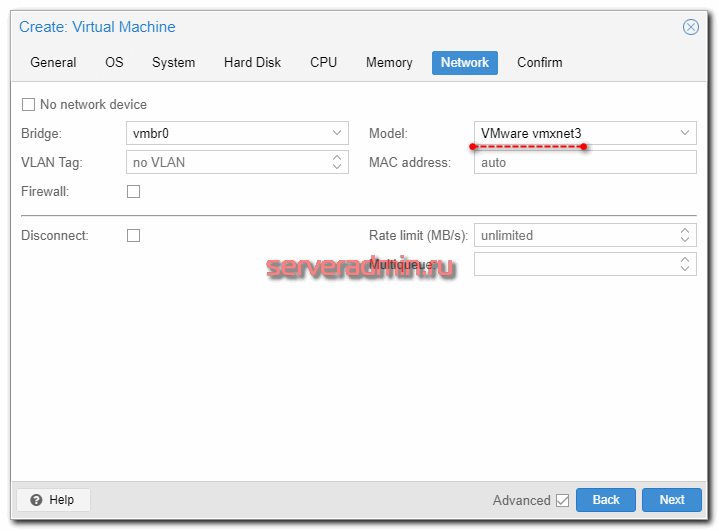
Теперь идём в веб интерфейс proxmox и создаем виртуальную машину для MacOS. Я ей выделю 4 ядра и 8 гигабайт оперативной памяти. Количество ядер не должно быть 6. Я лично пробовал с 4 или 8 ядрами. Если сделать 6, ничего не получится. Динамическую память тоже обязательно выключаем.
Не буду расписывать все шаги, а просто покажу картинки настроек. Они будут предварительные. Затем завершим подготовку виртуальной машины в консоли. А пока создаём через веб интерфейс.
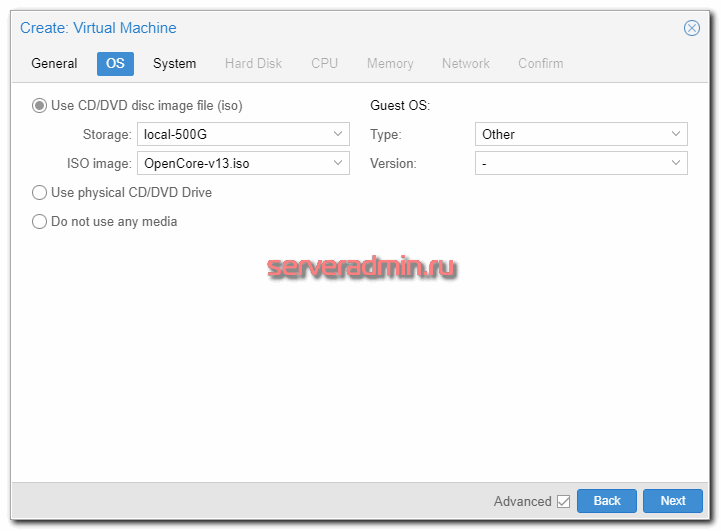
После создания открываем список оборудования VM и добавляем туда iso образ Catalina-installer.iso.
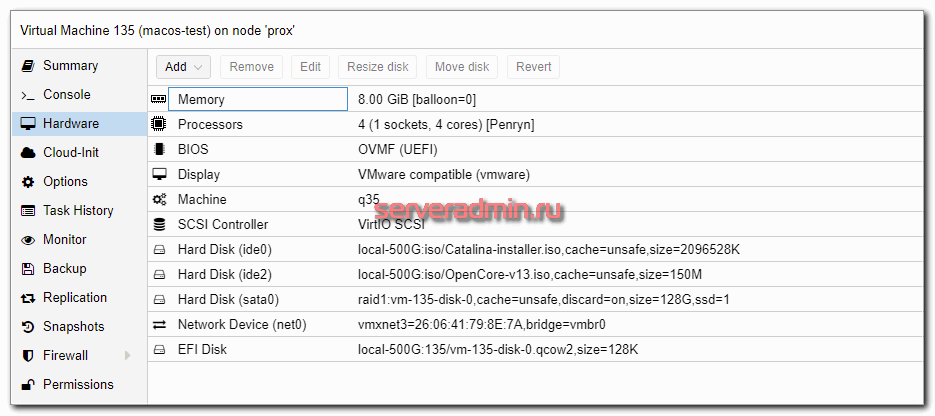
После создания, виртуальную машину не запускаем. Перемещаемся в консоль гипервизора и открываем конфиг виртуальной машины в директории /etc/pve/qemu-server. Имя конфиг виртуальной машины будет равен её номеру. В моем случае это 135.conf. Нам нужно привести конфиг к следующему виду. Я выделю то, что я добавил и изменил.
В веб интерфейсе настройки должны выглядеть примерно вот так:
Если у вас процессор не Intel, а AMD, параметры процессора следует использовать другие:
В консоли гипервизора делаем еще одну настройку, меняя параметры модуля ядра kvm.
Активируем эту настройку без перезагрузки:
У нас всё готово к тому, чтобы начать установку MacOS на виртуальную машину Proxmox.
Установка MacOS на Proxmox
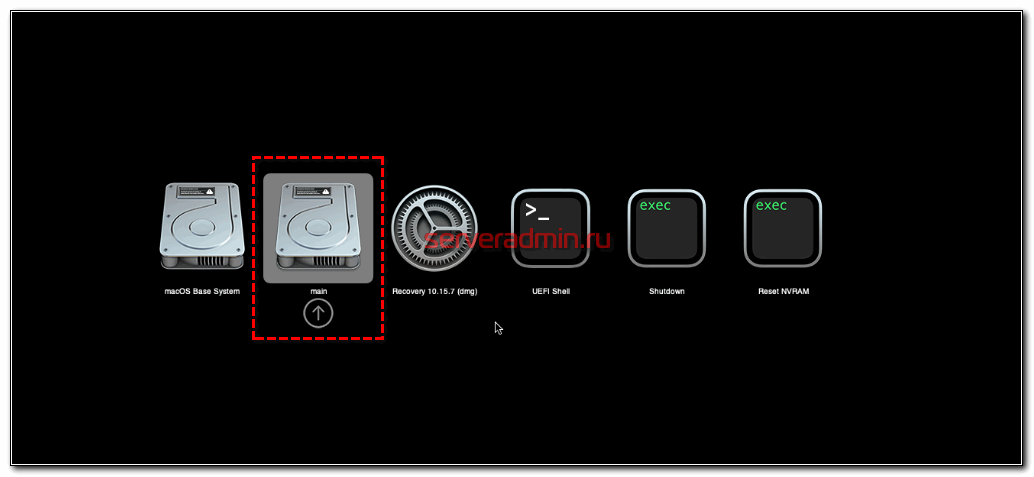
Запускаем виртуальную машину и переходим в консоль. Если всё сделали правильно на предыдущих шагах, должны увидеть следующую картинку.
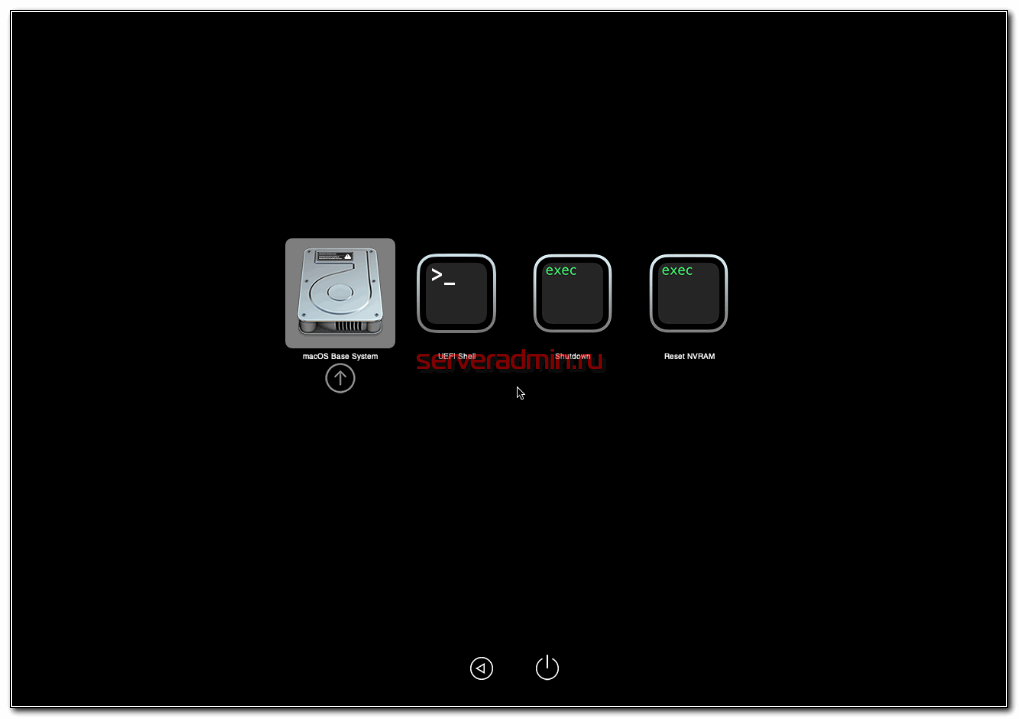
Мышка в этом режиме не будет работать, так что стрелками на клавиатуре выбираем macOS Base System и жмём Enter.
Некоторое время будете видеть надкусанное яблоко с прогресс баром.

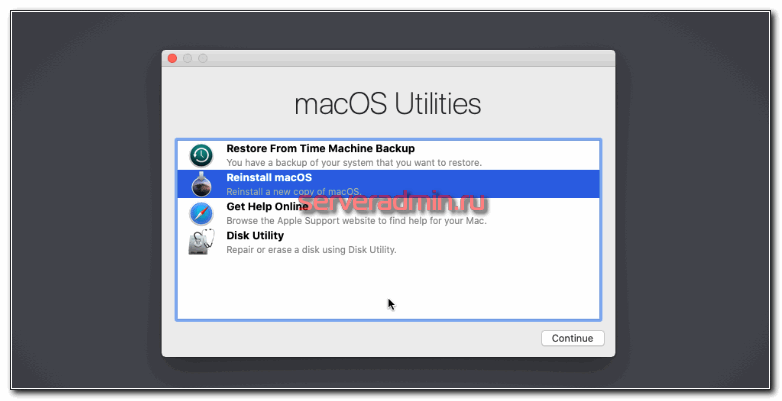
Если на предыдущих этапах всё сделали правильно, то должны увидеть утилиты macOS.

Нам надо выбрать Disk Utility. Здесь уже должна работать мышка. Выберите свой основной диск и очистите его, нажав Erase.

После того, как закончите очистку, закрывайте утилиту и переходите в главное меню. Здесь вам нужно будет выбрать Reinstall macOS.
Дальше будут разные вопросы, на которые нужно дать согласие и выбрать в качестве диска для установки системы свой единственный диск.
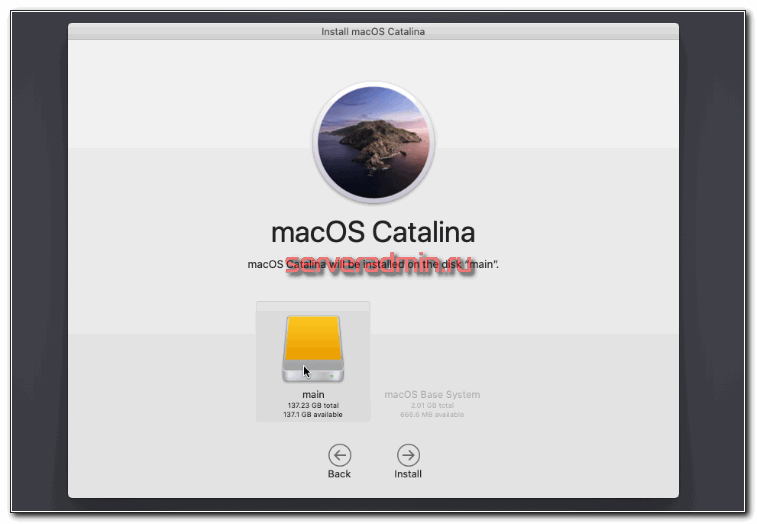
Начнёт процесс установки macOS, который в зависимости от вашего железа может длиться разное количество времени. В основном скорость будет зависеть от вашего жесткого диска. У меня минут 15-20 длился данный этап.
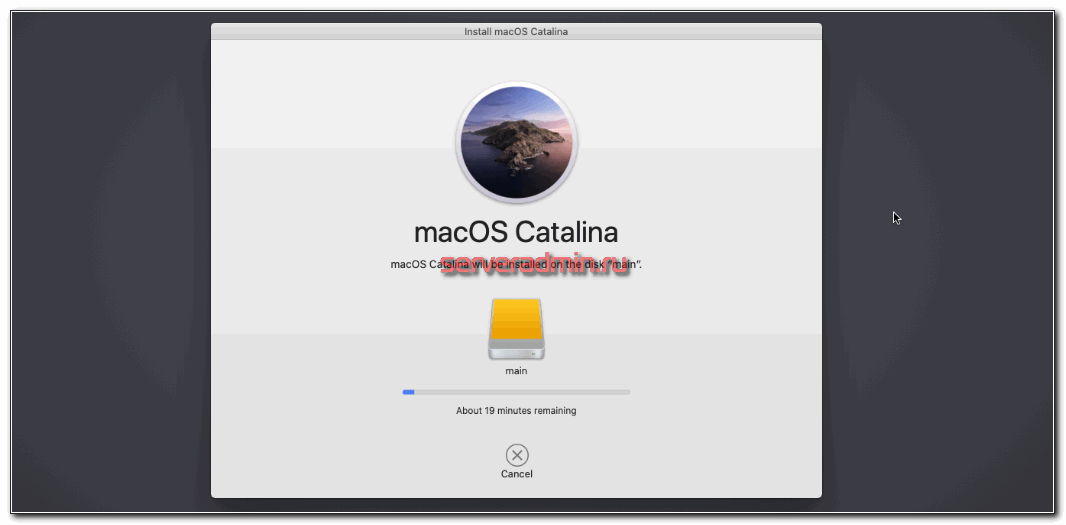
После завершения этого этапа VM автоматически перезагрузится и встретит вас подобным меню.
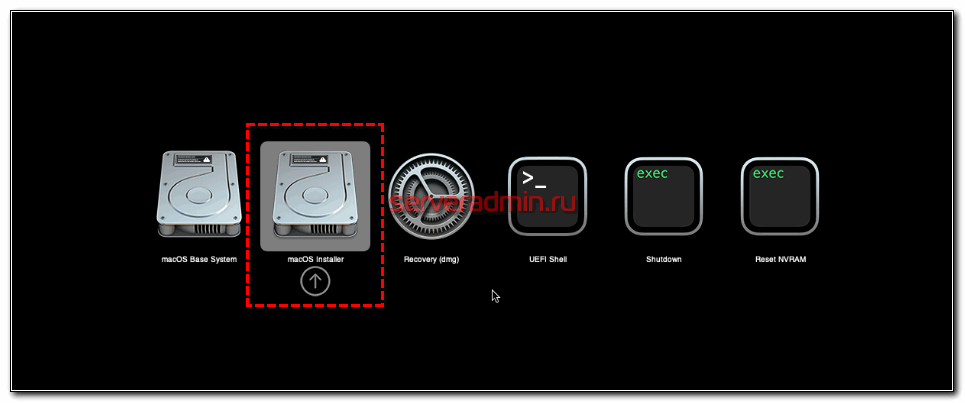
Нужно клавиатурой выбрать macOS Installer и установка продолжится. Пройдёт еще 10-15 минут, после которых система автоматически перезагрузится ещё раз. Далее вас встретит очередной загрузчик, где нужно выбрать ваш основной диск, на который установлена система. В моем случае это Main.
Дальше запускается стандартная преднастройка системы. Нужно будет выбрать страну, язык, логин, пароль и т.д. От использования учётной записи с Apple ID можно отказаться, так что никакие дополнительные учетные записи для работы macOS делать не нужно будет.
После завершения установки системы, рекомендую сразу же сделать себе архивную копию на всякий случай, чтобы потом заново устанавливать не пришлось.
Видео установки macOS
Мне очень сильно помогло видео на youtube на данную тему. Оно позволило быстро въехать в тему, чтобы понять этапы, по которым надо пройти.
В видео не рассмотрен момент с получением osk key. Автор взял его со своего текущего mac. А что делать тем, у кого его нет? Я не сразу понял. В итоге нашёл информацию, что на последних версиях OpenCore ключ не имеет значения. Можно указать любой, что я и сделал. После этого всё получилось.
Заключение
Что теперь делать с установленной на виртуальную машину macOS, решать вам. Было бы интересно узнать, как вам эта система пригодилась. Поделитесь в комментариях. Я подозреваю, что подобная установка будет актуальна для разработчиков, которым нужно что-то проверять в экосистеме apple. Какое-то другое применение в голову не приходит. Я, как сисадмин, никакого полезного применения для себя не нашёл.
Проблему с тормозами графики частично можно решить, если подключаться к системе через встроенный в macos Screen Sharing. Но это возможно только если у вас есть под рукой нормальный Mac. В этом случае можете использовать подобное подключение. Так же с помощью этого шаринга можно подключиться по VNC, но качество графики всё равно будет очень низкое, сопоставимое с консолью proxmox.
Источник


