Работа с mdadm в Linux для организации RAID
mdadm — утилита для работы с программными RAID-массивами различных уровней. В данной инструкции рассмотрим примеры ее использования.
Установка mdadm
Утилита mdadm может быть установлена одной командой.
Если используем CentOS / Red Hat:
yum install mdadm
Если используем Ubuntu / Debian:
apt-get install mdadm
Сборка RAID
Перед сборкой, стоит подготовить наши носители. Затем можно приступать к созданию рейд-массива.
Подготовка носителей
Сначала необходимо занулить суперблоки на дисках, которые мы будем использовать для построения RAID (если диски ранее использовались, их суперблоки могут содержать служебную информацию о других RAID):
mdadm —zero-superblock —force /dev/sd
* в данном примере мы зануляем суперблоки для дисков sdb и sdc.
Если мы получили ответ:
mdadm: Unrecognised md component device — /dev/sdb
mdadm: Unrecognised md component device — /dev/sdc
. то значит, что диски не использовались ранее для RAID. Просто продолжаем настройку.
Далее нужно удалить старые метаданные и подпись на дисках:
wipefs —all —force /dev/sd
Создание рейда
Для сборки избыточного массива применяем следующую команду:
mdadm —create —verbose /dev/md0 -l 1 -n 2 /dev/sd
- /dev/md0 — устройство RAID, которое появится после сборки;
- -l 1 — уровень RAID;
- -n 2 — количество дисков, из которых собирается массив;
- /dev/sd — сборка выполняется из дисков sdb и sdc.
Мы должны увидеть что-то на подобие:
mdadm: Note: this array has metadata at the start and
may not be suitable as a boot device. If you plan to
store ‘/boot’ on this device please ensure that
your boot-loader understands md/v1.x metadata, or use
—metadata=0.90
mdadm: size set to 1046528K
Также система задаст контрольный вопрос, хотим ли мы продолжить и создать RAID — нужно ответить y:
Continue creating array? y
Мы увидим что-то на подобие:
mdadm: Defaulting to version 1.2 metadata
mdadm: array /dev/md0 started.
. и находим информацию о том, что у наших дисков sdb и sdc появился раздел md0, например:
.
sdb 8:16 0 2G 0 disk
??md0 9:0 0 2G 0 raid1
sdc 8:32 0 2G 0 disk
??md0 9:0 0 2G 0 raid1
.
* в примере мы видим собранный raid1 из дисков sdb и sdc.
Создание файла mdadm.conf
В файле mdadm.conf находится информация о RAID-массивах и компонентах, которые в них входят. Для его создания выполняем следующие команды:
echo «DEVICE partitions» > /etc/mdadm/mdadm.conf
mdadm —detail —scan —verbose | awk ‘/ARRAY/
DEVICE partitions
ARRAY /dev/md0 level=raid1 num-devices=2 metadata=1.2 name=proxy.dmosk.local:0 UUID=411f9848:0fae25f9:85736344:ff18e41d
* в данном примере хранится информация о массиве /dev/md0 — его уровень 1, он собирается из 2-х дисков.
Создание файловой системы и монтирование массива
Создание файловой системы для массива выполняется также, как для раздела:
* данной командой мы создаем на md0 файловую систему ext4.
Примонтировать раздел можно командой:
mount /dev/md0 /mnt
* в данном случае мы примонтировали наш массив в каталог /mnt.
Чтобы данный раздел также монтировался при загрузке системы, добавляем в fstab следующее:
/dev/md0 /mnt ext4 defaults 1 2
Для проверки правильности fstab, вводим:
Мы должны увидеть примонтированный раздел md, например:
/dev/md0 990M 2,6M 921M 1% /mnt
Информация о RAID
Посмотреть состояние всех RAID можно командой:
В ответ мы получим что-то на подобие:
md0 : active raid1 sdc[1] sdb[0]
1046528 blocks super 1.2 [2/2] [UU]
* где md0 — имя RAID устройства; raid1 sdc[1] sdb[0] — уровень избыточности и из каких дисков собран; 1046528 blocks — размер массива; [2/2] [UU] — количество юнитов, которые на данный момент используются.
** мы можем увидеть строку md0 : active(auto-read-only) — это означает, что после монтирования массива, он не использовался для записи.
Подробную информацию о конкретном массиве можно посмотреть командой:
* где /dev/md0 — имя RAID устройства.
Version : 1.2
Creation Time : Wed Mar 6 09:41:06 2019
Raid Level : raid1
Array Size : 1046528 (1022.00 MiB 1071.64 MB)
Used Dev Size : 1046528 (1022.00 MiB 1071.64 MB)
Raid Devices : 2
Total Devices : 2
Persistence : Superblock is persistent
Update Time : Wed Mar 6 09:41:26 2019
State : clean
Active Devices : 2
Working Devices : 2
Failed Devices : 0
Spare Devices : 0
Consistency Policy : resync
Name : proxy.dmosk.local:0 (local to host proxy.dmosk.local)
UUID : 304ad447:a04cda4a:90457d04:d9a4e884
Events : 17
Number Major Minor RaidDevice State
0 8 16 0 active sync /dev/sdb
1 8 32 1 active sync /dev/sdc
- Version — версия метаданных.
- Creation Time — дата в время создания массива.
- Raid Level — уровень RAID.
- Array Size — объем дискового пространства для RAID.
- Used Dev Size — используемый объем для устройств. Для каждого уровня будет индивидуальный расчет: RAID1 — равен половине общего размера дисков, RAID5 — равен размеру, используемому для контроля четности.
- Raid Devices — количество используемых устройств для RAID.
- Total Devices — количество добавленных в RAID устройств.
- Update Time — дата и время последнего изменения массива.
- State — текущее состояние. clean — все в порядке.
- Active Devices — количество работающих в массиве устройств.
- Working Devices — количество добавленных в массив устройств в рабочем состоянии.
- Failed Devices — количество сбойных устройств.
- Spare Devices — количество запасных устройств.
- Consistency Policy — политика согласованности активного массива (при неожиданном сбое). По умолчанию используется resync — полная ресинхронизация после восстановления. Также могут быть bitmap, journal, ppl.
- Name — имя компьютера.
- UUID — идентификатор для массива.
- Events — количество событий обновления.
- Chunk Size (для RAID5) — размер блока в килобайтах, который пишется на разные диски.
Подробнее про каждый параметр можно прочитать в мануале для mdadm:
Также, информацию о разделах и дисковом пространстве массива можно посмотреть командой fdisk:
Источник
Install Linux Mint 18.3 on software raid (mdraid) device
Published on May 26th 2018 — Listed in Hardware Linux
When I re-vamped my computer (bought in 2011) a few days ago, I replaced the two internal 750GB hard drives with three SSD’s.
- Drive 1 (/dev/sda) 500GB Samsung 850 Evo
- Drive 2 (/dev/sdb) 500GB Samsung 850 Evo
- Drive 3 (/dev/sdc) 120GB ADATA SSD S510
I wanted to use both Samsung drives as a raid-1 for my main installation, Linux Mint 18.3.
The standalone SSD would be used for a Windows 7 installation for dual booting.
When I launched the Linux Mint 18.3 installation, I couldn’t find any options to create software raid. So I created them manually (mdadm. ) and restarted the installer. At the end of the installation the installer asks to reboot. That’s what I did. Just to come to the grub loader and it coudln’t find any operating system. Great :-/
After some try’n’err, I finally got to a way which works. If you want to install Linux Mint 18.3 on a software raid, follow these steps. Make sure you are using the correct device names, in my case they were /dev/sda and /dev/sdb.
1) Create the partitions on /dev/sda
I chose a very simple approach here with two partitions. The main partition almost fills up the whole disk, only leaving 4GB left for the second partition (swap).
# sfdisk -l /dev/sda
Disk /dev/sda: 465.8 GiB, 500107862016 bytes, 976773168 sectors
Units: sectors of 1 * 512 = 512 bytes
Sector size (logical/physical): 512 bytes / 512 bytes
I/O size (minimum/optimal): 512 bytes / 512 bytes
Disklabel type: dos
Disk identifier: 0x4f1db047
Device Boot Start End Sectors Size Id Type
/dev/sda1 * 2048 968384511 968382464 461.8G 83 Linux
/dev/sda2 968384512 976773119 8388608 4G 82 Linux swap / Solaris
2) Copy the partition table from SDA to SDB
The following command dumps (-d) the partition table from /dev/sda and inserts it into /dev/sdb:
# sfdisk -d /dev/sda | sfdisk /dev/sdb
Checking that no-one is using this disk right now . OK
Disk /dev/sdb: 465.8 GiB, 500107862016 bytes, 976773168 sectors
Units: sectors of 1 * 512 = 512 bytes
Sector size (logical/physical): 512 bytes / 512 bytes
I/O size (minimum/optimal): 512 bytes / 512 bytes
Disklabel type: dos
Disk identifier: 0x16a9c579
>>> Script header accepted.
>>> Script header accepted.
>>> Script header accepted.
>>> Script header accepted.
>>> Created a new DOS disklabel with disk identifier 0x4f1db047.
Created a new partition 1 of type ‘Linux’ and of size 461.8 GiB.
/dev/sdb2: Created a new partition 2 of type ‘Linux swap / Solaris’ and of size 4 GiB.
/dev/sdb3:
New situation:
Device Boot Start End Sectors Size Id Type
/dev/sdb1 * 2048 968384511 968382464 461.8G 83 Linux
/dev/sdb2 968384512 976773119 8388608 4G 82 Linux swap / Solaris
The partition table has been altered.
Calling ioctl() to re-read partition table.
Syncing disks.
3) Create the raid devices
First I created /dev/md0, which will hold the Linux Mint installation:
# mdadm —create /dev/md0 —level=1 —raid-devices=2 /dev/sda1 /dev/sdb1
mdadm: /dev/sda1 appears to contain an ext2fs file system
size=484191232K mtime=Fri May 25 15:31:47 2018
mdadm: Note: this array has metadata at the start and
may not be suitable as a boot device. If you plan to
store ‘/boot’ on this device please ensure that
your boot-loader understands md/v1.x metadata, or use
—metadata=0.90
mdadm: /dev/sdb1 appears to be part of a raid array:
level=raid1 devices=2 ctime=Fri May 25 12:50:09 2018
Continue creating array? y
mdadm: Defaulting to version 1.2 metadata
mdadm: array /dev/md0 started.
Then create /dev/md1 which will be used as swap partition:
# mdadm —create /dev/md1 —level=1 —raid-devices=2 /dev/sda2 /dev/sdb2
mdadm: Note: this array has metadata at the start and
may not be suitable as a boot device. If you plan to
store ‘/boot’ on this device please ensure that
your boot-loader understands md/v1.x metadata, or use
—metadata=0.90
mdadm: /dev/sdb2 appears to be part of a raid array:
level=raid1 devices=2 ctime=Fri May 25 12:50:23 2018
Continue creating array? y
mdadm: Defaulting to version 1.2 metadata
mdadm: array /dev/md1 started.
4) Wait for the sync to be completed
# cat /proc/mdstat
Personalities : [raid1]
md1 : active raid1 sdb2[1] sda2[0]
4190208 blocks super 1.2 [2/2] [UU]
resync=DELAYED
md0 : active raid1 sdb1[1] sda1[0]
484060160 blocks super 1.2 [2/2] [UU]
[>. ] resync = 0.7% (3421824/484060160) finish=39.7min speed=201283K/sec
bitmap: 4/4 pages [16KB], 65536KB chunk
Yes, patience you must have.
# cat /proc/mdstat
Personalities : [raid1]
md1 : active raid1 sdb2[1] sda2[0]
4190208 blocks super 1.2 [2/2] [UU]
md0 : active raid1 sdb1[1] sda1[0]
484060160 blocks super 1.2 [2/2] [UU]
bitmap: 0/4 pages [0KB], 65536KB chunk
5) Format the raid device /dev/md0
I will be using an ext4 filesystem, so:
# mkfs.ext4 /dev/md0
mke2fs 1.42.13 (17-May-2015)
Discarding device blocks: done
Creating filesystem with 121015040 4k blocks and 30261248 inodes
Filesystem UUID: 8f662d46-4759-4b81-b879-eb60dd643f41
Superblock backups stored on blocks:
32768, 98304, 163840, 229376, 294912, 819200, 884736, 1605632, 2654208,
4096000, 7962624, 11239424, 20480000, 23887872, 71663616, 78675968,
102400000
Allocating group tables: done
Writing inode tables: done
Creating journal (32768 blocks): done
Writing superblocks and filesystem accounting information: done
6) Launch the installer
But launch it from the command line:
# ubiquity -b
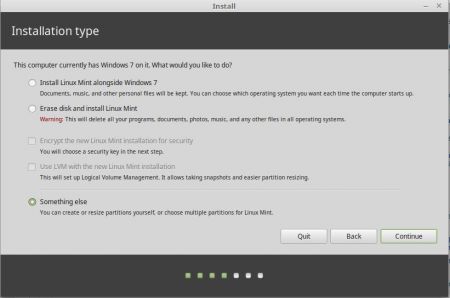
7) In the installer.
When the installer asks how about the installation type, select «Something else»:
The raid devices /dev/md0 (with ext4 as type) and /dev/md1 (with swap as type) should be shown in the list:
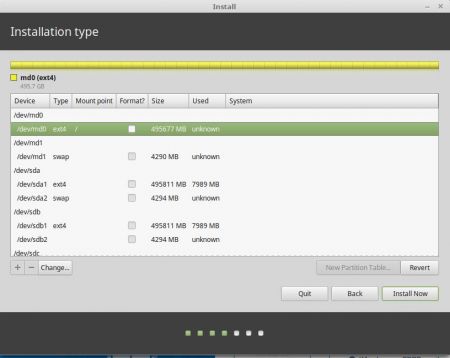
Double-click on the row /dev/md0 with the values and select use the partition as ext4 mounted as /.
Double-click on the row /dev/md1 with the values and select use the partition as swap.
Important: Make sure the other swap partitions (from devices SDA and SDB) are set to «do not use this partition». Otherwise the installer will fail and somehow crashes.
Make sure you select the row /dev/md0 with the values, then click on «Install now»:

8) At the end of the installation.
Very important: DO NOT click on «Restart Now». Click on «Continue Testing» instead. Otherwise you will have the same failing boot effect as I described at the begin of this article.

9) Prepare the Linux Mint installation to chroot into
Launch a terminal window and mount /dev/md0:
# mount /dev/md0 /mnt
Also make sure you are mounting sys and proc file systems as bind mounts into /mnt:
# for i in /dev /dev/pts /sys /proc; do mount —bind $i /mnt/$i; done
In case the resolv.conf inside the Linux Mint installation is empty, enter a nameserver manually:
# cat /mnt/etc/resolv.conf
mint
# echo «nameserver 1.1.1.1» > /mnt/etc/resolv.conf
Now chroot into your Linux Mint installation, mounted as /mnt:
10) Fix grub in the terminal
Now install the package mdadm into the Linux Mint installation. I will show the full output here:
mint / # apt-get install mdadm
Reading package lists. Done
Building dependency tree
Reading state information. Done
Suggested packages:
default-mta | mail-transport-agent dracut-core
The following NEW packages will be installed:
mdadm
0 upgraded, 1 newly installed, 0 to remove and 326 not upgraded.
Need to get 394 kB of archives.
After this operation, 1,208 kB of additional disk space will be used.
Get:1 http://archive.ubuntu.com/ubuntu xenial-updates/main amd64 mdadm amd64 3.3-2ubuntu7.6 [394 kB]
Fetched 394 kB in 0s (1,491 kB/s)
Preconfiguring packages .
Selecting previously unselected package mdadm.
(Reading database . 199757 files and directories currently installed.)
Preparing to unpack . /mdadm_3.3-2ubuntu7.6_amd64.deb .
Unpacking mdadm (3.3-2ubuntu7.6) .
Processing triggers for systemd (229-4ubuntu21) .
Processing triggers for ureadahead (0.100.0-19) .
Processing triggers for doc-base (0.10.7) .
Processing 4 added doc-base files.
Registering documents with scrollkeeper.
Processing triggers for man-db (2.7.5-1) .
Setting up mdadm (3.3-2ubuntu7.6) .
Generating mdadm.conf. done.
update-initramfs: deferring update (trigger activated)
Generating grub configuration file .
Warning: Setting GRUB_TIMEOUT to a non-zero value when GRUB_HIDDEN_TIMEOUT is set is no longer supported.
Found linux image: /boot/vmlinuz-4.10.0-38-generic
Found initrd image: /boot/initrd.img-4.10.0-38-generic
Found memtest86+ image: /boot/memtest86+.elf
Found memtest86+ image: /boot/memtest86+.bin
ERROR: isw: Could not find disk /dev/sdd in the metadata
ERROR: isw: Could not find disk /dev/sdd in the metadata
ERROR: isw: Could not find disk /dev/sdd in the metadata
ERROR: isw: Could not find disk /dev/sdd in the metadata
ERROR: isw: Could not find disk /dev/sdd in the metadata
ERROR: isw: Could not find disk /dev/sdd in the metadata
ERROR: isw: Could not find disk /dev/sdd in the metadata
ERROR: isw: Could not find disk /dev/sdd in the metadata
File descriptor 3 (pipe:[1799227]) leaked on lvs invocation. Parent PID 29155: /bin/sh
/run/lvm/lvmetad.socket: connect failed: No such file or directory
WARNING: Failed to connect to lvmetad. Falling back to internal scanning.
Found Windows 7 (loader) on /dev/sdd1
done
Running in chroot, ignoring request.
update-rc.d: warning: start and stop actions are no longer supported; falling back to defaults
Processing triggers for systemd (229-4ubuntu21) .
Processing triggers for ureadahead (0.100.0-19) .
Processing triggers for initramfs-tools (0.122ubuntu8.9) .
update-initramfs: Generating /boot/initrd.img-4.10.0-38-generic
Warning: No support for locale: en_US.utf8
You can ignore the errors about drive /dev/sdd (it was an additional USB drive, nothing to do with the installation).
Very important here: When mdadm was installed into the Linux Mint installation, a new Kernel initramfs was created and also the grub config was created. Also the mdadm.conf was written. Obviously this step (installing mdadm into the Linux Mint installation and therefore self-awareness of being a Linux raid) was missed by the installer.
11) Verification
After mdadm was installed, a bunch of necessary files were created. Let’s start with grub:
mint / # ll /boot/grub/
total 2368
drwxr-xr-x 2 root root 4096 May 26 08:08 ./
drwxr-xr-x 3 root root 4096 May 26 08:08 ../
-rw-r—r— 1 root root 712 Nov 24 2017 gfxblacklist.txt
-r—r—r— 1 root root 9734 May 26 08:08 grub.cfg
-rw-r—r— 1 root root 2398585 Nov 24 2017 unicode.pf2
grub.cfg was only created once mdadm was installed. No wonder, a boot was not possible without this manual fix.
What does it contain?
mint / # cat /boot/grub/grub.cfg
#
# DO NOT EDIT THIS FILE
#
# It is automatically generated by grub-mkconfig using templates
# from /etc/grub.d and settings from /etc/default/grub
#
[. ]
insmod part_msdos
insmod part_msdos
insmod diskfilter
insmod mdraid1x
insmod ext2
set root=’mduuid/650864013e2d41cf1f2acfeafc5c2bd7′
if [ x$feature_platform_search_hint = xy ]; then
search —no-floppy —fs-uuid —set=root —hint=’mduuid/650864013e2d41cf1f2acfeafc5c2bd7′ 8f662d46-4759-4b81-b879-eb60dd643f41
else
search —no-floppy —fs-uuid —set=root 8f662d46-4759-4b81-b879-eb60dd643f41
fi
font=»/usr/share/grub/unicode.pf2″
fi
[. ]
menuentry ‘Linux Mint 18.3 Cinnamon 64-bit’ —class ubuntu —class gnu-linux —class gnu —class os $menuentry_id_option ‘gnulinux-simple-8f662d46-4759-4b81-b879-eb60dd643f41’ <
recordfail
load_video
gfxmode $linux_gfx_mode
insmod gzio
if [ x$grub_platform = xxen ]; then insmod xzio; insmod lzopio; fi
insmod part_msdos
insmod part_msdos
insmod diskfilter
insmod mdraid1x
insmod ext2
set root=’mduuid/650864013e2d41cf1f2acfeafc5c2bd7′
if [ x$feature_platform_search_hint = xy ]; then
search —no-floppy —fs-uuid —set=root —hint=’mduuid/650864013e2d41cf1f2acfeafc5c2bd7′ 8f662d46-4759-4b81-b879-eb60dd643f41
else
search —no-floppy —fs-uuid —set=root 8f662d46-4759-4b81-b879-eb60dd643f41
fi
linux /boot/vmlinuz-4.10.0-38-generic root=UUID=8f662d46-4759-4b81-b879-eb60dd643f41 ro quiet splash $vt_handoff
initrd /boot/initrd.img-4.10.0-38-generic
>
submenu ‘Advanced options for Linux Mint 18.3 Cinnamon 64-bit’ $menuentry_id_option ‘gnulinux-advanced-8f662d46-4759-4b81-b879-eb60dd643f41’ <
menuentry ‘Linux Mint 18.3 Cinnamon 64-bit, with Linux 4.10.0-38-generic’ —class ubuntu —class gnu-linux —class gnu —class os $menuentry_id_option ‘gnulinux-4.10.0-38-generic-advanced-8f662d46-4759-4b81-b879-eb60dd643f41’ <
recordfail
load_video
gfxmode $linux_gfx_mode
insmod gzio
if [ x$grub_platform = xxen ]; then insmod xzio; insmod lzopio; fi
insmod part_msdos
insmod part_msdos
insmod diskfilter
insmod mdraid1x
insmod ext2
set root=’mduuid/650864013e2d41cf1f2acfeafc5c2bd7′
if [ x$feature_platform_search_hint = xy ]; then
search —no-floppy —fs-uuid —set=root —hint=’mduuid/650864013e2d41cf1f2acfeafc5c2bd7′ 8f662d46-4759-4b81-b879-eb60dd643f41
else
search —no-floppy —fs-uuid —set=root 8f662d46-4759-4b81-b879-eb60dd643f41
fi
echo ‘Loading Linux 4.10.0-38-generic . ‘
linux /boot/vmlinuz-4.10.0-38-generic root=UUID=8f662d46-4759-4b81-b879-eb60dd643f41 ro quiet splash $vt_handoff
echo ‘Loading initial ramdisk . ‘
initrd /boot/initrd.img-4.10.0-38-generic
>
menuentry ‘Linux Mint 18.3 Cinnamon 64-bit, with Linux 4.10.0-38-generic (upstart)’ —class ubuntu —class gnu-linux —class gnu —class os $menuentry_id_option ‘gnulinux-4.10.0-38-generic-init-upstart-8f662d46-4759-4b81-b879-eb60dd643f41’ <
recordfail
load_video
gfxmode $linux_gfx_mode
insmod gzio
if [ x$grub_platform = xxen ]; then insmod xzio; insmod lzopio; fi
insmod part_msdos
insmod part_msdos
insmod diskfilter
insmod mdraid1x
insmod ext2
set root=’mduuid/650864013e2d41cf1f2acfeafc5c2bd7′
if [ x$feature_platform_search_hint = xy ]; then
search —no-floppy —fs-uuid —set=root —hint=’mduuid/650864013e2d41cf1f2acfeafc5c2bd7′ 8f662d46-4759-4b81-b879-eb60dd643f41
else
search —no-floppy —fs-uuid —set=root 8f662d46-4759-4b81-b879-eb60dd643f41
fi
echo ‘Loading Linux 4.10.0-38-generic . ‘
linux /boot/vmlinuz-4.10.0-38-generic root=UUID=8f662d46-4759-4b81-b879-eb60dd643f41 ro quiet splash $vt_handoff init=/sbin/upstart
echo ‘Loading initial ramdisk . ‘
initrd /boot/initrd.img-4.10.0-38-generic
>
menuentry ‘Linux Mint 18.3 Cinnamon 64-bit, with Linux 4.10.0-38-generic (recovery mode)’ —class ubuntu —class gnu-linux —class gnu —class os $menuentry_id_option ‘gnulinux-4.10.0-38-generic-recovery-8f662d46-4759-4b81-b879-eb60dd643f41’ <
recordfail
load_video
insmod gzio
if [ x$grub_platform = xxen ]; then insmod xzio; insmod lzopio; fi
insmod part_msdos
insmod part_msdos
insmod diskfilter
insmod mdraid1x
insmod ext2
set root=’mduuid/650864013e2d41cf1f2acfeafc5c2bd7′
if [ x$feature_platform_search_hint = xy ]; then
search —no-floppy —fs-uuid —set=root —hint=’mduuid/650864013e2d41cf1f2acfeafc5c2bd7′ 8f662d46-4759-4b81-b879-eb60dd643f41
else
search —no-floppy —fs-uuid —set=root 8f662d46-4759-4b81-b879-eb60dd643f41
fi
echo ‘Loading Linux 4.10.0-38-generic . ‘
linux /boot/vmlinuz-4.10.0-38-generic root=UUID=8f662d46-4759-4b81-b879-eb60dd643f41 ro recovery nomodeset
echo ‘Loading initial ramdisk . ‘
initrd /boot/initrd.img-4.10.0-38-generic
>
>
As root device (set root) an uuid using mdraid (mduuid/650864013e2d41cf1f2acfeafc5c2bd7) was used. Let’s doublecheck that with the entries in mdadm.conf:
mint / # cat /etc/mdadm/mdadm.conf
# mdadm.conf
#
# Please refer to mdadm.conf(5) for information about this file.
#
# by default (built-in), scan all partitions (/proc/partitions) and all
# containers for MD superblocks. alternatively, specify devices to scan, using
# wildcards if desired.
#DEVICE partitions containers
# auto-create devices with Debian standard permissions
CREATE owner=root group=disk mode=0660 auto=yes
# automatically tag new arrays as belonging to the local system
HOMEHOST
# instruct the monitoring daemon where to send mail alerts
MAILADDR root
# definitions of existing MD arrays
ARRAY /dev/md/0 metadata=1.2 UUID=65086401:3e2d41cf:1f2acfea:fc5c2bd7 name=mint:0
ARRAY /dev/md/1 metadata=1.2 UUID=ad052a0a:eb1f9198:ec842848:215b650b name=mint:1
ARRAY metadata=imsm UUID=0b24ad7f:9b251541:a98a3748:f6333faa
ARRAY /dev/md/RAID1 container=0b24ad7f:9b251541:a98a3748:f6333faa member=0 UUID=aaa62640:f0d57fc8:6c097c8f:547b9c8f
# This file was auto-generated on Sat, 26 May 2018 08:08:42 +0200
# by mkconf $Id$
The UUID for /dev/md/0 looks familiar ;-). It’s the same UUID as used in the grub config. So far so good.
Let’s check /etc/fstab, too:
mint / # cat /etc/fstab
# /etc/fstab: static file system information.
#
# Use ‘blkid’ to print the universally unique identifier for a
# device; this may be used with UUID= as a more robust way to name devices
# that works even if disks are added and removed. See fstab(5).
#
#
# / was on /dev/md0 during installation
UUID=8f662d46-4759-4b81-b879-eb60dd643f41 / ext4 errors=remount-ro 0 1
# swap was on /dev/md1 during installation
UUID=b8277371-01fb-4aa3-bec1-9c0a4295deea none swap sw 0 0
Here another UUID is used (because it’s a device UUID, not a mdraid UUID). We can verify these by checking in /dev/disk/by-uuid:
mint / # ls -la /dev/disk/by-uuid/
total 0
drwxr-xr-x 2 root root 180 May 26 08:05 .
drwxr-xr-x 6 root root 120 May 25 18:59 ..
lrwxrwxrwx 1 root root 10 May 26 08:05 101EC9371EC9171E -> ../../sdd2
lrwxrwxrwx 1 root root 10 May 26 08:05 1EF881D5F881AB99 -> ../../sdc1
lrwxrwxrwx 1 root root 9 May 26 08:05 2017-11-24-13-25-42-00 -> ../../sr0
lrwxrwxrwx 1 root root 9 May 26 08:08 8f662d46-4759-4b81-b879-eb60dd643f41 -> ../../md0
lrwxrwxrwx 1 root root 9 May 26 08:08 b8277371-01fb-4aa3-bec1-9c0a4295deea -> ../../md1
lrwxrwxrwx 1 root root 10 May 26 08:05 CEAABB7CAABB601F -> ../../sdd1
lrwxrwxrwx 1 root root 10 May 26 08:05 E646DD2A46DCFBED -> ../../sdd3
Both UUID’s used in fstab (for the root partition and for swap) are here.
12) Grub install on the physical drives
Now that everything looks in order, we can install grub to /dev/sda and /dev/sdb.
mint / # grub-install /dev/sda
Installing for i386-pc platform.
Installation finished. No error reported.
mint / # grub-install /dev/sdb
Installing for i386-pc platform.
Installation finished. No error reported.
Very good, no errors.
Now I exited the chroot environment and rebooted the machine.
mint / # exit
# reboot
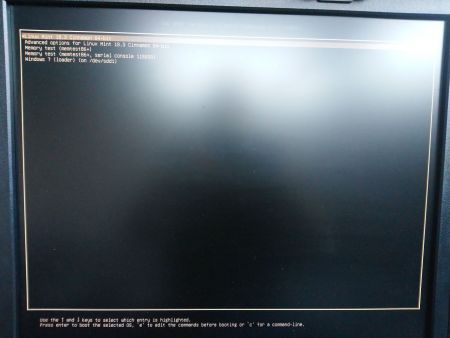
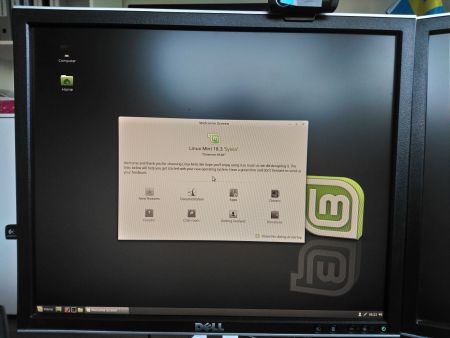
13) Booting
And finally, success: Linux Mint 18.3 now boots from the software raid-1 /dev/md0 device.
Update June 11th 2018:
After I installed Linux Mint on the raid device, I discovered that Windows 7 (on /dev/sdc) did not boot anymore and failed with the following error:
BOOTMGR is missing
Press Ctrl+Alt+Del to restart
All attempts to repair the Windows boot with the Windows 7 DVD failed. I had to phyiscally unplug the two Samsung SSD’s and then boot from the Windows 7 DVD again.
This time Windows 7 Repair was able to fix the boot loader. Seems Windows 7 repair requires the Windows drive to be discovered as the first drive (/dev/sda) and only then the repair works.
After I was able to boot into my Windows 7 installation on the ADATA SSD again, I replugged the two Samsung SSD’s. This made the Windows drive to /dev/sdc again. But with the fixed boot loader, I can now boot into Windows 7 from the Grub menu.
Add a comment
Comments (newest first)
anonymous from wrote on Apr 15th, 2020:
thank you very much for your guide, it is very helpful!
Junior SMS from Goiânia/GO — Brazil wrote on Mar 21st, 2020:
Dear Claudio, after hours of searching and a number of wasted installations, your guide just solve my problem! So, thank you SO MUCH for your time writing e publishing.
Claudio from Sweden wrote on Apr 17th, 2019:
Júnior, become root (sudo su -) and try it without the sudo command. Or install «sudo» package.
Júnior Lourenção from Foz do Iguaçu/Paraná/Brasil wrote on Apr 17th, 2019:
O comando: # for i in /dev /dev/pts /sys /proc; do mount —bind $i /mnt/$i; done
retornou erro:
sudo for i in /dev /dev/pts /sys /proc; o mount —bind $i /mnt/$i;
sudo: for: command not found
o: command not found
Como proceder?
Aguardo retorno.
Obrigado.
Источник


