- Installing MongoDB on a Mac
- What’s MongoDB?
- Prerequisites
- Installation Overview
- Install and Run MongoDB with Homebrew
- Install and Run MongoDB by Downloading it Manually
- 🇮🇹 Как установить MongoDB на MacOS
- Предпосылки
- Установите MongoDB на MacOS
- Запустить / Остановить MongoDB
- Работа с MongoDB
- Настройка MongoDB на Mac
- Что такое MongoDB?
- Установка MongoDB
- Это работает?
- Установка драйверов PHP в MAMP
- В заключение…
- Installing MongoDB on Mac (Catalina and non-Catalina)
- Preparations (Before MacOS Catalina)
- Preparations (MacOS Catalina onwards)
- Using MongoDB
- Starting MongoDB
- Checking if MongoDB is running
- The Mongo Shell
- Stopping MongoDB
- Aliases to make these easier
- What’s next?
- How to install MongoDB on macOS using Homebrew
- Creating Data Folder Before you install and use MongoDB, you need to create a data/db folder on your computer for storing MongoDB data. Before macOS Catalina, you can create this folder in the user’s root directory with the following command: If you are on macOS Catalina or Big Sur (or any future release), you can not use the root folder for this purpose. macOS Catalina runs in a read-only system volume, separate from other files on the system. Apple created a secondary volume on Catalina that you need to use for storing MongoDB data folder: Installing MongoDB You can install the MongoDB community edition with Homebrew. If Homebrew is not already installed, execute the following command first: Now update Homebrew to the latest version: Next, tap the MongoDB formulae into Homebrew: Finally, execute the following command to install the MongoDB community edition: That’s it. MongoDB is now installed on your macOS computer. Managing MongoDB Service To manage MongoDB on your macOS computer, you can use the brew services command. First of all, install brew services by tapping homebrew/services : To start the MongoDB service, you use the following command: The above command will start MongoDB as a background service. Here’s what you will see on the terminal: Note: You can also use the run command instead of start . The start command will configure MongoDB to automatically start when you log into your Macbook. If you do not want to run MongoDB all the time, use the run command instead. To check the current status of the MongoDB service, issue the following command: The above command will output something like below: You can stop the service anytime by typing: If you want to restart the service, use the following command: Creating Aliases To make your life easier, you can also create aliases for managing MongoDB service. Just add the following to Next source the /.zshrc file to load aliases: Now you can use aliases to manage your MongoDB service: Conclusion That’s all folks for today. In this article, we learned how to install the MongoDB community edition on macOS Catalina and higher. We use the Homebrew package manager to install MongoDB binaries and to manage MongoDB service. If you enjoy reading this article, don’t forget to share it with your friends and followers. ✌️ Like this article? Follow me on Twitter and LinkedIn. You can also subscribe to RSS Feed. Источник
- Installing MongoDB
- Managing MongoDB Service
- Creating Aliases
- Conclusion
Installing MongoDB on a Mac
What’s MongoDB?
MongoDB is a document database which belongs to a family of databases called NoSQL — not only SQL. In MongoDB, records are documents which behave a lot like JSON objects in JavaScript. Values in documents can be looked up by their field’s key. Documents can have some fields/keys and not others, which makes Mongo extremely flexible.
This is different than SQL databases like MySQL and PostgreSQL, where fields correspond to columns in a table and individual records correspond to rows.
Prerequisites
- You should have some familiarity with the Mac Terminal application since you’ll need to use it to install and run MongoDB.
- Dependencies. This guide goes over the two main ways to install MongoDB on a Mac. One of the methods requires Homebrew.
- Homebrew. Homebrew is a package manager for the Mac – it makes installing most open source software (like MongoDB) as simple as writing brew install mongodb . Follow the instructions in the How to Install Homebrew on a Mac instruction guide.
Installation Overview
There are two primary ways to install MongoDB on a Mac. The best way to install MongoDB is with Homebrew. The other way to install MongoDB is by downloading it from the the MongoDB website.
Install and Run MongoDB with Homebrew
- Open the Terminal app and type brew update .
- After updating Homebrew brew install mongodb
- After downloading Mongo, create the “db” directory. This is where the Mongo data files will live. You can create the directory in the default location by running mkdir -p /data/db
Make sure that the /data/db directory has the right permissions by running
Install and Run MongoDB by Downloading it Manually
- Go to the MongoDB website’s download section and download the correct version of MongoDB.
After downloading Mongo move the gzipped tar file (the file with the extension .tgz that you downloaded) to the folder where you want Mongo installed. In this case, we’ll say that we want Mongo to live in our home folder, and so the commands might look something like this:
Extract MongoDB from the the downloaded archive, and change the name of the directory to something more palatable: > cd
/ > tar -zxvf mongodb-osx-x86_64-3.0.7.tgz > mv mongodb-osx-x86_64-3.0.7 mongodb
Make sure that the /data/db directory has the right permissions by running
/mongodb/bin/mongod . This will start the Mongo server.
Run the Mongo shell, with the Mongo daemon running in one terminal, type
/mongodb/bin/mongo in another terminal window. This will run the Mongo shell which is an application to access data in MongoDB.
Источник
🇮🇹 Как установить MongoDB на MacOS

MongoDB – это полностью гибкая база данных с поддержкой индекса и запросов.
Это база данных NoSQL.
MongoDB 4.0 поддерживает транзакции ACID с несколькими документами.
Это руководство поможет вам установить сервер базы данных MongoDB на macOS.
После установки вам также может понравиться наши учебники MongoDB.
Предпосылки
Terminal: У вас должен быть доступ к терминалу MacOS и немного знаний о работе с командной строкой.
Homebrew: Homebrew – это популярный инструмент управления пакетами, используемый для установки большинства программ с открытым исходным кодом, таких как Node.
Установите MongoDB на MacOS
Прежде всего, обновите индекс репозитория пакетов Homebrew.
Затем установите MongoDB, используя установщик homebrew.
Это установит MongoDB по адресу /usr/local/Cellar/mongodb.
Запустить / Остановить MongoDB
Запустите MongoDB – используйте следующую команду для запуска MongoDB из терминала.
Убедитесь, что изменили 4.0.3_1 в приведенной ниже команде на установленную версию MongoDB на вашем macOS
Остановите MongoDB – просто используйте параметры выгрузки, чтобы остановить запуск службы базы данных MongoDB в macOS.
Работа с MongoDB
После запуска сервиса MongoDB, просто наберите «mongo» на терминале.
Это подключит вас к сервису MongoDB, работающему в локальной системе.
Источник
Настройка MongoDB на Mac
MongoDB — это документно-ориентированная база данных NoSQL. Он набирает обороты и популярность среди разработчиков, потому что он гибкий и масштабируемый одновременно. В этой статье я опишу, как я его настроил и работал на моем Mac с OS X 10.8.2 и MAMP с PHP 5.2.17 и PHP 5.3.6.
Что такое MongoDB?
MongoDB — это приложение с открытым исходным кодом, написанное на языке программирования C ++. Это база данных типа хранилища данных NoSQL , что означает, что она хранит данные в коллекциях. Коллекции состоят из набора документов. Документы содержат набор пар ключ-значение, и их не нужно определять перед началом использования базы данных.
Установка MongoDB
Вы на самом деле не устанавливаете MongoDB, не совсем. Вы можете скачать предварительно скомпилированные двоичные файлы , поместить полученный каталог куда-нибудь (я выбрал свою домашнюю папку), и он почти готов к началу. Я выбрал версию 2.0.2 и 64-битную версию OS X, и на этом основана эта статья.
Вам необходимо создать каталог данных. На веб-сайте MongoDB есть советы, как это сделать, и это почти то, что я сделал:
Это работает?
Теперь мы можем проверить, все ли работает. Откройте приложение терминала, измените каталог в вашу домашнюю папку, если вы еще не там:
Я переименовал папку Mongo в mongodb, чтобы ее было легче набирать. Затем вы можете запустить сервер:
Затем в новой вкладке терминала подключитесь к localhost:
Это должно вернуть что-то вроде этого:
Мы находимся на территории «это просто работает». Я прошел через эти шаги на нескольких компьютерах Mac, и это действительно работает. Мы скажем Mongo, что мы хотим использовать определенную коллекцию (эти команды должны быть набраны в окне оболочки localhost):
Монго ответит, что он переключился на базу данных с именем testingdb. Далее мы добавим некоторые данные:
Здесь вы можете видеть, что я определил 3 поля: заголовок, заметку и теги. Когда вы нажмете Enter, запись будет сохранена. Добавьте еще немного, таким же образом, и тогда мы можем запросить коллекцию, чтобы увидеть наши записи:
Эта команда вернет все результаты, найденные в коллекции. Это также показывает, что все работает хорошо. Теперь для некоторых водителей.
Установка драйверов PHP в MAMP
Во-первых, вам нужно посетить Github и скачать версию драйвера для PHP, которую вы чаще всего используете с MAMP. Доступна двоичная сборка для PHP 5.2 и PHP 5.3.
Затем вам нужно будет переместить загруженный двоичный файл (mongo.so) в правильную папку, чтобы MAMP мог его найти. Папку можно найти по адресу: /applications/MAMP/bin/php/php5.2.17/lib/php/extensions/no-debug-non-zts-20060613
Я использую MAMP 2.0.5, но он должен быть похож на другую версию. Далее нам нужно отредактировать шаблон PHP.ini в MAMP. В строке меню выберите «Файл» -> «Изменить шаблон» — выберите шаблон php, который вы хотите использовать.
Оказавшись там (вы можете нажать OK на предупреждающем сообщении), перейдите к разделу расширений и добавьте ссылку на mongo.so:
Сохраните и перезапустите MAMP. Если вы затем зайдете в веб-запуск и нажмете phpInfo, вы сможете прокрутить вниз и увидеть:
Это означает, что теперь вы готовы начать кодирование с MongoDB и MAMP.
В заключение…
Это быстрый и простой способ начать работу с MongoDB на OS X Lion и запустить MAMP. Существуют и другие способы установки, например, установка через Homebrew, но пока я нашел, что это работает отлично.
Хотя это в некоторой степени экспериментально, пожалуйста, поделитесь своим опытом ниже.
Источник
Installing MongoDB on Mac (Catalina and non-Catalina)
I had to reconfigure my Macbook after sending it for repairs. During the reconfiguration period, I noticed the instructions I linked to in “Setting up a local MongoDB connection” were outdated.
Here’s an updated version on how to install MongoDB on a Mac.
There are a few steps:
First, you install Homebrew. If you’re curious about what Homebrew is, read this article.
Second, find the MongoDB tap.
Third, install MongoDB.
MongoDB is now installed on your computer.
Preparations (Before MacOS Catalina)
Before you can use MongoDB, you need to create a /data/db folder on your computer to use MongoDB. You can create this folder with the following command:
You also need to give permissions to use it:
Now you can follow the rest of the article to set up your MongoDB connection.
Preparations (MacOS Catalina onwards)
Apple created a new Volume in Catalina for security purposes. If you’re on Catalina, you need to create the /data/db folder in System/Volumes/Data .
Use this command:
Then, use this command to give permissions:
Using MongoDB
In the past, I can run the mongod command to start MongoDB. This no longer works out for the box from MongoDB v4.2.3 onwards.
The best way to start MongoDB now is via brew services .
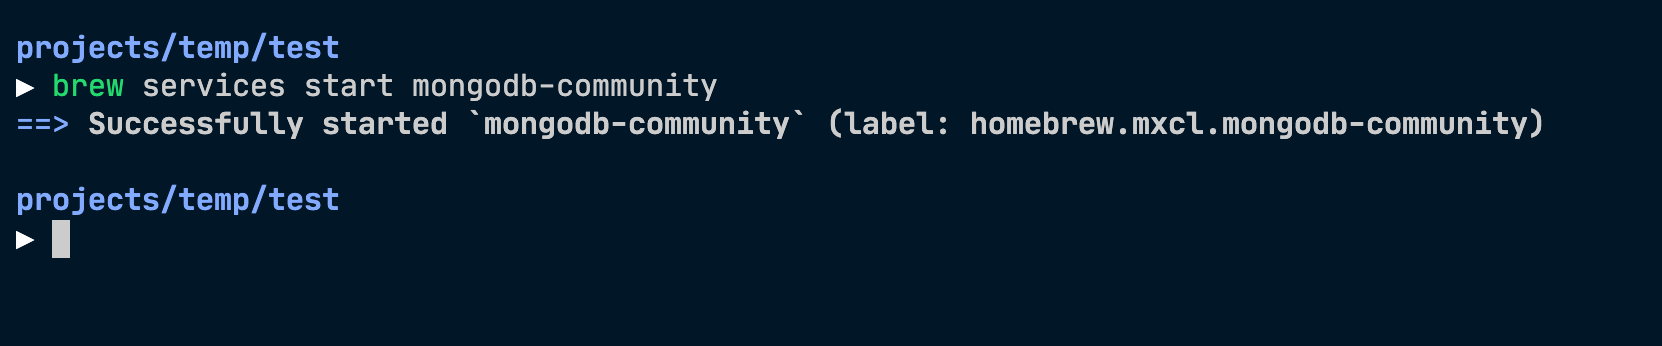
Starting MongoDB
Use this command:
MongoDB will start as a background service. Here’s what you’ll see:
You can use start instead of run . start will start MongoDB automatically when you login into your Macbook. I prefer run since I don’t want MongoDB to be running all the time.
Checking if MongoDB is running
Use this command:
Homebrew will list all running services. If MongoDB is running, mongodb-community will have a status set to started .

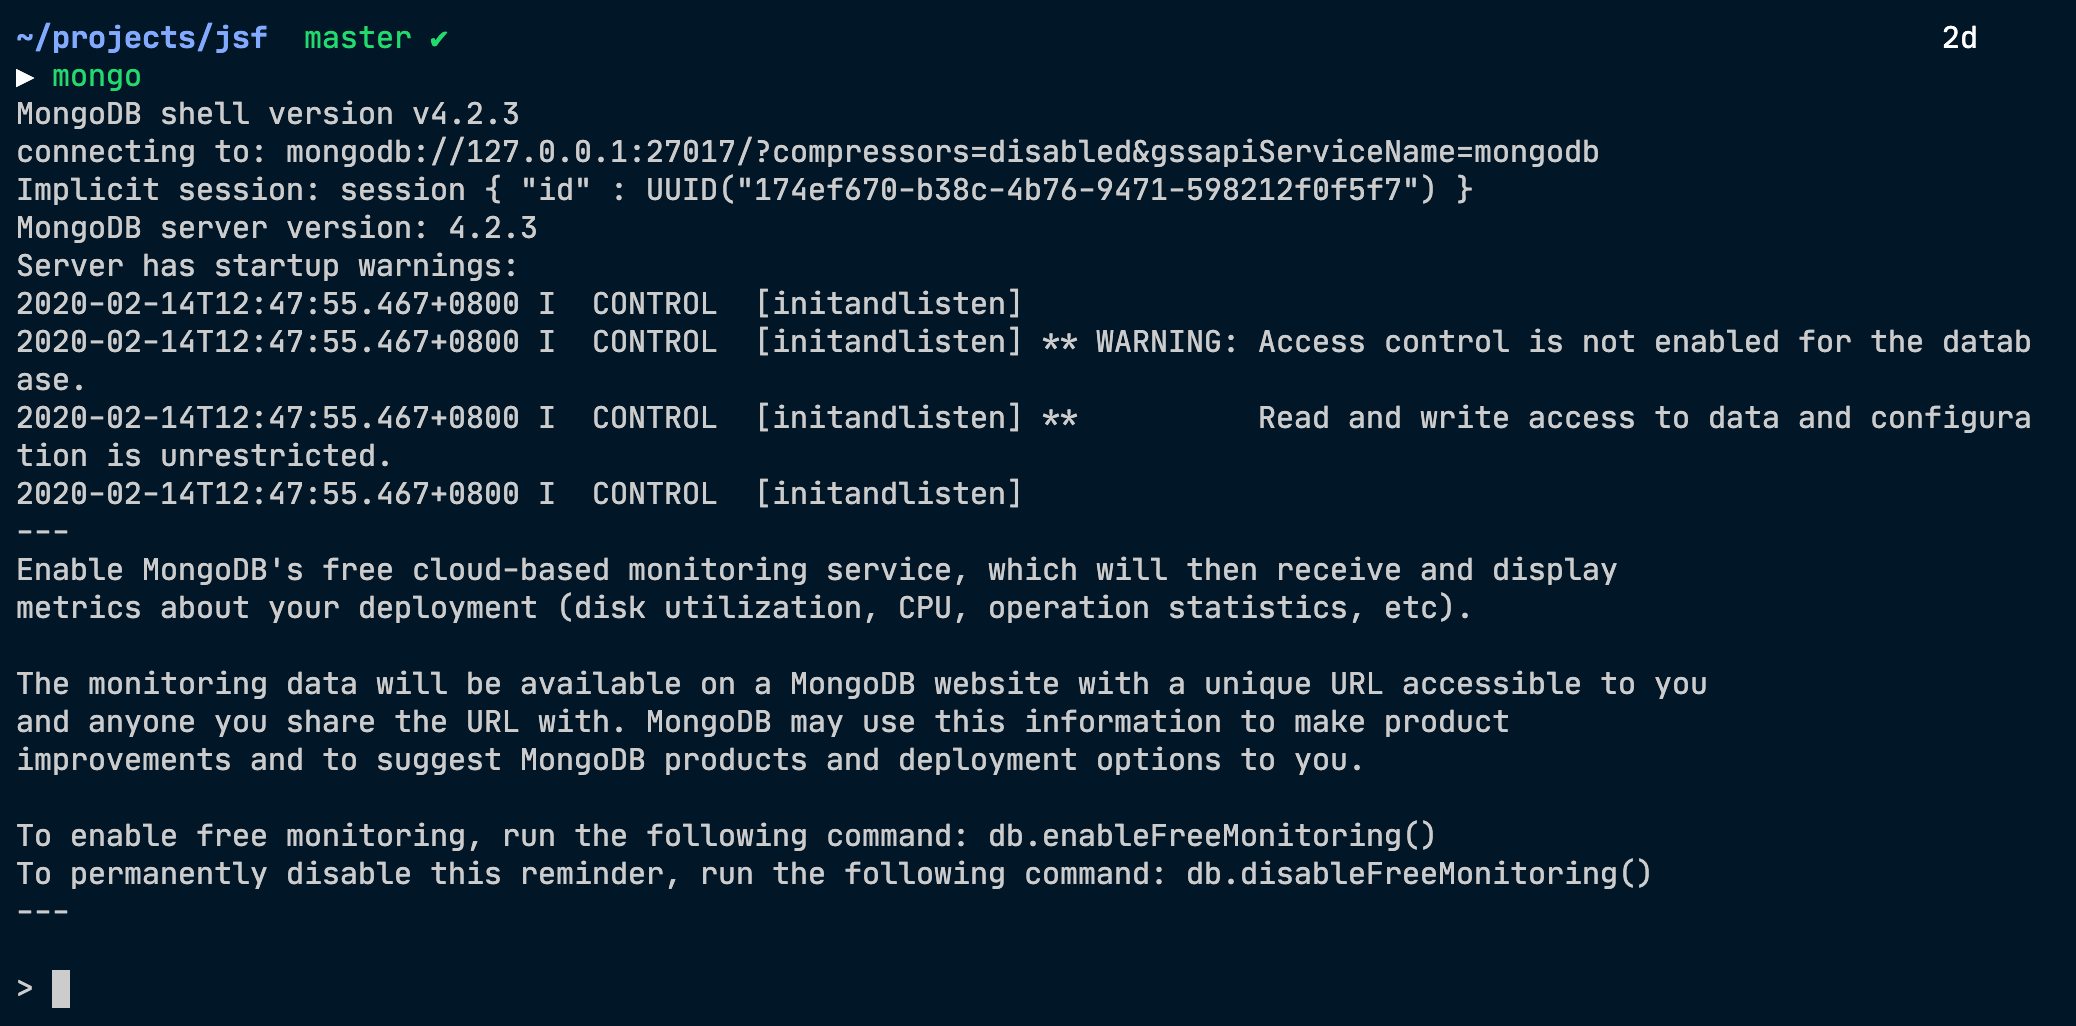
The Mongo Shell
If MongoDB is running, you should be able to access the Mongo shell with the mongo command.
Stopping MongoDB
Use this command:
Homebrew will stop MongoDB and let you know.

Aliases to make these easier
It’s a chore typing brew services run mongodb-community every time I want to start MongoDB.
I created some aliases to make things easier for me. Here are my aliases:
What’s next?
If you haven’t already, you should learn how to set up a local MongoDB connection.
If you enjoyed this article, please tell a friend about it! Share it on Twitter. If you spot a typo, I’d appreciate if you can correct it on GitHub. Thank you!
Источник
How to install MongoDB on macOS using Homebrew
December 06, 2020 • Atta
In an earlier article, I wrote about how to install the MongoDB community edition on Ubuntu operating system. Today, you’ll learn to install the MongoDB community edition on macOS Catalina and higher.
Creating Data Folder
Before you install and use MongoDB, you need to create a data/db folder on your computer for storing MongoDB data.
Before macOS Catalina, you can create this folder in the user’s root directory with the following command:
If you are on macOS Catalina or Big Sur (or any future release), you can not use the root folder for this purpose. macOS Catalina runs in a read-only system volume, separate from other files on the system.
Apple created a secondary volume on Catalina that you need to use for storing MongoDB data folder:
Installing MongoDB
You can install the MongoDB community edition with Homebrew. If Homebrew is not already installed, execute the following command first:
Now update Homebrew to the latest version:
Next, tap the MongoDB formulae into Homebrew:
Finally, execute the following command to install the MongoDB community edition:
That’s it. MongoDB is now installed on your macOS computer.
Managing MongoDB Service
To manage MongoDB on your macOS computer, you can use the brew services command.
First of all, install brew services by tapping homebrew/services :
To start the MongoDB service, you use the following command:
The above command will start MongoDB as a background service. Here’s what you will see on the terminal:
Note: You can also use the run command instead of start . The start command will configure MongoDB to automatically start when you log into your Macbook. If you do not want to run MongoDB all the time, use the run command instead.
To check the current status of the MongoDB service, issue the following command:
The above command will output something like below:
You can stop the service anytime by typing:
If you want to restart the service, use the following command:
Creating Aliases
To make your life easier, you can also create aliases for managing MongoDB service. Just add the following to
Next source the
/.zshrc file to load aliases:
Now you can use aliases to manage your MongoDB service:
Conclusion
That’s all folks for today. In this article, we learned how to install the MongoDB community edition on macOS Catalina and higher.
We use the Homebrew package manager to install MongoDB binaries and to manage MongoDB service.
If you enjoy reading this article, don’t forget to share it with your friends and followers.
✌️ Like this article? Follow me on Twitter and LinkedIn. You can also subscribe to RSS Feed.
Источник


