- Установка и настройка SNMP в CentOS
- Установка агента SNMP и утилит диагностики в CentOS Linux
- Настройка SNMP агента в CentOS
- Опрос SNMP агента с помощью утилиты snmpwalk
- Настройка протокола SNMP v3 в CentOS
- Linux SNMP: Simple Network Management Protocol:
- Installation:
- Configure:
- Start:
- Installation:
- Net-Snmp on Ubuntu
- Contents
- Getting the sources
- Setting the Environment
- Ubuntu Dependencies
- Configuring & Installing
Установка и настройка SNMP в CentOS
Протокол SNMP (Simple Network Management Protocol) используется для получения информации о текущем состоянии серверов, сетевых устройств, принтеров и другого IP оборудования (можно собирать различные метрики: загрузка CPU, количество процессов, состояние служб и многое другое). Основные преимущества SNMP – он поддерживается практически на любых устройствах и не требует установки отдельного агента системы мониторинга. В этой статье мы рассмотрим, как установить и настроить SNMP агент (и SNMP v3) на сервере под управлением Linux CentOS 8.
Установка агента SNMP и утилит диагностики в CentOS Linux
Перед установкой пакетов SNMP, сначала установите на сервере последние обновления с помощью пакетного менеджера dnf (yum):
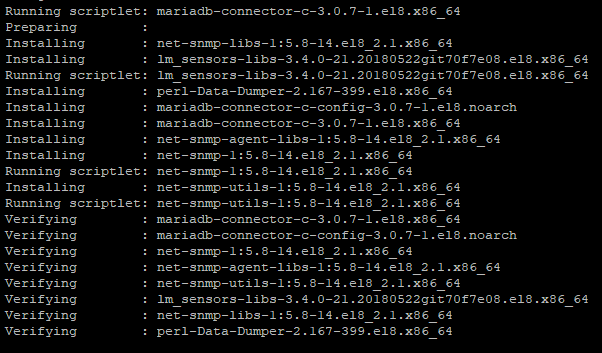
Затем установите агент SNMP и дополнительные утилиты из стандартного репозитория:
# dnf install net-snmp net-snmp-utils -y
Настройка SNMP агента в CentOS
Перед началом настройки параметров SNMP сервиса, создайте копию оригинального конфигурационного файла:
# mv /etc/snmp/snmpd.conf /etc/snmp/snmpd.conf.orig
Теперь отредактируйте настройки SNMP агента:
Добавьте следующие строки:
Сохраните файл (локацию и почтовый ящик желательно указать корректные). Теперь нужно добавить в автозагрузку сервис snmpd и запустить его:
# systemctl enable snmpd.service
# systemctl start snmpd
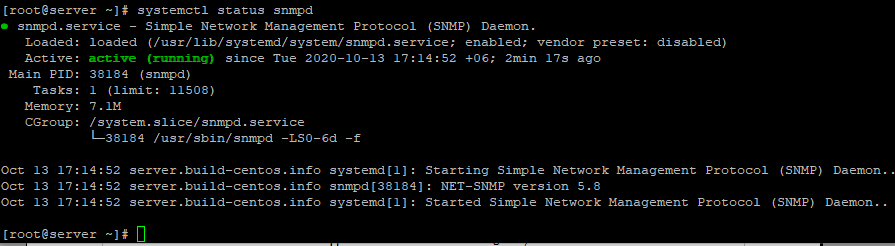
Проверьте, что сервис запущен:
# systemctl status snmpd
Если на сервере используется файерволл, нужно разрешить подключение к портам 161 и 162 TCP/UDP. Для firewalld в CentOS можно выполнить такие команды:
# firewall-cmd —zone=public —add-port=161/udp —permanent
# firewall-cmd —zone=public —add-port=161/tcp –permanent
# firewall-cmd —zone=public —add-port=162/udp —permanent
# firewall-cmd —zone=public —add-port=162/tcp —permanent
# firewall-cmd —reload
Опрос SNMP агента с помощью утилиты snmpwalk
С помощью утилиты snmpwalk вы можете опросить SNMP агент. Для локальной проверки службы по протоколу SMMPv2 используется команда:
# snmpwalk -v 2c -c public -O e 127.0.0.1
Если SNMP настроен корректно, вы получите от агента набор SNMP данных.
Решилось она очисткой всего конфигурационного файла и добавлением только тех строчек, которые я указал в статье. Если вам нужны будут какие-то специфичные настройки, внимательно проверяйте все, так как сам сервис запускается без проблем, но фактически он не работает.
Также вы можете опросить сервер локально командой:
# snmpwalk -v2c -c public localhost system
Затем проверьте, что ваш SNMP агент доступен удаленно. Выполните следующую команду с другого сервера (нужно предварительно установить утилиты snmp):
# snmpwalk -v2c -c public 10.10.22.225 system
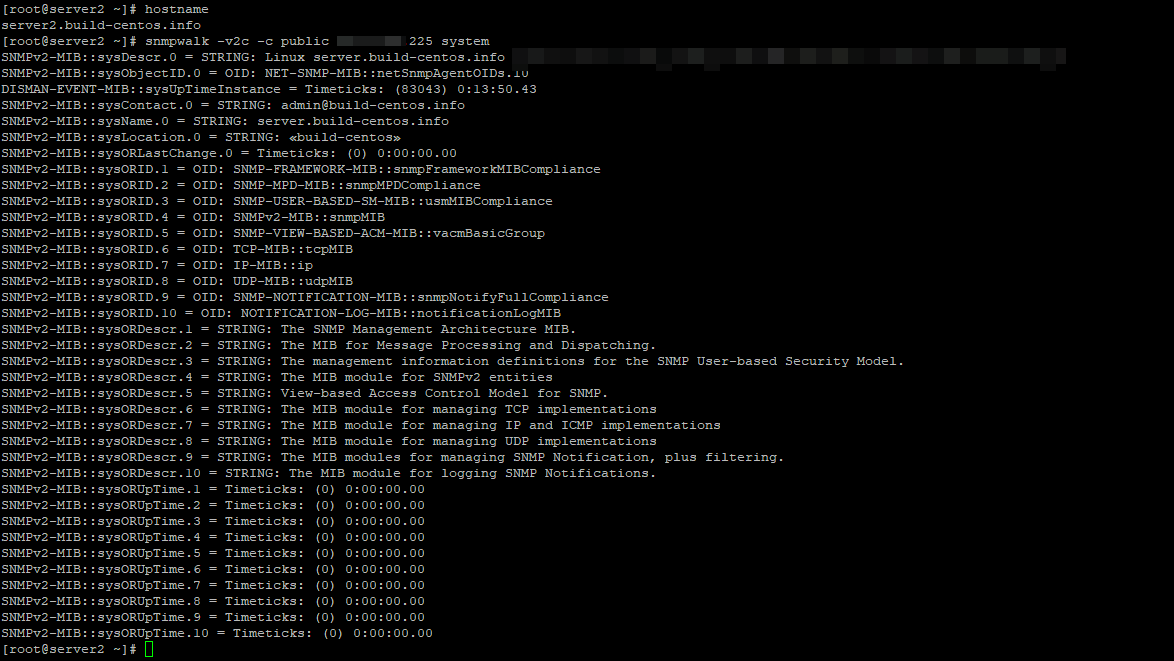
Как видите, удаленный сервер получил с сервера информацию по протоколу SNMP. Теперь вы можете добавить сервер в любую из систем мониторинга, работающую по SNMP (например, Zabbix или Cacti).
Настройка протокола SNMP v3 в CentOS
В первой части статьи мы рассматривали, как настроить SNMP агент, который работает по версиям протокола 1 и 2. SNMPv3 – это более современная и безопасная версия протокола. Оно из преимуществ которого — возможность аутентификации и шифрования. Для настройки SNMPv3 вам нужно создать отдельного пользователя с паролем, задать пароль шифрования, права доступа и алгоритм шифрования (MD5 или SHA).
Чтобы создать пользователя для SNMP v3, нужно остановить сервис snmpd:
# systemctl stop snmpd
Теперь можно создать пользователя:
# net-snmp-create-v3-user -ro -A 123456789 -a SHA -X 1234567890 -x AES snmpuser
net-snmp-create-v3-user [-ro] [-A authpass] [-a MD5|SHA] [-X privpass][-x DES|AES] [username]
- -ro — read-only, то есть пользователь только для чтения
- Authpass — пароль аутентификации
- Privpass — приватный ключ
- Username — пользователь
После запуска команды, у вас будет создан пользователь с заданными паролем и ключом:

# systemctl start snmpd
Попробуйте опросить SNMP агент с помощью утилиты snmpwalk (обратите внимание, для опроса по SNMPv3 нужно указывать имя пользователя, пароль и ключ).
# snmpwalk -v3 -a SHA -A 123456789 -x AES -X 1234567890 -l authPriv -u snmpuser localhost | head
Теперь вы смело можете добавлять свой сервер в любую систему мониторинга, работающую по SNMP.
Источник
Linux SNMP: Simple Network Management Protocol:
Installing and using SNMP on Linux
Related YoLinux Tutorials:
SNMP or Simple Network Management Protocol, is a technology standard for alert messages (trap), monitoring (get), and configuring (set) network devices. SNMP comes in three varieties: v1, v2 and v3, of which v3 is the only version to be considered secure.
The variables associated with a network device configuration is defined in the Management Information Base, or MIB. The MIB is a collection of information for managing the network element and is comprised of managed objects identified by the Object Identifier (OID). Each OID is unique and identifies a special characteristic of the managed network device. SNMP is built upon a client (SNMP manager) — server (SNMP agent/network device) architecture pattern with a message schema defined by the MIB and sent over UDP port 161 (SNMP agent) and port 162 (SNMP manager). Each of the data values defined by the MIB are associated with an OID identified by a hierarchy of numbers separated by periods.
Installation:
- CentOS/RedHat: sudo yum install net-snmp-utils net-snmp net-snmp-devel
(RPMs also included with CentOS/RHEL 6 and 7 install DVDs) - Ubuntu: sudo apt-get install snmp snmpd snmp-mibs-downloader
Configure:
- System file /etc/snmp/snmpd.conf
This file default restricts access to localhost only. - User file
Start:
- CentOS/RedHat:
- sudo systemctl enable snmpd.service
- sudo systemctl start snmpd.service
- sudo systemctl status snmpd.service
- Ubuntu:
- sudo systemctl enable snmpd.service
- sudo systemctl start snmpd.service
- sudo systemctl status snmpd.service
- snmpwalk -v 1 localhost -c public .1.3.6.1
- snmpwalk -v 1 localhost -c public system
[Potential Pitfall] : open up the firewall rules:
- Open firewall to everything (if using iptables): sudo iptables -F
or - if using firewald: sudo firewall-cmd --permanent --new-service=snmp
this command will add service to directory /etc/firewalld/services/
Note: Ports 161 and 162 need to be available. See /etc/services:
- RHEL 7: snmpget -v 1 -c public localhost sysDescr.0 Ubuntu: snmpget -v 1 -c public localhost .1.3.6.1.2.1.1.1.0
- RHEL 7: snmptranslate -Tp | less
MIB files have to be installed on your system so that it understands the schema hierarchy of the system you want to query.
net-snmp-config --default-mibs --default-mibdirs
Look in /usr/share/snmp/mibs/ for a full list of system MIB files.
(CentOS/RHEL only)
| Command | Description |
|---|---|
| snmpcmd | options and behavior common to most of the Net-SNMP command-line tools |
| snmpwalk | retrieve a subtree of management values using SNMP GETNEXT requests |
| snmpget | communicates with a network entity using SNMP GET requests |
| snmpset | communicates with a network entity using SNMP SET requests |
| snmptrap | sends an SNMP notification to a manager (also snmpinform) |
| snmpgetnext | communicates with a network entity using SNMP GETNEXT requests to get the next variable that is lexicographically «next» in the remote entity’s MIB |
| snmptable | retrieve an SNMP table and display it in tabular form |
| snmpdelta | Monitor delta differences in SNMP Counter values |
| snmptest | flexible SNMP application that can monitor and manage information on a network entity |
| snmpdf | display disk space usage on a network entity via SNMP |
| snmpusm | creates and maintains SNMPv3 users on a network entity |
| snmpstatus | retrieves a fixed set of management information from a network entity |
| snmpnetstat | display networking status and configuration information from a network entity via SNMP |
| snmpbulkget | SNMP application that uses the SNMP GETBULK request to query a network entity efficiently for information |
| snmpbulkwalk | retrieve a subtree of management values using SNMP GETBULK requests |
| snmp.conf | configuration files for the Net-SNMP applications |
| SNMP Variables | Format of specifying variable names to SNMP tools |
The Object Identifiers (OID)s are used to identify a specific characteristic of a managed device.
There are two types of Managed OIDs:
- Scalar: managed object with a single instance (a single key to a key-value pair)
- Tabular: multiple data instances such as the rows of a table (e.g. CPU with multiple cores each with its’ own specific charateristics)
SNMP uses ASN.1 (Abstract Syntax Notation One) to define the data types used to build an SNMP message and uses Basic Encoding Rules (BER) to define the data types.
Two data types each with multiple sub-types:
- Primitive Type: type/length(bytes)/data
- integer
- octet (byte, char)
- string
- null
- boolean
- OID
- Complex Type: type/length/(type/length/data)(type/length/data)
- sequence
- SNMP PDU (Protocol Data Unit) — complex data types specific to SNMP
| OID | Description |
|---|---|
| CPU Statistics | |
| .1.3.6.1.4.1.2021.10.1.3.1 | Load 1 minute |
| .1.3.6.1.4.1.2021.10.1.3.2 | Load 5 minute |
| .1.3.6.1.4.1.2021.10.1.3.3 | Load 15 minute |
| .1.3.6.1.4.1.2021.11.9.0 | percentage of user CPU time |
| .1.3.6.1.4.1.2021.11.50.0 | raw user cpu time |
| .1.3.6.1.4.1.2021.11.10.0 | percentages of system CPU time |
| .1.3.6.1.4.1.2021.11.52.0 | raw system cpu time |
| .1.3.6.1.4.1.2021.11.11.0 | percentages of idle CPU time |
| .1.3.6.1.4.1.2021.11.53.0 | raw idle cpu time |
| .1.3.6.1.4.1.2021.11.51.0 | raw nice cpu time |
| Memory Statistics | |
| .1.3.6.1.4.1.2021.4.3.0 | Total Swap Size |
| .1.3.6.1.4.1.2021.4.4.0 | Available Swap Space |
| .1.3.6.1.4.1.2021.4.5.0 | Total RAM in machine |
| .1.3.6.1.4.1.2021.4.6.0 | Total RAM used |
| .1.3.6.1.4.1.2021.4.11.0 | Total RAM Free |
| .1.3.6.1.4.1.2021.4.13.0 | Total RAM Shared |
| .1.3.6.1.4.1.2021.4.14.0 | Total RAM Buffered |
| .1.3.6.1.4.1.2021.4.15.0 | Total Cached Memory |
| Disk Statistics | |
| .1.3.6.1.4.1.2021.9.1.2.1 | Disk path where disk is mounted |
| .1.3.6.1.4.1.2021.9.1.3.1 | Path of the device for the partition |
| .1.3.6.1.4.1.2021.9.1.6.1 | Total size of the disk/partition (kBytes) |
| .1.3.6.1.4.1.2021.9.1.7.1 | Available space on the disk |
| .1.3.6.1.4.1.2021.9.1.8.1 | Used space on the disk |
| .1.3.6.1.4.1.2021.9.1.9.1 | Percentage of space used on disk |
| .1.3.6.1.4.1.2021.9.1.10.1 | Percentage of inodes used on disk |
| System Statistics | |
| .1.3.6.1.2.1.1.3.0 | System uptime |
| .1.3.6.1.2.1.1.5.0 | Host name |
Installation:
- CentOS/RedHat: sudo yum install net-snmp-gui
(uses EPEL repository) - Ubuntu: sudo apt-get install tkmib
Run: tkmib localhost
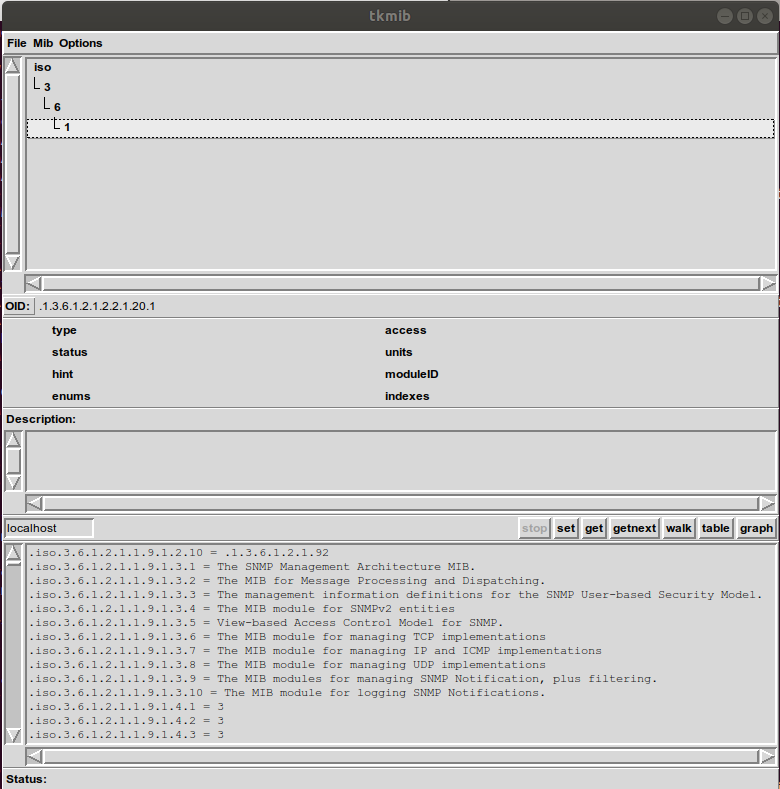
Select the «walk» button to traverse the OIDs.
Источник
Net-Snmp on Ubuntu
Contents
Some rambling from the author
I originally wanted to write a tutorial on configuring and optimizing the net-snmp agent to run on an embedded MIPS platform. The more I thought about the idea, the more I realized — it would have a VERY limited audience. Going over my notes, I discovered something — with the exception of the compiler settings, all my instructions could very well be used to install the agent on a regular x86 ubuntu system. Eureka! And thus this tutorial was born. My idea is that if you understand how to customize the net-snmp agent to run on an ubuntu system following these instructions, you should be in a very good position to modify the instructions to your own platform (and I get a bigger reading audience!).
Getting the sources
You can download the latest sources of net-snmp from here,
Setting the Environment
I advise you to start off with a fresh install of the Ubuntu Desktop edition. Don’t worry — we won’t really need the GUI, but if you are a beginner, it will be useful. Now, open up a terminal window and create a projects directory,
The purpose of the «projects» directory is an organizational measure. I like keeping all the code I work with separate from my «Download» or «Document» or «Home» folders (just messy, doing that). And «abru» is my username (short for Abraham).
Now we need to move the source tarball into the projects folder. If you haven’t downloaded it yet, you can download the sources with the «wget» command (At the time of this writing, 5.6.1 is the latest),
Now lets get about extracting the sources,
It’s not really a must, to the «mv» step above. But doing it here will help keep this tutorial updated (fewer changes with future releases).
Ubuntu Dependencies
If you’ve installed the desktop version of Ubuntu, then there’s only 1 package missing from your install. Get it from the Ubuntu repositories with this,
If instead, you went and installed the server version of ubuntu, then you’ll probably need to get gcc and build-essentails as well — I don’t remember if there were more.
Configuring & Installing
Anyway, with all that out of the way, lets configure the package! Follow these steps,
The configure script will scan your system and prepare the «Makefile» from which we will perform our actual install. configure will ask you a few questions — I just press «enter» and go with the defaults. Now there IS a way to avoid those questions — simple include those options when you call configure. That means running it like this,
Feel free to change those options if you want. I’m just showing what the default settings are. In fact, if you have an embedded build environment and want to automate the whole procedure, passing in those settings is the best way to avoid the user-prompt messages. After a while you should see something like this,
The above means that «configure» has finished running and we can start compiling!
The compiling step is easy, just run «make». Like this,
Depending on how powerful your system is, it can take anywhere between 2 — 4 mins for it to finish. After your done, you can install the net-snmp package to your ubuntu system by running this,
You’ll need to use the «sudo» command as the install will copy over the needed executables to system directories and obviously, you’ll need root permission for that. From a user-perspective, we’re almost done. For the net-snmp applications to work we need to add an export command to our «.bashrc» file. In my case the steps go like this,
With that we’re done. To actually confirm if you’ve got it working try running this (should work from any directory),
If you get the version number correctly, then congratulations !! You’ve installed net-snmp on your Ubuntu system !! 🙂
But if you want to develop stuff with the snmp agent I’d advise you to install the net-snmp Perl libraries too. For that do the following,
What we’ve done is create the Makefiles. Now to compile and install them,
The idea behind the «make test» line is to run checks to see if the installation would work (I think). Unfortunately, its a bit buggy and will return a few failed tests. In spite of it, you can install the perl-dependencies and it will work just fine.
Источник


