- Как установить openssh-server в Ubuntu / Debian
- Установка:
- Подробная информация о пакете:
- Зависимости:
- linux-notes.org
- Установка и настройка OpenSSH-сервера на Linux
- Особенности OpenSSH
- Установка OpenSSH на RHEL / CentOS 5.x/6.x
- Установка OpenSSH на Fedora 15/16/17/18/19
- Установка OpenSSH на основе Debian / Ubuntu
- Как войти в OpenSSH
- Настройка сервера OpenSSH
- RootUsers
- Guides, tutorials, reviews and news for System Administrators.
- How To Enable SSH in Linux Mint
- Enable SSH in Linux Mint
- Summary
- How to Install OpenSSH 8.0 Server from Source in Linux
- Requirements:
- If You Appreciate What We Do Here On TecMint, You Should Consider:
- How to Install and Configure OpenSSH Server In Linux
- What is OpenSSH?
- Why Use OpenSSH And Over Telnet Or Ftp?
- What Are Some Of The OpenSSH Features?
- Installation of OpenSSH in Linux
- On Ubuntu/Debian/Linux Mint
- On RHEL/Centos/Fedora
- Configuration of OpenSSH
- How Do I Connect to OpenSSH
- Conclusion
- If You Appreciate What We Do Here On TecMint, You Should Consider:
Как установить openssh-server в Ubuntu / Debian
Установка:
Для установки openssh-server в Ubuntu / Linux Mint / Debian, введите в Терминал :

Подробная информация о пакете:
Безопасный сервер (SSH) для безопасного доступа с удаленных компьютеров
Зависимости:
Добавлять и удалять пользователей и группы
Система управления конфигурацией Debian
Система управления пакетами Debian
Динамическая библиотека для аудита безопасности
Библиотека GNU C: общие библиотеки
Общая библиотека описания ошибок
Библиотека времени MIT Kerberos — krb5 GSS-API-механизм
Библиотеки времени выполнения MIT Kerberos
Подключаемые модули аутентификации для PAM
Поддержка Runtime для библиотеки PAM
Библиотека подключаемых модулей аутентификации
Общие библиотеки времени выполнения SELinux
Инструментарий Secure Sockets Layer — общие библиотеки
Системная библиотека systemd
Библиотека оберток TCP для Wietse Venema
Функциональность базового сценария Linux Standard Base
Клиент безопасной оболочки (SSH) для безопасного доступа к удаленным компьютерам
Защищенный сервер (SSH) sftp, для доступа SFTP с удаленных компьютеров
Утилиты файловой системы /proc
Обновить файл конфигурации (ов): сохранить изменения пользователя в файлах конфигурации
Источник
linux-notes.org

Установка и настройка OpenSSH-сервера на Linux
Secure Shell (SSH) является сетевым протоколом обеспечения оболочки услуги на удаленной машине по защищенному каналу. OpenSSH является реализацией с открытым исходным кодом протокола SSH, позволяя зашифровать сообщения по сети через набор программного обеспечения.
OpenSSH разработан группой открытого BSD и он выпущен под упрощенное лицензии BSD.

Особенности OpenSSH
1. Open Source проект ;
2. Бесплатная лицензирование;
3. Очень хорошее шифрование (3DES, Blowfish, AES, Arcfour);
4. X11 Forwarding (шифрование X Window System трафика);
5. Перенаправление портов (зашифрованные каналы для традиционных протоколов);
6. Сильная аутентификация (Public Key, Одноразовый пароль и Проверка подлинности Kerberos);
7. Экспедитор (Single-Sign-On);
8. Взаимодействие (Соблюдение SSH 1.3, 1.5 и стандартов протоколов 2,0);
9. SFTP клиент и сервер поддерживают в обоих протоколов SSH1 и SSH2;
10. Сжатие данных.
Установка OpenSSH на RHEL / CentOS 5.x/6.x
Чтобы установить OpenSSH и автоматически включить OpenSSH сервер на CentOS или RHEL необходимо выполнить следующую команду:
Запускаем ssh демон:
Добавим сервис в автозапуск системы (не нужно запускать каждый раз при старте вашей ОС):
Установка OpenSSH на Fedora 15/16/17/18/19
Чтобы установить OpenSSH и автоматически включить OpenSSH сервер на Fedora 15/16/17/18/19 необходимо выполнить следующую команду:
Запустим ssh-демон для работы:
Добавим, по желанию в автозагрузку нашей ОС:
Установка OpenSSH на основе Debian / Ubuntu
Чтобы установить OpenSSH и автоматически включить OpenSSH сервер на основе Debian / Ubuntu, необходимо выполнить следующую команду:
Как войти в OpenSSH
Для входа в систему с Unix-подобной машины, нужно зайти в терминал и в командной строке и ввести:
Настройка сервера OpenSSH
Если вы хотели бы настроить OpenSSH сервер то нужно отредактировать файл конфигурации OpenSSH /etc/ssh/sshd_config .
Есть несколько вариантов, OpenSSH вы можете быть заинтересованы в:
Порт 22 (Port 22).
По умолчанию SSHD прослушивает порт 22 для прослушивания входящих соединений SSH. Изменяя SSH порт по умолчанию, вы можете быть в состоянии предотвратить различные автоматизированные атаки от хакеров.
PermitRootLogin no
Опция PermitRootLogin говорит, может ли суперпользователь войти в систему через SSH.
AllowUsers user1 user2
С помощью опции AllowUsers можно выборочно отключить SSH сервис для конкретных пользователей Linux. Можно указать несколько пользователей, разделенных пробелами.
После изменения /etc/ssh/sshd_config, необходимо перезагрузить SSH сервис.
Чтобы перезапустить OpenSSH на Ubuntu или Debian:
Чтобы перезапустить OpenSSH на CentOS, Fedora или RHEL:
Установка и настройка OpenSSH-сервера на Linux завершена. Если нужно помочь, пишите мне ниже в комментарии и я вам помогу.
Источник
RootUsers
Guides, tutorials, reviews and news for System Administrators.
How To Enable SSH in Linux Mint
By default OpenSSH server is not installed in Linux Mint. This quick guide will show you how to install and enable SSH in Linux Mint, allowing you to remotely access the operating system over the network through SSH.
Enable SSH in Linux Mint
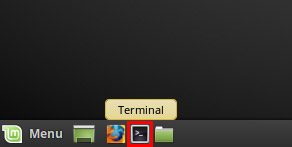
- Open Terminal
We’ll be doing this through command line, so begin by first opening up a terminal. You can find the terminal icon in the task bar in a default GUI installation, as shown below.
Install OpenSSH Server
Within the terminal, run the following command as root to install the OpenSSH server package.
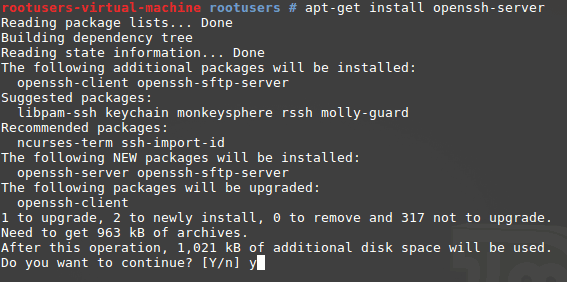
Note: You must do this with root privileges, otherwise you will receive the following error message:
You can become root by running ‘sudo su’, followed by your password. By default the first account that you create when you install Linux Mint should be able to become root.
Check OpenSSH Status
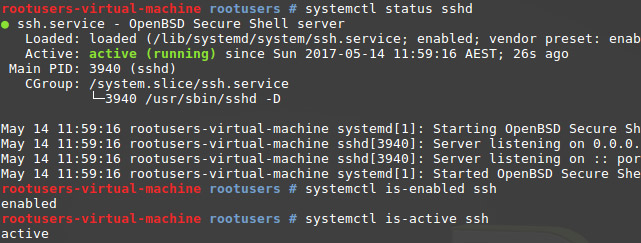
Once installed SSH should be automatically configured to start on system boot, and be already running. We’ll of course check this though rather than just assuming!
We can use ‘systemctl is-enabled’ as shown below to check that ssh is enabled to start automatically on system boot. If it comes back with ‘enabled’ then SSH should automatically start up on boot. If it’s disabled, you can run ‘systemctl enable ssh’ to enable to to start up on system boot.
We can then use ‘systemctl is-active’ as shown below to check that ssh is currently active and running. If it comes back with ‘active’ then SSH is currently running. If it’s not running, you can run ‘systemctl start ssh’ to start it up.
We can also use ‘systemctl status’ to get a quick overview of all information, in the example below we can see that it’s actively running as well as various useful information about the service.
Testing SSH Access
In this example we have confirmed that SSH is configured to start up on system boot automatically and is currently running, so let’s try and SSH to it from an external Windows system! We’ll do this using PuTTY.
You can display the IP address of the Linux Mint machine by running ‘ip a’ from the terminal.
We can see here that the IP address of our Linux Mint system is 192.168.1.20, so we’ll SSH to this using PuTTY from Windows. All you need to do is specify your username and password.
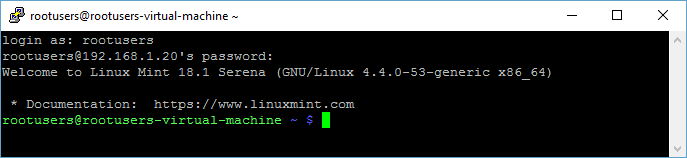
Note that by default the user ‘root’ will not have SSH access. This behaviour can be modified by editing the PermitRootLogin value in the ‘/etc/ssh/sshd_config’ file and then restarting SSH.
That’s all there is too it! We have now successfully established an SSH connection from Windows to Linux Mint, allowing us to remotely administer the Linux system over the network by running various commands via SSH.
Summary
By default Linux Mint does not have OpenSSH server installed. We have shown you how to quickly install and enable SSH in Linux Mint. Once installed we checked that it was configured to automatically start up on system boot and that it was running. Finally we connected to Linux Mint via SSH with PuTTY from a Windows computer.
Источник
How to Install OpenSSH 8.0 Server from Source in Linux
OpenSSH is a free and open source, full implementation of the SSH protocol 2.0. It provides a number of tools for securely accessing and managing remote computer systems, and managing authentications keys, such as ssh (a secure replacement for telnet), scp, sftp (secure replacement for ftp), ssh-keygen, ssh-copy-id, ssh-add, and more.
Recently OpenSSH 8.0 was released and ships in with many new features and bug fixes; you can read the release notes for more information.
In this article, we will explain how to install and configure the latest version of OpenSSH 8.0 server and client on a Linux system from sources. We assume that you have an existing installation of OpenSSH suite.
Requirements:
- A Debian/Ubuntu or RHEL/CentOS Linux system
- C compiler
- Zlib 1.1.4 or 1.2.1.2 or greater
- LibreSSL or OpenSSL >= 1.0.1
From the above result, the installed OpenSSH version is 7.7, to install latest OpenSSH version, first you need to install few dependencies, i.e development tools or build essentials and the other required packages, as follows.
To create a proper environment for installing OpenSSH version 8.0 server, we need to to create a new system user and group named “sshd”, as well as a safe place to chroot.
Note: Generally, if you have an existing installation, this environment should already be in place, you can skip this section and go to the next. Otherwise, run the following commands to set it up.
Explaining the flags in the useradd command above:
- -r – tells useradd to create a system user
- -U – instructs it to create a group with the same name and group ID
- -d – specifies the users directory
- -c – used to add a comment
- -s – specifies the user’s shell
Now, download the tarball of OpenSSH version 8.0 from any of the available HTTP mirrors or you can use following wget command to download directly in your terminal.
Now we will build and install OpenSSH server using the —with-md5-passwords , —with-privsep-path and —sysconfdir options, which will install all the files in /usr/local/ (this is the default installation PREFIX).
You can see all available options by running ./configure -h and customize your installation further.
For instance, to enable PAM and SELinux support, add the —with-pam and —with-selinux options, respectively, you need to install all the necessary header files for them to work.
Once you have installed OpenSSH, restart SSH or open another terminal windows and check the version of OpenSSH now installed on your system.
The various OpenSSH configuration files located at:
/.ssh/* – this directory stores user specific ssh client configurations (ssh aliases) and keys.
You might also like to read these following SSH related articles.
That’s it! In this article, we’ve explained how to install and configure the latest version of OpenSSH server and client on a Linux system. If you have any questions or comments, use the feedback form below to reach us.
If You Appreciate What We Do Here On TecMint, You Should Consider:
TecMint is the fastest growing and most trusted community site for any kind of Linux Articles, Guides and Books on the web. Millions of people visit TecMint! to search or browse the thousands of published articles available FREELY to all.
If you like what you are reading, please consider buying us a coffee ( or 2 ) as a token of appreciation.

We are thankful for your never ending support.
Источник
How to Install and Configure OpenSSH Server In Linux
Being a network administrator requires a deep knowledge about remote login protocols such as rlogin, telnet and ssh. The one I will discuss in this article is ssh, a secure remote protocol which is used to work remotely on other machines or transfer data between computers using SCP (Secure Copy) command. But, what is OpenSSH and how to install it in your Linux distribution?
![]() Install OpenSSH in Linux
Install OpenSSH in Linux
What is OpenSSH?
OpenSSH is a free open source set of computer tools used to provide secure and encrypted communication over a computer network by using the ssh protocol. Many people, new to computers and protocols, create a misconception about OpenSSH, they think it is a protocol, but it is not, it is a set of computer programs that use the ssh protocol.
OpenSSH is developed by the Open BSD group and it is released under Simplified BSD License. A main factor which has made possible for OpenSSH to be used so much among system administrators is its multi-platform capability and very useful nice features it has. The latest version is OpenSSH 6.4 which has been released on November 8, 2013.
This version of OpenSSH comes with many new features and patches, so if you already use OpenSSH for administering your machines, I suggest you to do an upgrade.
Why Use OpenSSH And Over Telnet Or Ftp?
The most important reason why should use OpenSSH tools over ftp and telnet is that all communications and user credentials using OpenSSH are encrypted, they are also protected from man in the middle attacks. If a third party tries to intercept your connection, OpenSSH detects it and informs you about that.
What Are Some Of The OpenSSH Features?
- Secure Communication
- Strong Encryption (3DES, Blowfish, AES, Arcfour)
- X11 Forwarding (encrypt X Window System traffic)
- Port Forwarding (encrypted channels for legacy protocols)
- Strong Authentication (Public Key, One-Time Password and Kerberos Authentication)
- Agent Forwarding (Single-Sign-On)
- Interoperability (Compliance with SSH 1.3, 1.5, and 2.0 protocol Standards)
- SFTP client and server support in both SSH1 and SSH2 protocols.
- Kerberos and AFS Ticket Passing
- Data Compression
Installation of OpenSSH in Linux
To install OpenSSH, open a terminal and run the following commands with superuser permissions.
On Ubuntu/Debian/Linux Mint
On RHEL/Centos/Fedora
Type the following yum command to install openssh client and server.
Configuration of OpenSSH
It’s time to configure our OpenSSH behaviour through the ssh config file, but before editing the /etc/ssh/sshd_config file we need to backup a copy of it, so in case we make any mistake we have the original copy.
Open a terminal and run the following command to make a copy of the original sshd configuration file.
As you can see from the command I typed, I added the original_copy suffix, so every time I see this file I know it is an original copy of the sshd config file.
How Do I Connect to OpenSSH
Before we go further, we need to verify if our openssh server is working or not. How to do that? You can try to connect to the openssh server from your localhost through your openssh client or do a portscan with nmap, but I like to use a small tool called netcat, also known as the TCP/IP Swiss army knife. I love working with this amazing tool on my machine, so let me show it to you.
Referring to the netcat results, the ssh service is running on port 22 on my machine. Very good! What if we want to use another port, instead of 22? We can do that by editing the sshd configuration file.
Set your OpenSSH to listen on TCP port 13 instead of the default TCP port 22. Open the sshd_config file with your favourite text editor and change the port directive to 13.
Restart OpenSSH server so the changes in config file can take place by typing the following command and run netcat to verify if the port you set for listening is open or not.
Should we verify is our openssh server is listening on port 13, or not?. This verification is necessary, so I am calling my lovely tool netcat to help me do the job.
Do you like to make your openssh server display a nice login banner? You can do it by modifying the content of /etc/issue.net file and adding the following line inside the sshd configuration file.
Conclusion
There are many things you can do with the openssh tools when it comes to the way you configure your openssh server, I can say that your imagination is the limit!.
If You Appreciate What We Do Here On TecMint, You Should Consider:
TecMint is the fastest growing and most trusted community site for any kind of Linux Articles, Guides and Books on the web. Millions of people visit TecMint! to search or browse the thousands of published articles available FREELY to all.
If you like what you are reading, please consider buying us a coffee ( or 2 ) as a token of appreciation.
We are thankful for your never ending support.
Источник


