- Как установить PostgreSQL с pgAdmin4 на Linux Mint 20
- Шаг 1: Установите базу данных PostgreSQL на Linux Mint
- Шаг 2: Установите pgAdmin4 на Linux Mint
- Как установить PostgreSQL на Linux Mint 20
- Как установить PostgreSQL на Linux Mint 20
- Установите PostgreSQL на Linux Mint 20 Ulyana
- Шаг 1. Во-первых, убедитесь, что все ваши системные пакеты обновлены, выполнив следующие apt команды в терминале.
- Шаг 2. Установка PostgreSQL на Linux Mint.
- Шаг 3. Роли и базы данных PostgreSQL.
- Шаг 4. Доступ к командной строке PostgreSQL.
- How to Install PostgreSQL with pgAdmin4 on Linux Mint 20
- Step 1: Install PostgreSQL Database on Linux Mint
- Step 2: Install pgAdmin4 on Linux Mint
- If You Appreciate What We Do Here On TecMint, You Should Consider:
- How to Install PostgreSQL 10 on Linux Mint 18.3 Sylvia
- So why Postgres?
- Installation steps for PostgreSQL on Linux Mint
- Add the PostgreSQL Package Source for Your Linux Distribution
- Add the PGDG APT source file
- Add the PostgreSQL Package Repository Key
- Update, Upgrade, and Install PostgreSQL
- Configuring Postgres for Use
- The postgres user
- The postgres database
- The psql Command Line Utility
- Create super user account
- Login using our newly created account
- Create test database
- Optional step
- Final Words
Как установить PostgreSQL с pgAdmin4 на Linux Mint 20
pgAdmin — это многофункциональный инструмент управления интерфейсом с открытым исходным кодом. Который позволяет легко администрировать и управлять реляционной базой данных PostgreSQL из веб-браузера.
Он обеспечивает простой в использовании пользовательский интерфейс, который упрощает создание и мониторинг баз данных, а так же объектов базы данных. PgAdmin 4 является улучшением более раннего инструмента pgAdmin и доступен для систем Linux, Windows, macOS.
В этой статье вы узнаете, как установить PostgreSQL с помощью pgAdmin4 на Linux Mint 20.
Шаг 1: Установите базу данных PostgreSQL на Linux Mint
1. Для начала запустите терминал и обновите пакеты с помощью диспетчера пакетов apt, как показано ниже.
После завершения обновления перейдите к следующему шагу.
Поскольку pgAdmin4 предоставляет интерфейс frontend для управления объектами базы данных PostgreSQL. Очень важно сначала установить PostgreSQL.
2. Для этого требуется установить пакет postgresql и postgresql-contrib, который предлагает расширение функций PostgreSQL.
$ sudo apt install postgresql postgresql-contrib
3. Обычно PostgreSQL запускается автоматически при загрузке. Вы можете подтвердить это с помощью приведенной ниже команды:
$ sudo systemctl status postgresql
4. Чтобы войти в PostgreSQL, для начала переключитесь на пользователя postgres. Пользователь Postgres входит в комплект поставки по умолчанию вместе с установкой PostgreSQL. Затем выполните команду psql, как показано на рисунке.
5. Кроме того, вы можете проверить, принимает ли сервер базы данных входящие соединения.
Шаг 2: Установите pgAdmin4 на Linux Mint
pgAdmin4 доступен для Ubuntu 16.04 и более поздних версий. Он его можно установить с помощью APT package manager. Разработчики Pgadmi4 еще не включили поддержку Linux Mint позволяющую пользователям легко устанавливать инструмент управления фронтендом с помощью APT package manager.
6. Единственный жизнеспособный вариант — это установить pgAdmin4 из виртуальной среды. Итак, для начала мы установим необходимые пакеты, как показано на рисунке.
$ sudo apt install libgmp3-dev build-essential libssl-dev
7. Затем установите виртуальную среду Python и связанные с ней зависимости.
$ sudo apt install python3-virtualenv python3-dev libpq-dev
8. Далее создайте каталог, в котором вы будете создавать виртуальную среду.
9. Затем создайте виртуальную среду, как показано ниже. Здесь pgadmin4env — это имя виртуальной среды.
10. Как только виртуальная среда установлена, активируйте ее, как показано ниже.
11. Затем требуется использовать инструмент pip для установки pgadmin4.
12. Далее создайте файл конфигурации config_local.py.
$ sudo nano pgadmin4env/lib/python3.8/site-packages/pgadmin4/config_local.py
И добавьте в этот файл строки которые написаны ниже.
import os
DATA_DIR = os.path.realpath(os.path.expanduser(u’
/.pgadmin/’))
LOG_FILE = os.path.join(DATA_DIR, ‘pgadmin4.log’)
SQLITE_PATH = os.path.join(DATA_DIR, ‘pgadmin4.db’)
SESSION_DB_PATH = os.path.join(DATA_DIR, ‘sessions’)
STORAGE_DIR = os.path.join(DATA_DIR, ‘storage’)
SERVER_MODE = False
13. Чтобы запустить средство управления pgAdmin4, вызовите команду:
14. Теперь, перейдите в свой браузер и введите адрес указанный ниже.
Вам будет предложено установить мастер-пароль, поэтому установите надежный пароль и нажмите кнопку «ОК«.
 Установить Пароль PgAdmin4
15. Чтобы упростить задачу, вы можете создать алиас (псевдоним) в файле
/.bashrc, как показано ниже.
16. Затем обновите файл bashrc.
17. Ну и теперь наконец вы можете запустить инструмент управления pgAdmin4, просто вызвав команду startpg.
Еще раз зайдите в свой браузер и войдите в интерфейс PgAdmin4. На этом установка pgAdmin4 в Linux Mint завершается.
Источник
Как установить PostgreSQL на Linux Mint 20
Как установить PostgreSQL на Linux Mint 20
В этом руководстве мы покажем вам, как установить PostgreSQL на Linux Mint 20. Для тех из вас, кто не знал, PostgreSQL — это система управления реляционными базами данных, которая обеспечивает реализацию языка запросов SQL. Он соответствует стандартам и имеет множество расширенных функций, таких как надежные транзакции и параллелизм без блокировок чтения.
В этой статье предполагается, что у вас есть хотя бы базовые знания Linux, вы знаете, как использовать оболочку, и, что наиболее важно, вы размещаете свой сайт на собственном VPS. Установка довольно проста и предполагает, что вы работаете с учетной записью root, в противном случае вам может потребоваться добавить ‘ sudo ‘ к командам для получения привилегий root. Я покажу вам пошаговую установку PostgreSQL на Linux Mint 20 (Ульяна).
Установите PostgreSQL на Linux Mint 20 Ulyana
Шаг 1. Во-первых, убедитесь, что все ваши системные пакеты обновлены, выполнив следующие apt команды в терминале.
Шаг 2. Установка PostgreSQL на Linux Mint.
Давайте установим сервер Postgresql, используя следующую команду:
Дождитесь завершения процесса установки. По умолчанию служба PostgreSQL запускается автоматически после установки. Вы можете подтвердить, что он запущен, с помощью команды:
Шаг 3. Роли и базы данных PostgreSQL.
И пользователь, и группа представлены в PostgreSQL как термины-роли для обработки прав доступа к базе данных. Ident , Trust , Password И Peer различные методы аутентификации в PostgreSQL. Ident метод в основном используется для соединения TCP / IP, в то время Trust как метод используется для подключения без пароля с использованием заданных критериев в файле. pg_hba . conf
Шаг 4. Доступ к командной строке PostgreSQL.
После установки сервера базы данных PostgreSQL по умолчанию он создает пользователя postgres с ролью postgres . Он также создает системную учетную запись с тем же именем ‘ postgres ‘. Итак, чтобы подключиться к серверу Postgres, войдите в свою систему как пользователь Postgres и подключите базу данных:
Теперь вы вошли на сервер базы данных PostgreSQL. Чтобы проверить информацию для входа в систему, используйте следующую команду из командной строки базы данных:
Чтобы отключиться от командной строки базы данных PostgreSQL, просто введите приведенную ниже команду и нажмите клавишу ВВОД. Он вернет вас обратно в командную строку Ubuntu:
Создайте нового пользователя и базу данных:
Поздравляю! Вы успешно установили PostgreSQL . Благодарим за использование этого руководства для установки последней версии PostgreSQL в системе Linux Mint. Для получения дополнительной помощи или полезной информации мы рекомендуем вам посетить официальный сайт PostgreSQL .
Источник
How to Install PostgreSQL with pgAdmin4 on Linux Mint 20
pgAdmin is an open-source feature-rich, frontend management tool that allows you to easily administer and manage your PostgreSQL relational database from a web browser.
It provides an easy-to-use user interface that simplifies the creation and monitoring of databases and database objects. PgAdmin 4 is an improvement of the earlier pgAdmin tool and is available for Linux, Windows, macOS systems, and even a Docker container.
In this tutorial, you will learn how to install PostgreSQL with pgAdmin4 on Linux Mint 20.
Step 1: Install PostgreSQL Database on Linux Mint
1. To start off, launch your terminal and update your packages using the apt package manager as shown.
Once the update is complete, proceed to the next step.
Since pgAdmin4 provides a frontend interface for the management of PostgreSQL database objects, it’s essential to have PostgreSQL installed first.
2. To do this, we are going to install the postgresql package and postgresql-contrib which offers extended features that extend the functionality of PostgreSQL.
![]() Install PostgreSQL on Linux Mint
Install PostgreSQL on Linux Mint
3. Usually, PostgreSQL starts automatically on boot up. You can confirm this using the command given below:
![]() Check PostgreSQL Status
Check PostgreSQL Status
4. To log in to your PostgreSQL instance, first switch to the postgres user. The Postgres user comes included by default with the installation of PostgreSQL. Then run the psql command as shown.
![]() Connect to PostgreSQL Shell
Connect to PostgreSQL Shell
5. Additionally, you can check if the database server is accepting incoming connections as shown.
![]() Check PostgreSQL Accepting Incoming Connections
Check PostgreSQL Accepting Incoming Connections
Step 2: Install pgAdmin4 on Linux Mint
pgAdmin4 is available for Ubuntu 16.04 and later versions and can easily be installed using the APT package manager. The same cannot support Linux Mint 20 and Pgadmi4 developers are yet to include support that allows users to easily install the frontend management tool using the APT package manager.
6. The only viable option is to install pgAdmin4 from a virtual environment. So first, we will install the prerequisite packages as shown.
![]() Install Prerequisite Packages
Install Prerequisite Packages
7. Next, install the Python virtual environment and associated dependencies.
![]() Install Python Virtual Environment
Install Python Virtual Environment
8. Next, create a directory where you will create a virtual environment.
9. Then create the virtual environment as shown. Here, pgadmin4env is the name of the virtual environment.
![]() Create Virtual Environment for pgAdmim4
Create Virtual Environment for pgAdmim4
10. Once the virtual environment is in place, activate it as shown.
11. Then use the pip tool to install pgadmin4 as shown.
![]() Install PgAdmin4 in Linux Mint
Install PgAdmin4 in Linux Mint
12. Next, create a configuration file config_local.py.
and add the lines below.
![]() Create PgAdmin4 Configuration
Create PgAdmin4 Configuration
13. To start the pgAdmin4 management tool, invoke the command:
![]() Start PgAdmin4 Service
Start PgAdmin4 Service
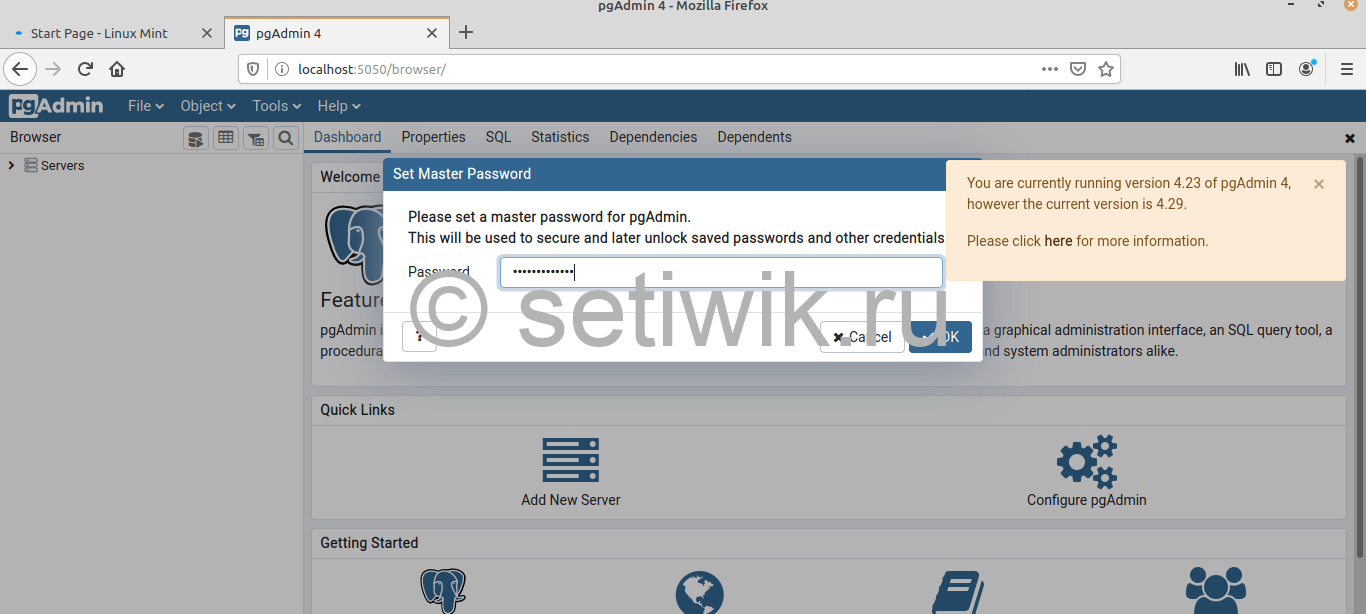
14. Finally, head over to your browser and browse the address shown.
You will be prompted to set the master password, so proceed and set a strong password and click the ‘Ok’ button.
![]() Set PgAdmin4 Password
Set PgAdmin4 Password
15. To make things easier, you can create an alias in the
/.bashrc file as shown.
16. Next, update the bashrc file.
17. Finally, you can start the pgAdmin4 management tool by simply invoking the startpg command.
![]() Start PgAdmin4 Tool
Start PgAdmin4 Tool
Once again head over to your browser and log in to the PgAdmin4 interface. And this concludes the installation of pgAdmin4 on Linux Mint.
If You Appreciate What We Do Here On TecMint, You Should Consider:
TecMint is the fastest growing and most trusted community site for any kind of Linux Articles, Guides and Books on the web. Millions of people visit TecMint! to search or browse the thousands of published articles available FREELY to all.
If you like what you are reading, please consider buying us a coffee ( or 2 ) as a token of appreciation.

We are thankful for your never ending support.
Источник
How to Install PostgreSQL 10 on Linux Mint 18.3 Sylvia
The installation process for Postgres on Ubuntu or Linux Mint is, like a lot of things in the Linux world, less than intuitive for new users. As much for my own benefit as anyone else’s, now I am going to walk through the steps to getting Postgres installed and configured on a Linux box.
Note: if you are an experienced Linux user, or a PostgreSQL DBA, this is not the post for you, even though your remarks and constructive criticism are very welcome – in case you see something either incorrect or missing, please do let me know inside the comments below.
So why Postgres?
PostgreSQL is a amazing database platform. PostgreSQL is free, cross-platform, and gives an high-quality function set which, in my mind, exceeds the ones of its similar platform in the relational database area.
PostgreSQL offers all of the (mostly) standard-compliant SQL/relational database function you’ll anticipate, plus a bunch of thrilling and innovative features. Some of worth mentioning features are json datatype (and additionally jsonb!), array datatype, and the brand new HStore type, which essentially allows the specification of a column as containing a list of key/value pairs. We’ll take a tour of PostgreSQL in every other posts, but first, let’s get the thing installed and running.
Installation steps for PostgreSQL on Linux Mint
Currently, my everyday Linux distro is Linux Mint 18.3 Sylvia along with the Cinnamon Desktop. This is a stable release and could be a fantastic distro if you haven’t use Linux already. If you do not have a dedicated Linux machine, it is simple enough to spin up a VM using Virtual Box.
As of this writing, the most up-to-date version of PostgreSQL is version 10.4, which introduced with it very cool features such as full JSONB support. However, the 10.4 release is not available directly using the Advanced Packaging Tool (APT) or the Linux Mint Software Manager.
Fortunately, the PostgreSQL Global Development Group (PGDG) maintain an apt repository of PostgreSQL packages for Debian and Ubuntu-derived Linux distros, located at http://apt.postgresql.org/pub/repos/apt/
Before we can install PostgreSQL, we have to add the package source for the distro we are currently using. In this case, I have been using Linux Mint 18.3 Sylvia, which is derived from (and therefore should be compatible with) Ubuntu 16.04 («Xenial Xerus») release. We’ll understand why this matters in a short while.
What’s currently supported:
- Debian 7 (wheezy), 8 (jessie), 9 (stretch), and unstable (sid)
- Ubuntu 14.04 (trusty), 16.04 (xenial)
- Architectures: amd64 (64-bit x86), i386 (32-bit x86), ppc64el (little-endian 64-bit POWER; not on wheezy/precise)
- PostgreSQL 9.2, 9.3, 9.4, 9.5, 9.6, 10, 11devel
- Server extensions such as Slony-I, various PL languages, and datatypes
- Applications like pgadmin3, pgbouncer, and pgpool-II
- Debian 7 (wheezy), 8 (jessie), 9 (stretch), and unstable (sid)
Add the PostgreSQL Package Source for Your Linux Distribution
We need to create a sources file reflecting the proper PostgreSQL source for our specific distro. As noted above, in my case I’ll need the source appropriate for the «Xenial» release of Ubuntu. We can accomplish this from the terminal to add the file (make sure to use sudo in all of the following steps):
Add the PGDG APT source file
Create a file at /etc/apt/sources.list.d/postgresql.list with the following command:
$ sudo sh -c ‘echo «deb http://apt.postgresql.org/pub/repos/apt/ xenial-pgdg main» > \
/etc/apt/sources.list.d/postgresql.list’
Add the PostgreSQL Package Repository Key
Next, add the package repository key:
$ wget —quiet -O — https://www.postgresql.org/media/keys/ACCC4CF8.asc | sudo apt-key add —
Update, Upgrade, and Install PostgreSQL
Update system package source. Once this task is done, we proceed with upgrade packages to the latest versions.
$ sudo apt-get update
$ sudo apt-get upgrade
Please note that this can be a long process. Also, you may be prompted at several points to make some choices about configuration items. Specifically, you may informed that this that or the other configuration file has been changed, and asked if you want to keep your original version, or replace with the package maintainer’s version. Select «Y» to accept the package maintainer’s version in these cases.
Next step is installing PostgreSQL 10:
Configuring Postgres for Use
The postgres user
While PostgreSQL become installed, a system user account named postgres was also created with an identical user account in postgres. By default, the postgres user account isn’t configured with a password, so it isn’t viable to log into the server the use of the postgres user account without first creating a password for it. This postgres account has an all-access pass on your PostgreSQL database server, permission-wise. The postgres user account has similarities to the sa account in SQL server.
The postgres database
PostgreSQL is installed with a default database postgres . For the most part, we use the postgres database for administration functions, and create new databases on the PostgreSQL server to suit our needs.
The psql Command Line Utility
PostgreSQL consists of psql , a command line application for managing your databases and server. While a GUI-based software such as pgadmin3 is often less complicated to use in the daily task, the command line utilty psql is always handy. psql gives total control of your postgres system from the terminal, together with the ability to execute SQL queries.
We will use psql to perform our preliminary configuration and to create an initial database super user.
Create super user account
In this step we will super-user account to deals with our database in the daily task.
To do this, we will get access to the postgres account through your machine root user. Then we’ll use that postgres account to create a brand new super-user account for your PostgreSQL installation which can be regulated more efficiently. As an example we will use adjie as our new PostgreSQL super-user account.
Notice in the above we can enter multiple lines of command in SQL shell. The SQL is not executed until semi-colon followed enter is found. Which means, the semi-colon will make the shell execute entered commands.
Login using our newly created account
Let’s verify that everything is working correctly. Try to log in with psql using our new super-user account and create a quick test database:
Note in the above terminal session, we specified the postgres default database when we logged in, since there aren’ tyet any other databases to connect to.
Create test database
Next test is to create test database test_database using our new super-user account:
If everything works as shown, then congratulations. Now you have a working installation of PostgreSQL 10.4 on Linux Mint 18.3.
Optional step
If you would like to manipulate your database in graphical mode, then pgadmin3 is the way to go. Install pgadmin3 by issuing this command:
$ sudo apt-get install pgadmin3
Final Words
I hope that you now know how to install PostgreSQL 10.4 on Linux Mint 18.3 Sylvia. If you run into any issues or have any feedback feel free to drop a comment below.
Источник


