- mac OS packages
- Interactive installer by EDB
- Platform support
- Postgres.app
- Homebrew
- MacPorts
- PostgreSQL: зачем и как
- Установка PostgreSQL на Ubuntu 14.04
- Установка PostgreSQL на Mac OS X через Homebrew
- Установка PostgreSQL на Mac OS X через Postgresapp
- Проверка установки
- Базовые команды PostgreSQL
- Команды терминала psql
- Установка и подключение PostgreSQL на Mac Os
- Установка PostgreSQL на Mac Os
- Не обязательно
- Подключение к PostgreSQL на Mac OS
- Как подключиться к PostgreSQL на Mac OS
- Подключение в сторонней программе к БД
- DataGrip
- Исправление ошибок
- Читайте также
- Install PostgreSQL on a Mac
- Introduction
- Prerequisites
- Install PostgreSQL on a Mac
- Install Postgres using the Postgres.app
- Install PostgreSQL using Homebrew
- Mac install of Postgres using ‘brew’
- psql command not found
- Start the Postgres server
- Reinstall PostgreSQL using Homebrew
- Install Postgres using MacPorts
- Use Macport’s ‘port’ command to install Postgres
- Uninstall Postgres on a Mac
- Uninstall Postgres.app on a Mac
- Uninstall the MacPorts installation of Postgres
- Conclusion
- Pilot the ObjectRocket Platform Free!
mac OS packages 

You can get macOS PostgreSQL packages from several different sources.
Interactive installer by EDB
Download the installer certified by EDB for all supported PostgreSQL versions.
This installer includes the PostgreSQL server, pgAdmin; a graphical tool for managing and developing your databases, and StackBuilder; a package manager that can be used to download and install additional PostgreSQL tools and drivers. Stackbuilder includes management, integration, migration, replication, geospatial, connectors and other tools.
This installer can run in graphical, command line, or silent install modes.
The installer is designed to be a straightforward, fast way to get up and running with PostgreSQL on macOS.
Advanced users can also download a zip archive of the binaries, without the installer. This download is intended for users who wish to include PostgreSQL as part of another application installer.
Platform support
The installers are tested by EDB on the following platforms. They will generally work on newer versions of macOS as well:
| PostgreSQL Version | 64-bit macOS Platforms |
|---|---|
| 13 | 10.14 — 11.0 |
| 12 | 10.13 — 10.15 |
| 11 | 10.12 — 10.14 |
| 10 | 10.11 — 10.13 |
| 9.6 | 10.10 — 10.12 |
Postgres.app
Postgres.app is a simple, native macOS app that runs in the menubar without the need of an installer. Open the app, and you have a PostgreSQL server ready and awaiting new connections. Close the app, and the server shuts down.
Homebrew
PostgreSQL can also be installed on macOS using Homebrew. Please see the Homebrew documentation for information on how to install packages.
A list of PostgreSQL packages can be found using the Braumeister search tool.
MacPorts
PostgreSQL packages are also available for macOS from the MacPorts Project. Please see the MacPorts documentation for information on how to install ports.
A list of PostgreSQL packages can be found using the portfiles search tool on the MacPorts website.
PostgreSQL packages are available for macOS from the Fink Project. Please see the Fink documentation for information on how to install packages.
A list of PostgreSQL packages can be found using the package search tool on the Fink website.


Copyright © 1996-2021 The PostgreSQL Global Development Group
Источник
PostgreSQL: зачем и как

По-умолчанию в качестве базы данных Rails предлагает использовать SQLite 3, автономную базу данных, которая неплохо подходит для получения первого опыта в разработке приложений. Одной из особенностей SQLite является невозможность одновременно выполнять более одной операции записи, поэтому чем скорее вы откажетесь от её использования, тем лучше. При разработке приложений зачастую практикуется подход, при котором development среда имеет минимум отличий от production среды. Это позволяет значительно уменьшить вероятность появления проблем, которые могут возникнуть из-за использования различных инструментов при разработке и при работе приложения в продакшене. Этот подход является одной из причин для того, чтобы задуматься об использовании PostgreSQL в разработке.
Здесь можно спросить себя: а почему именно PostgreSQL? Почему не MySQL или другая СУБД? Дело в том, что PostgreSQL стал фактически уже стандартом при работе над приложениями на Ruby on Rails. Он быстрый, расширяемый, адаптирован к высоким нагрузкам и использует такой подход к хранению данных, при котором достаточно сложно ошибиться, принимая те или иные решения (по сравнению, например, с MySQL).
Вот несколько ссылок, которые наглядно перечисляют все за и против:
Поскольку для разработки на Rails имеет смысл использовать OS X или ОС семейства Linux, рассмотрим установку PostgreSQL для Ubuntu и Mac OS X.
Содержание:
Установка PostgreSQL на Ubuntu 14.04
Во-первых, обновим удаленные репозитории:
Затем непосредственно установим PostgreSQL:
Строго говоря, база данных установлена. Убедимся в этом, войдя в терминал СУБД под стандартным пользователем postgres:
Если СУБД установлена корректно, в терминале появится ответ с приглашением к вводу команд:
Установка PostgreSQL на Mac OS X через Homebrew
Одним из наиболее простых способов установки PostgreSQL на OS X является Homebrew. Обновим список пакетов:
Если вы хотите, чтобы СУБД запускалась при старте системы, выполните команду:
Установка PostgreSQL на Mac OS X через Postgresapp
Помимо Homebrew СУБД PostgreSQL можно установить так же при помощи специального комплекта приложений, доступного для скачивания по адресу http://postgresapp.com/.
Пакет включает в себя саму PostgreSQL, PostGIS и еще несколько популярных расширений, отсутствие которых, впрочем, нисколько не помешает вам начать разрабатывать Rails-приложения использующие PostgreSQL.
Установка производится перетаскиванием иконки из загруженного пакета в папку Applications (Программы).
Проверка установки
Создадим тестовую базу данных:
Выйдем из терминала СУБД, введя команду \q и попробуем войти туда снова, используя свежесозданного пользователя:
После ввода пароля, терминал PostgreSQL поприветствует нас приглашением к вводу команд:
Для надежности проверим, может ли пользователь работать с текущей базой данных:
Таблица unicorns создалась, значит все в порядке, PostgreSQL установлен и готов к работе.
Базовые команды PostgreSQL
Чтобы работать с PostgreSQL, необходимо знать некоторые базовые команды. Некоторые из них, наиболее полезные, приведены ниже.
Вход в PostgreSQL:
Стандартный администраторский вход:
Команды терминала psql
- \dt – показать все таблицы
- \q – выход из терминала psql
- \dn – показать все схемы
- \du – показать всех пользователей
- \d имя_таблицы — показать информацию о таблице
И помните, что в любой непонятной ситуации стоит обращаться к официальной документации: http://www.postgresql.org/docs/, которой, в отличии от доков к MySQL, удобно пользоваться 😉

Мы рассказываем, как стать более лучшим разработчиком, как поддерживать и эффективно применять свои навыки. Информация о вакансиях и акциях эксклюзивно для более чем 8000 подписчиков. Присоединяйся!

- mkdev
- Менторы
- Специализации
- Контент
- Стать ментором
- О проекте
- Для компаний
- Что такое менторство
- Как проходит обучение
- Цены
- FAQ
- Impressum
- Аккаунт
- Записаться
- Войти
- Соцсети


© Copyright 2014 — 2021 mkdev | Privacy Policy | Lang: Russian
Источник
Установка и подключение PostgreSQL на Mac Os
Устанавливаем PostgreSQL на Mac OS.
Установка PostgreSQL на Mac Os
Добавляем в автозапуск при старте системы Mac OS.
Также можно запустить вручную:
Не обязательно
Если автозагрузка не сработает. Можно провести такие манипуляции:
Директория автозагрузки находится здесь:
Добавляем в автозагрузку
Подключение к PostgreSQL на Mac OS
Подключение на Mac OS немного отличается от Linux. Проверим пользователей:
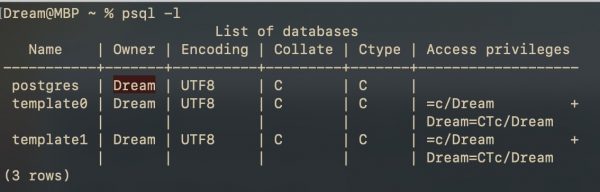
Для подключения указываем Owner из таблицы выше:
Как создать БД и пользователя, следовать инструкции:
https://ploshadka.net/postgresql/
Если коротко, то для локалки достаточно ввести в консоль:
Как подключиться к PostgreSQL на Mac OS
На localhost достаточно создать базу данных и подключиться к ней указав только её имя:
Остальное подхватиться по умолчанию.
Подключение в сторонней программе к БД
DataGrip
На примере программы DataGrip:
![]()
Исправление ошибок
Статья по исправлению некоторых ошибок с правами доступа.
Читайте также
Кстати, на сайте нет рекламы. У сайта нет цели самоокупаться, но если вам пригодилась информация можете задонатить мне на чашечку кофе в макдаке. Лайкнуть страницу или просто поблагодарить. Карма вам зачтется.
Источник
Install PostgreSQL on a Mac
![]()
Introduction
If you’re planning to run PostgreSQL on a Mac, it’s important to know how to install it properly. There are three common ways to install Postgres on a Mac: using Homebrew’s brew install command, downloading the DMG interactive installer for Postgres.app or using MacPorts. In this article, we’ll provide step-by-step instruction for all three of these methods, so you can choose the installation process that works best for you.
Prerequisites
Before attempting the instructions provided in this tutorial, make sure your Mac is running a supported version of MacOS X with at least 256MB of free disk space.
Install PostgreSQL on a Mac
As we mentioned earlier, there are three common ways to install PostgreSQL on macOS. You can use a downloadable DMG installer from Postgres.app, a Homebrew repository for Postgres or a MacPorts installation that uses the port command line interface.
It’s also possible to build a binary of PostgreSQL from source using a tarball archive or to run Postgres in a Docker container; however, we won’t be providing instructions for these alternatives in this article.
Install Postgres using the Postgres.app
The easiest way to install Postgres on a Mac is to visit the Postgres.app downloads page and get the latest stable version of PostgreSQL as a DMG interactive installer.
Once the download is complete, navigate to your Downloads directory in a Finder window and then double-click on the DMG file to mount the installer. After mounting it, you should see a window pop up that will allow you to drag and drop the Postgres.app to your Applications folder.

Once you complete the installation steps, you should be able to run PostgreSQL by double-clicking the app’s icon in the Applications folder. You can also choose to have Postgres.app run by default– just add the application to your Login Items list in System Preferences.
Use the following export command in a macOS Terminal window to add the Postgres.app path to your current PATH environment variable:
Install PostgreSQL using Homebrew
If you’d prefer to use Homebrew to install Postgres, you can do so using the brew install command. You’ll need to install the latest version of Homebrew using Ruby if you haven’t already. To do this, use the following command:
If you’re running the latest Catalina version of macOS, the output of this command should look like the following:
It may take a few minutes to install Homebrew depending on your internet connection. When the installation is complete, the next step is to “doctor” the Homebrew installation and update its repositories with this compound command:
NOTE: The latest versions of Homebrew will update the repository before installing packages.
Mac install of Postgres using ‘brew’
Now that we’ve installed the latest version of Homebrew, we can use the brew install command to install PostgreSQL:
NOTE: In Homebrew, the postgres “keg” is simply an alias for postgresql , so brew install postgres will work the same way.
Once the installation is finished, you can use the postgres -V or psql -V commands to return the version number and verify that the installation was successful. You can also use the brew list command to view a list of all locally installed packages using Homebrew.

psql command not found
If you get an error stating psql: command not found , you may have to export the path for the Homebrew installation using the following command:
As an alternative, you can also add the following PATH line to your
After editing any of these files, be sure to save the changes. You can have the new settings take effect by running the source command followed by the file name:
Try executing the psql command again after making these changes to verify that the PATH for PostgreSQL and psql has been set.
Start the Postgres server
With Homebrew, you can use the brew services start command to have Postgres start in the background:
If you’d prefer to run Postgres as a temporary background service, use the following pg_ctl command instead:
You can use Homebrew’s enable command to have PostgreSQL start automatically whenever you restart your Mac:
Reinstall PostgreSQL using Homebrew
If you already have PostgreSQL on your Mac and you’d like to reinstall the latest version of it, you can also use Homebrew’s reinstall command:
Install Postgres using MacPorts
The last method we’ll discuss in this article involves using the MacPorts package manager for macOS. To install Postgres on a Mac this way, visit the release page for MacPorts and download a .pkg installer that matches your version of macOS. Once the download is complete, you can navigate to your Downloads directory in a Finder window and double-click the package installer. Follow the steps for the interactive installer, and open a terminal window when you’re done.

NOTE: MacPorts also requires the Xcode library.
In order to install a package, you’ll need to export a path for Macport’s port command. Execute the following export command in a terminal window:
You can also open your .bash_profile or .zprofile file and append the following:
After saving your changes to the file, go back to your terminal and input source
/.bash_profile or source
/.zprofile to load the changes.
Use Macport’s ‘port’ command to install Postgres
At this point, we’re ready to use the port command to install Postgres. Use the following port info command to look for the PostgreSQL package:
You should receive a response that looks like the following:
Now, use the port install command with sudo to install the PostgreSQL packages with elevated privilages:
NOTE: You’ll need to press return or type y to verify that you’d like to install the package and its dependencies.

Finally, use the select command shown below to verify that PostgreSQL installed correctly:
If you’re in the MacPort interface, you can just type \q to quit.
Uninstall Postgres on a Mac
If you need to uninstall a Homebrew installation of PostgreSQL, use the following command to force the uninstall, even if it depends on other packages:
If you’d like to see any existing PostgreSQL dependencies, use the command shown below:
Uninstall Postgres.app on a Mac
You can uninstall the Postgres.app installation of PostgreSQL the same way you would for any package or applicaton on a Mac– just drag and drop the application from the Applications folder to the Trash directory. Make sure to first shut down the Postgres application and server before attempting this.
Uninstall the MacPorts installation of Postgres
If you installed Postgres using MacPorts, you’ll need to use the following command to remove the package:
Conclusion
If you need to install PostgreSQL on a Mac, it’s good to know the different methods that are available. In this article, we provided instructions on three common installation methods: using the Homebrew package manager, using the interactive installer and using MacPorts. With this tutorial to guide you, you’ll be able to select any of these methods for your own PostgreSQL installation.
Pilot the ObjectRocket Platform Free!
Try Fully-Managed CockroachDB, Elasticsearch, MongoDB, PostgreSQL (Beta) or Redis.
Источник


