- Downloading and Installing RabbitMQ
- Open Source RabbitMQ Server
- Installation Guides
- Preview Releases (Betas, Release Candidates)
- VMware Tanzu™ RabbitMQ® (Commercial Edition)
- Kubernetes
- RabbitMQ Cluster Kubernetes Operator
- RabbitMQ Topology Kubernetes Operator
- Docker
- Cloud
- Downloads on GitHub
- Debian (Apt) and RPM (Yum) Repositories
- Provisioning Tools (Chef, Puppet, etc)
- Release Signing Key
- Client Libraries
- Java Client
- JMS Client
- .NET/C# Client
- Erlang Client
- Clients for Other Languages
- Community Plugins
- Snapshot (Alpha) Builds
- Getting Help and Providing Feedback
- Help Us Improve the Docs <3
- The Homebrew RabbitMQ Formula
- Overview
- Installation
- Operations
- Getting Help and Providing Feedback
- Help Us Improve the Docs <3
- How to install RabbitMQ on macOS and Ubuntu 20.04
- Installing RabbitMQ on MacOS To install RabbitMQ on MacOS, you can use Homebrew — a widely used package manager for macOS operating system. RabbitMQ formula is available as part of the Homebrew’s core tap. Run the following command to update Homebrew to its latest version: Now you can install RabbitMQ with the following command: RabbitMQ formula installation will also install all the required Erlang and OTP dependencies. By default, RabbitMQ server and CLI tools are installed in the /usr/local/Cellar/rabbitmq/ /sbin directory. Symbolic links to binaries are also created under /usr/local/sbin . To access rabbitmq-server command from the command-line, add this directory to PATH : To start the RabbitMQ server in the foreground, type the following command in your terminal: To launch the RabbitMQ server in the background, you execute the following command: Optionally, if you want to access RabbitMQ in your browser, enable the management console plugin by typing the following command: Next, go to http://localhost:15672 to log into the RabbitMQ management console. The default username and password is guest: Here is how the console looks like once you are logged in: Installing RabbitMQ on Ubuntu 20.04 RabbitMQ is included in standard Debian and Ubuntu repositories. However, the included versions are usually outdated and months or even years behind the latest RabbitMQ releases. To install RabbitMQ on Ubuntu, Debian, and distributions based on one of them, you need to perform few additional steps. Step 1 — Update packages list Run the following command to update the apt packages list: Also, install curl and gnupg packages if missing: Step 2 — Import repository signing key Execute the following command to import RabbitMQ repository signing key to apt-key : This command will instruct apt to trust packages signed by RabbitMQ key. Step 3 — Enable apt HTTPS transport The apt-transport-https package must be installed on your Ubuntu machine to download RabbitMQ and Erlang packages from Bintray: Step 4 — Add PPA repository Add the PPA repository for RabbitMQ and Erlang by typing the following command: Press the [Enter] button when prompted to finish the import. Step 5 — Install RabbitMQ and Erlang Now you’re ready to install the RabbitMQ server and Erlang 23.x on your Ubuntu machine. Type the following command to update the system packages list: Next, run the following command to install RabbitMQ and Erlang: Execute the following command to verify the installation: You should see the following output: Step 6 — Manage RabbitMQ service RabbitMQ is installed as a systemd service. It means that you can manage it using standard systemd commands like systemctl or service on Ubuntu. To start the RabbitMQ service, run the following command: To check the current status of the RabbitMQ service, issue the following command: You can stop the service anytime by typing: If you want to restart the service, use the following command: Conclusion That’s all, folks! Today, you learned how to install and configure the popular message broker RabbitMQ on your macOS machine and Ubuntu 20.04 LTS server. ✌️ Like this article? Follow me on Twitter and LinkedIn. You can also subscribe to RSS Feed. Источник RabbitMQ — установка и управлением брокером сообщений Описание процесса установки и управления брокером сообщения RabbitMQ. Эта статья связана со статьёй Flask, Celery, RabbitMQ. Была вынесена в отдельную статью из-за объема информации. Зачем нужен RabbitMQ? RabbitMQ — это «брокер сообщений», иными словами что-то вроде почтовой службы. Он принимает сообщения (задачи), обрабатывает очередь из этих задач и отправляет результат (например, сохраняя его в бд). В Redis, который является сервисом хранилища данных в оперативной памяти тоже есть брокер сообщений. Однако RabbitMQ от начала и до конца был создан только для этой цели. Но если на сервере уже установлен Redis, то вероятно будет разумнее использовать его, а не добавлять дополнительные зависимости. Установка RabbitMQ на Mac OS Прежде чем отправить работать нашего почтальона на боевом сервере надо где-то все это отладить. Т.к. я использую Mac OS, то буду описывать процесс установки на эту операционную систему. Как и все сторонние пакеты в Mac OS RabbitMQ устанавливается через менеджер пакетов Homebrew. Потом надо его запустить: Добавить переменную окружения перед вводом команд на Mac OS. В противном случае будут ошибки: Для исправление ввести: Если потребуется перезагрузкить кролика: Установка RabbitMQ на Ubuntu 20.04 После установки сервер RabbitMQ запустится автоматически, а также будет добавлен в автозагрузку. Все команды для RabbitMQ на Linux надо вводить или от пользователя root или через sudo. rabbitmq_management rabbitmq_management — это веб-панель управления очередями RabbitMQ. Перед активацией веб-панели rabbitmq должен быть выключенным. По умолчанию логин и пароль guest. Нет необходимости менять этого пользователя или пароля для него. Он доступен только в localhost. Источник Русские Блоги MAC OSX быстрая установка rabbitMQ MAC OSX быстрая установка rabbitMQ Введение】 установить программное обеспечение , Обычно используется двумя способами , Один — скачать с официального сайта , Затем установите пошагово . Mac Одним из преимуществ является то, что С командой brew Установить , Эта статья научит вас пользоваться brew Установить rabbitMQ. Два, [подробности] 1. Откройте команду терминала Mac напрямую и введите: Brew install rabbitMQ Появляется следующий код rabbitMQ Успешная установка : 2. Адрес RabbitMQ после установки: 3. Шаги для запуска rabbitMQ: Введите /usr/local/Cellar/rabbitmq/3.7.3, выполните команду: Войдите в интерфейс : 4. Запускается плагин rabbitMQ: После запуска RabbitMQ другой терминал входит в cd /usr/local/Cellar/rabbitmq/3.7.3/sbin. Запустите плагин: Команда: Интерфейс успешного запуска выглядит следующим образом : заметка : password: Войдите в систему с паролем вашего собственного загрузочного интерфейса . 5. Войдите в интерфейс управления. Три, Резюме】 Краткое описание процесса запуска rabbitMQ: 1. Сначала запустите rabbitMQ, Войдите в каталог версии rabbitMQ: /usr/local/Cellar/rabbitmq/3.7.3, выполните 2, запустите плагин После запуска RabbitMQ запустите другой терминал и введите cd //usr/local/Cellar/rabbitmq/3.7.3/sbin. Запустите плагин: 3. Напоминание: начальная учетная запись и пароль являются гостевыми. Поздравляем, вы добились небольшого прогресса! Источник
- Installing RabbitMQ on Ubuntu 20.04
- Step 1 — Update packages list
- Step 2 — Import repository signing key
- Step 3 — Enable apt HTTPS transport
- Step 4 — Add PPA repository
- Step 5 — Install RabbitMQ and Erlang
- Step 6 — Manage RabbitMQ service
- Conclusion
- RabbitMQ — установка и управлением брокером сообщений
- Зачем нужен RabbitMQ?
- Установка RabbitMQ на Mac OS
- Установка RabbitMQ на Ubuntu 20.04
- rabbitmq_management
- Русские Блоги
- MAC OSX быстрая установка rabbitMQ
- Введение】
- Два, [подробности]
- 1. Откройте команду терминала Mac напрямую и введите:
- 2. Адрес RabbitMQ после установки:
- 3. Шаги для запуска rabbitMQ:
- 4. Запускается плагин rabbitMQ:
- заметка : password: Войдите в систему с паролем вашего собственного загрузочного интерфейса .
- 5. Войдите в интерфейс управления.
- Три, Резюме】
Downloading and Installing RabbitMQ
The latest release of RabbitMQ is 3.9.7. See change log for release notes. See RabbitMQ support timeline to find out what release series are supported.
Experimenting with RabbitMQ on your workstation? Try the community Docker image:
Open Source RabbitMQ Server
Installation Guides
- Linux, BSD, UNIX: Debian, Ubuntu | RHEL, CentOS, Fedora | Generic binary build | Solaris
- Windows: Chocolatey or Installer (recommended) | Binary build
- MacOS: Homebrew | Generic binary build
- Erlang/OTP for RabbitMQ
Preview Releases (Betas, Release Candidates)
You can contribute to RabbitMQ by helping the community test preview releases.
Preview releases are distributed via GitHub and marked as pre-release.
VMware Tanzu™ RabbitMQ® (Commercial Edition)
Kubernetes
RabbitMQ Cluster Kubernetes Operator
RabbitMQ Topology Kubernetes Operator
Other guides related to Kubernetes:
Docker
Cloud
- Tanzu™ RabbitMQ®
- RabbitMQ Cluster Kubernetes Operator by VMware (developed on GitHub)
- Tanzu™ RabbitMQ® on Kubernetes
- CloudAMQP: RabbitMQ-as-a-Service available in multiple clouds
- Amazon EC2
Downloads on GitHub
Debian (Apt) and RPM (Yum) Repositories
Provisioning Tools (Chef, Puppet, etc)
Release Signing Key
- Release Signing Key 0x6B73A36E6026DFCA (on GitHub)
- How to Verify Release Artifact Signatures
- Release Signing Key (alternative download location on rabbitmq.com)
Client Libraries
Java Client
- On Maven Central: RabbitMQ Java client
- Quick download: Maven.org | Source
- API guide
- API reference (JavaDoc)
- License and other information
- Older versions
JMS Client
.NET/C# Client
Erlang Client
Clients for Other Languages
The RabbitMQ community has created a large number of clients and developer tools covering a variety of platforms and languages.
Community Plugins
For your convenience, we offer binary downloads of various plugins developed by the community.
Snapshot (Alpha) Builds
Snapshot releases of the RabbitMQ broker available to users who wish to experiment with the latest and greatest features and bug fixes. For more details, head over to the snapshots page.
Getting Help and Providing Feedback
If you have questions about the contents of this guide or any other topic related to RabbitMQ, don’t hesitate to ask them on the RabbitMQ mailing list.
Help Us Improve the Docs <3
If you’d like to contribute an improvement to the site, its source is available on GitHub. Simply fork the repository and submit a pull request. Thank you!
Источник
The Homebrew RabbitMQ Formula
Overview
Homebrew is a popular package manager for MacOS. RabbitMQ formula is available from Homebrew’s core tap (out of the box).
The formula will also install a reasonably recent supported Erlang/OTP version as a dependency.
Installation
Before installing make sure the taps are up-to-date:
Then, install RabbitMQ server with:
Installing the RabbitMQ formula will install key dependencies such as a supported Erlang/OTP version.
Operations
The RabbitMQ server scripts and CLI tools are installed into the sbin directory under /usr/local/Cellar/rabbitmq/ / , which is accessible from /usr/local/opt/rabbitmq/sbin . Links to binaries have been created under /usr/local/sbin . In case that directory is not in PATH it’s recommended to append it:
Add the above export to the shell profile (such as
/.bashrc for bash or
/.zshrc for zsh) to have PATH updated for every new shell, including OS restarts.
The server can then be started with rabbitmq-server in the foreground or with brew services start rabbitmq to have it run under launchd in the background.
With Homebrew, the node and CLI tools will use the logged in user account by default. Using sudo is not required.
Otherwise operations are no different from the generic binary build. Please refer to the Operations section of the generic binary build guide.
Getting Help and Providing Feedback
If you have questions about the contents of this guide or any other topic related to RabbitMQ, don’t hesitate to ask them on the RabbitMQ mailing list.
Help Us Improve the Docs <3
If you’d like to contribute an improvement to the site, its source is available on GitHub. Simply fork the repository and submit a pull request. Thank you!
Источник
How to install RabbitMQ on macOS and Ubuntu 20.04
February 08, 2021 • Atta
RabbitMQ is a popular message broker software used by tens of thousands of small startups and large companies worldwide.
It supports multiple messaging protocols, including Advanced Message Queuing Protocol (AMQP), Streaming Text Oriented Messaging Protocol (STOMP), MQ Telemetry Transport (MQTT), and other protocols.
The RabbitMQ server is written in the Erlang programming language and is built on the Open Telecom Platform (OTP) framework for clustering and failover.
RabbitMQ runs on many operating systems and cloud environments. In this article, you’ll learn how to install and use the RabbitMQ server on macOS and Ubuntu machines.
Installing RabbitMQ on MacOS
To install RabbitMQ on MacOS, you can use Homebrew — a widely used package manager for macOS operating system.
RabbitMQ formula is available as part of the Homebrew’s core tap. Run the following command to update Homebrew to its latest version:
Now you can install RabbitMQ with the following command:
RabbitMQ formula installation will also install all the required Erlang and OTP dependencies.
By default, RabbitMQ server and CLI tools are installed in the /usr/local/Cellar/rabbitmq/ /sbin directory. Symbolic links to binaries are also created under /usr/local/sbin . To access rabbitmq-server command from the command-line, add this directory to PATH :
To start the RabbitMQ server in the foreground, type the following command in your terminal:
To launch the RabbitMQ server in the background, you execute the following command:
Optionally, if you want to access RabbitMQ in your browser, enable the management console plugin by typing the following command:
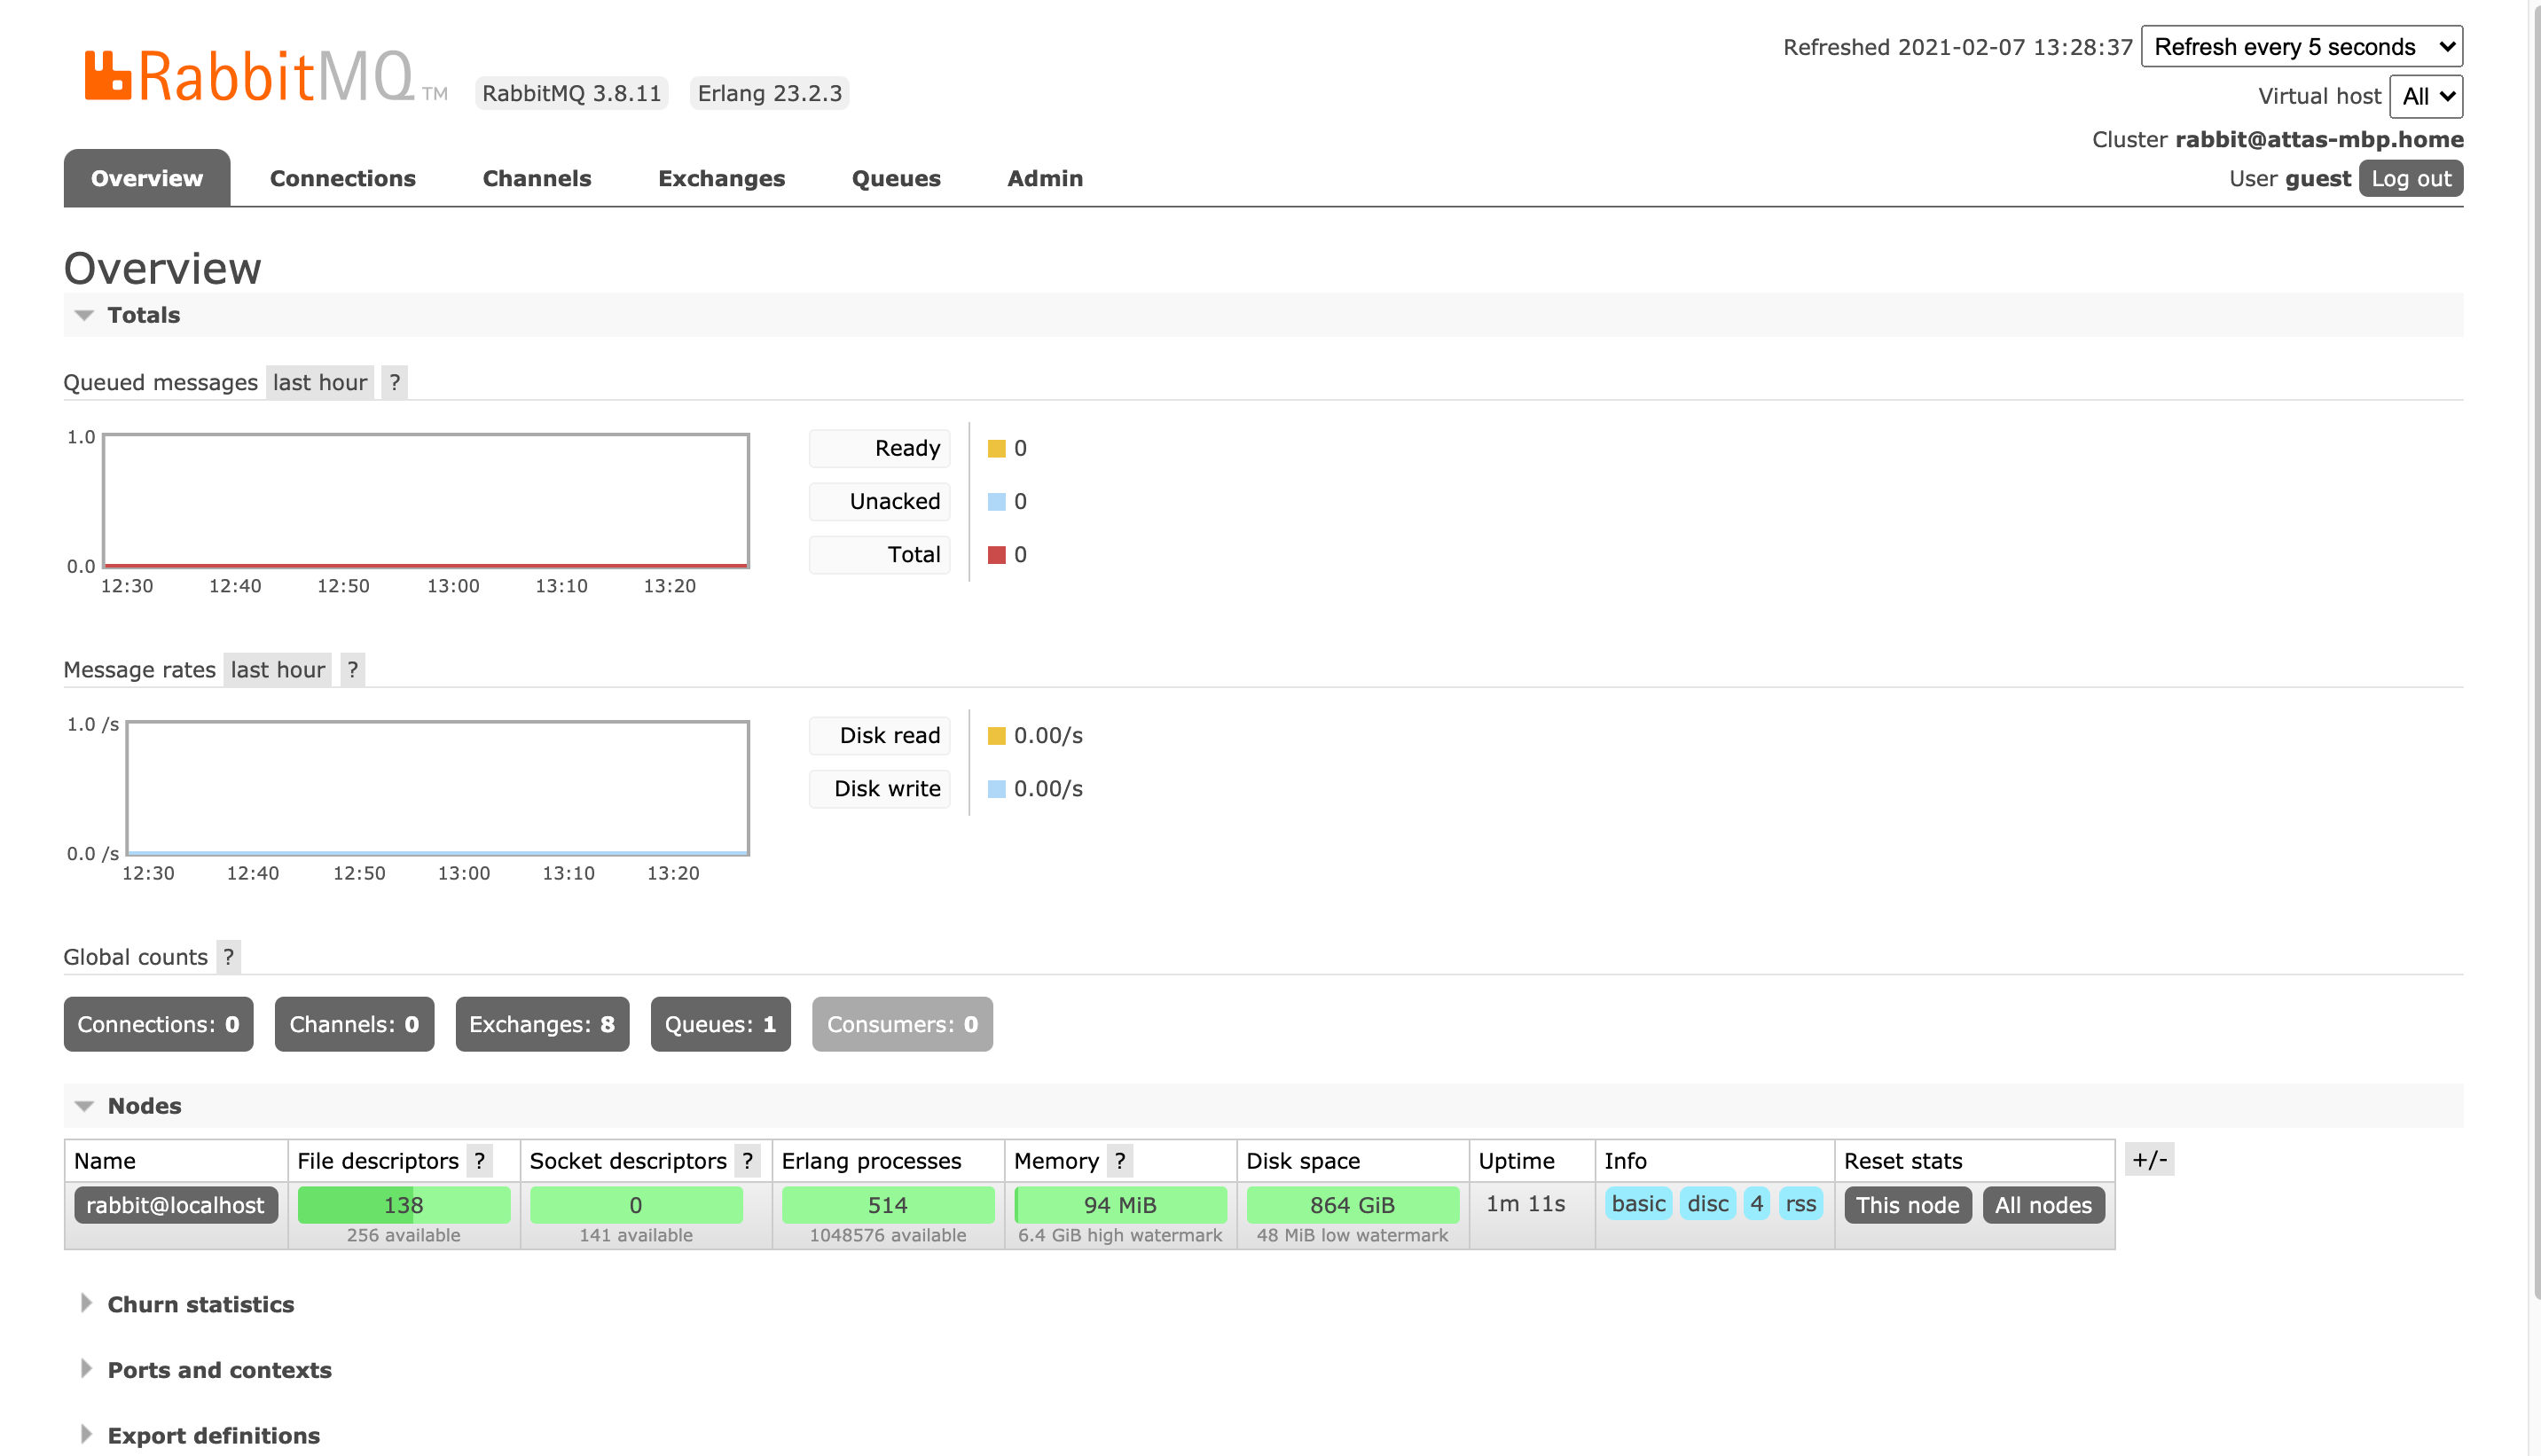
Next, go to http://localhost:15672 to log into the RabbitMQ management console. The default username and password is guest:

Here is how the console looks like once you are logged in:
Installing RabbitMQ on Ubuntu 20.04
RabbitMQ is included in standard Debian and Ubuntu repositories. However, the included versions are usually outdated and months or even years behind the latest RabbitMQ releases.
To install RabbitMQ on Ubuntu, Debian, and distributions based on one of them, you need to perform few additional steps.
Step 1 — Update packages list
Run the following command to update the apt packages list:
Also, install curl and gnupg packages if missing:
Step 2 — Import repository signing key
Execute the following command to import RabbitMQ repository signing key to apt-key :
This command will instruct apt to trust packages signed by RabbitMQ key.
Step 3 — Enable apt HTTPS transport
The apt-transport-https package must be installed on your Ubuntu machine to download RabbitMQ and Erlang packages from Bintray:
Step 4 — Add PPA repository
Add the PPA repository for RabbitMQ and Erlang by typing the following command:
Press the [Enter] button when prompted to finish the import.
Step 5 — Install RabbitMQ and Erlang
Now you’re ready to install the RabbitMQ server and Erlang 23.x on your Ubuntu machine.
Type the following command to update the system packages list:
Next, run the following command to install RabbitMQ and Erlang:
Execute the following command to verify the installation:
You should see the following output:
Step 6 — Manage RabbitMQ service
RabbitMQ is installed as a systemd service. It means that you can manage it using standard systemd commands like systemctl or service on Ubuntu.
To start the RabbitMQ service, run the following command:
To check the current status of the RabbitMQ service, issue the following command:
You can stop the service anytime by typing:
If you want to restart the service, use the following command:
Conclusion
That’s all, folks! Today, you learned how to install and configure the popular message broker RabbitMQ on your macOS machine and Ubuntu 20.04 LTS server.
✌️ Like this article? Follow me on Twitter and LinkedIn. You can also subscribe to RSS Feed.
Источник
RabbitMQ — установка и управлением брокером сообщений
Описание процесса установки и управления брокером сообщения RabbitMQ.
Эта статья связана со статьёй Flask, Celery, RabbitMQ. Была вынесена в отдельную статью из-за объема информации.
Зачем нужен RabbitMQ?
RabbitMQ — это «брокер сообщений», иными словами что-то вроде почтовой службы. Он принимает сообщения (задачи), обрабатывает очередь из этих задач и отправляет результат (например, сохраняя его в бд).
В Redis, который является сервисом хранилища данных в оперативной памяти тоже есть брокер сообщений. Однако RabbitMQ от начала и до конца был создан только для этой цели. Но если на сервере уже установлен Redis, то вероятно будет разумнее использовать его, а не добавлять дополнительные зависимости.
Установка RabbitMQ на Mac OS
Прежде чем отправить работать нашего почтальона на боевом сервере надо где-то все это отладить. Т.к. я использую Mac OS, то буду описывать процесс установки на эту операционную систему.
Как и все сторонние пакеты в Mac OS RabbitMQ устанавливается через менеджер пакетов Homebrew.
Потом надо его запустить:
Добавить переменную окружения перед вводом команд на Mac OS. В противном случае будут ошибки:
Для исправление ввести:
Если потребуется перезагрузкить кролика:
Установка RabbitMQ на Ubuntu 20.04
После установки сервер RabbitMQ запустится автоматически, а также будет добавлен в автозагрузку.
Все команды для RabbitMQ на Linux надо вводить или от пользователя root или через sudo.
rabbitmq_management
rabbitmq_management — это веб-панель управления очередями RabbitMQ.
Перед активацией веб-панели rabbitmq должен быть выключенным.
По умолчанию логин и пароль guest. Нет необходимости менять этого пользователя или пароля для него. Он доступен только в localhost.
Источник
Русские Блоги
MAC OSX быстрая установка rabbitMQ
MAC OSX быстрая установка rabbitMQ
Введение】
установить программное обеспечение , Обычно используется двумя способами , Один — скачать с официального сайта , Затем установите пошагово .
Mac Одним из преимуществ является то, что С командой brew Установить , Эта статья научит вас пользоваться brew Установить rabbitMQ.

Два, [подробности]
1. Откройте команду терминала Mac напрямую и введите:
Brew install rabbitMQ
Появляется следующий код rabbitMQ Успешная установка :
2. Адрес RabbitMQ после установки:

3. Шаги для запуска rabbitMQ:
Введите /usr/local/Cellar/rabbitmq/3.7.3, выполните команду:
Войдите в интерфейс :

4. Запускается плагин rabbitMQ:
После запуска RabbitMQ другой терминал входит в cd /usr/local/Cellar/rabbitmq/3.7.3/sbin. Запустите плагин:
Команда:
Интерфейс успешного запуска выглядит следующим образом :

заметка : password: Войдите в систему с паролем вашего собственного загрузочного интерфейса .
5. Войдите в интерфейс управления.

Три, Резюме】
Краткое описание процесса запуска rabbitMQ:
1. Сначала запустите rabbitMQ,
Войдите в каталог версии rabbitMQ: /usr/local/Cellar/rabbitmq/3.7.3, выполните

2, запустите плагин
После запуска RabbitMQ запустите другой терминал и введите cd //usr/local/Cellar/rabbitmq/3.7.3/sbin. Запустите плагин:

3. Напоминание: начальная учетная запись и пароль являются гостевыми. Поздравляем, вы добились небольшого прогресса!
Источник


