- Install TensorFlow-GPU + CUDA in Windows 10, with easy to follow instructions.
- Installing TensorFlow with GPU on Windows 10
- Getting Python and pip
- Checking your Windows GPU
- Installing the CUDA drivers
- Installing TensorFlow nightly build
- Installing the CuDNN libraries
- Testing TensorFlow
- Laurence Moroney
- Build from source on Windows
- Setup for Windows
- Install Python and the TensorFlow package dependencies
- Install Bazel
- Install MSYS2
- Install Visual C++ Build Tools 2019
- Install GPU support (optional)
- Download the TensorFlow source code
- Configure the build
- View sample configuration session
- Configuration options
- Build the pip package
- TensorFlow 2.x
- TensorFlow 1.x
- CPU-only
- GPU support
- Bazel build options
- Build the package
- Install the package
- Build using the MSYS shell
- Disable MSYS path conversion
- Set your PATH
- Tested build configurations
Install TensorFlow-GPU + CUDA in Windows 10, with easy to follow instructions.

Installing CUDA and TensorFlow-GPU can be a very challenging task, in this article I will show to install it in a few simple steps.
Before getting started with this installation we need to make sure that your graphics card is CUDA enabled. If it is not then using GOOGLE COLLAB can be a great alternative.Check if your Graphics card is CUDA enabled( link), scroll down and click on CUDA enabled Ge-force and Titan Products. Search for your graphics card from the list.
If you don’t know your graphics card specs:
- Go to Desktop
- Right Click and Select NVIDIA Control Panel
- Click Help and Select System Information from the drop down
- Under Items you can view your graphics card version.
Check the latest version of CUDA supported by TensorFlow. Click on this link . Scroll down to Software Requirements to check for the latest supported build.
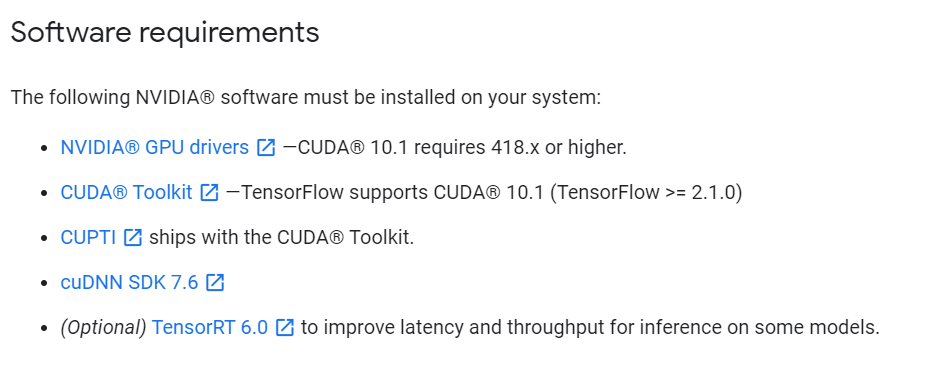
Here CUDA 10.1 and cuDNN SDK 7.6 are the latest supported version by TensorFlow, you can ignore the rest of the things for now.
Okay now that we know what we have to install we first need to clean our system of any NVIDIA programs. That means removing all installation of NVIDIA from our system.
- Go to My Computer/C Drive/Program Files and remove all files having the name NVIDIA.
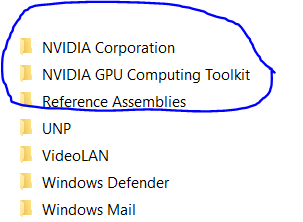
2. Again Go to My Computer/C Drive/Program Files(x86) and do the same thing remove all files having the name NVIDIA.

After removing all the files from your System perform a reboot.
Now Lets Download all the required software
- The First thing we need to download is Visual Studio, as it is a prerequisite for CUDA installation and without this our installation will fail. Go to this linkand download the latest Visual Studio Community Edition. Just follow the default installation settings until you reach Step 4(Choosing Workloads) don’t select any workload and just click on Install.
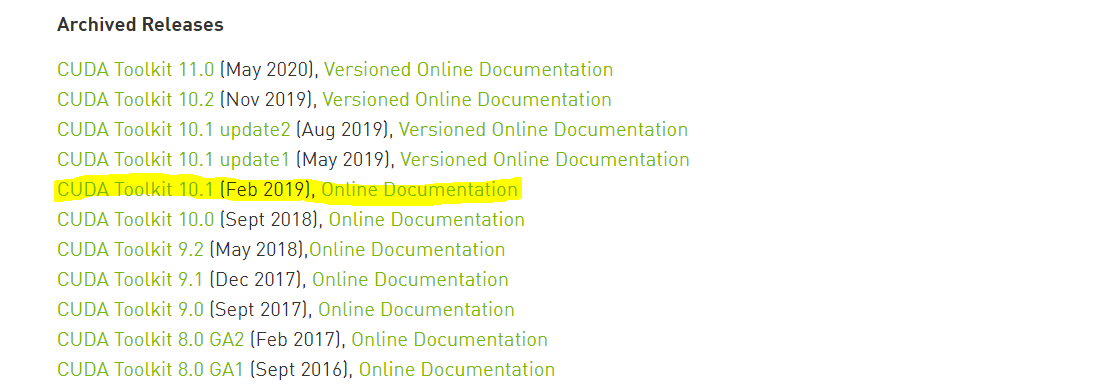
- Next we need to download CUDA Toolkit(link ). Recall the CUDA Toolkit Version from the TensorFlow Software Requirements(the latest supported build during the time of writing this article is 10.1, but if any new supported build is mentioned on the TensorFlow website go ahead and select it).
Select your Operating System( I have selected mine as Windows)
Installing TensorFlow with GPU on Windows 10
Dec 31, 2017 · 6 min read
In an earlier article I showed how to test your Linux system to see if you have a GPU that supports TensorFlow, with the promise that I’d next do Windows and MacOS. So, in this article, I will show how you can test a Windows system for a supported GPU, and if you have one, how you can then install and configure the required drivers, before getting a TensorFlow nightly build and ensuring that it works.
But before you go any further, you’ll also need Python and pip, which don’t typically come with Windows machines.
Getting Python and pip
There ’ s quite a few ways to install Python and pip for Windows, but I found the easiest to be to go to the python site and download the executible installer: https://www.python.org/downloads/windows/
Once you’ve downloaded it, launch it and be sure to select the custom option for install. This takes you into a configuration dialog where you can select pip as an option to install.

I’d recommend you just choose them all.
Once you’ve finished installing, you can open a command prompt and type ‘python’ to see which version you’re using. As you can see from the above I downloaded 3.6.4, and my python command matches this.

You can exit the Python interpreter with
And then test your pip install with
You should see something like this:

You’re now good to go with the Python runtime and pip installer for Windows. You’ll use these to install TensorFlow, but first, let’s check on your GPU to see if it is supported.
Checking your Windows GPU
From your command prompt you can launch Device Manager with this command:
Then look for the Display Adapter setting, open it and read the name of your adapter. You should see something like this:

As you can see, my system has a GTX 980 Ti. Take note of yours, and visit NVidia’s site of GPUs that support CUDA here. If your card is on the list (my GTX 980 Ti is), then you know that TensorFlow can support GPU operations on your machine, but before you can install and run TensorFlow, you’ll need to install the CUDA drivers for your machine and the CUDNN updates for it.
Installing the CUDA drivers
At the time of writing, the TensorFlow nightly builds support CUDA 9.0, and the release builds support 8.0. If you visit the cuda downloads site here, you’ll notice that it will take you to the latest version (right now it’s 9.1), so be sure to download the right version of the driver by selecting the Legacy link at the bottom of the downloads screen:

Of course as CUDA gets updated, and as TensorFlow gets updated, these versions will change. If you have the incorrect version, TensorFlow will warn you (I’ll show you where, later in this article), and you’ll have to go back to this site to get the correct version. Download the drivers for your system and install them using defaults. It takes a little while, and a couple of reboots, so while you’re waiting, check out a couple of episodes of Coffee With A Googler 🙂
You’ll also need a version of CuDNN that matches your version of CUDA before you can run TensorFlow, but, I’ve found it easier not to install it yet — you want to ensure that you have the right CUDA first, so, while it might seem counterintuitive, you should install TensorFlow first, and try to get it to run. One of two things will happen:
- It will fail on the CUDA drivers, so you’ll need to repeat this step
- It will fail on the CuDNN drivers, so you know your CUDA drivers are good, and you will get the version of CuDNN that you need.
So let’s install TensorFlow next:
Installing TensorFlow nightly build
I’m assuming here you’re using TensorFlow with GPU, so, to install it, from a command prompt, simply type:
(Replace with tf-nightly if you don’t want the GPU version)
Then, once it’s completed, in your command prompt window type
to open the python editor, and within it type
If you are using the GPU version you should get an error. That’s good.
If you have the wrong CUDA drivers, it will likely show that cudart64_XX.dll fails, where ‘XX’ is a version number. At time of writing it is cudart_90.dll, which tells you that you need version 9.0 of the CUDA drivers. Check this version carefully, and repeat the previous step (downloading and installing the drivers) until this error goes away. Be sure to close the command prompt window, and open a new one to test the new installation so your paths are up to date.
When you have the right CUDA drivers, but the wrong or missing CuDNN drivers, you’ll see an error saying something like cudnn64_X.dll is missing, where X is a version number. Take note of that, and you’ll use it in the next step. Exit python and close the command prompt window before continuing. In my case it told me that cudnn64_7.dll was missing, so I know I need version 7.
Installing the CuDNN libraries
The CuDNN libraries are an update to CUDA for Deep Neural Nets, and used by TensorFlow to accelerate deep learning on NVidia GPUs. You can download them from here: https://developer.nvidia.com/cudnn. You’ll have to sign up for an NVidia developer account first, but it’s pretty quick and costs nothing. Once you’ve signed in you’ll see a variety of CUDNN downloads. Here’s where you’ll have to match to the version of CUDA that you downloaded in the previous section. So, for example, I used CUDA 9.0, so made sure I used a CuDNN that matches both this and the required version you saw in the last step (in my case version 7), so I chose cuDNN v7.0.5 for CUDA 9.0

This will download a ZIP file with several folders, each containing the CuDNN files (one DLL, one header and one library). Find your CUDA installation (should be at something like: C:\Program Files\NVIDIA GPU Computing Toolkit\CUDA\v9.0)
You’ll see the directories from the ZIP file are also in this directory — i.e. there’s a bin, and include, a lib etc. Copy the files from the zip to the relevant directory. So, for example, drag cudnn64_7.dll to C:\Program Files\NVIDIA GPU Computing Toolkit\CUDA\v9.0\bin, and do the same for the others. You can see more here: http://docs.nvidia.com/deeplearning/sdk/cudnn-install/index.html#install-windows
Once you’re done, re-open a command prompt window, and test TensorFlow again!
Testing TensorFlow
If all goes to plan, you can now open a command prompt window, and type ‘python’ to open the Python interpreter. Then type:
And if you have the right versions of the libraries, you should see no error, like this:

If you see errors in cudart64_xx.dll or cudnn64_x.dll, go back to the previous steps and make sure you’ve downloaded and installed the correct versions of the drivers that cause these errors. It takes a bit of trial and error I’m afraid 🙁
Then, you can check your TensorFlow version by typing
Note that there are 2 underscores before and after ‘version’. TensorFlow will output it’s version #, as shown here:

You now have a full TensorFlow runtime environment with GPU support on Windows! Congratulations. Time to do some deep learning…
Laurence Moroney
Developer Advocate at Google for Artificial Intelligence. Host of YouTube Show ‘Coffee with a Googler’. Author of lots of books, comics, screenplays and more!
Build from source on Windows
Build a TensorFlow pip package from source and install it on Windows.
Setup for Windows
Install the following build tools to configure your Windows development environment.
Install Python and the TensorFlow package dependencies
Install a Python 3.6.x 64-bit release for Windows. Select pip as an optional feature and add it to your %PATH% environmental variable.
Install the TensorFlow pip package dependencies:
The dependencies are listed in the setup.py file under REQUIRED_PACKAGES .
Install Bazel
Install Bazel, the build tool used to compile TensorFlow. For Bazel version, see the tested build configurations for Windows. Configure Bazel to build C++.
Add the location of the Bazel executable to your %PATH% environment variable.
Install MSYS2
Install MSYS2 for the bin tools needed to build TensorFlow. If MSYS2 is installed to C:\msys64 , add C:\msys64\usr\bin to your %PATH% environment variable. Then, using cmd.exe , run:
Install Visual C++ Build Tools 2019
Install the Visual C++ build tools 2019. This comes with Visual Studio 2019 but can be installed separately:
Install GPU support (optional)
See the Windows GPU support guide to install the drivers and additional software required to run TensorFlow on a GPU.
Download the TensorFlow source code
Use Git to clone the TensorFlow repository ( git is installed with MSYS2):
The repo defaults to the master development branch. You can also checkout a release branch to build:
Configure the build
Configure your system build by running the following at the root of your TensorFlow source tree:
This script prompts you for the location of TensorFlow dependencies and asks for additional build configuration options (compiler flags, for example). The following shows a sample run of python ./configure.py (your session may differ):
View sample configuration session
Configuration options
For GPU support, specify the versions of CUDA and cuDNN. If your system has multiple versions of CUDA or cuDNN installed, explicitly set the version instead of relying on the default. ./configure.py creates symbolic links to your system’s CUDA libraries—so if you update your CUDA library paths, this configuration step must be run again before building.
Build the pip package
TensorFlow 2.x
tensorflow:master repo has been updated to build 2.x by default. Install Bazel and use bazel build to create the TensorFlow package.
TensorFlow 1.x
To build the 1.x version of TensorFlow from master, use bazel build —config=v1 to create a TensorFlow 1.x package.
CPU-only
Use bazel to make the TensorFlow package builder with CPU-only support:
GPU support
To make the TensorFlow package builder with GPU support:
Bazel build options
Use this option when building to avoid issue with package creation: tensorflow:issue#22390
Building TensorFlow from source can use a lot of RAM. If your system is memory-constrained, limit Bazel’s RAM usage with: —local_ram_resources=2048 .
If building with GPU support, add —copt=-nvcc_options=disable-warnings to suppress nvcc warning messages.
Build the package
The bazel build command creates an executable named build_pip_package —this is the program that builds the pip package. For example, the following builds a .whl package in the C:/tmp/tensorflow_pkg directory:
Although it is possible to build both CUDA and non-CUDA configs under the same source tree, we recommend running bazel clean when switching between these two configurations in the same source tree.
Install the package
The filename of the generated .whl file depends on the TensorFlow version and your platform. Use pip3 install to install the package, for example:
Build using the MSYS shell
TensorFlow can also be built using the MSYS shell. Make the changes listed below, then follow the previous instructions for the Windows native command line ( cmd.exe ).
Disable MSYS path conversion
MSYS automatically converts arguments that look like Unix paths to Windows paths, and this doesn’t work with bazel . (The label //path/to:bin is considered a Unix absolute path since it starts with a slash.)
Set your PATH
Add the Bazel and Python installation directories to your $PATH environmental variable. If Bazel is installed to C:\tools\bazel.exe , and Python to C:\Python36\python.exe , set your PATH with:
For GPU support, add the CUDA and cuDNN bin directories to your $PATH :
Tested build configurations
| Version | Python version | Compiler | Build tools |
|---|---|---|---|
| tensorflow-2.4.0 | 3.6-3.8 | MSVC 2019 | Bazel 3.1.0 |
| tensorflow-2.3.0 | 3.5-3.8 | MSVC 2019 | Bazel 3.1.0 |
| tensorflow-2.2.0 | 3.5-3.8 | MSVC 2019 | Bazel 2.0.0 |
| tensorflow-2.1.0 | 3.5-3.7 | MSVC 2019 | Bazel 0.27.1-0.29.1 |
| tensorflow-2.0.0 | 3.5-3.7 | MSVC 2017 | Bazel 0.26.1 |
| tensorflow-1.15.0 | 3.5-3.7 | MSVC 2017 | Bazel 0.26.1 |
| tensorflow-1.14.0 | 3.5-3.7 | MSVC 2017 | Bazel 0.24.1-0.25.2 |
| tensorflow-1.13.0 | 3.5-3.7 | MSVC 2015 update 3 | Bazel 0.19.0-0.21.0 |
| tensorflow-1.12.0 | 3.5-3.6 | MSVC 2015 update 3 | Bazel 0.15.0 |
| tensorflow-1.11.0 | 3.5-3.6 | MSVC 2015 update 3 | Bazel 0.15.0 |
| tensorflow-1.10.0 | 3.5-3.6 | MSVC 2015 update 3 | Cmake v3.6.3 |
| tensorflow-1.9.0 | 3.5-3.6 | MSVC 2015 update 3 | Cmake v3.6.3 |
| tensorflow-1.8.0 | 3.5-3.6 | MSVC 2015 update 3 | Cmake v3.6.3 |
| tensorflow-1.7.0 | 3.5-3.6 | MSVC 2015 update 3 | Cmake v3.6.3 |
| tensorflow-1.6.0 | 3.5-3.6 | MSVC 2015 update 3 | Cmake v3.6.3 |
| tensorflow-1.5.0 | 3.5-3.6 | MSVC 2015 update 3 | Cmake v3.6.3 |
| tensorflow-1.4.0 | 3.5-3.6 | MSVC 2015 update 3 | Cmake v3.6.3 |
| tensorflow-1.3.0 | 3.5-3.6 | MSVC 2015 update 3 | Cmake v3.6.3 |
| tensorflow-1.2.0 | 3.5-3.6 | MSVC 2015 update 3 | Cmake v3.6.3 |
| tensorflow-1.1.0 | 3.5 | MSVC 2015 update 3 | Cmake v3.6.3 |
| tensorflow-1.0.0 | 3.5 | MSVC 2015 update 3 | Cmake v3.6.3 |
| Version | Python version | Compiler | Build tools | cuDNN | CUDA |
|---|---|---|---|---|---|
| tensorflow_gpu-2.4.0 | 3.6-3.8 | MSVC 2019 | Bazel 3.1.0 | 8.0 | 11.0 |
| tensorflow_gpu-2.3.0 | 3.5-3.8 | MSVC 2019 | Bazel 3.1.0 | 7.6 | 10.1 |
| tensorflow_gpu-2.2.0 | 3.5-3.8 | MSVC 2019 | Bazel 2.0.0 | 7.6 | 10.1 |
| tensorflow_gpu-2.1.0 | 3.5-3.7 | MSVC 2019 | Bazel 0.27.1-0.29.1 | 7.6 | 10.1 |
| tensorflow_gpu-2.0.0 | 3.5-3.7 | MSVC 2017 | Bazel 0.26.1 | 7.4 | 10 |
| tensorflow_gpu-1.15.0 | 3.5-3.7 | MSVC 2017 | Bazel 0.26.1 | 7.4 | 10 |
| tensorflow_gpu-1.14.0 | 3.5-3.7 | MSVC 2017 | Bazel 0.24.1-0.25.2 | 7.4 | 10 |
| tensorflow_gpu-1.13.0 | 3.5-3.7 | MSVC 2015 update 3 | Bazel 0.19.0-0.21.0 | 7.4 | 10 |
| tensorflow_gpu-1.12.0 | 3.5-3.6 | MSVC 2015 update 3 | Bazel 0.15.0 | 7.2 | 9.0 |
| tensorflow_gpu-1.11.0 | 3.5-3.6 | MSVC 2015 update 3 | Bazel 0.15.0 | 7 | 9 |
| tensorflow_gpu-1.10.0 | 3.5-3.6 | MSVC 2015 update 3 | Cmake v3.6.3 | 7 | 9 |
| tensorflow_gpu-1.9.0 | 3.5-3.6 | MSVC 2015 update 3 | Cmake v3.6.3 | 7 | 9 |
| tensorflow_gpu-1.8.0 | 3.5-3.6 | MSVC 2015 update 3 | Cmake v3.6.3 | 7 | 9 |
| tensorflow_gpu-1.7.0 | 3.5-3.6 | MSVC 2015 update 3 | Cmake v3.6.3 | 7 | 9 |
| tensorflow_gpu-1.6.0 | 3.5-3.6 | MSVC 2015 update 3 | Cmake v3.6.3 | 7 | 9 |
| tensorflow_gpu-1.5.0 | 3.5-3.6 | MSVC 2015 update 3 | Cmake v3.6.3 | 7 | 9 |
| tensorflow_gpu-1.4.0 | 3.5-3.6 | MSVC 2015 update 3 | Cmake v3.6.3 | 6 | 8 |
| tensorflow_gpu-1.3.0 | 3.5-3.6 | MSVC 2015 update 3 | Cmake v3.6.3 | 6 | 8 |
| tensorflow_gpu-1.2.0 | 3.5-3.6 | MSVC 2015 update 3 | Cmake v3.6.3 | 5.1 | 8 |
| tensorflow_gpu-1.1.0 | 3.5 | MSVC 2015 update 3 | Cmake v3.6.3 | 5.1 | 8 |
| tensorflow_gpu-1.0.0 | 3.5 | MSVC 2015 update 3 | Cmake v3.6.3 | 5.1 | 8 |
Except as otherwise noted, the content of this page is licensed under the Creative Commons Attribution 4.0 License, and code samples are licensed under the Apache 2.0 License. For details, see the Google Developers Site Policies. Java is a registered trademark of Oracle and/or its affiliates.


