- Установить tkinter для Python
- 15 ответов
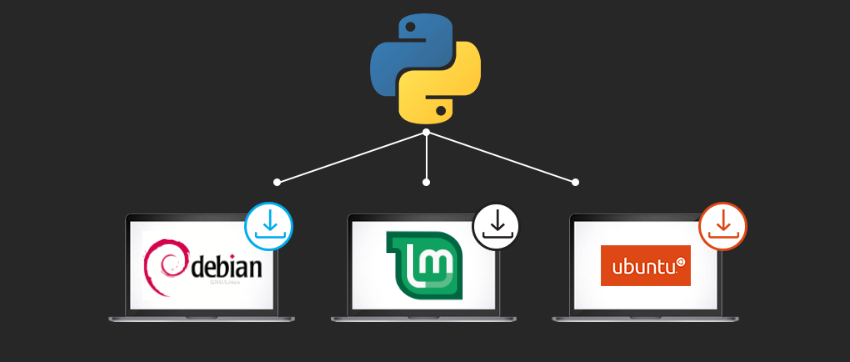
- How to install and use Tkinter in ubuntu / Debian / Linux mint
- How to Use it ?
- Как установить Python 3.8 на Ubuntu, Debian и LinuxMint
- Подготовка к установке Python 3.8 на Ubuntu, Debian и LinuxMint
- Ошибка ImportError: No named ‘_tkinter’
- Скачать Python 3.8 для Ubuntu, Debian и LinuxMint
- Компиляция исходного кода Python для Ubuntu, Debian и LinuxMint
- Проверка версии Python на системах Ubuntu, Debian и LinuxMint
- Installing Tk
- Jump to Tk Install Instructions:
- Installing Tk on macOS
- The Easy Way
- Installing Tcl/Tk
- Compiling Python
- Install ActiveTcl
- Install Ruby
- Install Ruby/Tk
- Install ActiveTcl
- Install Perl
- Install Tkx
- Installing Tk on Windows
- Install ActiveTcl
- Install Ruby
- Install Ruby/Tk
- Tell Ruby Where to Find ActiveTcl
- Installing Tk on Linux
- Option 1. Your Linux Distribution’s Package Manager
- Option 2. Install Tcl/Tk and Compile the Standard Python Distribution
- Verifying your Install
- Using a Package Manager
- Using ActiveTcl
- The Obligatory First Program
Установить tkinter для Python
Я пытаюсь импортировать Tkinter. Тем не менее, я получаю сообщение об ошибке, указывающее, что Tkinter не был установлен:
ImportError: нет модуля с именем _tkinter, пожалуйста, установите пакет python-tk
Я мог бы, вероятно, установить его с помощью synaptic manager (могу ли я?), однако, мне пришлось бы установить его на каждой машине, на которой я программирую. Можно ли добавить библиотеку Tkinter в мое рабочее пространство и ссылаться на нее оттуда?
15 ответов
не очень легко установить Tkinter локально для использования с системным Python. Вы можете создать его из источников, но это обычно не лучшая идея с дистрибутивом на основе двоичного пакета, который вы, по-видимому, используете.
безопасность apt-get install python-tk на вашей машине(машинах). (Работает в дистрибутивах, производных от Debian, таких как Ubuntu; обратитесь к менеджеру пакетов и списку пакетов в других дистрибутивах.)
Если, как и я, у вас нет привилегий root в вашей сети из-за ваших замечательных друзей в I. S., и вы работаете в локальной установке, у вас могут возникнуть проблемы с вышеуказанными подходами.
Я потратил века на Google-но в конце концов, это легко.
загрузите tcl и tk из http://www.tcl.tk/software/tcltk/download.html и установите их локально тоже.
для установки локально на Linux (я сделал это в своем домашнем каталоге), извлечь .смола.GZ файлы для tcl и tk. Затем откройте файлы readme внутри ./ каталог unix. Я побежал!—4—>
это может показаться болью, но файлы крошечные, и установка очень быстрая.
затем повторно python setup.py build и python setup.py install в вашем каталоге установки python — и он должен работать. Это сработало для меня — и теперь я могу импортировать Tkinter и т. д., чтобы мое сердце-yipidy-yay. Целый день потратил на это — надеюсь, эта записка спасет других от боли.
На самом деле, вам просто нужно использовать следующее, Чтобы установить tkinter для python3:
кроме того, для пользователей Fedora, используйте следующую команду:
Если вы используете Python 3, это может быть потому, что вы набираете Tkinter не tkinter
вам понадобится пакет и его зависимости.
поскольку вы упомянули synaptic, вы должны использовать систему на основе Debian. один из способов получить то, что вам нужно:
вам не нужно загружать Tkinter — это неотъемлемая часть всех дистрибутивов Python (кроме двоичных дистрибутивов для платформ, которые не поддерживают Tcl/Tk).
Как пишет здесь. В моем случае в Windows помогла переустановка дистрибутива Python. Вероятно, давным-давно я отключил функцию установки «Tcl/Tk». После переустановки все работает нормально и я могу import _tkinter и import Tkinter .
для пользователей Arch Linux это немного похоже на
Если вы используете RHEL, CentOS, Oracle Linux и т. д. Вы можете использовать Yum для установки модуля tkinter
tk-devel также должен быть установлен в моем случае
установите их и перестройте python
Fedora release 25 (двадцать пять)
это сработало для меня.
есть _tkinter и Tkinter-оба работают на Py 3.икс Но для безопасности-загрузите Loopy и измените корневой каталог python(если вы используете IDE, такую как PyCharms) в каталог установки Loopy. Вы получите эту библиотеку и многое другое.
если вы используете Python 3 затем вы должны установить следующим образом:
Tkinter для Python 2 ( python-tk ) отличается от Python 3 ‘ s ( python3-tk ).
ситуация на macOS по-прежнему сложно, но выполнимо:
Python.org настоятельно рекомендуем загрузить tkinter из ActiveState, а ты должны читать лицензия first (подсказка: не распространять или не нужна поддержка).
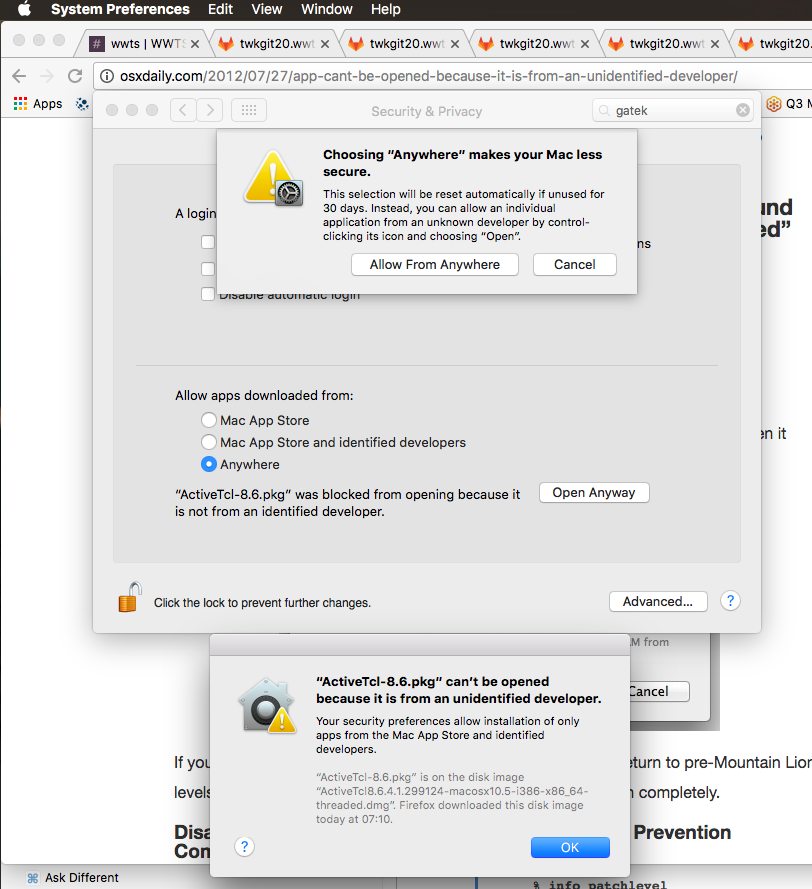
при открытии загрузки OS X 10.11 отклонила его, потому что не смогла найти мою квитанцию: «ActiveTcl-8.6.pkg не может быть открыт, потому что он из неопознанного разработчик.»
Я последовал за OSXDaily исправить с 2012 который предложил разрешить из любого места. Но OS X теперь добавила опцию «Открыть в любом случае», чтобы разрешить (например) Active-Tcl как один раз, а опция» Anywhere » получила тайм-аут.
Если вы хотите установить его, вы должны перейти к терминалу и введите: —
sudo apt-get python-tk
и если вы хотите обновить существующий пакет или Python в этом случае:-
sudo apt-получить обновление
тогда все ваши пакеты будут обновлены. И если вы хотите удалить пакет, вы просто введите: —
sudo apt-get remove [имя пакета]#в этом случае python-tk
Tkinter-это модуль GUI для python. вы можете использовать его для создания приложений на основе GUI в python. Tkinter предоставляет несколько GUI виджетов, таких как кнопки,меню, полотно,текст,рамки,надписи и т. д. для разработки настольных приложений.Хотя Tkinter очень популярен и входит в состав windows, MacOSX install of python, есть также альтернативные варианты, такие как pyQt, wxPython.
в этом уроке мы рассмотрим, как установить его на Linux и использовать его на примере.
во-первых, проверить если у вас установлен python, а также проверьте его версию
откройте терминал и введите python. если он установлен, то он покажет информацию, такую как версия, справка. проверьте свою версию (моя версия python 2.7.9)
$ python Python 2.7.9 (по умолчанию, 2 апреля 2015, 15:33 :21) [GCC 4.9.2] на linux2 Введите «справка», «авторское право», «кредиты» или «лицензия» для получения дополнительной информации.
если у вас нет python, установите его sudo apt-get install питон
если вы хотите установить python 3, введите следующее. Если вы новичок, я бы рекомендовал python 2 вместо python 3. Python 2 по-прежнему очень популярен, и на нем сделано много приложений. На ubuntu python2 по-прежнему по умолчанию sudo apt-получить установить python3
Наконец, Установите Tkinter
теперь давайте проверим, хорошо ли работает Tkinter с этим маленьким пример
откройте терминал и войдите в свою оболочку python. питон
для питон3 питон3
если python был установлен правильно, вы получите приглашение>>>. aman@vostro:
теперь импортируйте модуль Tkinter. он не покажет никакой ошибки, если он был импортирован правильно. Примечание: убедитесь, что вы вводите Tkinter (не tkinter) в python2 и tkinter (не Tkinter) в python3.
теперь, просто чтобы проверить, вы можете создать пустой окно с помощью Tkinter.
Источник
How to install and use Tkinter in ubuntu / Debian / Linux mint
Tkinter is a GUI module for python. you can use it to make GUI based applications in python. Tkinter provides several GUI widgets like buttons,menu, canvas,text,frame,label etc. to develop desktop applications.Though Tkinter is very popular and is included with windows, macosx install of python, There are also alternative choices like pyQt, wxPython…
In this tutorial we will see how to install it on linux and use it with an example.
First, check if you have python installed and also check its version
Open up your terminal and type python. if its installed then it will show information like version, help… check your version (mine is python 2.7.9)
If you don’t have python then install it
If you want to install python 3 then enter the following. If you are a newbie, I would recommend python 2 instead of python 3. Python 2 is still very popular and many apps are made on it. On ubuntu python2 is still the default
Finally, Install Tkinter
How to Use it ?
Now, lets check if Tkinter is working well with this little example
open your terminal and enter into your python shell.
if python was installed correctly you will get a >>> prompt.
Now import Tkinter module. it wont show any error if it got imported correctly. NOTE: Make sure you type Tkinter (not tkinter) in python2 and tkinter (not Tkinter) in python3.
Now, just to check you can create an empty window using Tkinter.
Источник
Как установить Python 3.8 на Ubuntu, Debian и LinuxMint
Совсем недавно стала доступна новая версия Python — Python 3.8. Теперь она доступна для скачивания и последующей установки каждому пользователю. В следующем руководстве будет показано, как установить Python 3.8 на операционные системы Ubuntu, Debian и LinuxMint. Подробнее о релизах Python можно узнать здесь.
Подготовка к установке Python 3.8 на Ubuntu, Debian и LinuxMint
Python 3.8 будет устанавливаться из исходника. По этой причине изначально требуется установить несколько библиотек разработки для компиляции исходного кода Python. Для установки всех необходимых компонентов для Python используется следующая команда:
Есть вопросы по Python?
На нашем форуме вы можете задать любой вопрос и получить ответ от всего нашего сообщества!
Telegram Чат & Канал
Вступите в наш дружный чат по Python и начните общение с единомышленниками! Станьте частью большого сообщества!
Паблик VK
Одно из самых больших сообществ по Python в социальной сети ВК. Видео уроки и книги для вас!
Ошибка ImportError: No named ‘_tkinter’
Данная ошибка появляется из за того, что Tkinter не был установлен ДО компиляции Python. Сперва вам нужно установить Tkinter потом уже собрать нужную версию Python. Иначе, после установки Python вы никак не сможете устранить эту ошибку.
Скачать Python 3.8 для Ubuntu, Debian и LinuxMint
Скачайте исходный код Python 3.8 с официального сайта, используя следующую команду. Также можно скачать последнюю версию по точной ссылке, указанной ниже.
Распакуйте файл исходного кода из архива:
Компиляция исходного кода Python для Ubuntu, Debian и LinuxMint
Для компиляции исходного кода Python на систему Linux используйте указанный ниже набор команд, используя altinstall .
make altinstall используется для предотвращения замены бинарного файла Python, который по умолчанию в /usr/bin/python .
Проверка версии Python на системах Ubuntu, Debian и LinuxMint
Проверить текущую версию Python можно при помощи следующей команды. Версия в системе по умолчанию переписана не была, поэтому используем команду для Python 3.8, что следующая:
После успешной установки для экономии места на диске можете удалить загруженный архив при помощи следующей команды:

Являюсь администратором нескольких порталов по обучению языков программирования Python, Golang и Kotlin. В составе небольшой команды единомышленников, мы занимаемся популяризацией языков программирования на русскоязычную аудиторию. Большая часть статей была адаптирована нами на русский язык и распространяется бесплатно.
E-mail: vasile.buldumac@ati.utm.md
Образование
Universitatea Tehnică a Moldovei (utm.md)
- 2014 — 2018 Технический Университет Молдовы, ИТ-Инженер. Тема дипломной работы «Автоматизация покупки и продажи криптовалюты используя технический анализ»
- 2018 — 2020 Технический Университет Молдовы, Магистр, Магистерская диссертация «Идентификация человека в киберпространстве по фотографии лица»
Источник
Installing Tk
In this chapter, you’ll get Tk installed on your machine, verify it works, and then see a quick example of what a Tk program looks like.
Jump to Tk Install Instructions:
Though pretty much all macOS and Linux machines come with Tk installed already, it’s often an older version (typically 8.4.x or an early 8.5). You want to make sure you’ve got at least version 8.5 (preferably 8.6) to use the new widget set, so if that’s not already there, you’ll want to install the newer version.
You’ll need both Tk and bindings for the language you’re using it from. Sometimes these are bundled together, sometimes not. Though there are lots of ways to install Tk, often the easiest is to download and install one of the versions provided by ActiveState (www.activestate.com).
Users of recent Python versions can avoid this intermediate step. Starting with Python 3.7, the binary installers available at python.org now include everything you need to use Tk out of the box. If you’re using an earlier Python version, or want to compile it yourself, you’ll need to install Tcl/Tk on your system to do so. In this case, ActiveState’s distributions are still the recommended way to go.
Remember, this tutorial assumes you’re using Python 3, not Python 2. There are some significant differences between the two, including module naming, which is the first thing you’ll encounter when trying Tkinter.
ActiveState is a company that sells professional developer tools for dynamic languages. They also provide (for free) quality-controlled distributions of some of these languages, and happen to employ a number of core developers of these languages.
Installing Tk on macOS
Install Tk for Python (Tkinter) on macOS
The Easy Way
As noted, the easiest way to get Tk and Tkinter installed on your system is using Python’s binary installer, available at python.org. Thanks to work by Python core developer Ned Deily, binary installers starting with version 3.7 include Tcl and Tk.
Remember, we’re using Python 3.x here, not 2.x. As of this writing, the latest 3.9 installer (3.9.0rc1) includes Tk 8.6.8.
If, however, you’re compiling Python yourself, you’ll have more work to do. Read on.
Installing Tcl/Tk
The Tkinter module is included with core Python, of course, but you’ll need a version of Tcl/Tk on your system to compile it against. Do yourself a huge favor and get the most recent version.
Whatever you do, do not rely on the Tk versions included in macOS! Older versions included Tk 8.4.x. Even more recent macOS versions include an early 8.5 version (8.5.9, released in 2010), which has several serious bugs that are easily triggered by Tkinter.
While there are several different ways to get Tcl and Tk onto your machine, the easiest and most recommended is to use the ActiveTcl distribution.
In your web browser, visit www.activestate.com/products/activetcl. Download ActiveTcl (as of this writing, it’s version 8.6.9). Make sure to download an 8.6.x version, not something older! Note that you will need to create an account with ActiveState (no cost) to download it. After it’s downloaded, run the installer to get Tcl and Tk loaded onto your machine.
If you’re a masochist and want to read about other Tcl/Tk options and variations and how they interact with Python, see the Mac Tcl/Tk page at python.org If you want to compile Tcl/Tk from source, see www.tcl.tk.
Compiling Python
When compiling Python from source, you may need to tell it where to find the ActiveTcl (or other) distribution. Otherwise, it might not find any Tcl/Tk distribution (so Tkinter won’t work), or it could find the (ancient and broken) version of Tcl/Tk supplied with macOS.
If you’re using Python 3.9 or newer, the build system will look in /Library/Frameworks , where ActiveState and other custom builds are typically installed.
The initial «%» is the Unix shell prompt; you don’t have to type it. The rest of it should all go on one line, without adding line breaks.
When compiling Python versions prior to 3.9, you will need to add two new command-line options to the initial ./configure in the Python build process. The first provides the locations of the Tcl and Tk include files, and the second provides the locations of the Tcl and Tk libraries. These are usually found in two different locations (i.e., Tcl.framework and Tk.framework ). You therefore need to provide two locations for the include files and two for the libraries. Note the location of the quotes in the command below and the spaces separating the Tcl and Tk paths.
If you have multiple versions of Tcl/Tk installed on your system (and in the same frameworks), you may need to check inside the framework to ensure the most recent version is marked as the current one. If not, you may need to adjust your paths to point to the specific version (i.e., Versions/8.x/ ) within each framework.
When everything is built, be sure to test it out. Start Python from your terminal, e.g.
This should give you the Python command prompt. From the prompt, enter these two commands:
This should pop up a small window; the first line at the top of the window should say «This is Tcl/Tk version 8.6»; make sure it is not 8.4 or 8.5!
Get an error saying «No module named tkinter» ? You’re probably using Python 2. This tutorial assumes Python 3.
You can also get the exact version of Tcl/Tk that is being used with:
It should return something like ‘8.6.9’.
Verified install using ActiveTcl 8.6.9.8609.2 and Python 3.90rc1 source code from python.org on macOS 10.15.6.
Install Tk for Tcl on macOS
On macOS, the easiest way to get Tk is to install the «ActiveTcl» distribution from ActiveState, which includes Tcl, Tk, plus a number of other extension libraries.
In your web browser, go to www.activestate.com, and follow along the links to download the Community Edition of ActiveTcl. Note that you will need to create an account with ActiveState (no cost) to download it. Make sure you’re downloading an 8.6.x version, not an older version.
Run the installer to get everything loaded onto your machine. When you’re done, you’ll find a shiny new application called «Wish 8.6» inside the Utilities folder of your Applications folder. This is the «wish» shell, an application that includes both Tcl and Tk.
If you launch that application, you’ll see two windows popup (see below), one titled «Wish» which will contain your application, and the second titled «Console» which is where you can type in Tcl/Tk commands.

The Wish application running on macOS.
For convenient use from the Unix command line, you’ll also find a script installed as /usr/local/bin/wish8.6 which will launch the same application.
To verify the exact version of Tcl/Tk that you are running, from the Wish console type the following:
We want this to be returning something like ‘8.6.9’.
Verified install using ActiveTcl 8.6.9.8609.2 on macOS 10.15.6.
Install Tk for Ruby (Ruby/Tk) on macOS
While previous versions of macOS included both Ruby and Tk (albeit older 8.4 versions), since Snow Leopard this has no longer been the case.
Ruby/Tk is a binding that links against an existing but separate Tk library. So, to get the latest version of Tk for Ruby, we’re going to have to do first download the latest 8.6.x Tcl/Tk version from ActiveState.
Install ActiveTcl
The «ActiveTcl» distribution from ActiveState contains the latest Tk, as well as the latest version of Tcl (which Ruby’s Tk bindings use internally to talk to Tk). In your web browser, go to www.activestate.com, and follow along the links to download the Community Edition of ActiveTcl. Note that you will need to create an account with ActiveState (no cost) to download it. Again, make sure you’re downloading an 8.6.x version.
Run the installer and everything will be loaded onto your machine.
Install Ruby
Next, you’ll want to install Ruby. There are multiple ways to do this, as explained at www.ruby-lang.org. One option is to use a package manager like Homebrew. Once it’s been installed (at /usr/local/bin/brew ) you can install Ruby from a command prompt (e.g. Terminal) via:
The initial «%» is the Unix shell prompt; you don’t have to type it.
That should put the Ruby binaries in /usr/local/opt/ruby/bin ). You can check this via brew info ruby . Below, where we use gem or irb , make sure you’re running the version you just installed. One way to do that is specifying the full path.
Install Ruby/Tk
Next, you’ll need to download and install Ruby’s Tk module, which is packaged as a Ruby gem. To do so, from the command prompt, run:
The Tk gem will look for installed versions of Tcl and Tk in /Library/Frameworks , which is where ActiveTcl puts them.
To verify that everything worked, start up /usr/local/opt/ruby/bin/irb and type:
The first line should load Ruby/Tk; typically if there was a problem with finding Tcl/Tk it would show up here. The second line will return the version of Tk that you’re running, which should be something like «8.6.9».
Verified install using ActiveTcl 8.6.9.8609.2 and Ruby 2.7.1 via Homebrew on macOS 10.15.6.
Install Tk for Perl (Tkx) on macOS
For modern Tk programming using Perl, the «Tkx» module is highly recommended, and we’ll be using that here. It links against an existing but separate Tk library. So, to get the latest version of Tk for Perl, we’re going to have to do first download the latest 8.6.x Tcl/Tk version from ActiveState.
This tutorial used to rely on the ActivePerl distribution from ActiveState, which bundled a full Tcl/Tk installation, as well as the Tkx module. Unfortunately, as of this writing, there is not a macOS version of ActivePerl available.
Install ActiveTcl
The «ActiveTcl» distribution from ActiveState contains the latest Tk, as well as the latest version of Tcl (which Perl’s Tk bindings use internally to talk to Tk). In your web browser, go to www.activestate.com, and follow along the links to download the Community Edition of ActiveTcl. Note that you will need to create an account with ActiveState (no cost) to download it. Again, make sure you’re downloading an 8.6.x version.
Run the installer and everything will be loaded onto your machine.
Install Perl
Next, you’ll want to install Perl. There are multiple ways to do this, as explained at www.perl.org. One option is to use a package manager like Homebrew. Once it’s been installed (at /usr/local/bin/brew ) you can install Ruby from a command prompt (e.g. Terminal) via:
The initial «%» is the Unix shell prompt; you don’t have to type it.
That should put the Perl binaries in /usr/local/opt/perl/bin ). You can check this via brew info perl . Below, where we use perl , make sure you’re running the version you just installed. One way to do that is specifying the full path.
Install Tkx
Next, you’ll need to download and install Perl’s Tkx module. We can grab it from CPAN. Unfortunately, at present it will not install correctly due to errors in its tests. We can bypass the tests and install it anyway. To do so, from the command prompt, run:
The Tkx module will look for installed versions of Tcl and Tk in /Library/Frameworks , which is where ActiveTcl puts them.
To check that this worked, run this from the Unix command line:
This will return the version of Tcl/Tk that it found. It should be something like «8.6.9».
Verified install using ActiveTcl 8.6.9.8609.2 and Perl 5.32.0 via Homebrew on macOS 10.15.6.
Installing Tk on Windows
Install Tk for Python (Tkinter) on Windows
Tkinter (and, since Python 3.1, ttk, which is the interface to the newer themed widgets) is included in the Python standard library. We highly recommend installing Python using the standard binary distributions from python.org. These will automatically install Tcl/Tk, which of course, is needed by Tkinter.
If you’re instead building Python from source code, the Visual Studio projects included in the «PCbuild» directory can automatically fetch and compile Tcl/Tk on your system.
Once you’ve installed or compiled Python, test it out to make sure Tkinter works. From the Python prompt, enter these two commands:
This should pop up a small window; the first line at the top of the window should say «This is Tcl/Tk version 8.6»; make sure it is not 8.4 or 8.5!
Get an error saying «No module named tkinter» ? You’re probably using Python 2. This tutorial assumes Python 3.
You can also get the exact version of Tcl/Tk that is being used with:
It should return something like ‘8.6.9’.
Verified using Python 3.9.0rc1 binary installer from python.org (containing Tcl/Tk 8.6.9) on Windows 10 version 1809.
Install Tk for Tcl on Windows
On Windows, the easiest way to get Tcl/Tk onto your machine is to install the «ActiveTcl» distribution from ActiveState, which includes Tcl, Tk, plus a number of other extension libraries.
In your web browser, go to www.activestate.com, and follow along the links to download the Community Edition of ActiveTcl for Windows. Make sure you’re downloading an 8.6.x version. Note that you will need to create an account with ActiveState (no cost) to download it.
Run the installer, and follow along. You’ll end up with a fresh install of ActiveTcl, usually located in C:\ActiveTcl. From a command prompt, you should then be able to run a Tcl/Tk 8.6 shell via:
This should pop up a small window titled «wish», which will contain your application. A second, larger window titled «Console» is where you can type in Tcl/Tk commands. To verify the exact version of Tcl/Tk that you are running, type the following:
We want this to be returning something like ‘8.6.9’.
Type «exit» in the console window to exit. You may also want to add C:\ActiveTcl\bin to your PATH environment variable.
Verified install using ActiveTcl 8.6.9.8609-2 on Windows 10.
Install Tk for Ruby (Ruby/Tk) on Windows
Ruby/Tk is the binding for Tk. In the distant past, installing it on your Windows machine used to be pure hell, involving installing a separate version of Tcl/Tk, downloading a development environment like Visual Studio, downloading the Ruby source code, carefully compiling Ruby, .
Luckily, it is now only mildly painful, thanks to the good folks behind RubyInstaller for Windows.
The one-click installer used to include everything you needed to run Ruby/Tk, including the underlying Tcl/Tk libraries. Unfortunately, Tk was removed from the Ruby standard library (stdlib) in version 2.4, and made available as an external gem. RubyInstaller followed suit.
Install ActiveTcl
First, you’ll need to install Tcl/Tk.
On Windows, the easiest way to get Tcl/Tk onto your machine is to install the «ActiveTcl» distribution from ActiveState, which includes Tcl, Tk, plus a number of other extension libraries.
In your web browser, go to www.activestate.com, and follow along the links to download the Community Edition of ActiveTcl for Windows. Make sure you’re downloading an 8.6.x version. Note that you will need to create an account with ActiveState (no cost) to download it.
Run the installer, and follow along. You’ll end up with a fresh install of ActiveTcl in C:\ActiveTcl.
Install Ruby
Next, go to rubyinstaller.org. Download and run the installer, which will install everything into the directory you choose, e.g. C:\Ruby26 .
Install Ruby/Tk
Next, you’ll need to download and install Ruby’s Tk module, which is packaged as a Ruby gem. To do so, open a command prompt and run:
The initial «%» is the Unix shell prompt; you don’t have to type it.
Tell Ruby Where to Find ActiveTcl
You’re not done yet. If you try to use Tk from Ruby, it will complain that it can’t find the underlying Tcl/Tk libraries. We’ll need to do a couple of things to fix that.
First, Ruby needs to find the tcl86t.dll and tk86t.dll shared libraries. These are located in C:\ActiveTcl\bin . Make a copy of them somewhere Ruby can find them, e.g. C:\Ruby26\bin .
Second, the Tcl and Tk shared libraries will look for a bunch of initialization and other scripts which were installed as part of ActiveTcl. The best way to specify where to find them is to set the TCL_LIBRARY and TK_LIBRARY system environment variables.
This can be done in the Windows control panel (or search for «system environment variables» from the taskbar). In Windows 10, you’ll find a button labelled «Environment Variables. » in the «Advanced» tab of «System Properties». Add these system variables:
If you’re running a shell via command prompt you’ll need to restart it to see those new additions.
To verify the version of Tk, start up your newly installed copy of ‘irb’ (which would have been installed in C:\Ruby26\bin ), and type:
The first line should load Ruby/Tk. The second line will return the version of Tk that you’re running, which should be something like «8.6.9».
Verified install using ActiveTcl 8.6.9.8609-2, RubyInstaller Ruby+DevKit 2.6.6-1 on Windows 10 version 1809.
Install Tk for Perl (Tkx) on Windows
For modern Tk programming using Perl, the «Tkx» module is highly recommended, and we’ll be using that here. The easiest way to get set up is to use the «ActivePerl» distribution from www.activestate.com.
The «ActivePerl» distribution from ActiveState includes not only Perl, but also recent versions of Tk and Tcl (which Tkx uses internally to talk to Tk). In your web browser, go to www.activestate.com, and follow along the links to download the Community Edition of ActivePerl. Note that you will need to create an account with ActiveState (no cost) to download it.
Run the installer and everything will be loaded onto your machine. On our machine, perl.exe was installed at «C:\Perl64\bin»
To find out what version of Tk Perl and Tkx are using, run this from the Windows command prompt:
We want this to be returning something like «8.5.13».
Versions of ActivePerl prior to 5.10 (and some of the first 5.10 builds) included earlier versions of Tcl/Tk (8.4.x rather than 8.5.x). Use a more recent version, and and verify that you do have Tk 8.5 or newer.
Verified install using ActivePerl 5.28 on Windows 10 version 1809.
Installing Tk on Linux
Install Tk for Python (Tkinter) on Linux/X11
Tkinter (and, since Python 3.1, ttk, which is the interface to the newer themed widgets) is included in the Python standard library. It relies on Tcl/Tk being installed on your system. Depending on how you install Python, this may not happen automatically.
Remember, we’re using Python 3.x here, not 2.x.
You have several different options to get Python and Tkinter onto your machine. We’ll show you two, using your distro’s package manager, or compiling from source.
Option 1. Your Linux Distribution’s Package Manager
Currently supported Linux distributions usually install a recent version of Python 3.x by default. If not, they have a package (.deb, .rpm, etc.) that you can install using their package manager. This is usually the easiest way to install Python.
However, after you’re done installing Python, you should verify that Tkinter works correctly. Start up a Python shell (e.g. /usr/bin/python3 ) and verify the install (see below).
You may find that when you try to import tkinter that you get an error. Sometimes it will tell you that you need to install another package. If so, follow the instructions, and try again. It may also just give you Python’s standard error message: «ModuleNotFoundError: No module named ‘tkinter'» .
If you’re getting an error saying «No module named tkinter» (without the single quotes around the module name), you’re probably using Python 2. This tutorial assumes Python 3.
Sometimes Linux distributions separate out their Tkinter support into a separate package. That saves installing the Tcl/Tk libraries for people who are using Python but not Tkinter. If so, you’ll need to find and install this package, which will also ensure that an appropriate version of the Tcl/Tk libraries are installed on your system.
For example, running Ubuntu 20.04LTS, Python 3.8.2 is already installed. However, to use Tkinter, you need to install a separate package, named python3-tk :
In this case, that package provides Tcl/Tk 8.6.x libraries to be used with Python.
Option 2. Install Tcl/Tk and Compile the Standard Python Distribution
If you’d like to use the standard source distribution from python.org, you can certainly do that.
But to do so, you’ll need to get the Tcl and Tk include files and libraries loaded on your machine first. Again, while there are several ways to do that, the easiest is to download and install ActiveTcl.
Another option would be to install the Tk development package, e.g. tk8.6-dev via your package manager.
In your web browser, go to www.activestate.com/products/activetcl. Download the latest version of ActiveTcl for Linux. Make sure you’re downloading an 8.6 or newer version. Note that you will need to create an account with ActiveState (no cost) to download it. After it’s downloaded, unpack it, run the installer ( sudo ./install.sh ), and follow along. You’ll end up with a fresh install of ActiveTcl, located in e.g. /opt/ActiveTcl-8.6 .
Next, download the current Python 3.x source distribution from python.org, and unpack it. On your configure line, you’ll need to tell it how to find the version of Tcl/Tk you installed. Then build as usual:
If you installed tk8.6-dev via your package manager instead of using ActiveTcl, the include files should be found in /usr/include/tcl8.6 , and the libraries libtcl8.6.so and libtk8.6.so should be in /usr/lib/x86_64-linux-gnu .
Make sure to verify your install (see below).
Didn’t work? There may have been an error compiling Python’s tkinter code. To check, from the main Python source directory, try touch Modules/_tkinter.c (note the underscore) and then make to recompile it. Watch closely for error messages.
The most common thing is that the way you specified the Tcl/Tk include and libraries needs to be changed somehow. Or if you get messages that certain include files can’t be found (e.g. X11/Xlib.h ) you may need to install additional packages on your Linux distribution (e.g. apt-get install libx11-dev ). Once you get it to compile without errors, don’t forget to make install .
Verifying your Install
At the Python command prompt, enter these two commands:
This should pop up a small window; the first line at the top of the window should say «This is Tcl/Tk version 8.6»; make sure it is not 8.4!
If it gives you an error when you try to import tkinter (e.g. «If this fails your Python may not be configured for Tk»), something hasn’t been set up correctly. If you compiled Python yourself, see above to check for compile errors.
Get an error saying «No module named tkinter» ? You’re probably using Python 2. This tutorial assumes Python 3.
You can also get the exact version of Tcl/Tk that is being used with:
It should return something like ‘8.6.9’.
Verified install using ActiveTcl 8.6.9.8609.2 and Python 3.90rc1 source code from python.org on Ubuntu 20.04LTS.
Install Tk for Tcl on Linux/X11
Using a Package Manager
Pretty much all Linux distributions have Tcl/Tk packages available via their package managers, e.g., apt . Usually there are a variety of packages, providing libraries, command-line tools, development options if you’re building extensions, and many more. On Ubuntu and many other distributions, apt install tk8.6 should be enough to install /usr/bin/wish8.6 , which you’ll use to run your Tcl/Tk programs.
Using ActiveTcl
Another option is to install the «ActiveTcl» distribution from ActiveState, which includes Tcl, Tk, plus a number of other extension libraries.
In your web browser, go to www.activestate.com, and follow along the links to download the Community Edition of ActiveTcl for Linux. Make sure you’re downloading an 8.6.x version. Note that you will need to create an account with ActiveState (no cost) to download it.
Unpack it, and run the installer ( sudo ./install.sh ), and follow along. You’ll end up with a fresh install of ActiveTcl, located in /opt/ActiveTcl-8.6. You should then be able to run a Tcl/Tk 8.6 shell via:
This should pop up a window titled «wish8.6». To verify the exact version of Tcl/Tk that you are running, from the Wish prompt (in the terminal window) type the following:
We want this to be returning something like ‘8.6.9’. Type a control-D at the prompt in the terminal window to exit. You may also want to add /opt/ActiveTcl-8.6/bin to your Unix path.
Verified install using ActiveTcl 8.6.9.8609.2 on Ubuntu 20.04LTS.
Install Tk for Ruby (Ruby/Tk) on Linux/X11
To get Ruby/Tk working on Linux, we’ll rely on your distribution’s package manager. The package names and commands shown here are for Ubuntu, and may be different on your system.
Because Ruby/Tk is an add-on gem, it needs to be compiled on your system. That means we’re going to need to install the development versions of the Tcl/Tk libraries ( tk8.6-dev ) as well as Ruby ( ruby2.7-dev plus ruby2.7 for the command-line tools like irb and gem ]). This will also ensure we have the necessary compilers, dependent libraries like X11, and so on.
The initial «%» is the Unix shell prompt; you don’t have to type it.
Finally, you can install the Ruby/Tk binding with:
To verify that everything worked, start up irb and type:
The first line should load Ruby/Tk; typically if there was a problem with compiling it would show up here. The second line will return the version of Tk that you’re running, which should be something like «8.6.10».
Verified install using tk8.6-dev 8.6.10-1, ruby2.7.0 on Ubuntu 20.04LTS.
Install Tk for Perl (Tkx) on Linux/X11
For modern Tk programming using Perl, the «Tkx» module is highly recommended, and we’ll be using that here. The easiest way to get set up is to use the «ActivePerl» distribution from www.activestate.com.
The «ActivePerl» distribution from ActiveState includes not only Perl, but also recent versions of Tk and Tcl (which Tkx uses internally to talk to Tk). In your web browser, go to www.activestate.com, and follow along the links to download the Community Edition of ActivePerl. Note that you will need to create an account with ActiveState (no cost) to download it.
Run the installer and everything will be loaded onto your machine, in e.g. /opt/ActivePerl-5.28.
To find out what version of Tk Perl and Tkx are using, run this from the command line:
We want this to be returning something like «8.5.13».
Versions of ActivePerl prior to 5.10 (and some of the first 5.10 builds) included earlier versions of Tcl/Tk (8.4.x rather than 8.5.x). Use a more recent version, and and verify that you do have Tk 8.5 or newer.
Verified install using ActivePerl 5.28.1 on Ubuntu 20.04LTS.
The Obligatory First Program
To make sure that everything actually did work, let’s try to run a «Hello World» program in Tk. While for something this short, you could just type it in directly to the interpreter, instead use your favorite text editor to put it in a file.
Save this to a file named «hello.py». From a command prompt, type:
Couldn’t find hello.py? You might be looking in the wrong directory. Try providing the full path to hello.py.
Save this to a file named «hello.tcl». From the wish shell, type:
Couldn’t find hello.tcl? You might be looking in the wrong directory. You can either give the full path to hello.tcl, or use Tcl’s pwd and cd commands to see what directory you’re in, and change to a different one.
Save this to a file named «hello.rb». Start up [tk::inl «irb»], and from the command prompt, type:
Couldn’t find hello.rb? You might be looking in the wrong directory. You can either give the full path to hello.rb, or use Ruby’s Dir.pwd and Dir.chdir commands to see what directory you’re in, and change to a different one.
Note that there are two underscores between «ttk» and «button».
Save this to a file named «hello.pl». From a command prompt, type:
Couldn’t find hello.pl? You might be looking in the wrong directory. Try providing the full path to hello.pl.
Not working? Are you sure you’re using an 8.5 or newer version of Tcl/Tk? See the install chapter.

Our first program. Some work left to do before the IPO.
Spotted a mistake? Couldn’t find what you were looking for? Suggestions? Let me know!
If you’ve found this tutorial useful, please check out Modern Tkinter.
Источник


