- Как установить UNetbootin в Linux Mint?
- Описание процесса установки UNetbootin в Linux Mint
- Установка UNetbootin с помощью менеджера программ
- Шаг 1 – Подключение PPA репозитория и обновление кэша
- Шаг 2 – Запуск менеджера программ и установка UNetbootin
- Установка UNetbootin с помощью терминала Linux
- Шаг 1 – Запуск терминала Linux
- Шаг 2 – Подключение PPA репозитория
- Шаг 3 – Обновление пакетов
- Шаг 4 – Установка UNetbootin
- Удаление UNetbootin в Linux Mint
- UNetbootin
- Features
- Using UNetbootin
- Supported Distributions
- Installing Other Distributions Using UNetbootin
- Distribution X isn’t on the list of supported distributions, will it work?
- UNetbootin isn’t able to download the distribution, what should I do?
- My USB stick isn’t booting, what should I do?
- My USB stick/hard drive isn’t detected, what should I do?
- How do I use UNetbootin from the command line?
- How does UNetbootin work, and what does it do?
- Where can I report bugs, submit patches, etc?
- Does UNetbootin have any spyware, viruses, trojans, or other malware?
- What translations are available, and how can I use them?
- Can I help translate?
- Removal Instructions (Applicable only to Hard Disk installs)
- Where’s the source code, and how can I compile or modify it?
- License
- Other open-source projects from the creators of UNetbootin
- HabitLab
Как установить UNetbootin в Linux Mint?
UNetbootin – это программа для записи ISO образов дисков дистрибутивов Linux на USB флешку. Она реализована как под Windows, так и под Linux. Сегодня я покажу Вам, как можно установить UNetbootin в операционной системе Linux Mint.
Описание процесса установки UNetbootin в Linux Mint
В стандартных репозиториях Linux Mint пакет UNetbootin отсутствует, поэтому мы сначала будем подключать необходимый PPA репозиторий, а затем устанавливать UNetbootin.
Кстати, в Windows устанавливать UNetbootin не требуется, необходимо просто скачать исполняемый файл. О том, где скачать UNetbootin для Windows, и как использовать эту программу в операционной системе Windows, я рассказывал в статье — Как записать ISO образ диска дистрибутива Linux на USB флешку в Windows?.
Установить UNetbootin в Linux Mint можно двумя способами: с помощью менеджера программ и с помощью терминала Linux, мы рассмотрим оба.
Примечание! Установка UNetbootin, которая описана в статье, производилась в версии Linux Mint 19 с графической оболочкой MATE, в случае с Cinnamon у Вас немного будет отличаться меню Mint, в остальном процесс установки UNetbootin не отличается.
Установка UNetbootin с помощью менеджера программ
Сначала давайте рассмотрим способ, который предполагает использование менеджера программ – это стандартный компонент системы с графическим интерфейсом, с помощью которого осуществляется установка и удаление программ в Linux Mint.
Данный способ подойдет пользователям, которые привыкли кликать мышкой, хотя, на мой взгляд, использование терминала немного быстрее и даже проще.
На заметку! Новичкам рекомендую почитать мою книгу « Linux для обычных пользователей » – в ней я подробно рассказываю про основы операционной системы Linux и как пользоваться этой системой без командной строки
Шаг 1 – Подключение PPA репозитория и обновление кэша
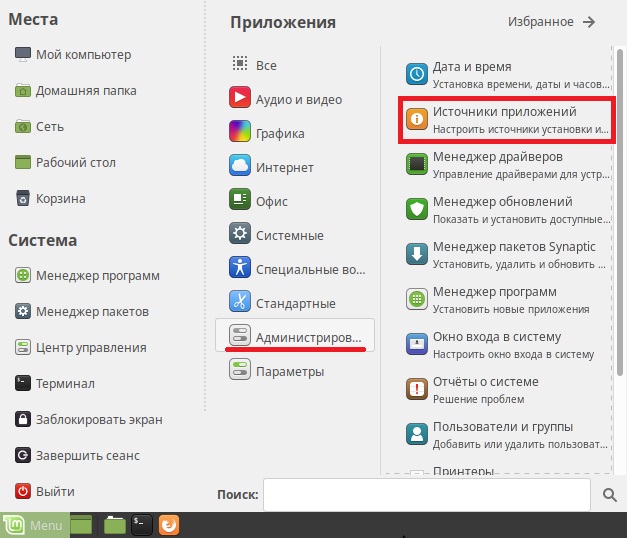
Чтобы подключить PPA репозиторий, нам необходимо открыть компонент «Источники приложений», для этого запускаем «Меню Mint-> Администрирование -> Источники приложений».
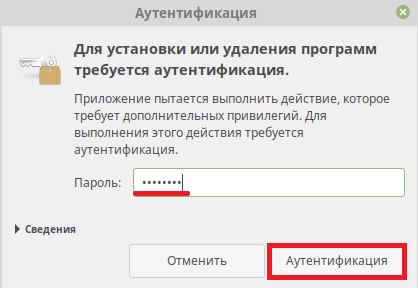
Далее вводим пароль администратора, так как данная операция в Linux Mint требует административных прав. Жмем «Аутентификация».

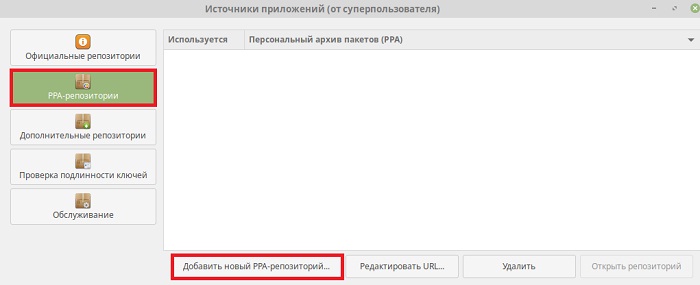
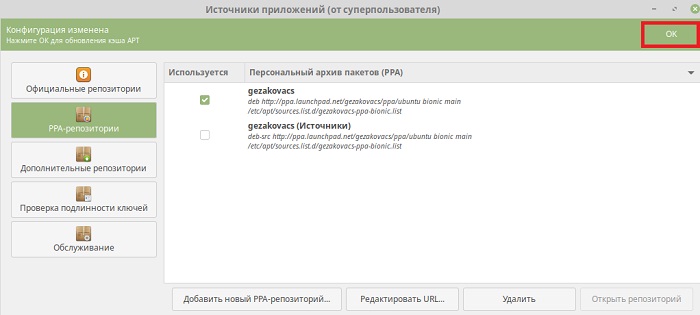
Затем переходим в раздел «PPA-репозитории» и для добавления нового PPA-репозитория нажимаем кнопку «Добавить новый PPA-репозиторий».
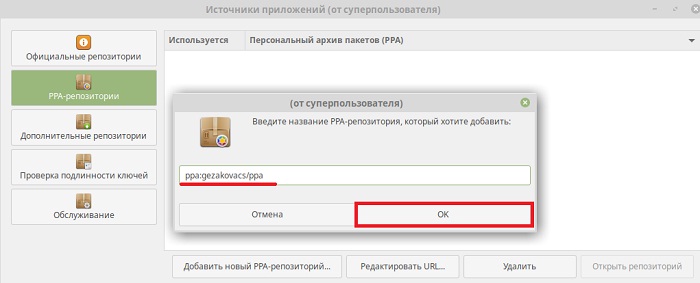
Откроется окно, в которое нам необходимо ввести название нового PPA-репозитория, в нашем случае для установки UNetbootin необходимо ввести ppa:gezakovacs/ppa, нажимаем «ОК».
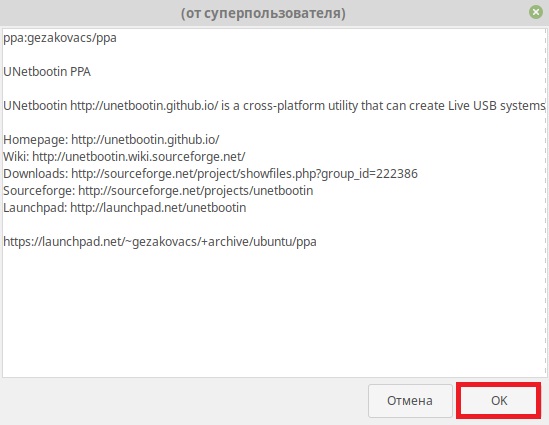
Подтверждаем подключение репозитория, нажимаем «ОК».
После чего PPA-репозиторий подключится. Перед тем как переходить к установке UNetbootin нам осталось обновить список пакетов (обновить кэш APT), для этого жмем кнопку «ОК».
Когда обновление списка пакетов завершится, сообщение с предложением обновить кэш исчезнет. Компонент «Источники приложений» можно закрывать и переходить к установке программы UNetbootin.
Шаг 2 – Запуск менеджера программ и установка UNetbootin
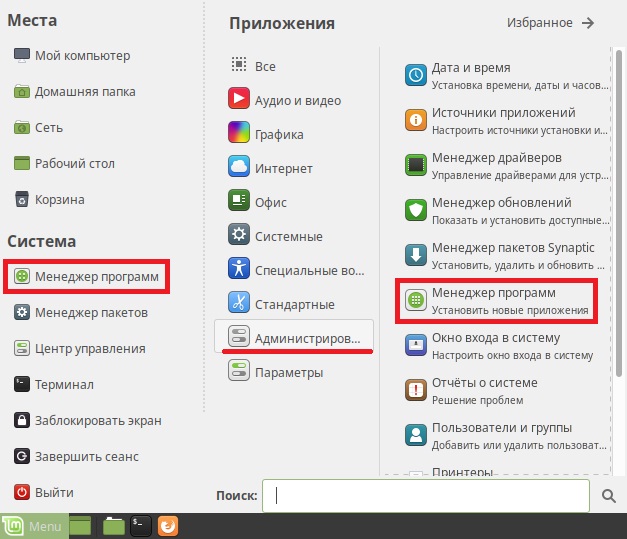
Запустить менеджер программ можно следующими способами: «Меню Mint -> Менеджер программ» или «Меню Mint-> Администрирование -> Менеджер программ».
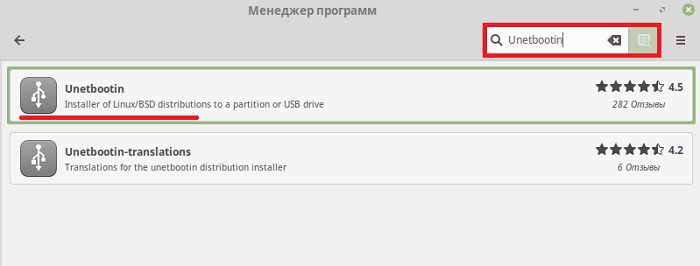
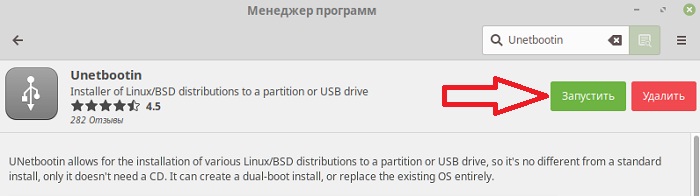
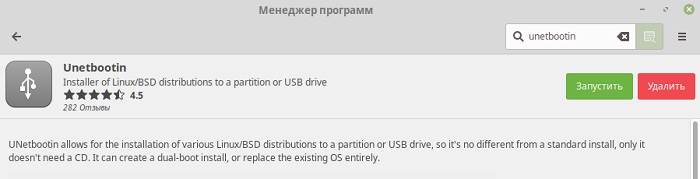
В поиске вводим UNetbootin и жмем Enter.
Менеджер найдет два пакета:
- Unetbootin – сама программа;
- Unetbootin-translations – пакет для русификации UNetbootin.
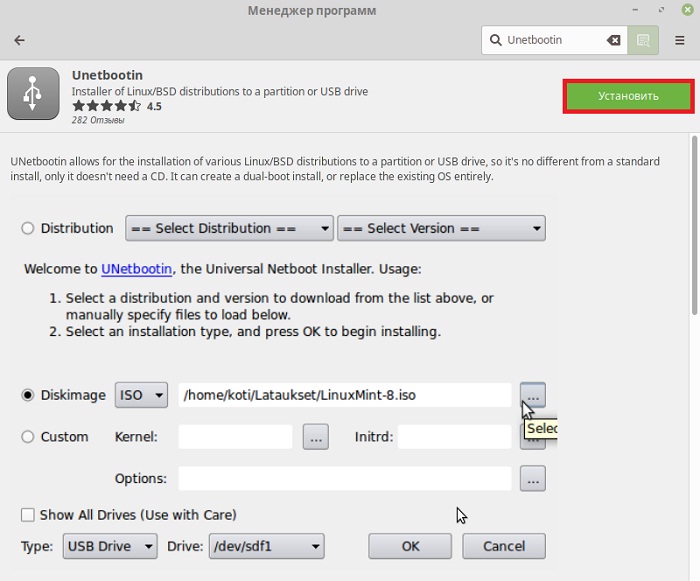
Сначала устанавливаем программу, т.е. щелкаем двойным кликом по пакету Unetbootin (пакет русификации устанавливается после того, как будет установлена программа).
Далее жмем «Установить».
Менеджер попросит подтвердить установку дополнительных программ, которые необходимы для работы UNetbootin, нажимаем «Продолжить».
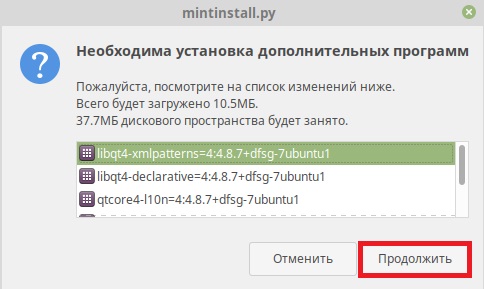
Установка приложений также требует прав администратора, поэтому далее нам необходимо ввести пароль, нажимаем «Аутентификация».
Установка будет завершена, когда появятся кнопки «Запустить» (с помощью этой кнопки Вы можете сразу запустить программу) и «Удалить» (эта кнопка предназначена для удаления UNetbootin).
Теперь можно переходить к русификации программы UNetbootin. Для этого Вам необходимо установить пакет «UNetbootin-translations» точно таким же способом, как мы устанавливали пакет самой программы UNetbootin.
Примечание! Для работы с USB-накопителем, в котором файловая система EXT, возможно потребуется установка дополнительного пакета Extlinux. Его также можно установить с помощью менеджера программ.
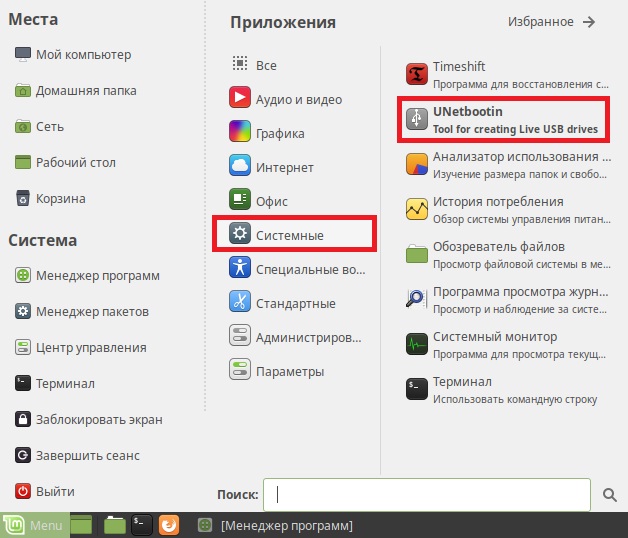
В дальнейшем программа будет доступна в меню Mint в списке приложений в разделе «Системные» — «Меню ->Системные-> UNetbootin».
Установка UNetbootin с помощью терминала Linux
Процесс установки UNetbootin через терминал Linux заключается в простом запуске терминала и последовательном выполнении команд в этом терминале. Сейчас мы пошагово разберем весь этот процесс.
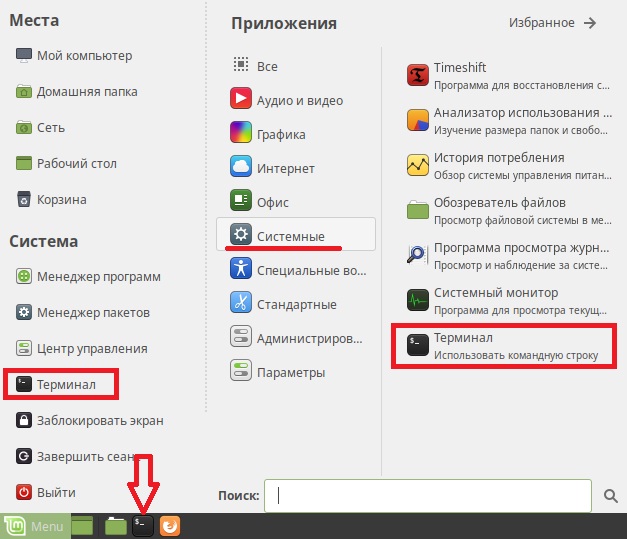
Шаг 1 – Запуск терминала Linux
Запускаем терминал, например, щелкаем на значок «Терминал» на панели или используем соответствующий ярлык в меню Mint («Меню Mint -> Системные -> Терминал»).
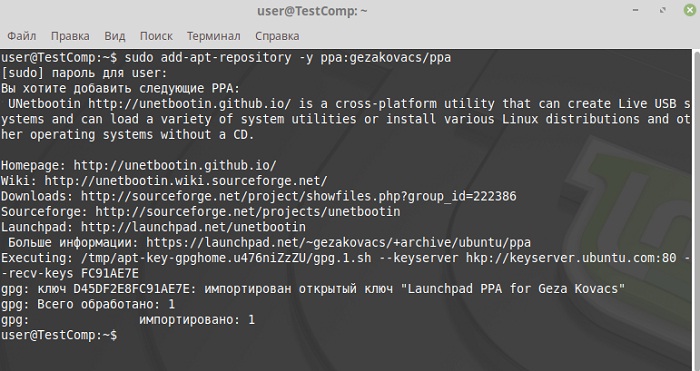
Шаг 2 – Подключение PPA репозитория
В случае с терминалом PPA репозиторий нам также нужно подключать, поэтому сначала вводим команду подключения PPA репозитория и нажимаем Enter, а после вводим пароль администратора, так как ранее было уже отмечено, что все подобные операции требуют более высоких прав.
Шаг 3 – Обновление пакетов
Затем обновляем список пакетов следующей командой.
Шаг 4 – Установка UNetbootin
Запускаем следующие команды:
Для установки программы UNetbootin
Для установки пакета русификации
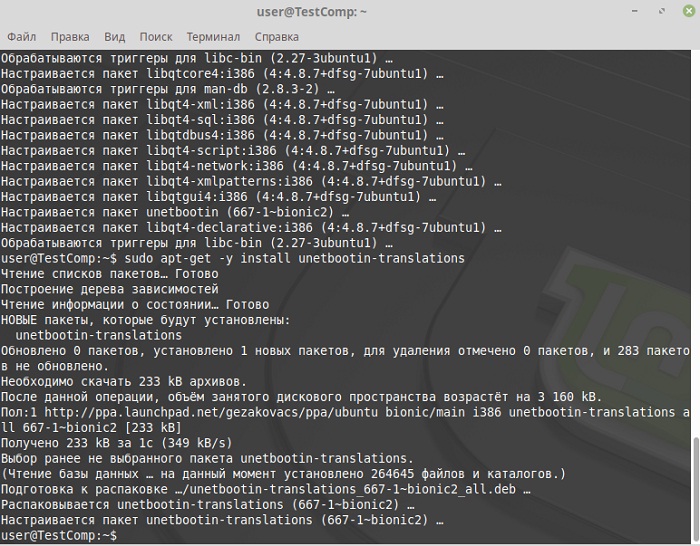
Для установки пакета extlinux
На этом установка UNetbootin через терминал Linux закончена, согласитесь, что в этом процессе нет ничего сложного.
Удаление UNetbootin в Linux Mint
Если Вам требуется удалить UNetbootin из системы, то это также можно сделать двумя способами, используя тот же менеджер программ и терминал.
В менеджере программ для удаления приложений необходимо открыть соответствующее приложение и нажать «Удалить».
В терминале для удаления UNetbootin нужно выполнить следующие команды.
Удаление пакетов unetbootin и unetbootin-translations
Удаление всех зависимостей
Теперь Вы знаете, как установить UNetbootin в Linux Mint, а также как удалить это приложение, у меня все, пока!
Источник
UNetbootin
UNetbootin allows you to create bootable Live USB drives for Ubuntu and other Linux distributions without burning a CD.
You can either let UNetbootin download one of the many distributions supported out-of-the-box for you, or supply your own Linux .iso file.
Features
UNetbootin can create a bootable Live USB drive
It loads distributions either by downloading a ISO (CD image) files for you, or by using an ISO file you’ve already downloaded.
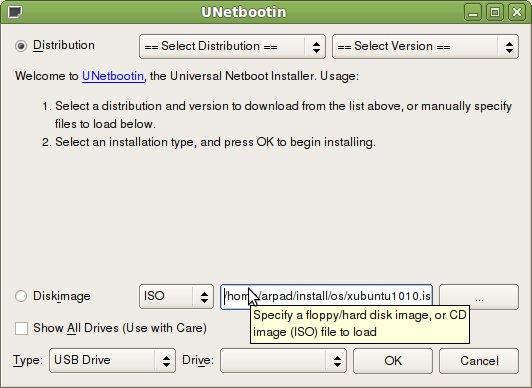
Using UNetbootin
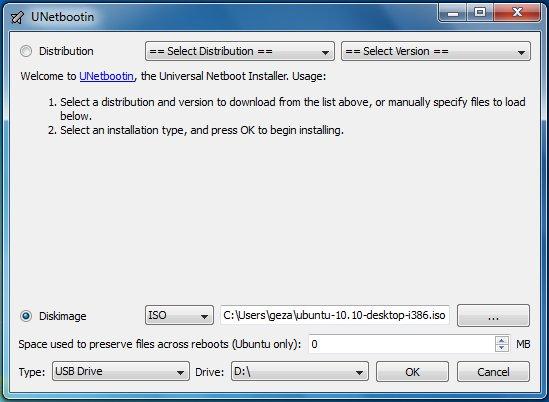
Select an ISO file or a distribution to download, select a target drive (USB Drive or Hard Disk), then reboot once done. If your USB drive doesn’t show up, reformat it as FAT32.
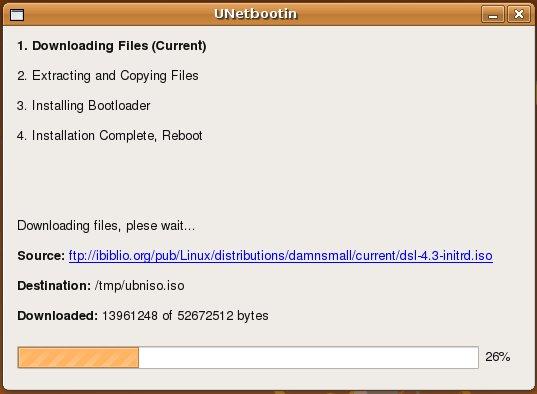
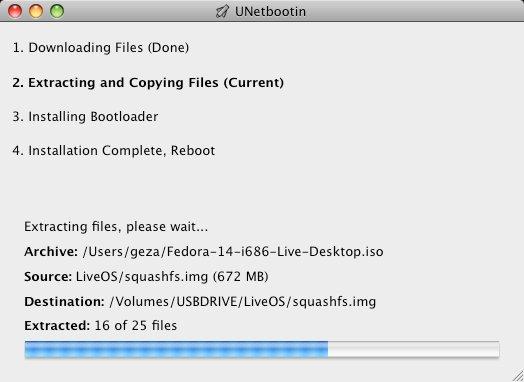
If you used the «USB Drive» install mode: After rebooting, boot from the USB drive. On PCs, this usually involves pressing a button such as Esc or F12 immediately after you turn on your computer, while on Macs, you should hold the Option key before OSX boots.
If you used the «Hard Disk» install mode: After rebooting, select the UNetbootin entry from the Windows Boot Menu.
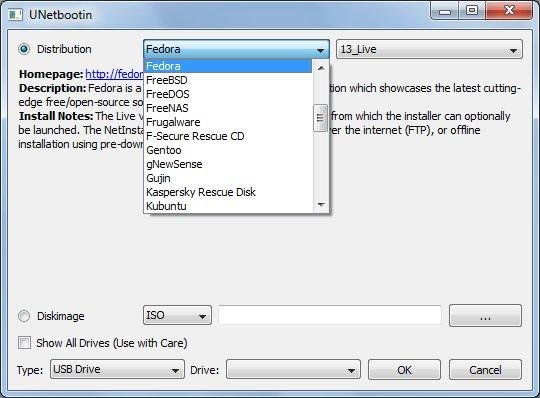
Supported Distributions
UNetbootin has built-in support for automatically downloading and loading the following distributions, though installing other distributions is also supported:
UNetbootin can also be used to load various system utilities, including:
Installing Other Distributions Using UNetbootin
Download and run UNetbootin, then select the «disk image» option and supply it with an ISO (CD image).
UNetbootin doesn’t use distribution-specific rules for making your live USB drive, so most Linux ISO files should load correctly using this option. However, not all distributions support booting from USB, and some others require extra boot options or other modifications before they can boot from USB drives, so these ISO files will not work as-is. Also, ISO files for non-Linux operating systems have a different boot mechanism, so don’t expect them to work either.
Distribution X isn’t on the list of supported distributions, will it work?
UNetbootin isn’t able to download the distribution, what should I do?
Download the ISO straight from the website, then provide it to UNetbootin via the diskimage option.
My USB stick isn’t booting, what should I do?
Reformat the USB drive as FAT32, then use UNetbootin again to put your distribution on the USB stick.
My USB stick/hard drive isn’t detected, what should I do?
Reformat the USB drive as FAT32, then use UNetbootin again. If it still isn’t showing up, use the targetdrive command line option.
How do I use UNetbootin from the command line?
How does UNetbootin work, and what does it do?
Where can I report bugs, submit patches, etc?
First, make sure you are using the latest version available on this website.
» See Github Issues to file a bug report.
» See Github Pull Requests to submit a patch.
Does UNetbootin have any spyware, viruses, trojans, or other malware?
No; though some anti-virus products may raise «Trojan.generic» warnings due to the auto-uninstall feature, these are false positives. Just make sure you obtain UNetbootin from this site, not some shady third-party source. If you’re absolutely paranoid, you can check the source code and compile it yourself.

What translations are available, and how can I use them?
A number of translations are included in the latest UNetbootin release. See the Translations Page for the status of each.
If a translation corresponding to your system’s native language has already been included into UNetbootin, it should automatically load the corresponding translation. Alternatively, you can force the language to use via the lang=es command-line option, where you substitute es with the the 2-letter ISO 639-1 code for your language.
Can I help translate?
If you’d like to help translate this website, join the project on Transifex, then edit translations either on this website or on Transifex.
If you’d like to help translate the UNetbootin program itself, please use Launchpad Translations. If you are new to Launchpad, you will first have to join the corresponding Ubuntu Translators group for the language you intend to translate. For information on using the Launchpad Translations system, see the translations help page.
Removal Instructions (Applicable only to Hard Disk installs)
If using Windows, UNetbootin should prompt you to remove it the next time you boot into Windows. Alternatively, you can remove it via Add/Remove Programs in the Control Panel.
If using Linux, re-run the UNetbootin executable (with root priveledges), and press OK when prompted to uninstall.
Removal is only required if you used the «Hard Drive» installation mode; to remove the bootloader from a USB drive, back up its contents and reformat it.
Uninstalling UNetbootin simply removes the UNetbootin entry from your boot menu; if you installed an operating system to a partition using UNetbootin, removing UNetbootin will not remove the OS.
To manually remove a Linux installation, you will have to restore the Windows bootloader using «fixmbr» from a recovery CD, and use Parted Magic to delete the Linux partition and expand the Windows partition.
Where’s the source code, and how can I compile or modify it?
Source code is on Github, though you may prefer a tarball of the latest release.
License
UNetbootin was created and written by Geza Kovacs (Github: gkovacs, Launchpad: gezakovacs, contact info).
Translators are listed on the translations page.
UNetbootin is licensed under the GNU General Public License (GPL) Version 2 or above. Site materials, documentation, screenshots, and logos are licensed as Creative Commons Attribution-Share-Alike 3.0.
Other open-source projects from the creators of UNetbootin

HabitLab
A Chrome extension to help you waste less time online (on sites like Facebook, Youtube, etc) by experimenting with different interventions (news feed blockers, comment hiders, and more) to find the ones that work best for you.
Источник


