- Настройка Raspberry Pi Setting up a Raspberry Pi
- Обзор Overview
- Использование панели мониторинга Using the Dashboard
- Instructions Instructions
- Подключение к сети Connect to a network
- Проводное подключение Wired connection
- Беспроводное подключение Wireless connection
- Подключение к порталу устройств Windows Connect to Windows Device Portal
- Как работает Windows 10 на Raspberry Pi 4 и Pi 3
- Как установить Windows 10 на Raspberry Pi 4
- Установка windows 10 для raspberry pi 4
- Re: Installation of Windows 10 in Rpi4
- Re: Installation of Windows 10 in Rpi4
- Re: Installation of Windows 10 in Rpi4
- Re: Installation of Windows 10 in Rpi4
- Re: Installation of Windows 10 in Rpi4
- Re: Installation of Windows 10 in Rpi4
- Как работает Windows 10 на Raspberry Pi 4 и Pi 3
- Как установить Windows 10 на Raspberry Pi 4
- How to Install Windows 10 on a Raspberry Pi 4
- What you will need to install Windows 10 on a Raspberry Pi 4
- How to Install Windows 10 on the Raspberry Pi 4
Настройка Raspberry Pi Setting up a Raspberry Pi
Обзор Overview
Нельзя установить ОС на Raspberry Pi 3B+ с помощью панели мониторинга. Dashboard cannot be used used to setup the Raspberry Pi 3B+. Для устройств 3B+ необходимо использовать бета-версию 3B+. If you have a 3B+ device, you must use the 3B+ technical preview. Ознакомьтесь с известными ограничениями бета-версии, чтобы выяснить, подходит ли она вам. Please view the known limitations of the technical preview to determine if this is suitable for your development.
При появлении запроса о форматировании диска не выполняйте форматирование. When the «format this disk» pop up comes up, do not format the disk. Мы создаем исправление для этой проблемы. We are working on a fix for this issue.
Если Raspberry Pi настраивается для создания прототипов, рекомендуем использовать панель мониторинга Windows 10 IoT Базовая. When setting up a Raspberry Pi for prototyping, we recommend using the Windows 10 IoT Core Dashboard. Если вы намерены использовать Raspberry Pi в производстве, ознакомьтесь с руководством по производственному использованию Windows 10 IoT Базовая. However, if you’re looking to manufacture with a Raspberry Pi, please refer to the IoT Core Manufacturing Guide. Образы ОС, поставляемые изготовителем платы, нельзя использовать при производстве устройств. You cannot use maker images for manufacturing.
Использование панели мониторинга Using the Dashboard
Для установки образа Windows 10 IoT Базовая на плату Raspberry Pi вам потребуется следующее: To flash, or download, IoT Core onto your Raspberry Pi, you’ll need:
- компьютер под управлением Windows 10; A computer running Windows 10
- Панель мониторинга Windows 10 IoT Базовая Windows 10 IoT Core Dashboard
- SD-карта с высоким уровнем производительности, например производства компании SanDisk; A high-performance SD card, such as a SanDisk SD card
- внешний монитор; An external display
- периферийные устройства, такие как мышь, клавиатура и т. п. Any other peripherals (e.g. mouse, keyboard, etc.)
Instructions Instructions
- Откройте панель мониторинга Windows 10 IoT Базовая, щелкните Настроить новое устройство и вставьте SD-карту в компьютер. Run the Windows 10 IoT Core Dashboard and click on Set up a new device and insert an SD card into your computer.
- Подключите к Raspberry Pi внешний монитор. Hook up your Raspberry Pi to an external display.
- Заполните все поля. Fill out the fields. Выберите «Broadcomm [Raspberry Pi 2 и 3]» в качестве типа устройства. Select «Broadcomm [Raspberry Pi 2 & 3]» as the device type. Не забудьте присвоить устройству новое имя и пароль. Make sure to give your device a new name and password. В противном случае сохранятся следующие учетные данные, настроенные по умолчанию: Otherwise the default credentials will remain as:
- Примите условия лицензионного соглашения и щелкните Download and install (Скачать и установить). Accept the software license terms and click Download and Install. Если все пройдет нормально, на мониторе отобразится ход установки ОС Windows 10 IoT Базовая на SD-карту. If all goes well, you’ll see that Windows 10 IoT Core is now flashing your SD card.

Подключение к сети Connect to a network
Проводное подключение Wired connection
Если у вашего устройства есть порт Ethernet или оно поддерживает USB-адаптер Ethernet, подключите к устройству кабель Ethernet для соединения с сетью. If your device comes with an Ethernet port or USB Ethernet adapter support to enable a wired connection, attach an Ethernet cable to connect it to your network.
Беспроводное подключение Wireless connection
Если ваше устройство поддерживает подключение к сети по Wi-Fi и к устройству подключен монитор, сделайте следующее: If your device supports Wi-Fi connectivity and you’ve connected a display to it, you’ll need to:
- Перейдите к приложению по умолчанию и нажмите кнопку настройки, расположенную рядом с часами. Go into your default application and click the settings button next to the clock.
- На странице параметров выберите Network and Wi-Fi (Сеть и Wi-Fi). On the settings page, select Network and Wi-Fi.
- Устройство начнет поиск беспроводных сетей. Your device will begin scanning for wireless networks.
- Как только ваша сеть отобразится в списке, выберите ее и щелкните Connect (Подключить). Once your network appears in this list, select it and click Connect.
Для беспроводного подключения к сети устройства, к которому не подключен монитор, сделайте следующее: If you haven’t connected a display and would like to connect via Wi-Fi, you’ll need to:
- Перейдите к панели мониторинга Windows 10 IoT Базовая и щелкните My Devices (Мои устройства). Go to the IoT Dashboard and click on My Devices.
- Найдите в списке свою ненастроенную плату. Find your unconfigured board from the list. Ее имя будет начинаться с «AJ_», например AJ_58EA6C68. Its name will begin with «AJ_». (e.g. AJ_58EA6C68). Если плата не отобразится в списке через несколько минут, перезагрузите ее. If you don’t see your board appear after a few minutes, try rebooting your board.
- Щелкните Configure Device (Настроить устройство) и введите учетные данные для своей сети. Click on Configure Device and enter your network credentials. После этого плата должна подключиться к сети. This will connect your board to the network.
Модуль Wi-Fi нужно включить на компьютере для поиска других сетей. Wifi on your computer will need to be turned on in order to find other networks.
Подключение к порталу устройств Windows Connect to Windows Device Portal
Используйте портал устройств Windows для подключения устройства через веб-браузер. Use the Windows Device Portal to connect your device through a web browser. На портале устройств доступны полезные функции настройки устройств и управления ими. The device portal makes valuable configuration and device management capabilities available.
Как работает Windows 10 на Raspberry Pi 4 и Pi 3
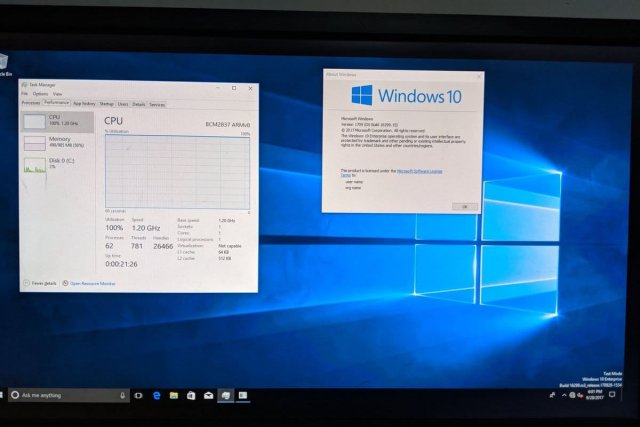
Разработчики наконец установили оптимизированную для ARM версию Windows 10 на Raspberry Pi 4 после того, как некоторым людям удалось запустить ее на Raspberry Pi 3 в первой половине 2019 года.
Raspberry Pi 4 и Pi 3 официально поддерживают версию Windows 10 для IoT Core, которая не совпадает с версией Windows 10, которая работает на настольном компьютере, но является упрощенной версией для маломощных компьютерных плат.
Например, Windows 10 IoT Core не позволяет запускать традиционные приложения Win32 или даже загружаться на рабочий стол. IoT позволяет вам запускать одновременно одно приложение UWP, и реальная цель ОС на Pi – запускать небольшие приложения, предназначенные для миниатюрных компьютерных плат.
К счастью, есть новое руководство, чтобы заставить Windows 10 на ARM работать на Pi 3 B + и Pi 4B, используя неподдерживаемую техническую предварительную сборку. В отличие от IoT, Windows 10 on ARM представляет собой ARM-ориентированную версию ОС, которая поставляется с традиционным десктопом и поддержкой приложений Win32 посредством эмуляции.
Разработчику Marcin удалось установить Windows 10 on ARM на Raspberry Pi 4 Model B, и он также опубликовал подробное руководство.
Как установить Windows 10 на Raspberry Pi 4
– Загрузите прошивку UEFI отсюда и распакуйте ее на карту MicroSD в формате FAT32.
– Загрузите сборку Windows 10 ARM64 отсюда. Только сборка 17134 была протестирована, но любая более новая сборка, которая проходит OOBE, также должна быть совместимой.
– Загрузите ISO-компилятор отсюда. В соответствии с разработкой, это создаст файл ISO, но вам все равно понадобится файл «install.wim» из «sources».
– Загрузите «Windows на Raspberry» отсюда. Оно установит Build 17134 или новее на USB-накопитель, но необходимо выбрать разметку GPT.
После загрузки этих файлов вы должны запустить командную строку и выполнить действия, описанные здесь.
Стоит отметить, что некоторые функции Raspberry Pi 4 могут не работать с Windows 10 на ARM. Например, вы можете использовать только USB-порт Type-C для зарядки и OTG. Windows 10 on ARM также ограничивает использование ОЗУ только в 1 ГБ, а драйвер контроллера Broadcom auxspi не работает.
Разработчики также портируют Windows 10 on ARM на телефоны Android, такие как Galaxy S8, OnePlus 6 и Xiaomi Mi Mix.
Установка windows 10 для raspberry pi 4
I tried to install Windows 10 in Raspberry Pi 4 and unable to do the same.
Model : — Raspberry Pi 4 Computer Model B ( 8 GB )
1) Tried to install Windows IoT version and nothing worked. I installed and followed instructions as per this link : https://docs.microsoft.com/en-us/window . /downloads
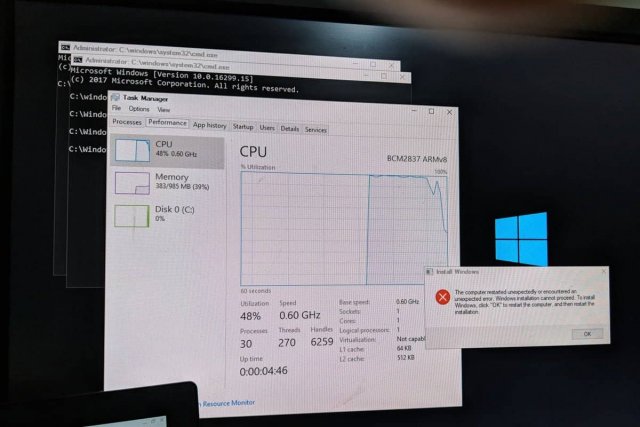
After Installing IoT version, when connected to the monitor, it displayed the message that the board requires newer software.
2) Tried to install Windows Arm version and the installation failed.
Kindly let me know how this can be done.
Re: Installation of Windows 10 in Rpi4

Re: Installation of Windows 10 in Rpi4
Re: Installation of Windows 10 in Rpi4
only logical thing to do:
give up and save whatever sanity you have left!
Re: Installation of Windows 10 in Rpi4
You in fact can get windows 10 running on the PI 4. There is a discord of people running it.
Linux has all the apps I need but if you just love windows it can be done.

Re: Installation of Windows 10 in Rpi4
Re: Installation of Windows 10 in Rpi4
We should put something on the downloads page and call it «windoze» (misspelled on purpose to avoid copyright trolls). People will see it, say «Yes!», download it, install it, and boot it.
Once booted, it will say:
There is no version of Microsoft Windows that runs effectively on any model of Raspberry Pi.
There are many alternatives you may have heard of; none of them qualify as «effectively running». These «alternatives» include:
1) Windows 10 IOT — which is not at all what you expect when you talk about Windows. It ran on certain, older models of the Rpi, but does not run on current models. Even on the models where it could be booted, it does not qualify, in our opinion, as an «effective»version of Windows, since you can’t use it to do any of the normal, Windows-y things, such as playing Solotaire.
2) Older versions of Windows can be run, sort of, via emulation software (e.g., QEMU and various derivative works), but it runs so slowly as to be unbearable. We also do not consider this to be «effective».
Note also that there are periodic rumors of a native Windows running on Arm processors, but again, even if these rumors prove to be true, it would not be effective, for the following reasons:
1) It is likely that what Arm version you are thinking of runs on other Arm CPUs, but not the one(s) used in the various models of the Raspberry Pi.
2) Even if it did, you wouldn’t be able to run your existing, x86-based, Windows software on it. And that’s really the whole point of wanting it, isn’t it?
After the above messages have been displayed, it will then show a window saying:
Click OK to shutdown.
GitD’s list of things that are not ready for prime time:
1) IPv6
2) 64 bit OSes
3) USB 3
4) Bluetooth
Как работает Windows 10 на Raspberry Pi 4 и Pi 3
Разработчики наконец установили оптимизированную для ARM версию Windows 10 на Raspberry Pi 4 после того, как некоторым людям удалось запустить ее на Raspberry Pi 3 в первой половине 2019 года.
Raspberry Pi 4 и Pi 3 официально поддерживают версию Windows 10 для IoT Core, которая не совпадает с версией Windows 10, которая работает на настольном компьютере, но является упрощенной версией для маломощных компьютерных плат.
Например, Windows 10 IoT Core не позволяет запускать традиционные приложения Win32 или даже загружаться на рабочий стол. IoT позволяет вам запускать одновременно одно приложение UWP, и реальная цель ОС на Pi – запускать небольшие приложения, предназначенные для миниатюрных компьютерных плат.
К счастью, есть новое руководство, чтобы заставить Windows 10 на ARM работать на Pi 3 B + и Pi 4B, используя неподдерживаемую техническую предварительную сборку. В отличие от IoT, Windows 10 on ARM представляет собой ARM-ориентированную версию ОС, которая поставляется с традиционным десктопом и поддержкой приложений Win32 посредством эмуляции.
Разработчику Marcin удалось установить Windows 10 on ARM на Raspberry Pi 4 Model B, и он также опубликовал подробное руководство.
Как установить Windows 10 на Raspberry Pi 4
– Загрузите прошивку UEFI отсюда и распакуйте ее на карту MicroSD в формате FAT32.
– Загрузите сборку Windows 10 ARM64 отсюда . Только сборка 17134 была протестирована, но любая более новая сборка, которая проходит OOBE, также должна быть совместимой.
– Загрузите ISO-компилятор отсюда . В соответствии с разработкой, это создаст файл ISO, но вам все равно понадобится файл «install.wim» из «sources».
– Загрузите «Windows на Raspberry» отсюда . Оно установит Build 17134 или новее на USB-накопитель, но необходимо выбрать разметку GPT.
После загрузки этих файлов вы должны запустить командную строку и выполнить действия, описанные здесь .
Стоит отметить, что некоторые функции Raspberry Pi 4 могут не работать с Windows 10 на ARM. Например, вы можете использовать только USB-порт Type-C для зарядки и OTG. Windows 10 on ARM также ограничивает использование ОЗУ только в 1 ГБ, а драйвер контроллера Broadcom auxspi не работает.
Разработчики также портируют Windows 10 on ARM на телефоны Android, такие как Galaxy S8, OnePlus 6 и Xiaomi Mi Mix.
How to Install Windows 10 on a Raspberry Pi 4
By Les Pounder 19 July 2020
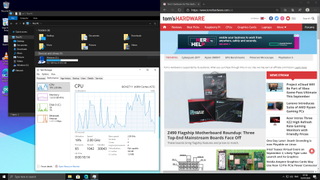
Yes, you can get a working Windows 10 desktop running on a Raspberry Pi 4
The Raspberry Pi is commonly associated with Linux operating systems such as Raspberry PI OS. But what about running Windows 10 on your Raspberry Pi? Officially, Microsoft’s only operating system for the Pi is an old version of Windows 10 IoT Core, which just lets you execute Visual Studio code on the computer but doesn’t work as a standalone OS with a GUI (in other words, no “windows”). However, the lack of support from Microsoft hasn’t stopped some ambitious developers from finding a way to run a full desktop version of Windows 10 on Raspberry Pi.
In 2019, we tried installing a hacked version of Windows 10 on a Raspberry Pi 3 and it ran, but it was extremely painful to use. Recent developments have now made it possible to run Windows 10 somewhat-competently on a Raspberry Pi 4, at least as a proof-of-concept We’ll show you how to install Windows 10 on your Raspberry Pi below.
However, before you begin, please note that this is not an official Microsoft product and the source of the images and software used is from a passionate and vibrant community working together to create this project. Amir Dahan is the creator of Windows 10 Lite, Marcin is responsible for UEFI and Pete Batard responsible for the 3GB RAM fix. The Windows 10 image file and RAM fix you’ll need to make this work are constantly changing as are their download locations so you’ll need to find them via the Windows on Raspberry Pi Discord Group, which is where all the developers hang out and share updates. We can’t vouch for the safety or legitimacy of any of the custom files the community has created for this project so proceed at your own risk.
At the time of writing this project runs surprisingly well (see below for more details) but has a lot of caveats. . The Raspberry Pi’s onboard Ethernet, Bluetooth and GPIO do not work so you’ll need a USB Ethernet or USB Wi-Fi dongle to get online (there’s no list of supported dongles so we can’t guarantee yours will work). Audio via HDMI is also not available but Bluetooth audio via a USB Bluetooth dongle is possible.
What you will need to install Windows 10 on a Raspberry Pi 4
- Raspberry Pi 4 4GB or 8GB
- 16GB or larger microSD card, (see best microSD cards for Raspberry Pi)
- Windows 10 PC
- USB to Ethernet or WiFi dongle
- Bluetooth dongle (if you want Bluetooth)
- Keyboard, mouse, HDMI and power for your Raspberry Pi
How to Install Windows 10 on the Raspberry Pi 4
1. Download the latest pre-release version of WoR tool https://www.worproject.ml/downloads and extract the files.
2. Visit the Windows on Raspberry Pi Discord server and go to the Downloads channel to Download the latest stable image, currently 0.2.1.
3. Open the WoR Alpha tool and select your language.

4. Insert microSD card and select the drive. The Raspberry Pi 4 mode is currently experimental, but has worked reliably in our tests.
5. Select your Windows on ARM image.
6. Select the latest package of drivers from the server.
7. Use the latest UEFI firmware available.
8. Check the configuration and when happy click Next.
9. Double check everything before clicking Install.
The installation process can take as long as two hours to complete, depending on the speed of the microSD card.
10. Download the RAM fix for Rpi 4 file from the Windows On Raspberry Pi Discord server. Extract the contents.
11. Copy winpatch.exe to the root of C: drive.
12. Locate the drive containing the Windows 10 on ARM installation, make a note of the drive letter.
13. Open a Command Prompt as Administrator and go to the root of C: drive.
14. Patch the USB driver to enable USB ports on the Raspberry Pi 4. Change the drive letter to match your installation.
15. Overclock the Raspberry Pi. This step is optional but highly recommended (though you’ll want a cooling fan). Edit the config.txt file found in BOOT drive. Add these two lines at the end of the file. Overclocking will require cooling for your Raspberry Pi.
16. Eject the microSD card and insert it into the Raspberry Pi 4. Connect your keyboard, mouse etc and power on the Pi.
17. Follow the standard Windows 10 install process and after a short while you are ready to use Windows 10 on your Raspberry Pi 4.
18. As an administrator open a Command Prompt and run this command to enable 3GB of RAM. Press Enter to run the command.
19. Reboot the Raspberry Pi for the update to take effect.
20. For network access, use a USB to Ethernet or a compatible WiFi dongle.
21. Install Microsoft Edge by double clicking on the Microsoft Edge desktop icon.
22. Installing software works in the same manner as a typical Windows 10 install. We tested GIMP Photo Editor and the Arduino IDE and both installed, albeit slowly and were usable for basic tasks.


