- Installing xRDP on Kali Linux
- Install xRDP
- “Authentication is required to create a color managed device”
- Open your Firewall
- Connecting via an SSH tunnel
- Install PuTTY & Set Up
- Create a Private Key file with PuTTYGen
- Connect the tunnel
- Last bits of security
- Set SSH to accept Certificates only
- Set xRDP to require SSH tunnels
- Ethical hacking and penetration testing
- InfoSec, IT, Kali Linux, BlackArch
- How to install and configure RDP server on Linux
- How to install an RDP server on Linux
- How to use freerdp-shadow to start an RDP server
- freerdp-shadow error ‘client authentication failure: -1’
- How to start an RDP server with xrdp
- Установка RDP сервера
- Содержание
- Общая информация
- Установка графической оболочки и XRDP
- Debian 7.4 (32 и 64 bit)
- CentOS 6.*
- CentOS 7
- Ubuntu 12.04 (64 bit)
- Ubuntu 14.04 (64 bit)
- Подключение по RDP
- Как настроить подключение в полноэкранном режиме?
- Решение проблемы с раскладкой клавиатуры в XRDP
Installing xRDP on Kali Linux
13 October 2019
There are a lot of complicated tutorials on how to get xRDP working on Kali Linux. I suspect the tutorials have become complicated as they address a variety of bugs that xRDP and connecting software has had over time, but there isn’t much you actually need to do.
Note that if you are using Gnome, you’ll run into issues. I have got RDP working with Gnome before, but I haven’t been able to create a reliable set of steps to replicate it, as it usually starts working after several hours of messing around. If this is you, then you can try the below, but it may just be your starting point.
Install xRDP
The only package you need is xrdp, which you should enable after installation.
“Authentication is required to create a color managed device”
If you get this message there are a few potential fixes. The one I use is to add the following file to policy kit, and restart it:
Open your Firewall
If you are using UFW, you’ll need to open up a port.
Then in Windows, you’ll need to lower your color depth in the RDP settings when you make a connection:
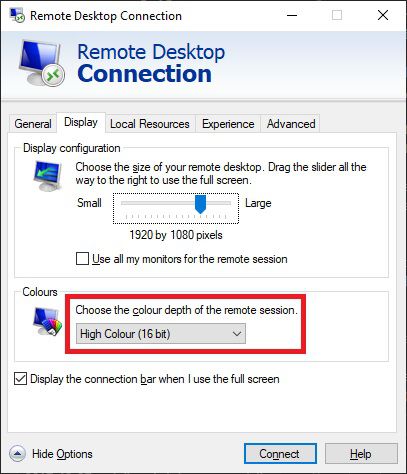
And it should work from this point.
Connecting via an SSH tunnel
xRDP transport is encrypted using TLS by default, and should be as secure as RDP is on windows, but if you open it up to the internet you can expect to be subject to ongoing brute force attacks. If a vulnerability is found, you can expect it to be used against you pretty soon. A safer option is to connect using an SSH tunnel, and secure that using certificates instead of passwords.
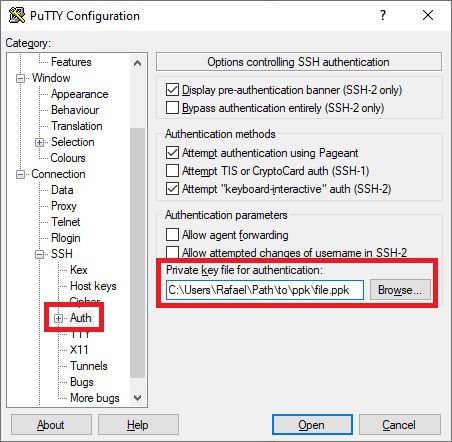
Install PuTTY & Set Up
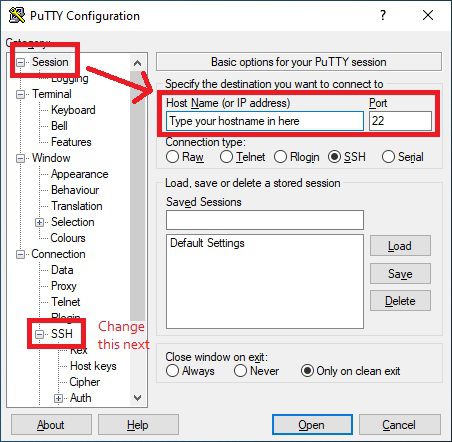
I’m assuming you know how to set up port forwarding on your router, and how to install puTTY. If not, Google is your friend. First step is just to put in your IP address (take a look at duckdns.org if you need a static one) and the external port that you’ve chosen into puTTY.
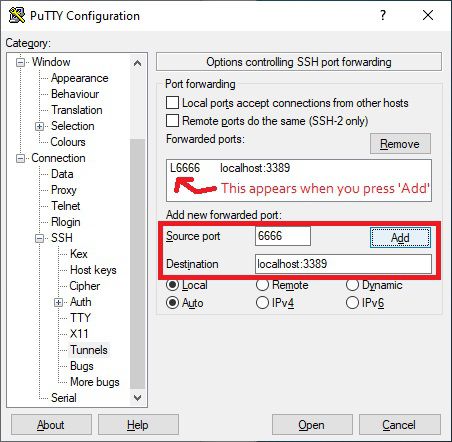
Next, you need to go into Tunnel under SSH. Here you need to add a Source port, which can be any port you have available on Windows. I’ve used 6666 in this example. Then under destination, add localhost:3389 .
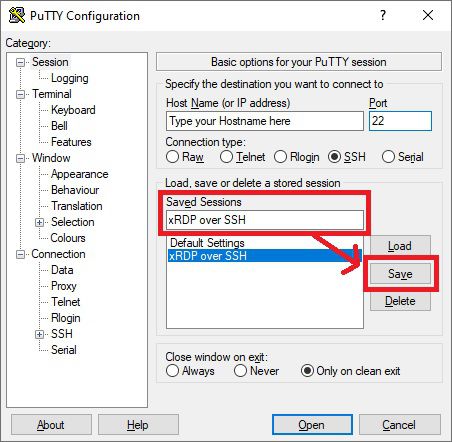
Under Session, you will probably want to save these settings so that you don’t need to do the setup every time.
Create a Private Key file with PuTTYGen
Press the Windows key and type in ‘PuttyGen’, which should open up the following program:
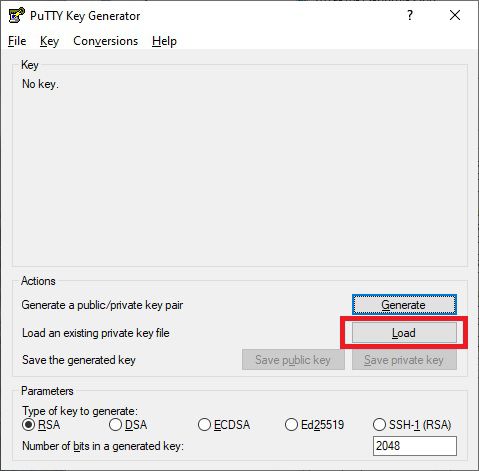
Click on Load, and select your private ‘id_rsa’ key that you normally use for logging in via SSH. You can then save this as a .ppk file. Once you have this, under SSH and Auth, add the .ppk key file.
Again, you’ll want to go back to Session and save this.
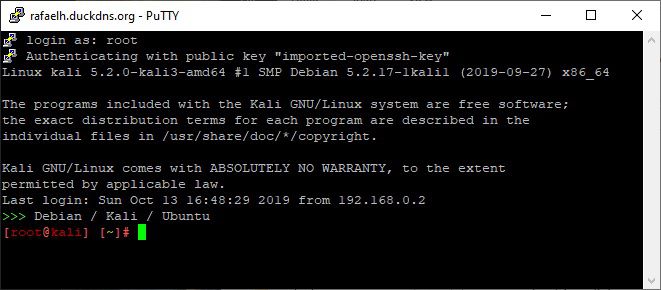
Connect the tunnel
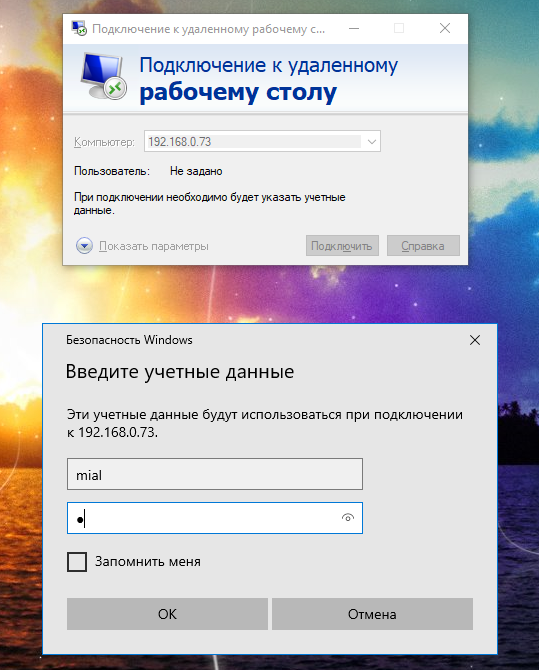
Now that this is set up, connect using puTTY by pressing ‘Open’. You’ll get a black window, asking you for the username, which will probably be ‘root’ for Kali.
Now that the connection is established, go into RDP and use localhost and the port you configured in puTTY to connect:
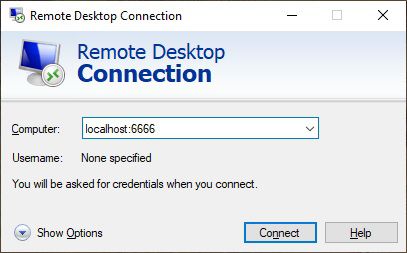
And all being well, you should successfully connect to xRDP via an SSH tunnel at this point
Last bits of security
Set SSH to accept Certificates only
You will need to edit the SSH daemon config and restart it. Make sure you have certificates set up and can authenticate without a password before you turn this off.
Set xRDP to require SSH tunnels
The last bit of security you can apply is to force xRDP to require a tunnel by constraining it to accept local connections only.
Hopefully that’s all you’ll need to connect in a reasonably secure fashion to your Kali box over the internet.
Источник
Ethical hacking and penetration testing
InfoSec, IT, Kali Linux, BlackArch
How to install and configure RDP server on Linux
How to install an RDP server on Linux
The Remote Desktop Protocol (RDP) Server can run on Windows and Linux as well. As a result, you can connect to Linux using the RDP protocol.
On Linux, the RDP protocol is not integrated by default as on Windows. Also, Linux does not have some other protocols that are used transparently (invisibly) for Windows users, for example, for network authentication.
However, there are RDP servers that run successfully on Linux.
How to use freerdp-shadow to start an RDP server
To install freerdp on Debian, Kali Linux, Linux Mint, Ubuntu and derivatives, run the command:
To install freerdp on Arch Linux and derivatives, run the command:
The executables in different distributions are called slightly differently. In Debian, Kali Linux, Linux Mint, Ubuntu, a file for starting an RDP server is called: freerdp-shadow-x11.
And in Arch Linux, the file for starting the RDP server is called: freerdp-shadow-cli.
But essentially this is same program and they have the same options.
Speaking a bit about rdesktop, we’ve already encountered Network Level Authentication (NLA), that is, network-level authentication. To run the RDP server on Linux, you must choose one of two options:
- start the server without authentication at all
- enable NLA and make the necessary settings for it
To start the RDP server without authentication at all, use the -auth option:
If authentication is enabled, PAM is used with the X11 subsystem. Running as root is not required, however, if running as user, only the same user who launched freerdp-shadow can authenticate. Warning: if authentication is disabled, everyone can connect.
Any network service without authentication is a disaster for system security. Therefore, consider how to run freerdp-shadow with NLA support.
First of all, for the NLA, you need to create a file in which there will be a line of the form:
We know the Linux username, to calculate the hash, we need to execute a command of the form:
For example, the username is mial, and the password is 2, then the command is as follows:
Calculated hash: 8f33e2ebe5960b8738d98a80363786b0
Create a SAM text file and write a line to it
Now run freerdp-shadow-x11 with two options:
- /sam-file:FILE – indicates the location of the NTLM SAM file for NLA authentication
- /sec:nla — force NLA authentication
So my command is as follows:
For verification, I connect from Windows:
We are asked to enter credentials – this means that NLA authentication is enabled on the RDP server.
To share not only the entire screen, but only part of it, use the /rect:x,y,w,h option. Where:
- x,y are coordinates of the upper left corner of the rectangle
- w is rectangle width
- h is the height of the rectangle
For example, to share part of the screen 500×500 pixels with coordinates 200,300:
freerdp-shadow error ‘client authentication failure: -1’
If you get an error when starting the RDP freerdp-shadow server:
Then you need to create a SAM file and run freerdp-shadow with the /sam-file:SAM /sec:nla options as shown above.
How to start an RDP server with xrdp
To install xrdp on Debian, Kali Linux, Linux Mint, Ubuntu and derivatives, run the command:
To install xrdp on Arch Linux and derivatives, run the following commands:
To start the xrdp-sesman and xrdp services on any distribution, run the command:
Important xrdp files:
- /etc/xrdp/xrdp.ini – configuration file
- /var/log/xrdp.log – log file
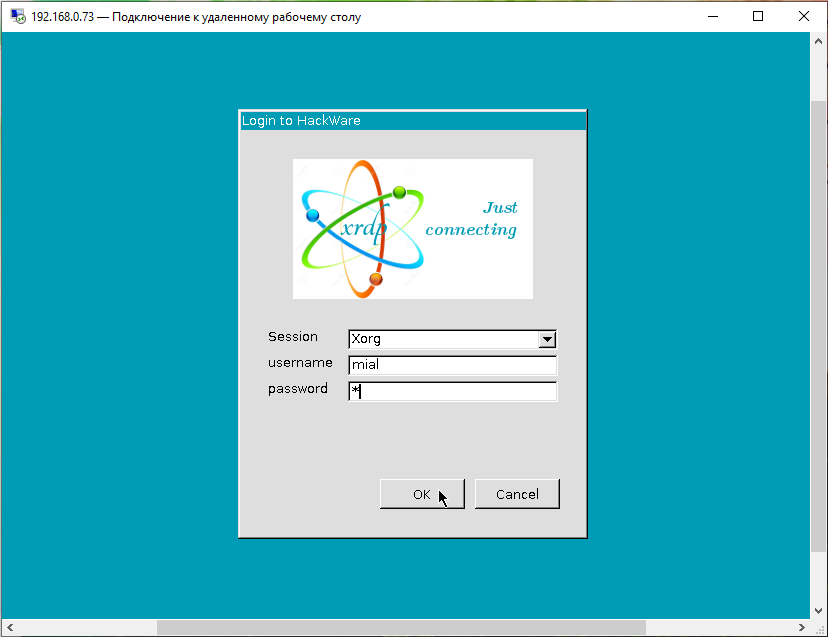
We are connected from Windows to Linux with xrdp. Enter the username and password of the Linux user:
Now we can execute commands on a Linux computer as if we were sitting in front of it:
Источник
Установка RDP сервера
Несмотря на то, что изначально на VPS и выделенном сервере отсутствует возможность подключения к удаленному рабочему столу в графическом режиме, такое подключение можно настроить самостоятельно, установив несколько пакетов, а именно: саму графическую среду и средство для удаленного подключения.
Содержание
Общая информация
Из графических окружений будет рассмотрена установка следующих:
1) XFCE. Официальный сайт — xfce.org
 XFCE по ресурсоёмкости является одним из наиболее «легковесных» графических окружений, поэтому его рекомендуется использовать на VPS с невысокой производительностью.
2) GNOME. Официальный сайт — gnome.org
 GNOME является стандартной оболочкой в Debian. Поэтому, если вы обычно работаете именно в этом окружении, то установка его на VPS не составит особых сложностей.
3) Unity. Официальный сайт — unity.ubuntu.com
 Unity — свободная оболочка для среды рабочего стола GNOME, разрабатываемая для операционной системы Ubuntu. Начиная с Ubuntu 11.04, Unity пришла на смену классической оболочке GNOME.
4) X Window System. Официальный сайт — x.org
Из программных средств для создания удаленного подключения будет рассмотрена установка сервера XRDP, который позволяет подключаться к VPS по RDP протоколу. В ОС Windows в качестве клиента используется утилита mstsc.
Установка графической оболочки и XRDP
Debian 7.4 (32 и 64 bit)
1. Обновляем список доступных пакетов:
2. Устанавливаем графическое окружение и xRDP:
3. Редактируем файл запуска xRDP. Наща цель — настроить автоматическую загрузку графической оболочки при запуске VPS. Воспользуемся любым редактором, например, nano:
Добавляем в файл startwm.sh следующие строки:
В обязательном порядке добавьте в конце пустую строку. Сохраните результаты при помощи нажатия клавиш Ctrl+O и выйдите из меню редактора — Ctrl+X.
4. Делаем перезапуск xRDP сервера при помощи команды
5. По окончании выполнения вышеописанных шагов необходимо перезапустить VPS из панели управления SolusVM либо выполнив команду
CentOS 6.*
1. Обновляем список доступных пакетов:
2. Устанавливаем графическое окружение:
3. Подключаем репозитории EPEL и Desktop:
4. Выполняем установку xRDP и добавляем его в автозапуск:
5. Настраиваем сетевые подключения. Для начала выполняем команду
Отобразится диалоговое окно, в котором необходимо выбрать DNS configuration, после чего нажать клавишу Enter.
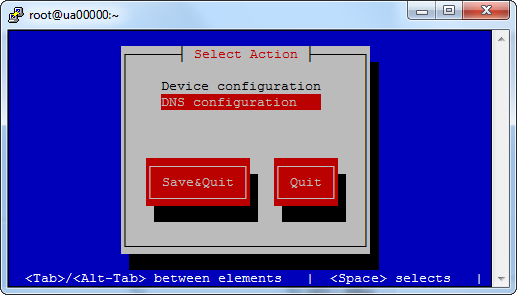 В следующем окне конфигурации в поле Primary DNS указываем IP адрес 8.8.8.8, а в поле для Secondary DNS вводим IP адрес 4.2.2.3. Затем нажимаем ОК. Сохраняем внесенные изменения, нажав на кнопку Save&Quit.
6. Перезапускаем виртуальный сервер через SolusVM или выполняем команду
CentOS 7
1. Выполняем обновление пакетов:
2. Добавляем репозитории EPEL и Desktop:
3. Устанавливаем графическое окружение и xRDP:
4. Обязательно необходимо указать графическую оболочку, которая будет доступна по умолчанию. Команда:
5. Чтобы xRDP загружался автоматически при старте виртуального сервера, дополнительно выполняем следующие команды:
6. Отключаем Firewalld:
7. Перезапускаем виртуальный сервер через SolusVM или выполняем команду
Ubuntu 12.04 (64 bit)
1. Выполняем обновление пакетов
2. Устанавливаем графическое окружение и сервис xRDP:
3. Настраиваем автозагрузку xRDP:
4. По окончании выполнения вышеописанных шагов необходимо перезапустить VPS из панели управления SolusVM либо выполнив команду
Ubuntu 14.04 (64 bit)
1. Выполняем обновление пакетов
2. Устанавливаем сервис xRDP:
3. Устанавливаем графическое окружение:
4. Настраиваем использование сервером установленной графической оболочки по умолчанию:
5. Редактируем файл запуска xRDP с помощью любого редактора, например, nano:
Итоговое содержимое файла должно быть таким:
Важно! Обратите внимание на тот факт, что в конце файла необходимо добавить пустую строку. Сохраните результаты редактирования сочетанием клавиш Ctrl+O и выйдите из редактора через Ctrl +X.
6. Делаем перезапуск xRDP сервера:
7. Перезапускаем виртуальный сервер через SolusVM или выполняем команду
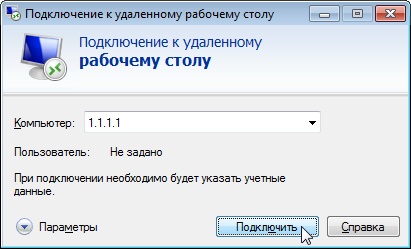
Подключение по RDP
- Запускаем на своём ПК утилиту mstsc через меню Пуск ->Выполнить

- Вводим IP адрес сервера и нажимаем на кнопку Подключить.
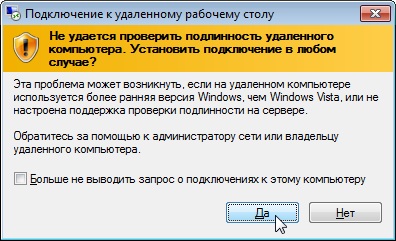
- В случае возникновения окна с предупреждением о невозможности проверки подлинности компьютера, нажимаем на кнопку Да.
- В появившемся окне вводим данные для доступа и нажимаем ОК.
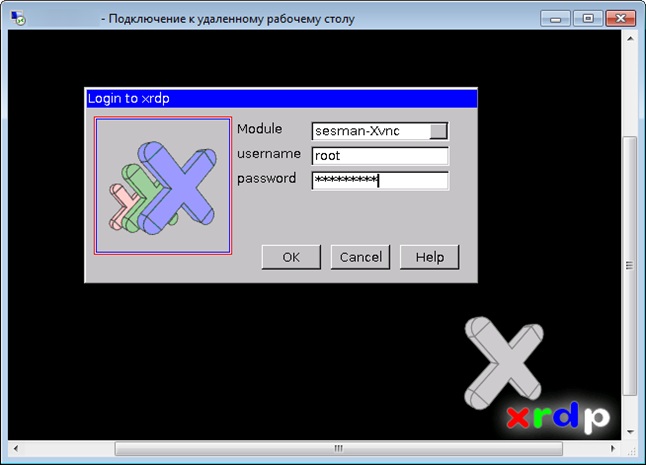
- Если данные были введены верно, то откроется рабочий стол VPS.
Из соображений безопасности, настоятельно не рекомендуется постоянно работать на VPS в графическом режиме от имени root-пользователя. Лучше всего для этих целей создать нового пользователя при помощи команды в консоли:
после чего установить для него пароль командой:
А после ввода нового пароля вы сможете использовать новые данные для подключения по RDP.
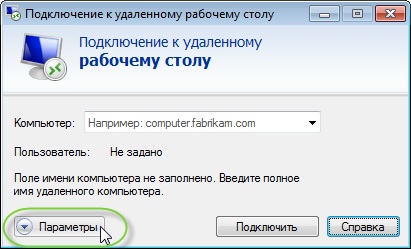
Как настроить подключение в полноэкранном режиме?
Полноэкранный режим включается в самой утилите mstsc через кнопку Параметры.
 После нажатия на эту кнопку развернется окно с доступными настройками, среди которых необходимо перейти во вкладку Экран, после чего в разделе Настройка отображения перевести бегунок в крайнее правое положение, как показано на изображении.
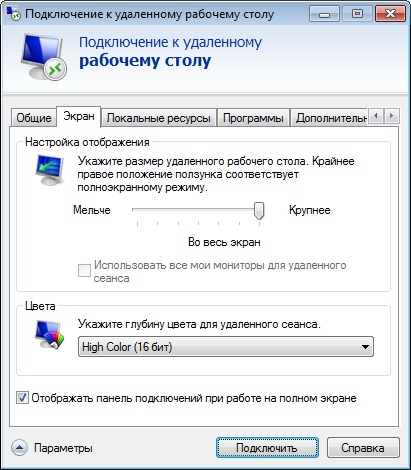 После этого можно вернуться во вкладку Общие и инициировать подключение к серверу.
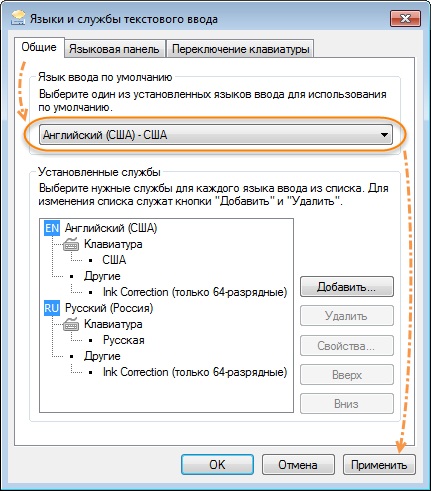
Решение проблемы с раскладкой клавиатуры в XRDP
При запуске утилиты mstsc может возникнуть ситуация, при которой в форме ввода логина и пароля текст вводится некорректно, либо вообще не вводится. Это связано с тем, что при запуске утилиты была установлена не английская раскладка клавиатуры. Для того, чтобы избежать повторения такой ситуации, перед подключением к указанному в mstsc серверу, убедитесь в том, что индикатор раскладки клавиатуры показывает значок английского языка.
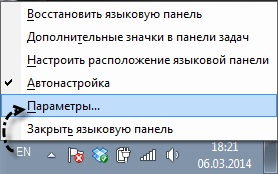
 Также, чтобы не отслеживать постоянно установленную раскладку в системе перед запуском mstsc, можно установить английскую в качестве варианта по умолчанию. Для этого нажмите правой кнопкой на языковой панели и выберите пункт Параметры.
 В открывшемся окне будет раздел «Язык ввода по умолчанию». Выберите из списка доступных языков английский, после чего нажмите на кнопку Применить, чтобы сохранить изменения.
 Хотите купить VPS или выделенный сервер? Смотрите предложения от HOSTiQ.ua. У нас вы также можете купить SSL-сертификаты и зарегистрировать домен дешево.
Источник


