- Как: Сгенерировать Хэш Пароля в Linux и как узнать тип хэша
- Сгенерировать Хэш Пароля в Linux
- Создать Хэш Пароля для /etc/shadow
- Узнать тип хэша
- Добавить комментарий Отменить ответ
- How to Verify Checksum on Linux [Beginner Guide]
- What is a Checksum?
- How is a Checksum generated?
- How to use checksum to verify file integrity [GUI way]
- Installing GtkHash on Ubuntu
- Using GtkHash
- Verify checksums via Linux command line
- Generating and Verifying SHA256 Checksum with sha256sum
- How accurately does this work?
- Подсчитываем md5 (хеш-сумму) в Linux
- После записи дистрибутива Linux на оптический диск нужно проверить целостность, узнать его MD5 сумму
- 5 комментариев Подсчитываем md5 (хеш-сумму) в Linux
- How to Check MD5 Checksum and SHA Hash of a File
- Hashes vs Checksums
- Check Hash Value using Command Line
- MD5Sum Windows Command Line
- Windows certutil -hashfile Command
- Mac OS X Hash Checker Commands
- Linux Command Line to Check Hash
- GtkHash Tool (Ubuntu)
- Hash Checker Tools
- QuickHash (Windows/Mac/Linux)
- Hash Generator (Windows)
- HashTab Hash Checker (Windows)
- Verify MD5sum on Android
- Online Hash Checker
- Hasher Hash Generator Extension
Как: Сгенерировать Хэш Пароля в Linux и как узнать тип хэша
Сгенерировать Хэш Пароля в Linux
Linux хранить зашифрованные пароли пользователей, также как и другую информацию связанную с безопасностью, например сроки действия аккаунтов или паролей, в файле /etc/shadow .
Однажды у вас может возникнуть необходимость вручную отредактировать файл /etc/shadow для того, чтобы задать или изменить чей-то пароль.
В отличие от файла /etc/passwd , который могут читать все, файл /etc/shadow должен быть доступен для чтения ИСКЛЮЧИТЕЛЬНО пользователю ROOT.
Для этого вам придется сгенерировать хэш пароля в формате, который будет совмести с /etc/shadow .
Нет необходимости устанавливать дополнительные утилиты, так как это может быть легко сделано из командной строки в Linux с помощью Python.
Создать Хэш Пароля для /etc/shadow
Зашифрованные пароли в /etc/shadow хранятся в следующем формате:
$ID обозначает тип шифрования, $SALT — это случайная (до 16 символов) строка и $ENCRYPTED — хэш пароля.
| Тип Хэша | ID | Длина Хэша |
|---|---|---|
| MD5 | $1 | 22 символов |
| SHA-256 | $5 | 43 символов |
| SHA-512 | $6 | 86 символов |
Используйте следующие команды из терминала в Linux для создания хэшированых паролей со случайной солью для /etc/shadow .
Создать MD5 Хэш пароля:
Создать SHA-256 Хэш пароля:
Создать SHA-512 Хэш пароля:
Надеюсь эти команды будут вам полезны.
Только не забудьте поменять MySecretPassword на ваш YourSecretPassword.
Как вы видите, это действительно очень легко генерировать хэши для /etc/shadow из командной строки в Linux с помощью Python.
В частности потому, что Python, по умолчанию, установлен в большинстве Linux дистрибутивах.
Узнать тип хэша
Существуют два основных параметра, которые могут помочь распознать тип используемой хэш-функции:
- Длина ХЭШа (каждая хэш-функция имеет определенную выходную длину);
- Используемый алфавит (есть ли английские буквы? числа 0-9 и A-F … возможно это hex? используются ли специальные символы?).
Step 1: Скачиваем последнюю версию (v1.1 на текущий момент)
Step 2: Запускаем скрипт и копируем интересующие нас ХЭШи
Добавить комментарий Отменить ответ
Для отправки комментария вам необходимо авторизоваться.
Источник
How to Verify Checksum on Linux [Beginner Guide]
Last updated April 10, 2020 By Munif Tanjim 35 Comments
Brief: This beginner’s guide tells you what a checksum checks, what MD5, SHA-256 and SHA-1 checksums are, why checksums are used and how to verify checksums on Linux.
You’ll learn the following in this tutorial:
What is a Checksum?

A checksum is like the digital fingerprint of a file. In technical terms,
A checksum is a small-sized datum from a block of digital data for the purpose of detecting errors which may have been introduced during its transmission or storage.
So a checksum is a long string of data containing various letters and numbers. You’ll generally find them when downloading files from the web, e.g. Linux distribution images, software packages, etc.
The most common use of checksums is for checking if a downloaded file is corrupted.
For instance, the Ubuntu MATE download page includes an SHA-256 checksum for every image it makes available. So after you’ve downloaded an image, you can generate an SHA-256 checksum for it and verify that the checksum value matches the one listed on the site.
If it doesn’t, that means your downloaded image’s integrity is compromised (maybe it was corrupted during the download process). We will use an Ubuntu MATE “ubuntu-mate-16.10-desktop-amd64.iso” image file for this guide.
How is a Checksum generated?
Each checksum is generated by a checksum algorithm. Without going into the technical details let’s just say it takes a file as input and outputs the checksum value of that file. There are various algorithms for generating checksums. The most popular checksum algorithms are:
- Secure Hash Algorithms and variants (SHA-1, SHA-2 etc.)
- MD5 algorithm
Let’s see how to verify a checksum on Linux.
How to use checksum to verify file integrity [GUI way]
If you’re looking for a graphical solution, you can use GtkHash.
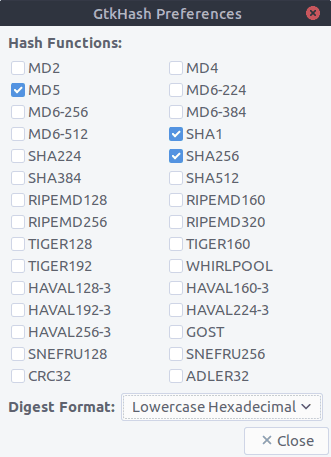
GtkHash is a nifty tool for generating and verifying various checksums. It supports a wide range of checksum algorithms, including SHA, MD5 and others. Here’s a list of supported algorithms:
GtkHash supported Checksum Algorithms
Installing GtkHash on Ubuntu
To install GtkHash on your Ubuntu system, simply run the following command:
That’s it. Then select the checksum algorithms to use:
- Go to Edit >Preferences in the menu.
- Select the ones you’d like to use.
- Hit the Close button.
By default, MD5, SHA-1 and SHA256 are selected.
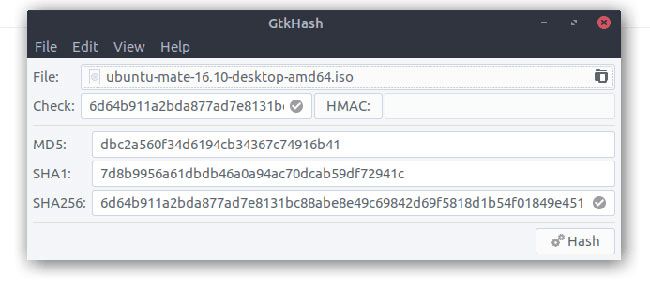
Using GtkHash
Using it is quite straight-forward.
- Select the file you want to check.
- Get the Checksum value from the website and put it in the Check box.
- Click the Hash button.
- This will generate the checksum values with the algorithms you selected.
- If any one of them matches with the Check box, it will show a small tick sign beside it.
Here’s an example showing GtkHash generating a checksum for the Ubuntu MATE iso image (ubuntu-mate-16.10-desktop-amd64.iso):
GtkHash with UbuntuMATE iso
Verify checksums via Linux command line
Every Linux distribution comes with tools for various checksum algorithms. You can generate and verify checksums with them. The command-line checksum tools are the following:
- MD5 checksum tool is called md5sum
- SHA-1 checksum tool is called sha1sum
- SHA-256 checksum tool is called sha256sum
There are some more available, e.g. sha224sum, sha384sum, etc. All of them use similar command formats. Let’s see an example using sha256sum. We’ll use the same “ubuntu-mate-16.10-desktop-amd64.iso” image file that we used before.
Generating and Verifying SHA256 Checksum with sha256sum
First go to the directory where the .iso image is stored:
Now, to generate the SHA-256 checksum, enter the following command:
You’ll see the SHA-256 checksum in your terminal window! Easy, isn’t it?
Generating SHA256 Checksum for UbuntuMATE iso
If the generated checksum matches the one provided on the Ubuntu MATE download page, that will mean no data was changed while you downloaded the file – in other words, your downloaded file is not corrupted.
The other tools mentioned work similarly.
How accurately does this work?
If you’re wondering how accurately these checksums detect corrupted files – if you delete or change even one character from any one of the text files inside the iso image, the checksum algorithm will generate a totally different value for that changed image. And that will definitely not match the checksum provided on the download page.
Do you checksum?
One of the suggested steps while installing Linux is to verify the checksum of your Linux ISO. Do you always follow this step or do you do it only when something goes wrong with the installation?
Was this guide helpful? If you have any questions, let us know! And if you need a similar guide for something else, reach out to us, we’re here to help.
Like what you read? Please share it with others.
Источник
Подсчитываем md5 (хеш-сумму) в Linux
Проверить MD5 (хеш-сумму) в Linux проще всего именно в терминале. Через какой-либо графический интерфейс необходимо будет сделать больше манипуляций, чем просто скомандовать в терминале Linux следующее:
Само собой разумеющееся путь до необходимого вам файла, (/home/pavel/Дистрибутивы/lubuntu-12.04-desktop-i386.iso) необходимо прописывать свой, тот который соответствует нужному объекту для подсчета MD5 суммы в Linux.
Чтобы не вводить путь к файлу вручную, его можно скопировать следующим образом. Через файловый менеджер заходим в каталог, где собственно находится тот нужный нам файл. Адресную строку в файловом менеджере необходимо перевести из вида «иконок» в текстовый вид, клавишами , дальше можно скопировать путь либо с помощью мышки через правый клик, либо клавишами . Переходим в терминал и к написанной команде «md5sum» через пробел добавляем наш путь с полным названием файла.
Команды в Linux являются стандартном для всех и значит, что команда md5sum подойдет для любого дистрибутива Linux, в котором бы вы не находились. Это и есть одно из достоинств командной строки.
Проверка MD5 (хеш-сумм) требуется после загрузки больших файлов, которые не смогут нормально работать, если какие-либо файлы повредились или каким-то образом изменились. Проверка MD5 сумм в основном применятся к .iso файлам, чаще всего к дистрибутивам. Если .ISO файл поврежден, то его не стоит записывать на USB брелок (флешку), а тем более на оптический диск, дистрибутив Linux при установке будет сообщать об ошибке каких-либо файлов.
После записи дистрибутива Linux на оптический диск нужно проверить целостность, узнать его MD5 сумму
В этой статье мы продолжим углубляться в мир командной строки и сверим MD5 записанного оптического с MD5 суммой исходного файла .ISO с помощью консольной утилиты isoinfo. Для начала мы выудим немного первичной информации о записанном диске командой:
Где /dev/sr0 это DVD-ROM, для уточнения имени вашего примонтированного оптического диска, в том случае если он у вас не один, можно найти по выводу этой команды:
Из имеющейся информации после ввода:
Будет иметься примерно следующее:
Для нас важны эти строчки:
Далее будем подставлять эти строки в следующую команду, которая нам сообщит MD5 сумму
Обратите внимание на три пункта, которые вы должны подставить свои:
- /dev/sr0 — путь до оптического диска (если он у вас один, значит этот пункт без изменений)
- bs= 2048 — у вас своё значение «Logical block size is:»
- count=352406 — из значения «Volume size is:».
После подсчета вы получите примерно следующее:
322e76e15cbe9ae4b964f3e6cbe49e37 — это и есть MD5 сумма диска. Если, она совпадает со значение указанном на сайте, где вы скачивали файл или с исходным файлом на компьютере, то значит, диск записался без ошибок. На практике бывает, что сумма MD5 часто не совпадает с суммой MD5 указанной на сайте из-за ошибок при чтении диска.
5 комментариев Подсчитываем md5 (хеш-сумму) в Linux
Для проверки записи диска нужно всего лишь дать команду:
$ md5sum /dev/hda
(если оптический диск определяется у вас hda, может определяться и по другому — узнайте с помощью mount).
Включится дисковод и через непродолжительное время получите ответ:
d790058a688150748e7a3b62477a3458 /dev/hda
И всё!
нет не усё!
если просто (md5sum /dev/hda или /dev/dvd) то hash посчитается вместе с служебной
информацией записаной на диск и вывод md5 hash будет не верным
правильно как написано в статье.
Большое спасибо. Замечательно доходчиво написано, даже для новичков, каковым я и являюсь.
а у меня на зпгрузочной флешке нет файла iso во всяком случае найти я егопока не смог. А вот на главном сайте Ubuntu предлагается «скачать файлы» SHA and SHA.pgp в какую-то «одну» директорию. Наверное им это ясно. Я рад за них. НО не за себя.
Приветствую! Спасибо за статью.
Попробовал два способа — самый первый в статье — md5sum /path/*.iso
Показывает одну сумму.
Источник
How to Check MD5 Checksum and SHA Hash of a File
Hash is a digital signature-based encryption system to check the integrity of a file. There are a number of hash checksum algorithm formats including MD5, SHA1, SHA256, SHA384, SHA512, SFV, CRC, Base64, LM, etc. There are some great hash checker programs and online tools using which you can easily check the MD5 checksum or hash of a file. You can also verify the MD5sum using the Windows command line as well. Moreover, we will also check some MD5 or hash generator utilities.
Hashes vs Checksums
The purpose of the hashes or hash codes and checksums is the same. Both are used to ensure the integrity of a file via an alphanumeric string. If the uploader of a file has provided that hash for the uploaded file, you can verify it easily. Once you have downloaded the file, you can use a hash checker or MD5 checksum utility to compare the hash signature of the original file and your copy of the file. If the signatures don’t match, it means your copy of the file may have corrupted or has been compromised.
Suppose some unauthorized person has modified the original file or it has been corrupted due to bad download, the checksum value of the file will change. The reasons due to which a file can get corrupted might be a network issue during a file download, errors that creep in during copying and moving, storing a file on a faulty storage drive.
As for MD5 checksum is a string of hexadecimal string (6 + 10 = 16) that contains 6 alphabets (A to F) and 10 digits (0 to 9). It is made up of 32 characters and looks as shown below:
MD5 is a 128-bit fingerprint. It’s one of the most popular hash algorithms and because of that, it is also more prone to the hash collision problem. MD5, SHA1, and SHA256 are the most widely used checksums to verify data integrity.
Depending on the encryption type, there are several types of hashing.
- MD4
- MD5
- SHA1
- SHA2
- SHA224
- SHA256
- SHA384
- SHA512
- SHA-512/224
- SHA-512/256
- SFV
- CRC
- Base64
- LM
- Tiger
- xxHash
- MACTripleDES
- RipeMD
- HAVAL
- Whirlpool
Now that we have understood what hashing and MD5 mean, it’s time to take a look at the ways to check MD5 checksum and the hash value of a file on Windows 10, macOS, and Linux. An MD5 hash checker can save you from the malicious files. There are several ways to verify the hash value of a file online, hash checker utilities, and even a command line (Windows 10).
Online hash checkers are great but big files can take a lot of time and consume your data file every time you check the hash value. Therefore, it’s a better idea to download an SHA or MD5 checksum utility or tool and install it on your computer.
Check Hash Value using Command Line
MD5Sum Windows Command Line
Windows natively supports the calculation of the hash values or checksums for the following algorithm types: MD5, SHA1, SHA256, SHA384, SHA512, MACTripleDES, and RIPEMD160. You can easily find out the hash code of any file on your Windows 10 PC using a command line.
- Navigate to the path where the concerned file is located. In my case, the file is saved on the desktop.
- Now, press the Shift key on the keyboard and perform a right-click action on the mouse. Select the Open PowerShell window here option here from the context menu. Launching the command window from the file location is convenient because that way you don’t need to add the full path of the file but the file name only.
- When the command prompt window is launched, execute the following command to find out the hash value or MD5 checksum of a file.
- Please note that you will get the SHA256 hash value of the file by default.
 SHA256 hash checker command Windows 10
 MD5 checksum command line Windows 10
That’s it! You have successfully checked the MD5 checksum on your Windows 10 PC using a command line.
Windows certutil -hashfile Command
Besides the Windows command line mentioned above, you can also make use of the built-in Certificate Utility tool to verify MD5 and SHA checksum. In this method though, you need to use the Windows Command Prompt instead of PowerShell. ‘certutil -hashfile’ command-line tool supports the following hash algorithms.
Please, note that SHA1 is the default hash of the ‘certutil -hashfile’ command if you don’t provide a value. Just open a command prompt and execute the following command to check the MD5 hash checksum of a file:
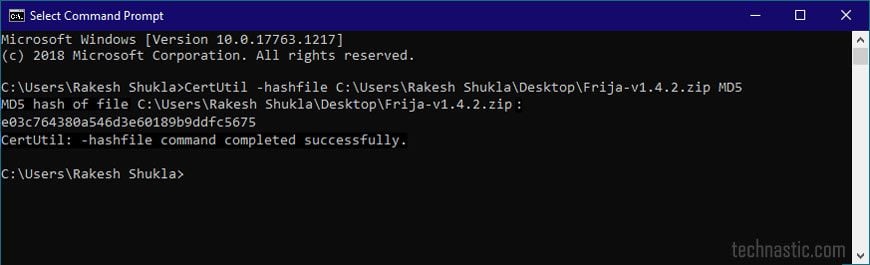 certutil -hashfile command Windows 10
To find out the SHA checksum, you just need to replace the MD5 parameter in the above command with some other hash algorithm. Using the Command Prompt, you can also format a USB drive on Windows 10.
Mac OS X Hash Checker Commands
If you are a Mac user, you can use terminal commands to check the hash value or MD5 checksum of a file.
- Navigate to Applications > Utilities > Terminal.
- Launch the Terminal and execute the following commands to find out the MD5, SHA1, SHA256, and SHA512 hash algorithms. Make sure to replace ‘uTorrent.dmg‘ with your own file name and path to the file. Suppose the file is located in the Downloads folder, the path to file would go like this: /Users/Username/Downloads/file-name.extension.
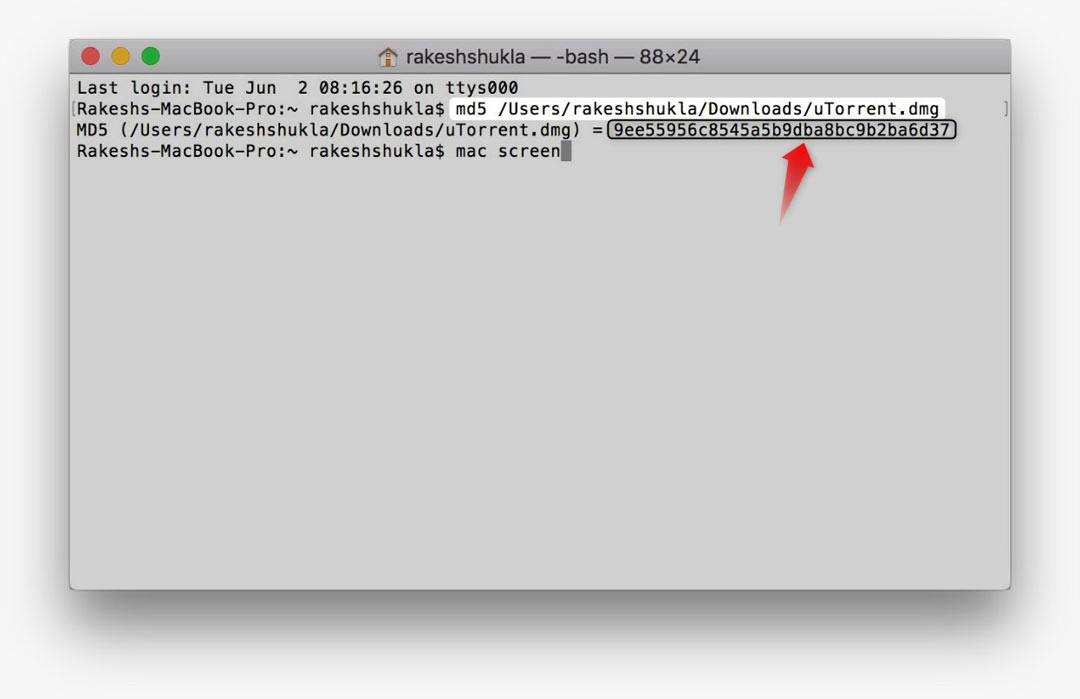 MD5 sum command Mac Terminal
Following is an example of the output you will get with the hash of the file.
Thus, you can easily get the MD5 checksum on Mac. Do you know all the possible ways to capture the screen of your Mac? Here are 3 methods to take screenshots on macOS.
Linux Command Line to Check Hash
If you are using Linux users or have been using any of the Linux distributions on your computer, here is how you can check or verify the checksum of MD5 (md5sum), SHA1 (sha1sum), SHA256 (sha256sum), SHA224 (sha224sum), or SHA384 (sha384sum) using commands. Just launch the Terminal window and execute the following command to go to the directory where the file is located. In case you have Ubuntu, you can use this command:
Then, you will need to use the following command:
The MD5 checksum of the file would print out as follows:
Similarly, if you want to check the SHA256 hash of a file, you can use the following command:
You can use the above commands with other algorithm types of hash.
GtkHash Tool (Ubuntu)
If you want to generate or verify the checksums of various algorithms via GUI (graphical user interface), you can use a tool called GtkHash. It supports all well-known hash algorithms including MD5, SHA1, SHA256, SHA512, Whirlpool, Tiger, RipeMD, HAVAL, etc.
Download GtkHash from Github and install it using the following command:
When GtkHash is installed, launch the app and add the file by clicking the Browse icon in the File section. If you want to match the checksum of the original file with your downloaded copy, paste the original hash value in the Check field and click the Hash button. Below is an example of SHA1 hash check for the Ubuntu MATE ISO image.
 GtkHash Ubuntu
In case you decide to uninstall this app later, head over to our tutorial on uninstalling apps on Ubuntu. Moreover, you should also check out these 20 useful commands for Ubuntu to make the most of your computer.
Hash Checker Tools
If you don’t find the Windows command line method convenient enough, you can try one of the following hash checker utilities on your Windows 10, Mac, or Linux machine.
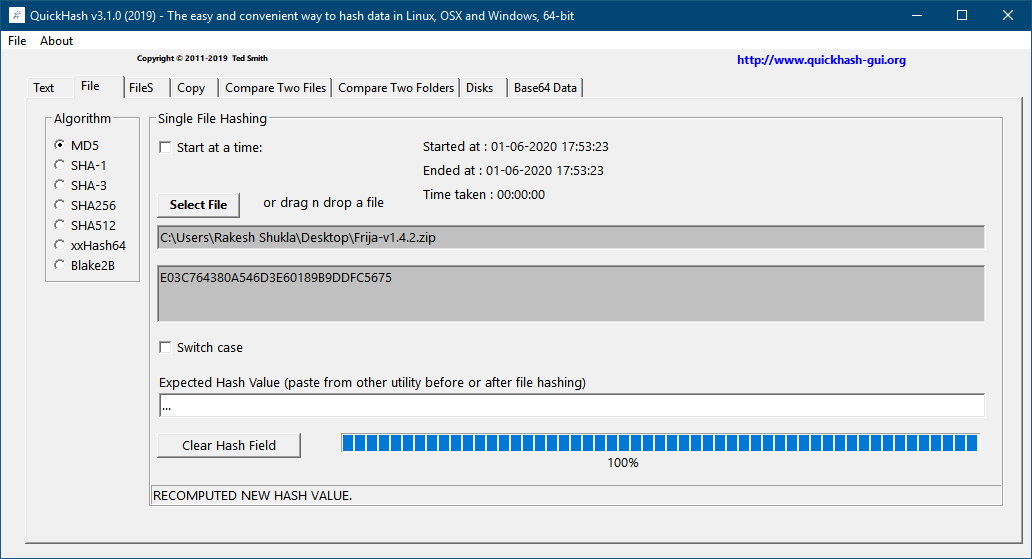
QuickHash (Windows/Mac/Linux)
The very reason why QuickHash is my favorite is that it’s versatile. It’s an open-source hash checker and hash generator tool for Windows (32 and 64-bit), macOS, and Linux. QuickHash is not only very easy to use but also offers more features than most other hash checkers and generators. However, it supports only a few popular hash algorithms.
QuickHash can check hash code or MD5 checksum for a single file, multiple files, or all files in an entire folder or disk. If you want to compare the hash codes or MD5 checksums of 2 files or folders, QuickHash can help you with that too.
 QuickHash hash checker
Suppose you want to compare MD5 checksum of two files in QuickHash, you just need to click the Compare Two Files tab, add both the files and click the Compare Now button. Not just that, QuickHash can also generate the checksum or hash value for all supported types.
Download QuickHash hash checker for Windows, Mac, and Linux (Debian) from quickhash-gui.org.
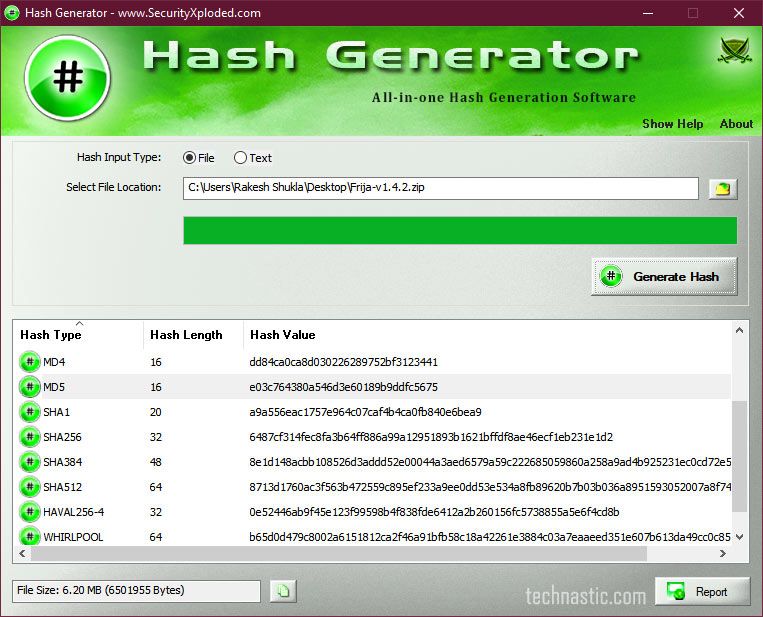
Hash Generator (Windows)
Hash Generator is another free hash checker tool that can generate and compute the checksums or hashes of no less than 16 popular hash algorithm types that include:
- MD5 family (md2, md4, md5)
- SHA family (sha1, sha256, sha384, sha512)
- LM
- NTLM
- ROT13
- CRC32
- BASE64
- ADLER32
- HAVAL256
- RIPEMD160
- WHIRLPOOL
Hash Generator even lets you export the complete list of hash values to a text, HTML, XML, or CSV file. Whether you want to verify the checksum of an MD5 or an SHA encrypted file or generate a new hash value for any text, Hash Generator is what you need.
 Hash Generator
- Download and install Hash Generator on your Windows PC.
- If you want to check the checksum of a file, just click the Browse button. You can also simply drag and drop your file as well. However, if you want to generate the hash for a text, you’ll have to select the Text option and paste your text.
- Then click the Generate Hash button and you will see a list of checksums or hash values for all 16 hash algorithm types.
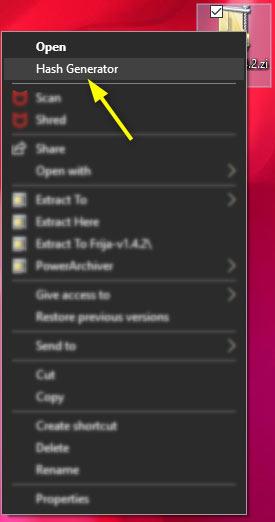
- Hash Generator adds a quick shortcut in the right-click context menu to easily generate hash and checksum for any file easily.

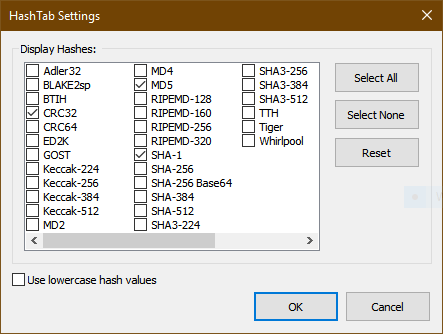
HashTab Hash Checker (Windows)
HashTab is a great option for Windows users because it takes a very practical take on how a hash checker tool should work. Once you have installed HashTab, you don’t need to launch it in a separate window. The program supports 30 types of hash algorithms. However, only MD5, CRC32, and SHA1 hashes are available by default. You can easily enable the additional hash types from the app settings. HashTab used to be available for Mac as a paid app but it has been taken down from the iTunes Store.
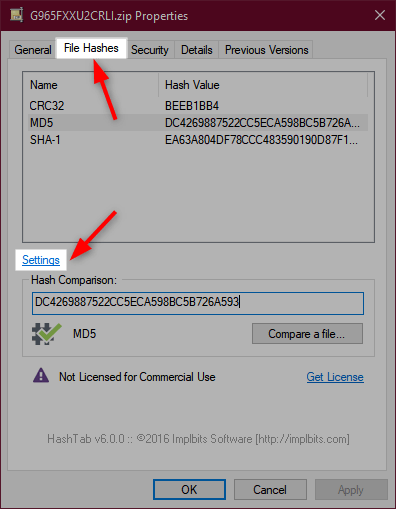
HashTab adds a tab called File Hashes in the Properties menu of a file. Here’s how to use HashTab.
- Right-click the file on which you want to perform the MD5sum or hash value check.
- In the context menu, click on Properties > File Hashes.
- The tool will automatically list the hash value or checksum of CRC32, MD5, and SHA-1.
 HashTab Windows hash check
By using the Compare a file… option you can compare the hash value of one file with another file.
Verify MD5sum on Android
If you want to check MD5 checksum on your smartphone or tablet, there are some good Android apps that you can try. Having tested 13 apps from the Google Play Store, I found 2 apps that really work great. Hash Droid supports not only MD5 hash check but also Adler-32, CRC-32, Haval-128, MD2, MD4, RIPEMD-128, RIPEMD-160, SHA-1, SHA-256, SHA-384, SHA-512, Tiger, and Whirlpool.
There is yet another app called Crypto – Tools for Encryption & Cryptography that combines a host of tools and utilities together. The app is like a Swiss Army knife. You can use the Checksums tool in the app to verify the hash of a file.
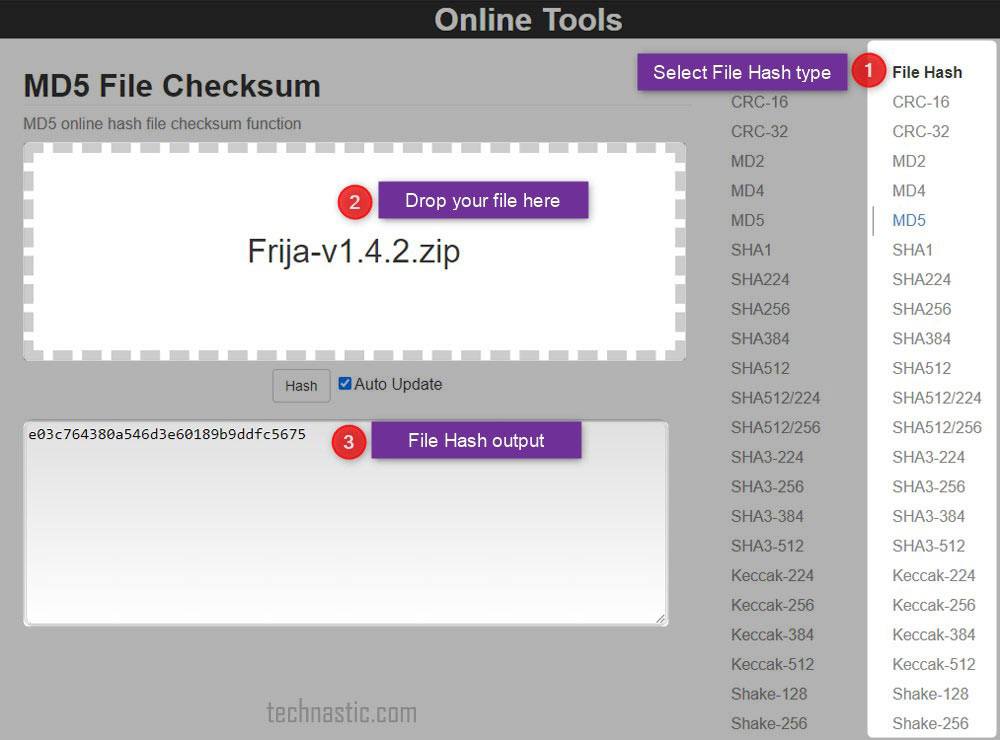
Online Hash Checker
Online Tools is the best hash checker website to check the hash checksum of a file online. It’s an ad-free and open-source platform that gives you hash file checksum for a huge range of hash algorithms of the following types:
Just visit Online Tools, select the File Hash type, and drop your file.
Hasher Hash Generator Extension
If you are looking for a great hash generator tool, you should try Secure Hash Generator Chrome extension. It’s a very easy-to-use utility (for developers) that computes cryptographic hashes.
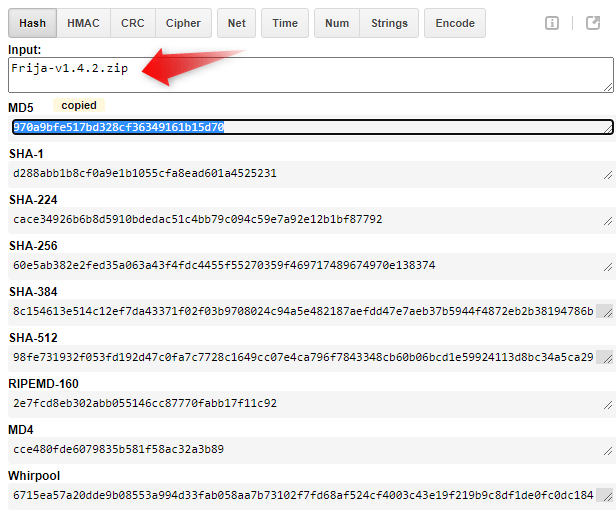
Having added the Hasher extension to your Chrome Browser, you just need to launch it and enter the text for which you want to generate the hash, HMAC, CRC, etc.
Whatever hash checker method you use, tt’s always a good thing to verify the MD5 checksum or SHA value of a file to make sure it’s not tampered. Personally, I would recommend using the command-line method or tools like QuickHash or HashTab. They certainly are far better than an online hash checker.
Источник


