- Секреты Терминала. Часть 11: Двенадцать полезных команд
- Find the Process Listening to Port on Mac OS X
- Step-by-Step
- Find the Process ID (PID)
- Find the Process ID (PID) Using lsof
- Find the Process ID (PID) Using netstat
- Find the Process Name
- Other Useful Commands
- How to Kill or Stop the Process by PID
- The lsof Command
- How to View and Kill Processes Using the Terminal in Mac OS X
- About Terminal
- About Activity Monitor
- How to Use Terminal
- Basic Terminal Commands
- To View All Processes
- To Find a Specific Process
- To Terminate (Kill) a Process
- Before you go
Секреты Терминала. Часть 11: Двенадцать полезных команд
 Терминал можно сравнить со скальпелем хирурга — зная что и где «резать», можно неплохо прокачать сложный «организм» системы Mac OS X, если же необдуманно сделать «надрез» не в том месте, то это чревато смертью «пациента». Разница лишь в том, что Mac OS X можно в случае чего восстановить из резервной копии. Мы продолжаем рассказ о практическом применении этого приложения для настройки и обслуживания Mac OS X и ряда других программ.
Напоминаем, что при работе в Терминале следует быть осторожным с командами, которые начинаются с sudo. Это команды системного уровня, которые при неправильном использовании могут вызвать серьезные проблемы в Mac OS X, вплоть до краха системы. Поэтому эти команды нужно вводить максимально аккауратно и именно так, как указано в инструкции. Как правило, при работе с такими командами требуется ввести пароль администратора, который вводится вслепую.
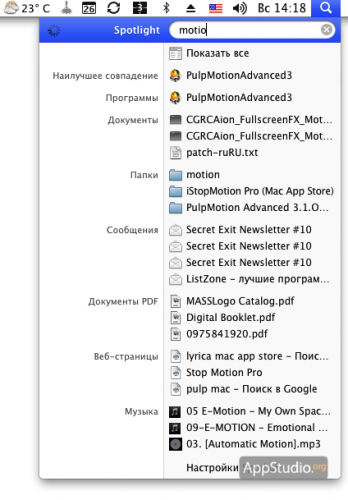
SPOTLIGHT
Нет нужды объяснять любому маководу, пусть даже начинающему, что такое Spotlight, так как большинство пользователей используют его для поиска документов, запуска приложений, математических вычислений и пр. Между тем, существует несколько команд Терминала, помогающих оптимизировать работу Spotlight или, например, скрыть иконку Spotlight в менюбаре.
- Исправление проблем с поиском
Даже в такой достаточно отлаженной системе, как Mac OS X, может случиться так (хотя и достаточно редко), что начинают глючить те или иные приложения. Так, например, Spotlight может начинать выдавать неверные результаты поиска, а то и вовсе отказываться от поиска. Как правило, такие сбои получаются в результате того, что в базе программы появились ошибки. Чтобы ликвидировать эти ошибки нам будет необходимо удалить всю базу метаданных и провести повторную индексацию содержимого всех разделов/дисков. Для этого можно воспользоваться следующими командами Терминала (не забываем после каждой команды нажимать RETURN):
[php]sudo mdutil -E
sudo mdutil -i on[/php]
После выполнения этих команд Spotlight заново проиндексирует все данные на вашем диске/дисках и ошибок больше возникать не будет.
- Убираем иконку Spotlight из менюбара
Наверняка найдется определенный ряд пользователей Mac OS X, например некоторые свичеры, недавно перешедшие с Windows на Mac OS X, в силу своих устоявшихся привычек совсем не использующие возможности Spotlight. Мы не будем сейчас говорить о том, хорошо или плохо ли не использовать Spotlight при повседневной работе в системе, а просто приведем команду Терминала, позволяющую убрать из менюбара иконку Spotlight, дабы освободить место для значка другого приложения.
[php]sudo chmod 0 /System/Library/CoreServices/Spotlight.app[/php]
Для того, чтобы вернуть иконку на место вводим другую команду:
[php]sudo chmod 755 /System/Library/CoreServices/Spotlight.app[/php]
Не забывайте, что эта команда убирает только иконку Spotlight, а само приложение продолжает работать.
ОБЛЕГЧАЕМ РАБОТУ СИСТЕМНОГО АДМИНИСТРАТОРА
Что самое трудное в работе системного администратора? Правильно, это работа с рядовыми пользователями сети и исправление последствий тех или иных действий, произведенных, например, какой-нибудь секретаршей. Неопытные пользователи, сами того не зная, могут зачастую натворить такого, чего не достичь даже при намеренном разрушении системы. Именно поэтому имеет смысл лишить пользователя возможности воздействовать на те или иные параметры системы, тем более, если этого не требуется при выполнении его обязанностей.

- Блокировка Дока от изменения его содержимого
[php]defaults write com.apple.Dock contents-immutable -bool YES; killall Dock[/php]
- Блокировка Дока от изменения его размеров
[php]defaults write com.apple.Dock size-immutable -bool YES; killall Dock[/php]
- Блокировка Дока от смены его положения на экране
[php]defaults write com.apple.Dock position-immutable -bool yes; killall Dock[/php]
Для того, чтобы отменить ту или иную блокировку, нужно повторно ввести команду, не забыв заменить YES на NO.
- Блокировка доступа к меню Системных настроек
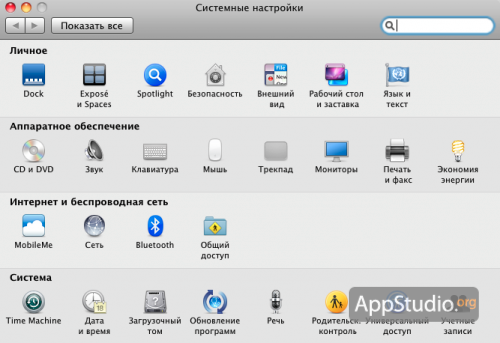
Это наиболее радикальный способ, позволяющий исключить внесение нежелательных изменений в систему. Сразу хотим предупредить о том, что если вы не очень хорошо знакомы с разрешениями и chmod, то лучше воздержаться от использования следующей команды Терминала, дабы оградить себя от возможных последствий. Ведь что бы ни случилось с компьютером пользователя сети, которая находится в вашем ведении, разбираться с проблемой всеравно придется вам.
[php]sudo chmod /Applications/System\ Preferences.app 000[/php]
Для того, чтобы снять блокировку, используем следующую команду:
[php]sudo chmod /Applications/System\ Preferences.app 777[/php]
ОТКЛЮЧАЕМ СОЗДАНИЕ ФАЙЛОВ .DS_STORE НА СЕТЕВЫХ ДИСКАХ
Как известно, файлы .DS_Store — это специальные файлы метаданных, которые Mac OS X использует для хранения персональных настроек папки (иконка, положение окна, фоновое изображение и пр.). Все бы хорошо, но Mac OS X создает такие файлы на всех дисках и их разделах, к которым только имеет доступ, включая сетевые диски и внешние накопители. А между тем, сетевые диски могут физически находится на удаленной машине, работающей под управлением системы Windows, для которой файлы .DS_Store совершенно бесполезны и будут только захламлять каталог файлов в каждой папке. Именно поэтому признаком хорошего тона стало бы отключение создания таких файлов метаданных на сетевых дисках. В этом нам поможет следующая команда Терминала:
[php]defaults write com.apple.desktopservices DSDontWriteNetworkStores TRUE[/php]
Для возврата к предыдущему значению следует повторно ввести данную команду, заменив TRUE на FALSE.
ЕСЛИ ЗАВИС МАК
У любой, даже самой совершенной системы случаются внештатные ситуации. Так и у Mac OS X иногда случается так, что зависает какое-то одно приложение или, что бывает гораздо реже, виснет вся система сразу. Особенно данная проблема касается пользователей Хакинтошей, так как в этом случае мы имеем дело не с оригинальной, а с модифицированной Mac OS X и ожидать такой же стабильности, как и у оригинальных Маков, здесь не приходится. Обращаем ваше внимание, что при принудительном завершении приложения, все данные, с которыми вы работали в зависшей программе, как правило, будут потеряны.
- Если зависло одно приложение
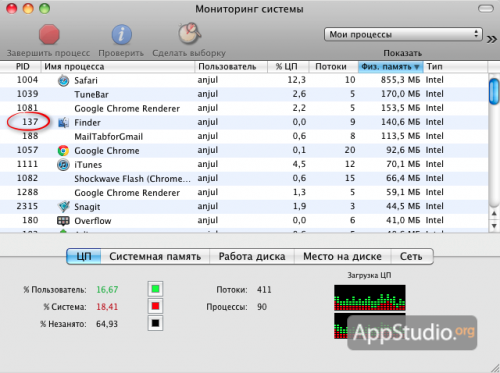
Если при зависании какого-либо приложения функция Принудительного завершения не работает, то проблемную программу можно завершить через Терминал. Для этого вам понадобиться узнать PID (идентификатор процесса) нужного приложения. Сделать это можно, как мнинмум, двумя способами.
Первый — запустить Мониторинг системы и, найдя соответствующий процесс, запомнить или записать его PID.
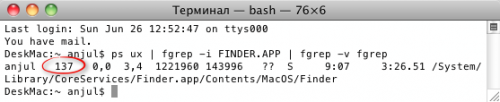
Второй — выполняем в Терминале следующую команду, заменив, в данном случае, FINDER.APP на название нужного приложения:
[php]ps ux | fgrep -i FINDER.APP | fgrep -v fgrep[/php]
После выполения этой команды обращаем внимание на число, показанное сразу после имени пользователя (в данном случае после слова anjul). Это число и будет являться идентификатором процесса зависшего приложения. Для контроля правильности выбора проверяем путь до приложения.
После того, как мы узнали PID зависшего приложения, можно приступать к его завершению, используя одну из трех команд Терминала. Во всех трех командах слово PID заменяем на на числовой идентификатор зависшего приложения.
Первая команда по своему действию является самой «мягкой» из трех команд и, если приложение не удалось завершить обычным способом, то ее применение, скорее всего, ни к чему не приведет. Тем не менее, начинать «убивать» программу следует именно с этой команды.
[php]kill -QUIT PID[/php]
Вторая команда является продвинутым вариантом первой и в большинстве случаев ее использования достаточно чтобы справиться с зависшей программой.
[php]kill -TERM PID[/php]
Если же ничего не помогает и приложение продолжает находится в подвешенном состоянии, то используем третью, самую радикальную команду, которая, как правило, гарантированно завершит приложение.
[php]kill -KILL PID[/php]
- Если завис весь Мак
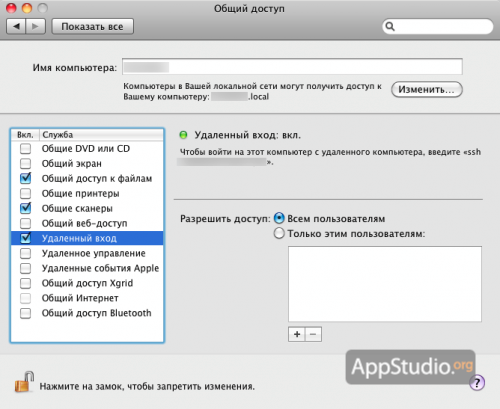
Если у вас под рукой нет ни второго компьютера, ни какого-либо apple-устройства, то в этой ситуации вам поможет только принудительное выключение компьютера, с помощью нажатия и удерживания кнопки питания до тех пор, пока Мак не выключится. Если имеется устройство, с которого можно удаленно подключитья к зависшему Маку, то принудительного выключения машины можно будет избежать. Надо ли говорить о том, что для данного способа необходимо, чтобы у Мака было включено удаленное управление. Для этого необходимо в Системных настройках зайти в раздел Общий доступ и отметить соответствующий пункт.
Со второго компьютера (в нашем случае это второй Мак) открываем ва Терминале Shell -> Новое удаленное подключение -> Безопасный Shell (ssh) и выбираем компьютер, к которому хотим подключиться.

После подключения вводим одну из двух команд, в зависимости от желаемого действия.
Для завершения сеанса работы на зависшем компьютере пишем в Терминале:
[php]sudo killall -HUP WindowServer[/php]
В случае того, если хотим перезагрузить зависший Мак, используем следующую команду:
[php]sudo shutdown -r now[/php]
После использования этих команд вы также потеряете все несохраненные данные, как и при завершении только зависшего приложения.
Источник
Find the Process Listening to Port on Mac OS X

Step-by-Step
To find the process that is listening to a port on Mac OS X, we’ll use the lsof command to find the process ID (PID), and the ps command to show the name.
Find the Process ID (PID)
There are two different ways we can use to find the process that is listening to a port on Mac OS X.
Find the Process ID (PID) Using lsof
Using the lsof command we can find the process ID (PID) for a specific port that is in a LISTEN state. In a terminal type the following and replace the “
” with our port number.
This generates output that looks like this:
In the output above the PID (process ID) is the second value, in this example output the process ID (PID) is “63851”. This command will also print out the port number, which is 9999 in the above output example.
Find the Process ID (PID) Using netstat
Using the nestat command we can find the process ID (PID) for a specific port. In a terminal type the following and replace the “
” with our port number.
This generates output that looks like this:
In the output above the PID (process ID) is the ninth value (the fourth value from the end), in this example output the process ID (PID) is “63851”. This command will also print out the port number, which is 9999 in the above output example.
Find the Process Name
We can now use the process status command ps to display the process name for the process ID (PID).
This generates output that looks like this:
In the output above the process name is the last value “the-process.” Now we know the name of the process that is listening to the port. The reason as to why the grep command is listed twice is to avoid displaying the process ID (PID) for the grep command itself.
Other Useful Commands
How to Kill or Stop the Process by PID
You can kill the process by process ID (PID) using the kill command. Replace “
” with the process ID from lsof or netstat.
The lsof Command
The lsof command lists open files. Network sockets count as files, so each open network socket, either listening or actively in use is listed by lsof. In addtion you can run the man lsof command to display all the different options for lsof.
lsof can take a very long time to execute, so I suggest that you use -n (inhibits the conversion of network numbers to host names for network files) and -P (inhibits the conversion of port numbers to port names for network files) to speed it up.
Источник
How to View and Kill Processes Using the Terminal in Mac OS X
Occasionally in Mac OS X, it may be necessary to force a program or process to quit. For example, if a particular program fails to respond or unexpectedly hangs. Every application on a Mac comprises of one or more processes.
It’s usually possible to use the Force Quit command (⌘⌥ esc) in the Apple Menu, but only individual applications are listed in the Force Quit Applications window rather than all processes which are running on your computer.
If you are new to using the OSX Terminal, I can recommend the Macintosh Terminal Pocket Guide by Daniel J. Barrett as a great way to get started.
The basic steps to check and kill a process are:
- Open the Terminal application
- List the running processes
- Find the process you want to close
- Kill the process
About Terminal
Probably the most useful tool to check and kill processes is called Terminal, which is an application that provides access to the lower levels of the Mac OS X operating system and files. Terminal is a text-based tool which lets you conduct all manner of routine tasks such as viewing directories, copying, moving and deleting files, as well as obtain detailed information about each process running including:
- the process ID (PID)
- the elapsed time spent running
- the command or application file path
About Activity Monitor
A related indispensable application is Activity Monitor – a graphical tool that allows you to manage processes, however it doesn’t have quite the same capabilities that Terminal does. Activity Monitor shows common process-related details such as the memory used and percentage of CPU that each process is consuming. When used together, Activity Monitor and Terminal provide a powerful yet relatively straightforward way to inspect and manage wayward processes.
The main Activity Monitor window is shown below.
Each application on your Mac has an associated Process ID (a PID) and a user-friendly name. From here you can inspect or quit each process, but in this example we use Activity Monitor simply as a companion to Terminal.
The Apple Mail application is displayed in Activity Monitor with a PID number of 14649. Note that process ID’s are assigned by Mac OS, and therefore will not be the same on your computer as somebody else’s.
The Activity Monitor Application
» data-medium-file=»https://www.chriswrites.com/wp-content/uploads/B1-Pic1-Activity-Monitor-300×220.png» data-large-file=»https://www.chriswrites.com/wp-content/uploads/B1-Pic1-Activity-Monitor.png» loading=»lazy» src data-src=»https://www.chriswrites.com/wp-content/uploads/B1-Pic1-Activity-Monitor.png» alt=»The Activity Monitor Application» width=»550″ height=»404″> The Activity Monitor Application
How to Use Terminal
The first step is to open Terminal either from the Applications -> Utilities folder or simply type Terminal into Spotlight. Terminal is always represented by the icon below.
Once it opens you’ll be presented with a standard Terminal window as below.
The first line shows the date and time when you last logged in. The second line is the command prompt which is where you enter the commands you wish to execute . The command prompt always begins with your computer name followed by your local Account Name.
The current directory (the “working directory”) when you open Terminal always defaults to your Home Folder.
The Terminal Window
» data-medium-file=»https://www.chriswrites.com/wp-content/uploads/B1-Pic3-Terminal-Window-300×191.png» data-large-file=»https://www.chriswrites.com/wp-content/uploads/B1-Pic3-Terminal-Window.png» loading=»lazy» src data-src=»https://www.chriswrites.com/wp-content/uploads/B1-Pic3-Terminal-Window.png» alt width=»550″ height=»351″>
Basic Terminal Commands
Before we describe how to check and terminate a process on your computer it’s worth knowing a few basic Terminal commands.
- To show the current folder name type pwd
- To list the files in the current folder type ls -l
- To move into another folder type cd
Note that many commands in Terminal can accept various options (sometimes called switches) that can alter their effect. The simplest way to discover the available command-line options is to type the command into Terminal followed by -? such as ls -?
Another useful command is apropos. Enter apropos into the Terminal window for a description of that command and its options.
To View All Processes
- Type ps -ax at Terminal’s command prompt to list every process running, along with additional details such as the PID, the elapsed time running, and the process name and location (shown in the CMD column)
» data-medium-file=»https://www.chriswrites.com/wp-content/uploads/B1-A2-Pic4-Process-List-300×125.png» data-large-file=»https://www.chriswrites.com/wp-content/uploads/B1-A2-Pic4-Process-List.png» loading=»lazy» src data-src=»https://www.chriswrites.com/wp-content/uploads/B1-A2-Pic4-Process-List.png» alt=»Running Processes Displayed» width=»550″ height=»229″> Running Processes Displayed
To Find a Specific Process
The process list displayed using ps -ax may include a hundred or more processes, but it’s quite simple to identify a process based on the name in the CMD column (for example Skype is listed as /Applications/Skype.app/Contents/MacOS/Skype), or even by the PID if you already know it.
As shown in Activity Monitor earlier, the Mail application on my Mac had the PID 14649, so it’s simple to scroll down the Terminal window until the relevant process is found.
One very useful command to help find a process by name or PID is grep which can filter out the desired information. It can be used in conjunction with the ps -ax command to list only the process that you are interested in.
The “pipe” function (“|”) simply uses the output from the process list as an input to grep, to filter out the desired process name.
Assuming that Skype is actually running, you may see a result something like this:
roly$ ps -ax | grep Skype 14530 ?? 0:56.32 /Applications/Skype.app/Contents/MacOS/Skype -psn_0_9218250 14947 ttys000 0:00.00 grep Skype
This example shows that Skype has a PID of 14530 and also the folder where Skype was launched from. The last line is just the process ID of the grep command itself, which can be safely ignored.
Repeating the command with the Skype process ID instead i.e. ps -ax | grep Skype yields the same result.
To Terminate (Kill) a Process
Once you know the process ID, killing it using Terminal is very simple. Be cautious however because forcing a process to suddenly exit can have unforeseen consequences, so it’s advisable to check carefully that the process you are about to kill is the correct one. There are essentially two easy ways to kill a process:
- By PID: the simplest way is with the kill command followed by the PID, which causes the selected process to terminate immediately. In the Sky example, kill 14530 does the job and causes the process to exit immediately
- By name: this method uses the killall command to kill all the processes that contain that name. For example killall Skype will terminate all the processes that have Skype in their name
Caution: killall should be used sparingly to avoid accidentally terminating the wrong processes. There is no confirmation prompt to ask if you really do wish to kill the processes, so check carefully beforehand.
Before you go
After spending over 20 years working with Macs, both old and new, theres a tool I think would be useful to every Mac owner who is experiencing performance issues.
CleanMyMac is highest rated all-round cleaning app for the Mac, it can quickly diagnose and solve a whole plethora of common (but sometimes tedious to fix) issues at the click of a button. It also just happens to resolve many of the issues covered in the speed up section of this site, so Download CleanMyMac to get your Mac back up to speed today.
Источник


