- How to clean windows
- Choose your time
- Tackle mildew on frames
- Give glass a going over
- Show sills some love
- Don’t neglect window screens
- How to clean up your computer and free up some space
- When does your computer need a cleanup?
- How to clean your PC
- How to clean computer system: the easy way
- How to clean computer system: the manual way
- Removing temp files on Windows 7
- Removing temp files on Windows 10
- Getting rid of caches and logs
- How to clean computer hard drive
- Sorting to find the largest folders
- Duplicate hunt
- Cleaning the desktop
- Uninstalling unnecessary programs
- PC cleaning final step: Trash the Trash
- How to clean your vacuum cleaner
- All bunged up?
- Filters need a clean?
- Brush heads looking worn?
- Nasty niffs in the air?
How to clean windows
This is how to get your windows gleaming

Cleaning the windows can be a task people easily miss off their to-do list, as it is a somewhat arduous chore. But, if you aim to clean them a couple of times a year, you’ll be rewarded by more light being allowed into your home.
Forget the old advice about scrunched-up newspaper. In the past, papers were printed with petroleum-based oil ink, which is what gave windows their shine. Then, in the 1980s, this was switched to soy ink for environmental and cost reasons — and it doesn’t have the same effect on glass.
Whilst it may be a hated household chore, it doesn’t have to take up hours of your time. Here’s how to get your windows looking shiny and clean again in no time.
Choose your time
Like with a car, avoid cleaning your windows on very sunny days — the heat will make the glass dry too quickly and cause smears undoing all your hard work.
To do a proper job, take down curtains and blinds and clear windows and sills of any bits and bobs. Use a dustpan and brush or your vacuum’s upholstery tool to remove any loose debris before washing to avoid a muddy mess.

Tackle mildew on frames
You’ll want to put on an old pair of washing-up gloves before you tackle any window frames. Then, clean off mildew with an old lint-free cloth.
Dip the cloth in a branded mould remover to give your window frames a thorough clean or a weak solution of household bleach. The GHI recommends the HG Mould Spray.

Give glass a going over
Use a branded window cleaner or create your own with a solution of one part distilled white vinegar to nine parts water into an old spray bottle. Use a lint-free cloth to wipe them down and then a chamois leather to buff them to a brilliant shine.
Vinegar is an age-old wonder and has the added benefit of being non-toxic and antibacterial, so a very handy product to have in your cupboard — and not just for your chips! You could also try adding dishwasher rinse aid to water when you wash your windows, for ensuring a streak-free finish.

Alternatively, the GHI also highly rates the e-cloth Window Pack, which is a microfibre cloth. Simply add water, no chemicals required.
If you have large areas of glass to clean, such as a conservatory or patio doors, it’s worth considering a window vacuum, to save you the energy. Once you’ve cleaned your windows, they vacuum up the remaining water in one sweep, making them far less messy than a squeegee which will result in water dripping onto your floors!

Show sills some love
Dust the internal sills regularly, taking time to get into any nooks or crannies that may need extra attention.
Check external sills regularly for rot, and replace any crumbling putty with the correct type for either timber or metal. Repaint as necessary.

Don’t neglect window screens
If you have metal window screens, write a number on each window in erasable pencil. Write a corresponding number on the screen before removing it from the window so you know which screen goes back where.
Remove the screens and dust the mesh and frame with the soft brush attachment of a vacuum cleaner. Scrub both sides of the screen with a stiff brush dipped in detergent solution (if you are doing this in the bath, line it with towels to prevent scratching the finish). Rinse using a shower attachment or the fine spray nozzle of a hosepipe. Leave to dry thoroughly in a sunny spot before refitting to the window.
How to clean up your computer and free up some space

Here’s a guide on how to clean your PC’s system and hard drive. By the way, if you own a Mac, switch from here to an article on how to clean up a Mac. Mac and Windows PC are pretty different, so make sure you’re reading the guide that helps you solve your problem.
When does your computer need a cleanup?
It’s quite easy to tell. There are a few solid signs you should clean up computer:
- You’re running out of disk space.
- Startup takes ages.
- Apps and browsers load way to slow.
- Desktop is full of files and folders.
- You can’t find the files you need in the mess.
- Programs quit unexpectedly and misbehave.
How to clean your PC
Let’s go over main problems and see how they can be solved. Generally, PC cleaning boils down to two main tasks: hard drive cleaning and system cleaning.
Hard drive cleaning means working with your own files, sorting them, finding and removing the ones you don’t need anymore. System cleaning is a trickier part where you have to dig into Windows folders and remove system trash that clutters your system. There’s also additional part of browser cleaning and uninstalling old programs (or applications).
Let’s start with the easiest part which is also much faster, system cleaning.

How to clean computer system: the easy way
If you don’t feel like spending time digging about in your system or you feel uncertain about messing with Windows files in general, there’s an easier way. You can get CleanMyPC that will do the job for you, sparing you the ordeal of manual cleaning.
CleanMyPC is a fast and powerful app for system cleaning. It will also keep an eye on your computer for you, making sure everything runs well. It’s a good choice if you want a quick fix.
In case you have time and inspiration for manual system cleaning, read on.
How to clean computer system: the manual way
The first thing you need to remove is temporary files or simply temp files. They are generated by your activity and by the apps you use, and they should get deleted automatically (hence the name), but for many reasons some of them don’t.
Removing temp files on Windows 7
- To begin with, close all apps
- Press Start
- Type Disk Cleanup into the search bar and hit Enter
- In the list you see, find Disk Cleanup and double-click it
- Select Temporary Internet Files, Temporary files (Temp), Thumbnails, Downloaded Program Files, Offline webpages.
- Delete them.
There are also hidden folders you need to clean.
- Click Start, select Control Panel > Appearance and Personalization.
- Choose Folder Options, then select the View tab.
- Under Advanced settings, select Show hidden files, folders, and drives, and click OK.
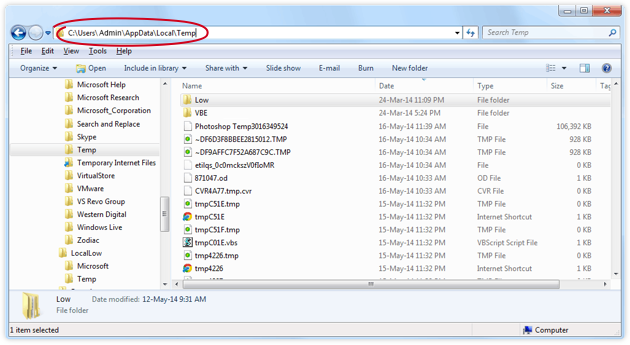
- Open \Users\$USER$\AppData\Local\Microsoft\Windows\Temporary Internet Files . Where $USER$ is your username.
- Clean up the folder by selecting all contents and removing them.
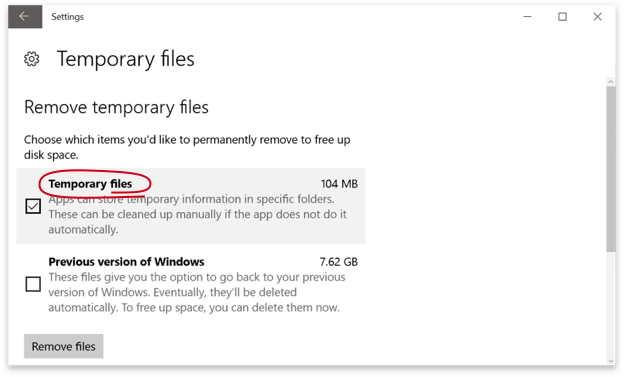
Removing temp files on Windows 10
- Go to Start menu
- Find Settings
- Choose System
- Choose Storage
- Find local storage called This PC
- Look for Temporary files
- Find the option “Delete Temporary files”.
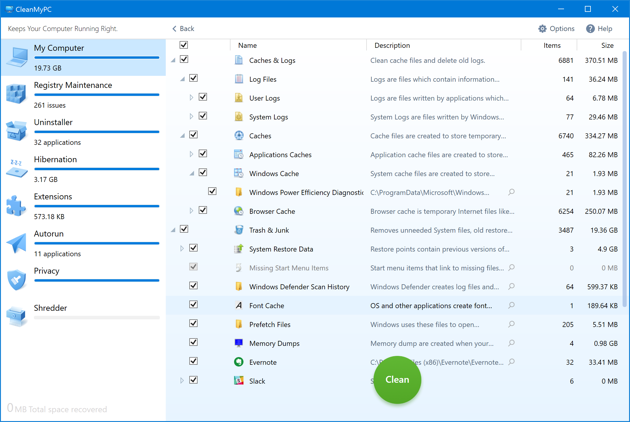
Getting rid of caches and logs
In every version of Windows there are about 7 different cache types. Believe me, you don’t want to go through each of them. There are plenty of manuals if you have a free hour or two, so you can turn to them. But the simplest way to deal with caches would be to download CleanMyPC for free and let it remove all caches in one instance.

How to clean computer hard drive
First, answer the question “Do I need to clean my computer?”. It’s pretty easy, Open My Computer (you can use the following keyboard shortcut with any other compatible keyboard that includes the Windows logo key ÿ+E) and look at the bar(s) of your Local Disk(s). If the free space is running low, the bar is red. If it’s green/blue — you’re good. The other reason you might want to execute hard drive cleaning is to organize all your files.
Sorting to find the largest folders
Now, how do you go about all the things you have on drives? It’s not as hard when you do the sorting first.
- Open your most used local disk in My Computer
- Right-click anywhere in the window (just not on the items)
- Sort by — Size
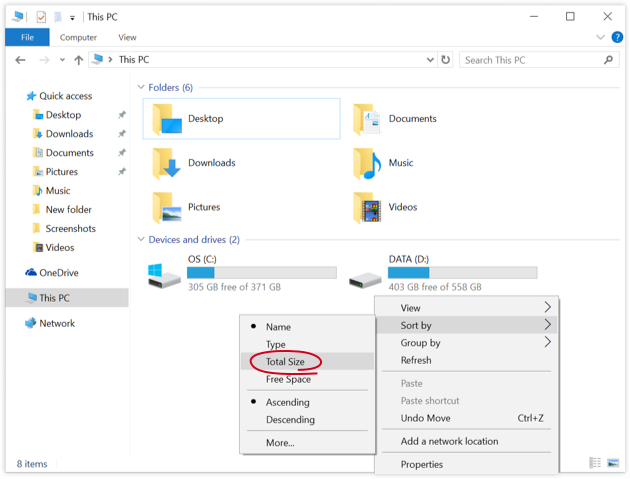
Now you see everything sorted from the biggest to the smallest, so it’s easy to spot the heavyweight champions that you should probably get rid of. Inside the heavy folders, you can also sort files by size (unless they’re all similar, like photos) to find what weights the folder down.
Duplicate hunt
There’s a high chance you’ve copied a folder and forgot to delete the original. Or downloaded something, couldn’t find it and downloaded it again. Happens to the best of us.
To find those duplicates, you might need an app that deals specifically with this problem. Try the free dupeGuru. The interface is a little bleak, but it does the job: finds you duplicate files and helps you remove them.
Cleaning the desktop
Did you know that the amount of icons on your desktop directly impacts the time it takes to load it? Give your PC a break and pack all everything but the very basics into one folder. Displaying only one icon instead of 50 will make a difference.
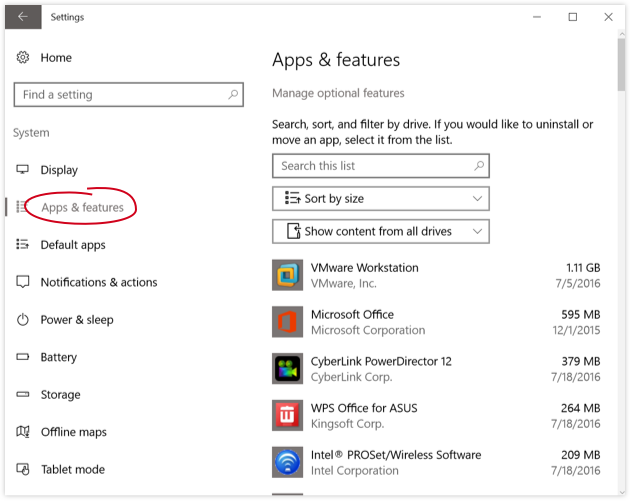
Uninstalling unnecessary programs
Here’s the deal with apps: the more you have, the worse off is your computer, even if you don’t use them. They pack up memory, the get into autorun, they leave random pieces behind. Here’s how to uninstall apps you don’t need:
- Open the Start menu
- Find and click Control Panel
- Open Uninstall a program
- Look through the list
- Find programs you don’t need anymore
- Choose them and then click Uninstall
Be careful: DO NOT uninstall anything that has Windows in its name. Also, make sure you KNOW what you’re uninstalling in order not to remove system drivers accidentally.
Also, some apps leave chunks of information and registry entries behind even when uninstalled, so it’s safer to use CleanMyPC for this procedure. It’s kind of a CleanMyMac alternative for PC. Just download it, install, and find the Complete Uninstall feature in the left menu.
CleanMyPC quickly removes the apps you choose, searches through the system to find leftovers, and cleans up the registry.

PC cleaning final step: Trash the Trash
You only need this if you removed files with a simple Delete, not CTRL + ⇧Shift + Delete. The latter removes items completely, omitting the Trash bin.
To empty Trash from all that you’ve just thrown in there, simply click on the icon and choose Empty Trash.
If you don’t see the Trash bin icon on your desktop (in Windows 10), follow these steps:
Step 1: Open Settings in the Start menu
Step 2: Choose System
Step 3: Find and click Storage, select This PC (or a hard drive)
Step 4: Click Temporary files and recycle bin
Step 5: Click Empty recycle bin and tap Delete.
That’s it! Now your computer should run faster, feel lighter, and have more free space on drive. Enjoy.
How to clean your vacuum cleaner
A clean vac is an efficient vac! Here’s how to keep it in top condition.

Without maintenance, a vacuum cleaner is only good for moving around dust and dirt. It’s one of the most hard-working pieces of kit in the house. But don’t forget, to keep it in top condition, it needs some TLC.
All bunged up?
The most common cause of loss of suction is blockages. This makes the machine slow to pick up and quick to overheat. To keep this to a minimum, never reuse the bag as this is often part of the filter system. If this gets clogged with dust it will reduce the efficiency of the machine.
With a bagless machine, empty the canister after each use. On most bagless machines, there will be a maximum fill line indicating how much dust and debris can be held in the canister, check this if your machine’s suction is poor. For bagged machines, replace the bag when the indicator light has come on. If the machine doesn’t have a light you can always open up the body and visually inspect the bag.

To unblock a vacuum cleaner, always switch it off and unplug. As well as teasing out any blockages in the tube, undo the hose and check the entrance to the machine/top of the bag for further debris.
GHI TIP: If the tube blockage is immovable, soak the tube in warm, soapy water.

Filters need a clean?
Many vacuums have at least one washable filter. Check where your vacuum’s filters are located, then remove and tap against a hard surface to remove any clumps of dust – do this outside or you’ll end up surrounded by a dust cloud!
If it is washable, run the filter under lukewarm water and allow to air dry thoroughly – at least 24 hours – before returning it to your machine. Additional filters in your machine may not be washable, so ensure you check the instruction manual. If they’re not washable, just tap against a surface to remove any clumps, then return it to your machine.

Brush heads looking worn?
Make sure the brush on the head is free from hairs and threads. If it becomes jammed, cut (don’t pull!) any threads that prevent it from rotating. Be careful to avoid cutting the bristles.
Some brush heads have indents that run the length of the head, these are designed to allow scissors to guide through hair and threads without cutting the bristles. Once all removed, if your brush head has no electrical elements, clean it in warm water, massaging the bristles to remove any embedded dust or fibres. Make sure to dry it thoroughly before refitting it to your machine.
Nasty niffs in the air?
Smelly vacuums are usually the result of not emptying your machine regularly enough or possibly sucking up something. Look in the bag first, then give the outside a wipe over with warm, soapy water and a cloth to keep it smelling and looking fresh.
For bagless vacuums, wash the canister in soapy water after emptying and leave it to completely air dry before putting the machine together again.
If your machine still isn’t efficient after all this, it’s time to buy a new one! Here’s our vacuum cleaner buying guide to help you decide what’s right for you.


