- How to Install macOS on VirtualBox
- Everything You Need to Get Started with Installing macOS on VirtualBox
- Extract macOS Sierra
- Creating a mac Virtual Machine on Windows
- Configuring Your VirtualBox to Run macOS High Sierra
- Running VirtualBox and the macOS Installer
- About The Author
- Как установить macOS Catalina на VirtualBox в Windows
- Необходимые файлы для macOS Catalina
- Установить VirtualBox + установить VirtualBox Extension Pack
- Создайте новую виртуальную машину для macOS Catalina 10.15
- Шаг по редактированию macOS Catalina 10.15 «Настройки»
- Добавьте коды в командную строку, чтобы устранить ошибку macOS Catalina 10.15
- Установите macOS Catalina 10.15 на VirtualBox на ПК с Windows
- Конечная точка
- Установите macOS Catalina на VirtualBox на ПК с Windows – Видео
How to Install macOS on VirtualBox

Windows, macOS – which one do you want to use today? On a traditional setup, you’re stuck with one or the other. But with virtual box, you actually have macOS on a Windows PC.
It’s the freedom that computer users have enjoyed with Linux and other operating systems.
But Apple has made it difficult to install their operating system on anything other than their own hardware. All of that is changing, and Virtual Box is responsible for it and the rise of the Hackintosh.
New to hackintosh? Learn more about it in our what is hackintosh? overview.
Note: A lot of people will be able to get a mac virtual machine one Windows running smoothly, but sound doesn’t seem to work well. That’s really not an issue because you’ll still be able to access all of your apps and software.
I also recommend that you have access to a real Mac. You might be able to find some distributions of the High Sierra ISO online, but there is always a risk when downloading from an unofficial source. Instead, borrow a Mac from a friend, or use your own and download the High Sierra OS from the App Store.
Everything You Need to Get Started with Installing macOS on VirtualBox
Before we go through the steps on how to install macOS on Virtual Box, let’s get everything together that you’ll need to get started.
- Open up your Mac
- Go to the App Store
- Type in “High Sierra”
You’ll want to search for your desired operating system (we’ll be using High Sierra), and Download it.

Note: You’ll need a decent computer to be able to run Virtual Box. Your computer will need to meet these minimum requirements:
- Dual core processor
- 4GB Ram or higher
- 64-bit
If your computer doesn’t meet these requirements, you won’t be able to run macOS properly. You’ll be able to download VirtualBox from the official website. I’m not going to go through the installation process, as the website will have all of the information you need to be able to install VirtualBox.
I do recommend that you read all of the documentation and ask any questions that you have in the community section of the website.
VirtualBox 6.0 was just released, so it’s definitely a great time to get started with your own macOS.

Extract macOS Sierra
Make sure you’ve downloaded High Sierra, and then you’ll want to run a few commands from your terminal . You’ll be able to open the terminal at: Applications > Utilities > Terminal. Once inside of the terminal, you’ll want to run the following commands:
Go to your desktop and rename the file, removing the “.cdr” extension. You need this extension to read “.iso” for it to work properly.
You’ve successfully created your own ISO file so that you can bootup your macOS.
The next step is to copy the file over to your Windows machine (using a large USB drive seems to work best). This file will be mounted in your virtual machine later on in the article, so it’s very important that this step is completed successfully.
Creating a mac Virtual Machine on Windows
You’ll want to create a virtual machine, and this is really easy. You’ll open up VirtualBox and click New. You’ll want to have the following parameters selected or entered before clicking Next.
- Name: High Sierra
- Type: Mac OS X
- Version: Mac OS X (64-bit)
Pay attention when selecting the version because you may find that High Sierra is offered as a version when you go to install it. But if it’s not, you can just choose the settings I listed above and they should work fine.

You’ll then be proceeding through all of the settings.
When you come up to the RAM setting, you’ll want to be generous. VirtualBox requires a minimum of 4GB or RAM to run, but the more the better.

You’ll want to provide at least 4GB to your macOS, or 4096MB to be precise. A general rule of thumb is that if you can spare it, supply more RAM to your virtual machine. RAM will allow the operating system to put more information into memory and retrieve it faster.
For better overall performance, supply as much RAM as you can.
The next steps are also important, and they’ll include:
- Hard Disk: Choose the “Create a virtual hard disk now” setting.
- Choose VDI when choosing the hard disk type.
- Choose Fixed Size instead of Dynamic for added speed.
- Set the size of the drive to at least 25GB.
You’ll now have your virtual machine using the RAM and disk space properly, and you’ll have to work your way through a few screen prompts before having everything setup properly.

Configuring Your VirtualBox to Run macOS High Sierra
We’ve made a lot of progress so far, and now it’s time to configure your virtual machine properly. You’ll see in the main window of VirtualBox that “High Sierra” is listed. Click on this and then click on the “Settings” button.
You’ll want to go to “System” and make sure that the following are unchecked on the Motherboard tab:

Click on the Processor tab and make sure that you have 2 or more CPUs set for your virtual machine.

The next few settings are rather simple:
- Display: Video Memory with a minimum of 128MB
- Storage: Click “Empty” and then click on the CD at the top right. Choose your High Sierra ISO file
Now you’ll need to click “Ok,” and save all of the changes you’ve made. Close out your VirtualBox now.
Apple is very strict on the system that their operating system runs on, so it’s very important that you do your best to configure your virtual machine in such a way that it tricks the installer to thinking you’re on a retail machine.
We’ll now be going into the Windows command prompt.
You’ll do this by:
- Clicking the Start Menu
- Typing “Command Prompt”
- Right-clicking on the Command Prompt desktop app
- Choosing Run as administrator

It’s very important to follow all of the following command prompts exactly. Your goal is to run each command, one by one, hitting the Enter button and waiting for the command to complete successfully.
Remember that VirtualBox needs to be closed before running these commands, or it won’t work properly.
You have to make sure that the virtual machine is properly named “High Sierra” for this method to work. If not, you’ll be able to go back and make changes to the name to get everything to work properly.
Once all of the commands are completed, and there are no errors, you’ll then be able to open up your VirtualBox and get macOS High Sierra installed properly on VirtualBox.
It’s a long process, but we’re almost done with your installation.
Running VirtualBox and the macOS Installer
You’ve almost learned how to install macOS on VirtualBox entirely, and we’re on the home stretch. You’ll want to open up your VirtualBox and then click on your virtual machine that you set up earlier.
Now, click “Start.”
There will be a lot of information displayed on the screen as everything starts running. I recommend stepping away from the machine and letting it run for a few minutes before coming back. Some errors can hang for 5 minutes or longer.

If you’ve done everything properly, you can be confident that the installer will boot properly.
You’ll eventually be presented with the option to pick a Language. If you’ve reached this point, you’re doing very well and are almost ready to run your macOS.
The next steps can be followed:
- Choose your desired language, and click
- Click “Disk Utility” and then
- Click “View” and then “Show All Devices.”
- Click on your empty virtual drive that has been setup and click “Erase.”
- Choose the following settings:
- Name: Macintosh HD
- Format: Mac OS Extended (Journaled)
- Scheme: GUID Partition Map
- Click “Erase” and close Disk Utility when the process is complete.
- Click “Reinstall macOS.”
- Click “Continue.”
You’ll come up to one point where you’ll be asked to choose a hard drive, and you’ll want to select the Macintosh HD partition that you just created with the Disk Utility.
We’ve successfully copied all of the files on the virtual machine, but we’re not done just yet.
Exit your virtual machine and then go back to your virtual machine’s settings. You’ll need to change up your Storage settings. Click on your ISO for High Sierra in the “Storage Tree.” You’ll click that CD icon just like we did earlier and then choose “Remove Disk from Virtual Disk.”
You need to do this to unlink the ISO from your virtual machine.
Start up your virtual machine and you should come across a black screen with the EFI Internal Shell. You’ll want to look for FS1. If this is listed in yellow, click on the virtual machine and then type fs1: and hit the Enter button.
You should be in the fs1 directory.
Type in the following commands:
- cd “macOS Install Data”
- cd “Locked Files”
- cd “Boot Files”
Now we’ll run the installer by running: boot.efi and hitting enter.
If everything goes well, you’ll come across a graphical installer and will just have to work through the prompts. The virtual machine will reboot eventually and then you’ll need to go through the settings and the rest of the setup process.
Soon enough, you’ll be right inside of macOS, where you’ll be able to start using your mac virtual machine on Windows.
Having a virtualbox mac OS is the easiest method of using mac as and when you need it. In addition, using virtualbox is far less complicated than the dual boot hackintosh method we have looked at previously.
About The Author
David Ingram
David has been interested in computers for over 25 years. From playing games on his parents computer as a kid in the early 90s, to building his first PC in 2003 (and many more since then). He has a passion for everything related to computing and this site is dedicated to helping others find the info they need.
Источник
Как установить macOS Catalina на VirtualBox в Windows
Привет! macOS Catalina – это основная версия операционной системы macOS. Они назвали это как macOS Catalina 10.15. Выпустив macOS Catalina, Apple внесла слишком много серьезных изменений. Они работали, разрабатывали и добавляли самые интересные функции в операционную систему macOS Catalina 10.15. Все операционные системы macOS выпускаются разработчиком Всемирной конференции на WWDC. А также последняя версия macOS Catalina 10.15 анонсирована на Всемирной конференции разработчиков 2019. Таким образом, каждая операционная система macOS, которую они создают. Они слишком сосредоточены на обеспечении безопасности, чтобы никто не мог их атаковать. А операционная система и полноценный ПК должны быть защищены от кибератак. Каждую операционную систему macOS, выпускающую до этого, выпускает разработчик. Так что пользователи должны правильно проверить это на виртуальной машине. Таким образом, вы узнаете, как установить macOS на VirtualBox.
Однако вы знаете, что существует множество платформ. Вы можете установить и протестировать любую операционную систему. Такие как VMware Workstation, VirtualBox, Hyper-V, Boot camp, новое приложение Sandbox для Windows 10 и многие другие. Например, вы можете установить Windows, Linux, macOS на Виртуальную машину. Однако установка другой операционной системы на виртуальную машину может быть очень полезной для пользователя. Предлагаю вам приобрести рабочую станцию VMware. Потому что VMware – один из лучших источников виртуализации плюс VirtualBox. Поскольку мы говорим о другом источнике Виртуальной машины. Итак, способы установки операционной системы на Виртуальную машину различаются и различаются.
Необходимые файлы для macOS Catalina
Необходимые файлы для macOS Catalina
Необходимые файлы для macOS Catalina
- VirtualBox: Как я уже говорил, у нас есть разные типы машин виртуализации. Таким образом, VirtualBox может быть лучшим источником для установки различных типов операционных систем в качестве гостевой операционной системы. VirtualBox – лучшая виртуализация, которая позволяет легко устанавливать на нее все операционные системы.
- VirtualBox Extension Pack: при установке операционных систем macOS. Таким образом, вы столкнетесь с одной из самых распространенных ошибок, при которой не работают мышь и клавиатура. В этом случае VirtualBox предоставляет вам очень простое расширение – VirtualBox Extension Pack. После этого вы установили операционную систему macOS, а также установили VirtualBox. Потому что это устранит ошибку мыши и клавиатуры на VirtualBox. Однако VirtualBox Extension Pack позволяет пользователям использовать USB 3.0 на VirtualBox. После macOS Sierra все более поздние версии macOS могут поддерживаться USB 3.0. Установите VirtualBox Extension Pack и наслаждайтесь операционной системой macOS на ПК с Windows.
- macOS Catalina 10.15 Образ виртуальной машины (файл VMDK): если вы хотите использовать macOS Catalina для виртуализации. Следовательно, вам необходимо загрузить файл VMDK, пока вы собираетесь загружать виртуальный образ. Я рекомендую вам иметь быстрое подключение к Интернету. Таким образом, файл macOS Catalina слишком велик, поэтому его можно загрузить при быстром подключении к Интернету. Как и в предыдущей статье, мы также говорили о двух разных файлах операционной системы macOS. Первый – это HFS и APFS, поэтому на VirtualBox можно установить только образ HFS. И APFS не может поддерживаться файлом APFS. Причина, о которой я упомянул, чтобы вы использовали только версию HFS. Вы можете легко обновить macOS до последней версии.
Установить VirtualBox + установить VirtualBox Extension Pack
Установить VirtualBox + установить VirtualBox Extension Pack
Установить VirtualBox + установить VirtualBox Extension Pack
Теперь вы знаете полную информацию о macOS Catalina 10.15. Итак, пришло время загрузить и установить VirtualBox plus VirtualBox Extension Pack. Поэтому вы можете скачать VirtualBox с его официальной страницы. Существуют разные типы версий VirtualBox для разных операционных систем. Загрузите последнюю версию, и процесс установки прост, вы можете установить его в несколько кликов.
- Пока вы загружаете VirtualBox, дважды щелкните, чтобы открыть мастер установки.
- Трехкратное нажатие кнопки «Далее» приведет к предупреждению сети.
- Теперь выберите Да, чтобы игнорировать сетевое предупреждение.
- На этом этапе нажмите кнопку «Установить», чтобы установить файлы VirtualBox.
- По завершении установки нажмите Готово.
- Как и в приведенном выше описании, я упомянул для вас пакет расширений VirtualBox. Поэтому вы устанавливаете пакет расширений из инструментов VirtualBox в Интернете. И второй, вы можете загрузить и установить пакет расширений VirtualBox с веб-сайта VirtualBox. VirtualBox Extension Pack позволяет исправить ошибку мыши и клавиатуры. После этого вы загружаете Extension Pack, дважды щелкаете по установке и нажимаете кнопку установки.
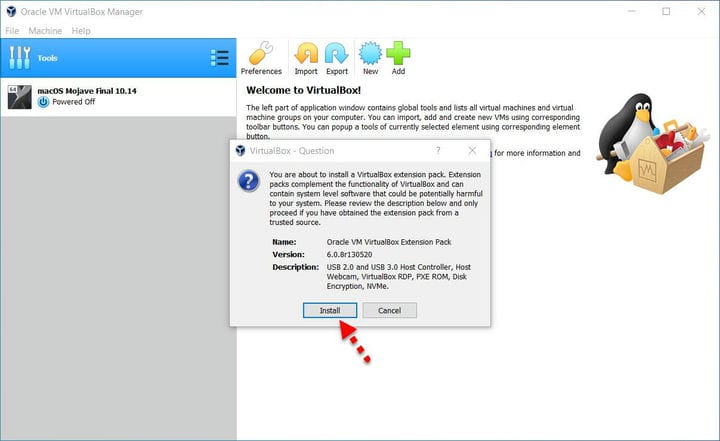
Установите пакет расширений VirtualBox
Создайте новую виртуальную машину для macOS Catalina 10.15
Создайте новую виртуальную машину для macOS Catalina 10.15
Создайте новую виртуальную машину для macOS Catalina 10.15
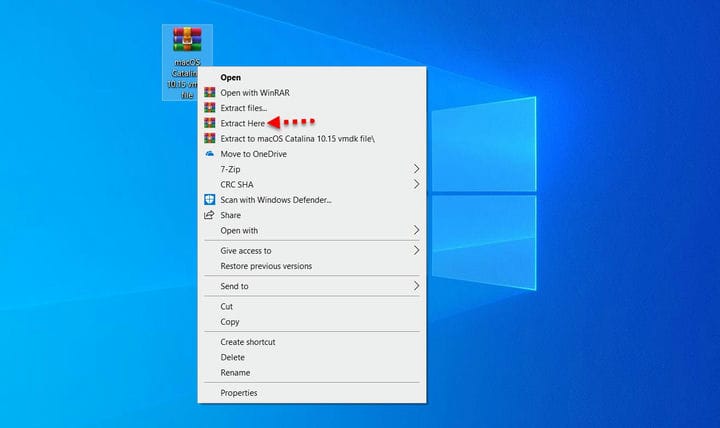
Шаг 1. После этого вы скачали образ виртуальной машины macOS Catalina. Вам необходимо распаковать файл, для этого на вашем компьютере должен быть установлен WinRaR или 7Zip. Пока вы распаковываете файл macOS Catalina 10.15, размер образа уменьшится с 8 ГБ до 6 ГБ.
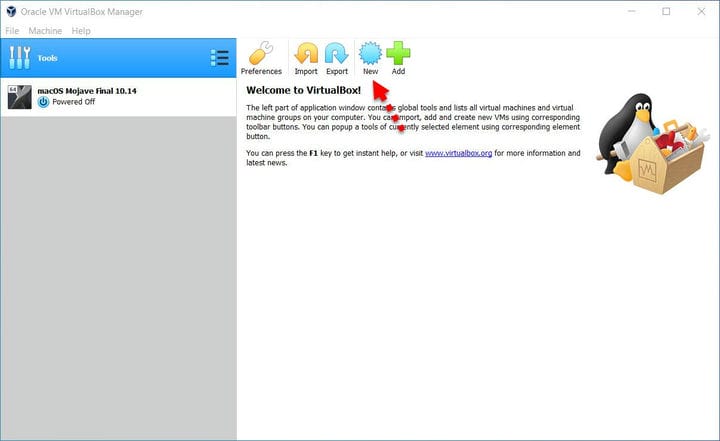
Шаг 2. Чтобы создать новую виртуальную машину для macOS Catalina 10.15, нажмите «Создать».
Шаг 3. Назовите операционную систему, выберите Mac OS X (64-разрядная версия) и нажмите «Далее».

Выберите имя для операционной системы
Шаг 4. Увеличьте размер памяти, рекомендуемый размер памяти – 2048 МБ.
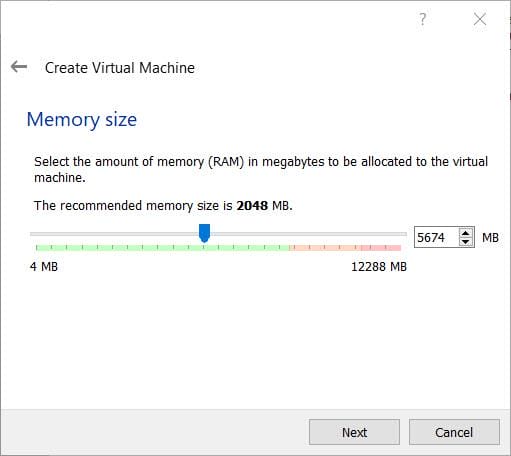
Увеличьте объем оперативной памяти
Шаг 5. Выберите третий вариант «Использовать существующий файл виртуального жесткого диска». Щелкните «Желтую» папку и найдите файл vmdk для macOS Catalina 10.15. Когда файл выбран, нажмите «Вставить».
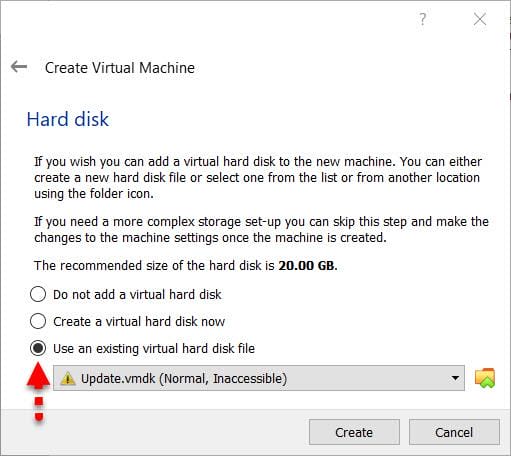
выберите третий вариант
Шаг по редактированию macOS Catalina 10.15 «Настройки»
Шаг по редактированию macOS Catalina 10.15 «Настройки»
Шаг по редактированию macOS Catalina 10.15 «Настройки»
Тем не менее, это сделано не для лучшей производительности. Вам необходимо настроить виртуальную машину macOS Catalina 10.15 на VirtualBox. Откройте VirtualBox и щелкните созданную виртуальную машину macOS Catalina, затем щелкните «Настройка».
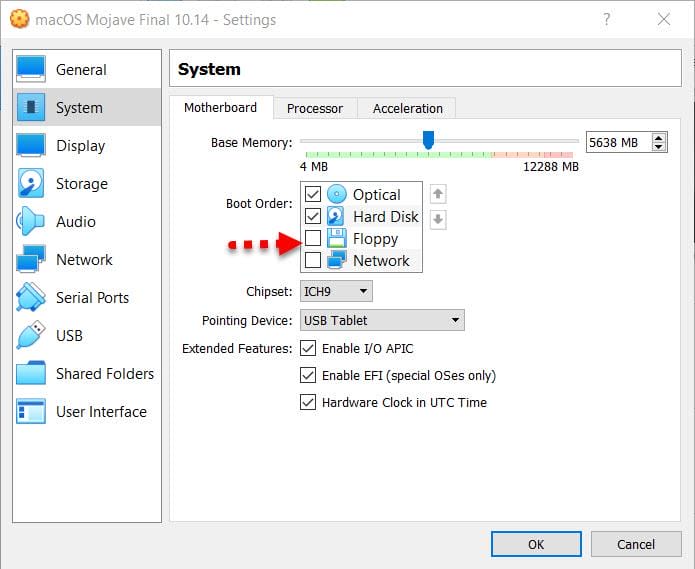
Шаг 1. Выберите «Система» на вкладке, затем снимите флажок «Дискета из« Порядка загрузки »».
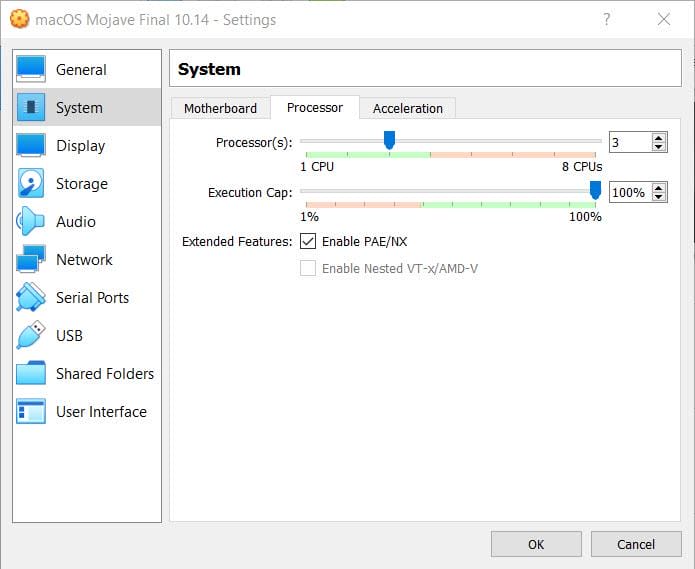
Шаг 2. Выберите «Процессор» и увеличьте ядро процессора.
Шаг 3. Выберите «Display» и увеличьте размер «Video Memory».
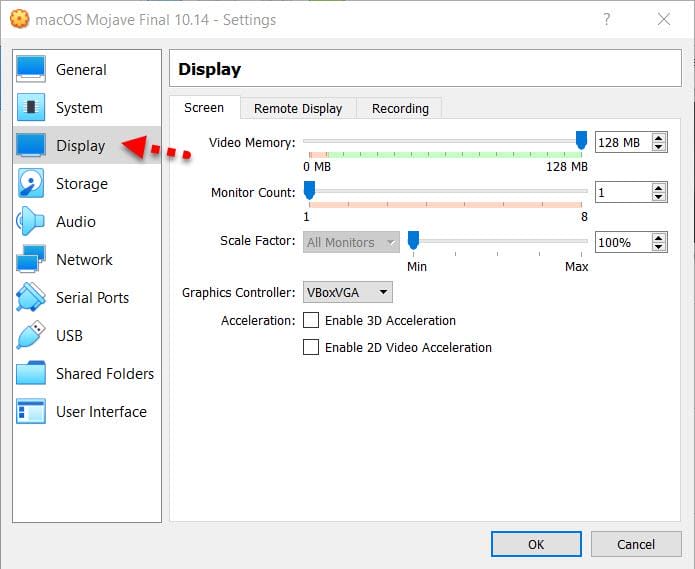
Шаг 4. На последнем этапе настройки вам необходимо включить «USB». и включите третью опцию Контроллер USB 3.0 (XHCI).
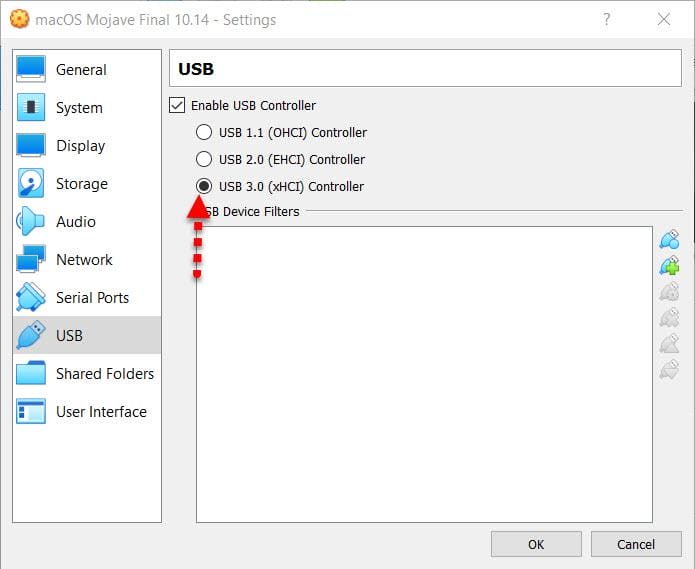
Выберите USB 3.0
Добавьте коды в командную строку, чтобы устранить ошибку macOS Catalina 10.15
Добавьте коды в командную строку, чтобы устранить ошибку macOS Catalina 10.15
Добавьте коды в командную строку, чтобы устранить ошибку macOS Catalina 10.15
Прежде чем добавлять коды в командную строку, закройте VirtualBox. После этого вы закрыли VirtualBox и запустили CMD от имени администратора. Следовательно, коды, принадлежащие VirtualBox, устранят ошибки macOS Catalina. Например, он исправит одну из самых распространенных ошибок – -Cpuidset. Этот простой код является простым продуктом компании Apple. Это позволяет пользователям при установке macOS работать на VirtualBox. Он отклонит ошибки macOS в VirtualBox.
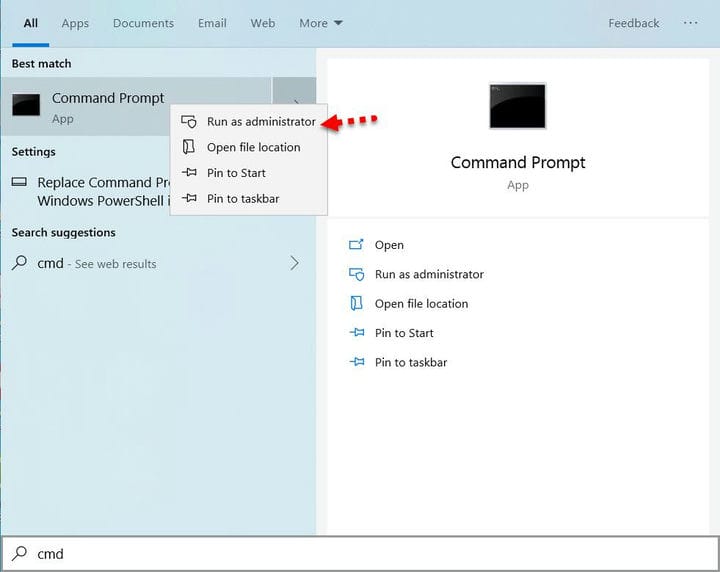
Запустите CMD от имени администратора
Теперь замените «Имя вашей виртуальной машины » на имя созданной виртуальной машины. И скопируйте и вставьте каждый код в «Командную строку», нажав «Enter». Примечание. Если вы скопировали какой-либо код неправильно, во время установки вы столкнетесь с ошибкой. Постарайтесь сосредоточиться на том, чтобы сделать лучшее.

Скопируйте и вставьте коды в CMD
Codes for VirtualBox V6.X:
Код для VirtualBox V5.X:
Установите macOS Catalina 10.15 на VirtualBox на ПК с Windows
Установите macOS Catalina 10.15 на VirtualBox на ПК с Windows
Установите macOS Catalina 10.15 на VirtualBox на ПК с Windows
Теперь вы полностью выполнили шаги macOS 10.15 на VirtualBox. Поэтому откройте VirtualBox и запустите установку macOS Catalina 10.15 на VirtualBox. После этого вы запустите установку, просто следуйте инструкциям, чтобы правильно установить macOS Catalina 10.15 на VirtualBox.
- Откройте VirtualBox, нажмите «Созданная виртуальная машина» и нажмите кнопку «Пуск».
Шаг 1. Когда вы запустите это в первом окне, выберите свой язык и страну.
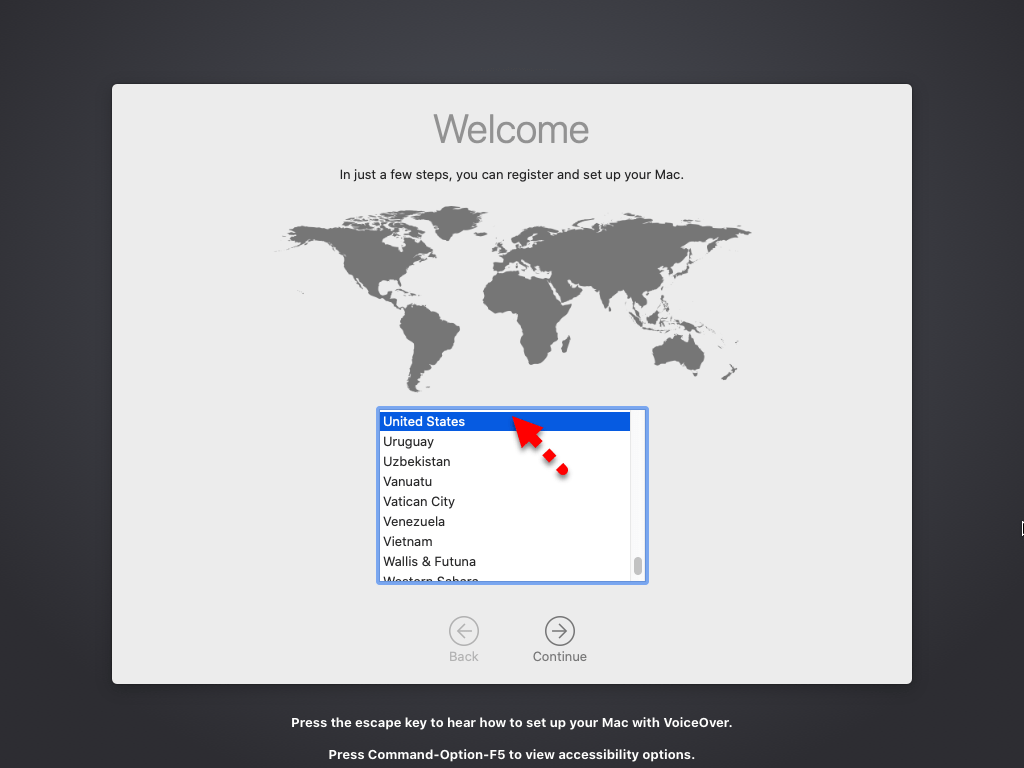
выберите свою страну
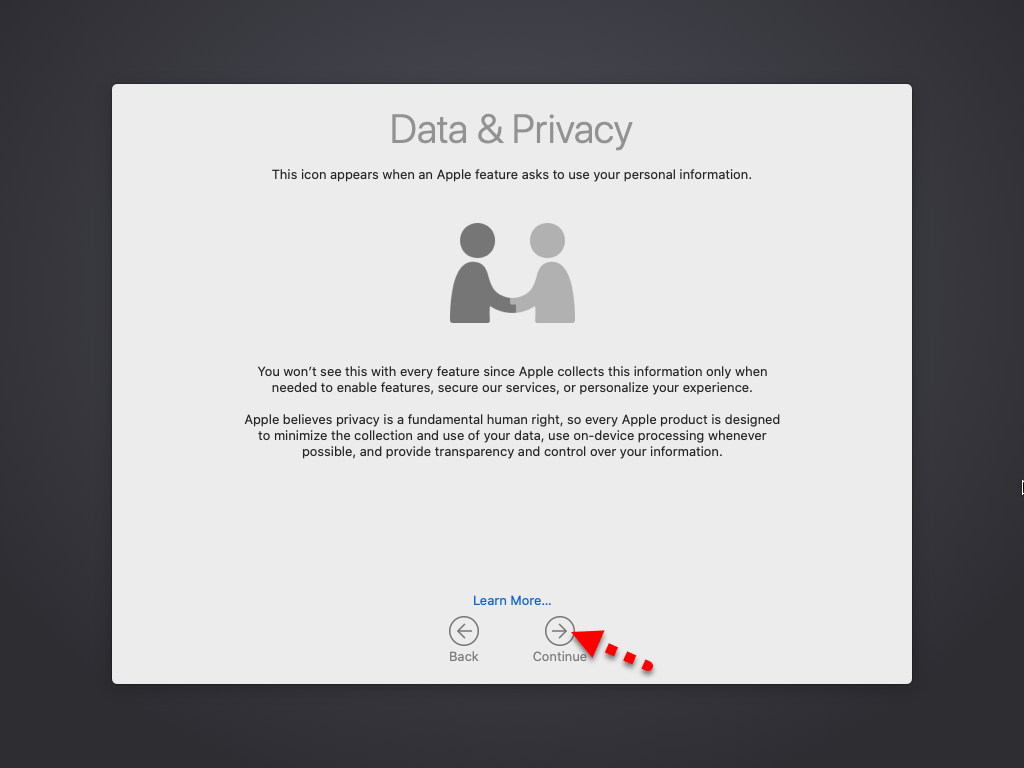
Шаг 2. Прочтите о данных и конфиденциальности и узнайте больше о macOS Catalina 10.15
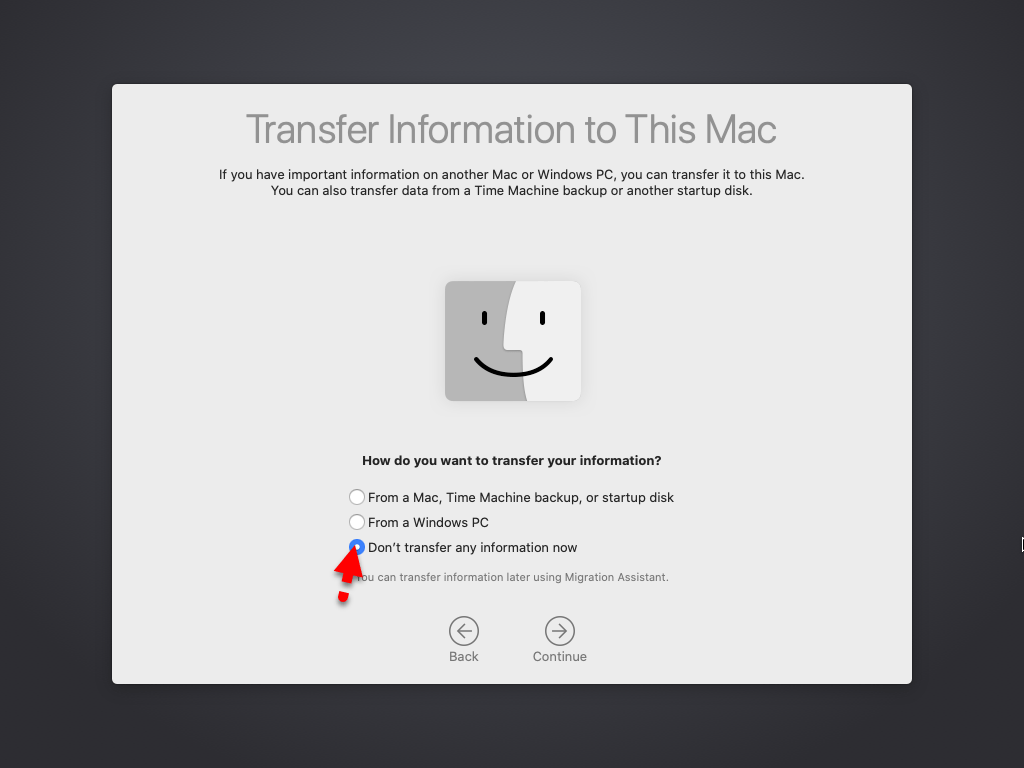
Шаг 3. Выберите «Не передавать какую-либо информацию на этот Mac» и нажмите «Продолжить».
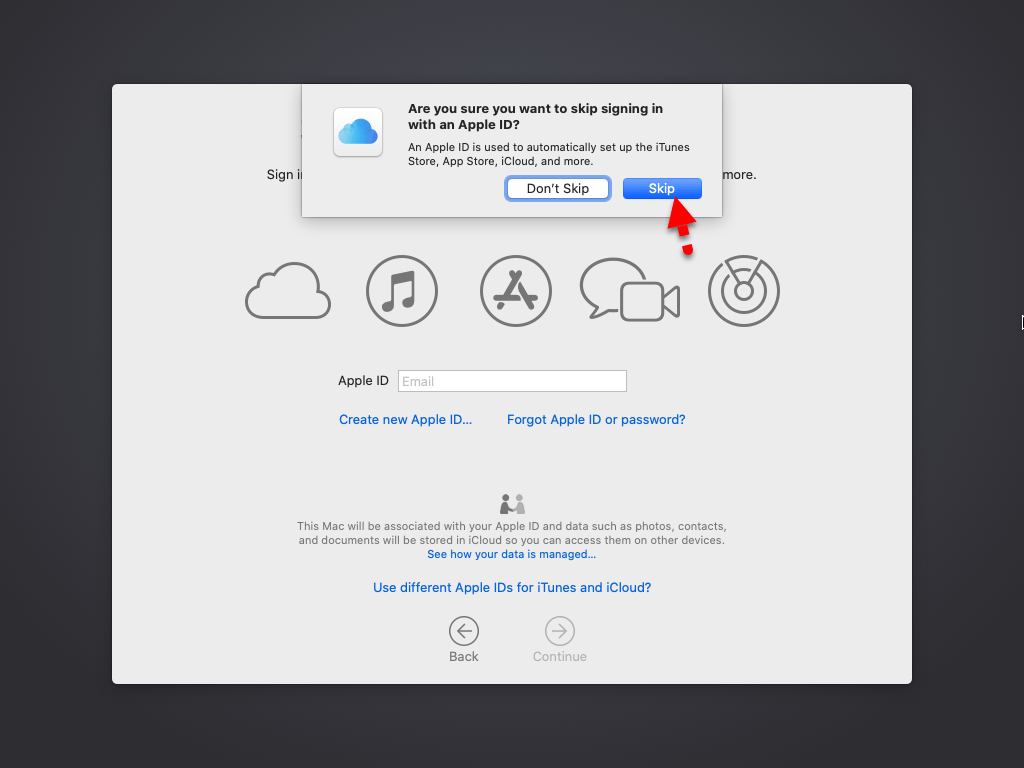
Шаг 4. Если у вас есть учетная запись Apple ID, введите ее. Затем, если вы не выберете продолжить без Apple ID.
Войти с Apple ID
Шаг 5. Согласитесь с условиями и нажмите Продолжить.

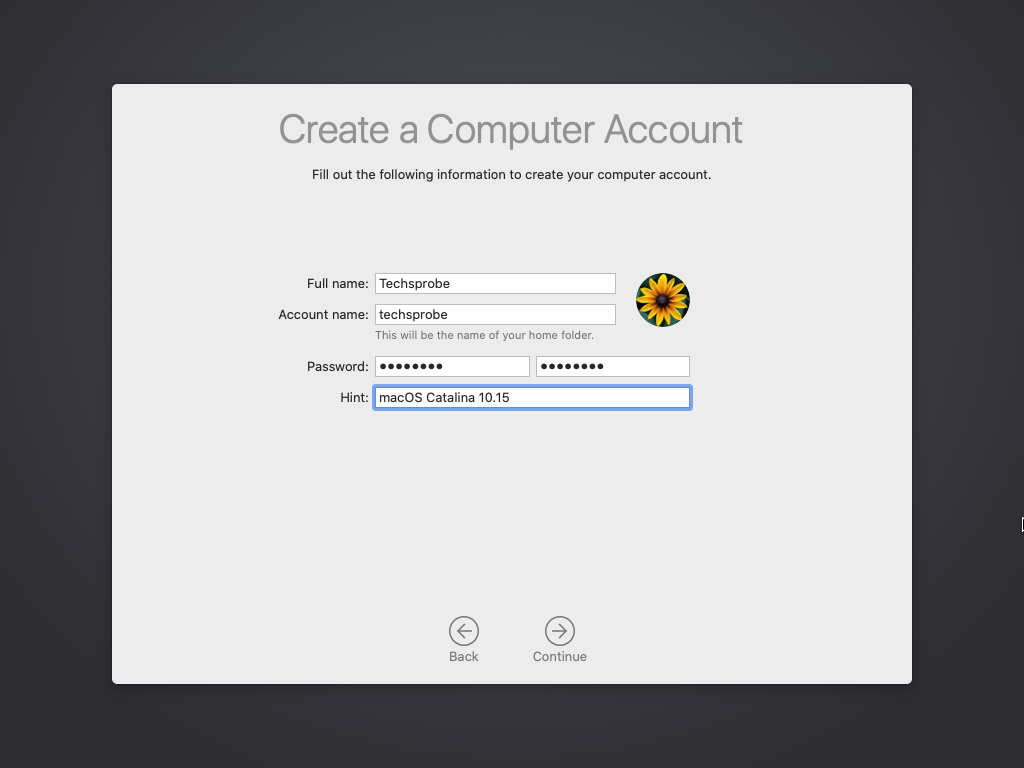
Шаг 6. Создайте учетную запись компьютера, указав полное имя, имя учетной записи, пароль и подсказку, затем нажмите «Продолжить».
Создайте учетную запись компьютера
Шаг 7. Приведенные ниже функции и параметры будут настроены для вас, или вы можете настроить параметры самостоятельно и нажать «Продолжить», если вы не хотите настраивать параметры.
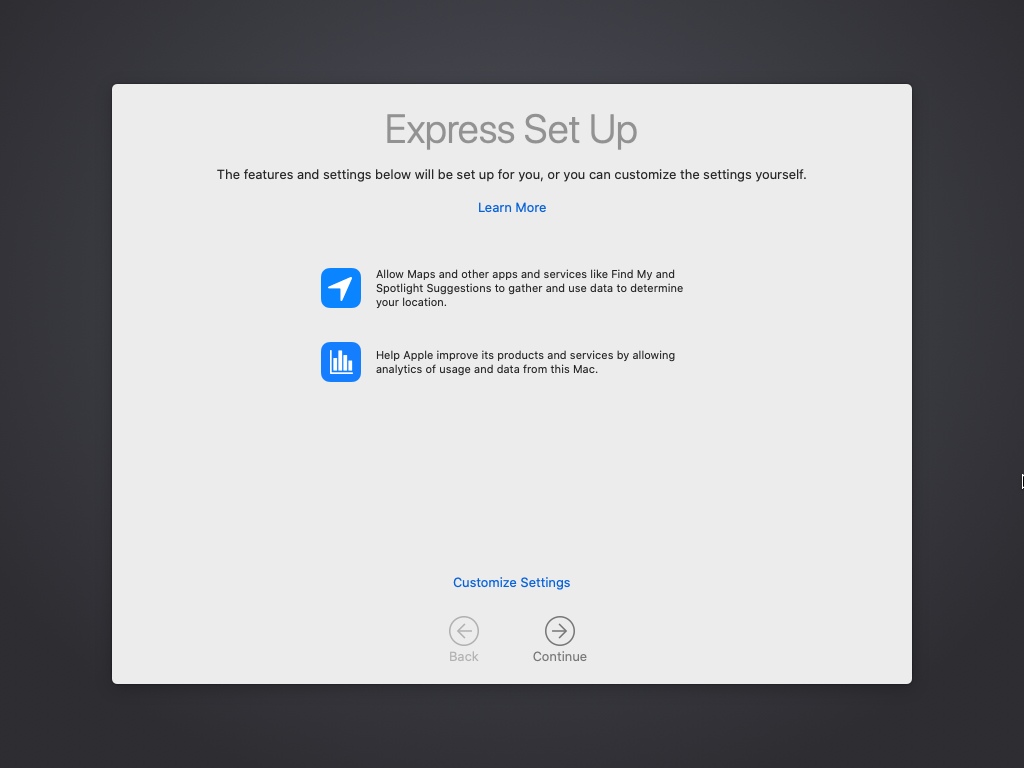
Шаг №8. Аналитика поможет macOS Catalina 10.15 автоматически отправлять диагностику и данные об использовании.

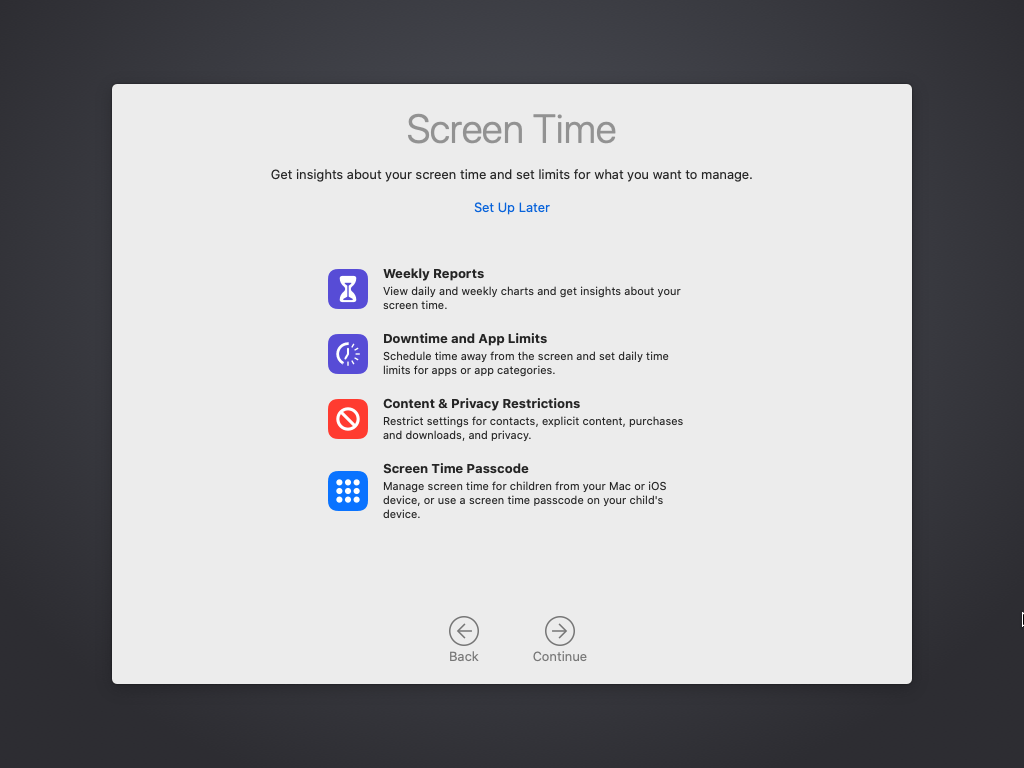
Шаг 9. Экранное время. Получите представление о времени использования экрана и ограничениях того, чем вы хотите управлять.
Шаг № 10. Здесь вы можете выбрать образ тремя способами. И вы можете лучше рассмотреть свой Mac.
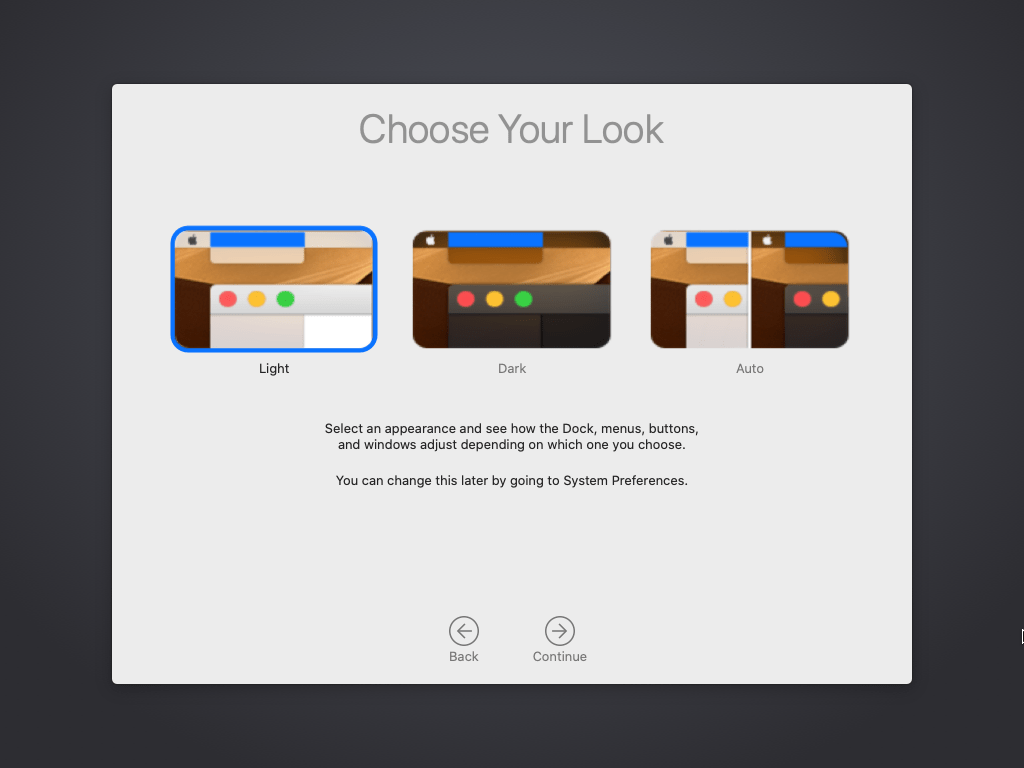
Выбери свой образ
Шаг № 10. Настройка вашего Mac … Подождите, пока это не шаг.
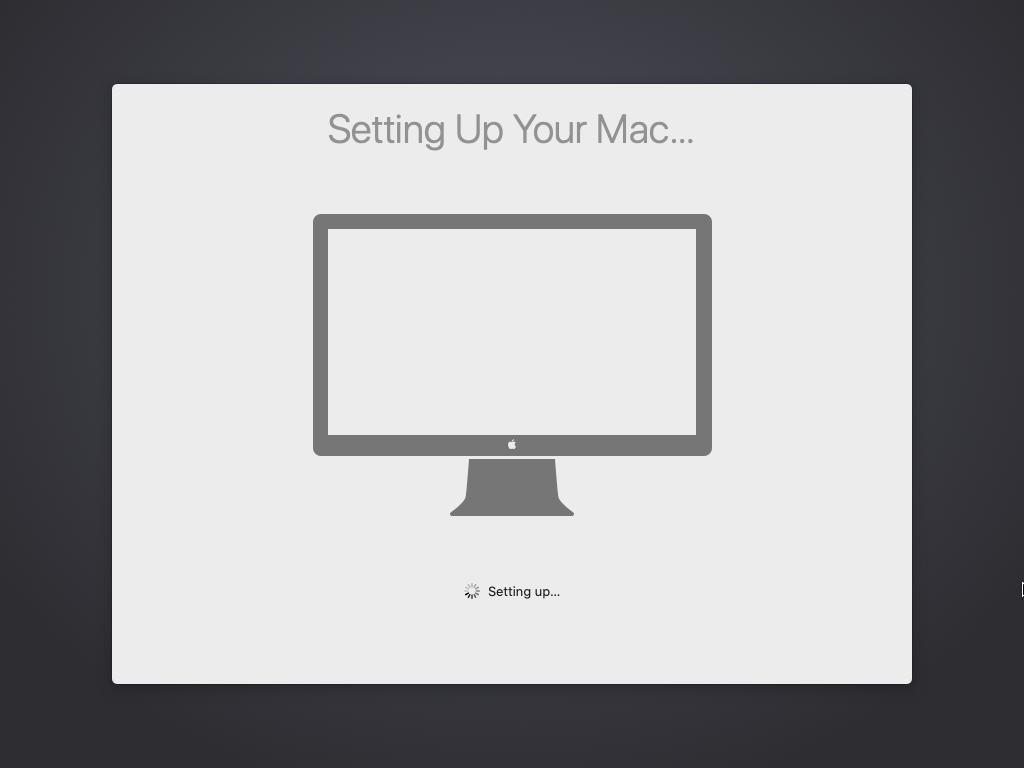
Настройка вашего Mac
Шаг №11. Вы успешно установили macOS Catalina 10.15 на VirtualBox в Windows.
macOS Catalina в VirtualBox в Windows
Конечная точка
Поздравляю! вот и все о способах установки macOS Catalina 10.15 на VirtualBox. Поэтому я надеюсь, что вы кое-что поняли из этой статьи. Кроме того, если вы столкнулись с какой-либо ошибкой, не стесняйтесь и оставьте комментарий, дайте нам знать об ошибке. Поделитесь с нами своим мнением для получения дополнительной поддержки и подпишитесь на наш блог.
Установите macOS Catalina на VirtualBox на ПК с Windows – Видео
Установите macOS Catalina на VirtualBox на ПК с Windows – Видео
Установите macOS Catalina на VirtualBox на ПК с Windows – Видео
Источник


