- Vega kali linux install
- Want to support Subgraph?
- Getting Started
- Videos
- Vega Requirements (1.0) / Troubleshooting
- About Subgraph
- Install and Use Vega on Kali Linux 2020 — Web penetration Testing
- Configuring Kali Linux 2020 for Vega
- Downloading and Installing Vega on Kali Linux
- Web Penetration Testing with Vega
- Scanner Mode:
- Proxy Mode:
- Kali Tools: Vega
Vega kali linux install
Vega is still early-stage software. We’re working on many exciting features for our upcoming release and would like to keep you notified when it becomes available! If you choose to leave your email address below we can send you a notification when a new version of Vega platform is released. Your email address will not be shared with third parties.
Want to support Subgraph?
We now accept Bitcoin! You can send us Bitcoin at this address: 1KUnb8ivujnmrvW8qdtFMs3uUHcVVSuLtj
Getting Started
New users can get familiar with the core features of Vega by reading the following guides:
Videos
Each less than 5 minutes long. More coming soon.
Vega Requirements (1.0) / Troubleshooting
On Ubuntu/Debian systems: sudo apt-get install libwebkitgtk-1.0
On Fedora systems: sudo yum install webkitgtk
Not having this library will commonly cause Vega to fail after installation.
Windows: if you have the 32-bit JRE (x86), you will need to install the 32-bit version of Vega.
The 32-bit JRE is common, especially for Java 7, even on 64-bit Windows systems.
If Vega fails after install because it cannot find Java, this may be the cause and you should try another version of Vega (32/64 bit).
Failed to create the Java Virtual Machine: This error often occurs when memory requirements for the max heap size can’t be met. Edit the Vega.ini file in the Vega directory and change the value of the -Xmx parameter to 1536m or lower, save the file, and then restart Vega.
The line should read -Xmx1536m or -Xmx1024m instead of -Xmx2048m
You may also be required to install and/or run Vega with administrator privileges on Windows 8 and some Windows 7 systems.
About Subgraph
“ One ought to design systems under the assumption that the enemy will immediately gain full familiarity with them
Источник
Install and Use Vega on Kali Linux 2020 — Web penetration Testing
Vega is an open source and cross platform web application penetration testing tool built in Java. Vega has a JavaScript based API which makes it even more powerful and flexible. In our today’s article we are going to install and use Vega on our Kali Linux 2020.4 system without getting any error and use it.
Using Vega is pretty easy by reading our detailed guide, everyone can install & use it to perform a scan also as a proxy. Vega did not comes with Kali Linux. Vega come pre-installed on some previous versions of Kali Linux, but now we need to install it manually, before that we need to do some configuration on our system.
Configuring Kali Linux 2020 for Vega
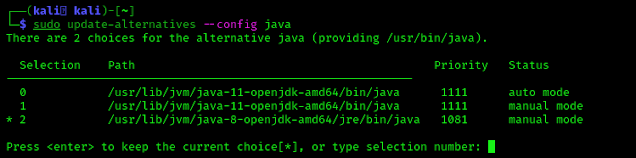
First we need to setup our java version to 8. To do it we need to run following command on our terminal:
The screenshot of the command is following:

Here we can see that our default Java version is marked by * i.e. Java version 11. To select Java version 8 we need to find the row number of Java 8. In our case Java 8 is on number 2. We need to type 2 and hit enter.
Now we have selected Java version 8 on our system. To check it we can run the previous command again to see the *’s location. It should be on Java 8.

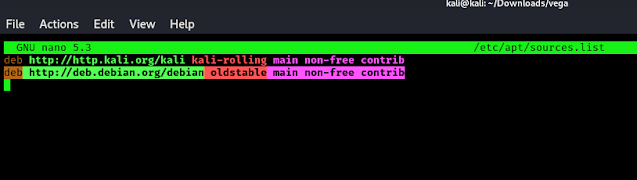
The above command will add Debian repository. We just need to update our cache by using update command:
Now we are going to install libwebkit on our system, to do it we need to run following command:
This may took some time depending on our internet speed and system performance. After this we may need to restart our system to see effects. We rebooted our system.
If we wish we can remove the Debian repository now by using following command:
Downloading and Installing Vega on Kali Linux
We can download Vega from the official website and Here we got the download option.
After click on the download button we got options for various systems like Mac, Linux and Windows. Here we are using Kali Linux and we have 64 bit system so we download the 64 bit version of Linux.

It will be unzip in seconds then we need to navigate to vega unzipped directory by using cd command:

We can see the files, we just need to run following command to start Vega on our Kali Linux system.
After this we can see that Vega is opened in our front as we can see in the following screenshot:
Web Penetration Testing with Vega
There are two ways to start a scan in Vega. We can use the Scanner mode or We can choose the Proxy mode. First we talk about Scanner mode.
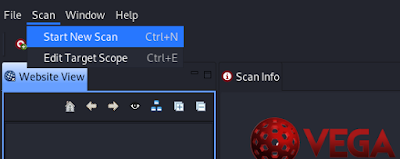
Scanner Mode:
In Scanner mode first we need to choose the «Start New Scan» option from the Scan menu.
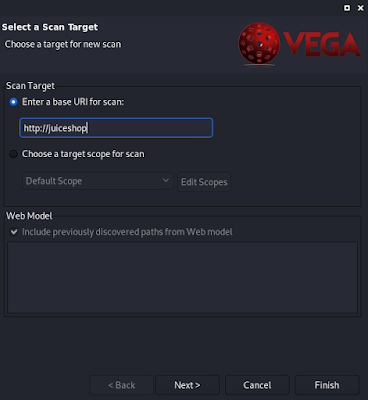
In the window, we enter the target website URL and click on Finish.
Then Vega will start the scan. After ending the scan we got the result as we can see in the following screenshot:

Here we can see we got 51 High risk on our vulnerable localhost server.
To check more details about the scan results and know about the vulnerabilities we need to look up at Scan Alerts in the left-hand side panel. Clicking on an alert shows us the details as we can see in the following screenshot:
This is how we can scan a website or web application using Vega on our Kali Linux system in 2020.
Proxy Mode:
This is very similar to Burp Suite and WebScarab. Vega also has a proxy feature, where we can intercept and analyze the requests manually too!
We are also able to edit and replay the requests to perform a manual check.
This is how we can install & use Vega on Kali Linux 2020 versions and use it to do web penetration testing. Vega is still a good all-in one tool for bug bounty hunters and cybersecurity experts.
Liked our tutorials then please do subscribe our website using mail id for free, our new articles will be send in mail. We are also available on Twitter and GitHub. Also follow us there we post updates there.
For any problem please comment down below in the comment section, we will happy to help. We always reply.
Источник
Kali Tools: Vega
There seem to be a virtually limitless number of free, quality, and open source penetration tools that come with the Kali operating system. Once you’ve learned how to use a few of them, you’ll find working at the command line much less intimidating and start to get the hang of it.
But one of the problems newbies often have is understanding what each tool is used for. There are so many that it may seem like an insurmountable task to learn them all. However, note that many of them perform similar functions (if not the same), albeit with slight variations. For instance, Kali Linux comes packed with a full arsenal of different types of scanners.
And once you’ve learned how to use one scanner, it’s a pretty simple matter to pick up another and start using it in minutes. Today, however, we’re going to be taking a closer look at one such scanner called Vega.
How Is Vega Different from Other Scanners?
Some of the most popular scanners on Kali include NMAP, AngryIPScanner, OS Scanner, OpenVAS, and other similar tools. But each scanner is useful in its own right, though many of them have similar functions.
For instance, both OpenVAS and NMAP are going to be able to detect open ports on the target they scan. However, I’d say that NMAP is more useful when you have direct network access and need to feel around to find hosts, identify them, and start building a reconnaissance profile. Regardless, Vega isn’t quite the same as NMAP.
Vega is extremely useful for testing the security of web servers and web applications specifically. As such, it’s a great tool to use to identify weaknesses that can be exploited with common web attacks like SQLi (SQL Injection) attacks and XSS (Cross-Site Scripting). It can also be used to scan for and discover sensitive information that wasn’t intentionally disclosed on a web service, among other vulnerabilities.
But what’s strange about Vega is that, like OpenVAS, it contains a GUI interface. And that makes it infinitely easier for newbies to start using. If you’re new to Kali and feel intimidated by the command line, I’d recommend starting with a GUI tool. They may not always be as useful, and let’s face it – most of the meat & potatoes of Kali tools operate solely from the command line. Still, it’s more immediately gratifying for newbies, and will help them build confidence and put another tool in their penetration testing tool belt.
Though we focus on penetration tools, Linux, and Kali on this site, note that you do have the option of running Vega in other environments. Since the code was written in Java, it ports well to other operating systems. In fact, you can run it on OS X and even Windows. So if you haven’t built a Kali (or any other flavor of Linux) environment, you can get by on another system.
What Are Vega’s Features?
Not only can Vega perform routine scanning operations to identify holes and security flaws in web applications, but it also has an intercepting proxy tool that allows you to inspect traffic. In addition, it even has a website crawler, that will comb over the website piece by piece to identify flaws and build a profile of the site.
Interestingly enough, it can even be used to attack SSL connections. Though SSL tunnels are secure and adequately protect data if a secure connection is built, there are ways to attack the process and monitor data as the tunnel is negotiated. If it is done correctly, an attacker can perform an MITM attack and intercept data from an SSL connection. However, note that this attack doesn’t truly break SSL encryption. Rather, it takes advantage of a vulnerability during the negotiation process. So don’t worry, SSL isn’t broken like PPTP.
The following outline Vega’s features and capabilities:
Web vulnerability scanning
XSS vulnerability identification
SQLi vulnerability identification
SSL MITM hacking
Website crawling operations
Alerts that can be customized to your choosing
Stores information in a database
The Same Old Warning, Again!
If I’ve said it once, I’ve said it ten thousand times. I know you probably don’t want a lecture regarding the ethics of hacking. But nevertheless, it can’t be said enough: do not abuse these tools. It’s immoral, unethical, and flat out illegal to start trying to use Kali tools to obtain unauthorized access to computer systems that don’t belong to you.
So naturally, don’t go out into the real world and start scanning everything you can get your hands on. Also consider that doing so might merit unwanted attention, and attract some very uncomfortable allegations and questions.
One of the great things about Vega is that it’s simple to install. It can be downloaded from github for free. The file is zipped, so you’ll want to unpack it in a directory from which you want to run the program. If you’re feeling lazy, you can unpack it in your home directory.
However, I would recommend that you unpack it in a directory where you commonly run other applications to keep things tidy. Barring dependency issues (it would be a good idea to run an update before proceeding), all you have to do to run Vega is change your current working directory to the folder where you unzipped the file, and the run “./vega”.
Remember that you can change your current working directory with the cd command, and you can use the pwd command to print your current working directory in the terminal.
Point and Shoot
It’s pretty simple to run a scan, too. All you have to do is launch the program and click on the “scan” menu in the top left of the window. Then, select “start new scan.” The first paramter you need to enter is the target’s URL. And since you aren’t abusing penetration testing tools, I’ll assume that you’re scanning a server that you own and control.
For instance, in the “base URL” field, you might enter “ www.mydomain.com ” and then click the “next” button. There are a myriad of modules to choose from that will help you choose what types of flaws the tool will scan for. For your first scan, you can either leave these settings at their default or add/subtract modules as you please.
On the following screen, just click the “next” button since you don’t already have any cookies. Finally, on the next screen, click the “finish” button. The scan will start to execute, so hang on and let Vega work its magic. The scan will continually update you with its progress.
You’ll also notice that threats will pop up in the main window. The threats are ranked as high, medium, low, and informational. The idea here is to find flaws in the site without leaving it to guesswork. So, for example, you could scan a domain and find out whether or not the database is vulnerable to SQLi injection attacks, and proceed from there.
Vega is a pretty darn simple tool. Not only is it simple to install and run, but it’s simple to use since it doesn’t rely on background knowledge of the Linux shell – and you can even run it on Mac and Windows systems.
Just remember that this is more of a reconnaissance tool that will help feel out a server’s weak points. In a penetration testing environment, the data can be used to plug up security holes to mitigate the threat of a risk.
Источник


