- Vhs to dvd mac os
- Easy VHS to DVD Рейтинг редакции
- 4Videosoft HD Converter for Mac
- 4Videosoft 3D Converter
- Aiseesoft Mac Video Enhancer
- ArKaos GrandVJ
- Frameline 47
- Apeaksoft Video Converter Ultimate
- How to Convert VHS to Digital on Windows and Mac
- Part 1. Things you need before converting VHS files to digital files.
- Part 2. Setting and steps to record on Windows.
- Part 3. How to convert VHS to digital on Mac.
- Part 4. How to convert, compress and burn VHS files.
- Wondershare UniConverter — Convert Digital VHS Files to Any Format
- Steps on how to convert, compress, and burn digital VHS files:
- Step 1 Add files to the VHS converter.
- Step 2 Edit digital VHS video (Optional).
- Step 3 Select output format and compress video size.
- Step 4 Convert digital VHS files to any format.
- Bonus Step: Burn Converted Videos to DVD
- Roxio Easy VHS to DVD для Mac
Vhs to dvd mac os
Трансфер VHS видео непосредственно на DVD .
Easy VHS to DVD Рейтинг редакции
Легко VHS к DVD позволяет передавать видео с видеомагнитофона на DVD всего за несколько кликов. Захват видео с видеомагнитофона и прямо с других аналоговых источников, включая Hi8, Video8 видеокамеры. Создать VCD, SVCD и DVD фильмы с вашего собственного видео. Редактировать отснятые фильмы в IMOVIE добавлять титры, переходы и другие изменения. Выберите из профессиональных стилей предназначена меню для повышения вашего созданный DVD. Дать видео YouTube или ваших любимых сайтах социальных сетей. Конвертировать видео файлы для воспроизведения на самых популярных мобильных устройств, включая IPod, iPhone и Sony PSP .
4Videosoft HD Converter for Mac
Конвертировать любой HD видео и конвертировать все видео файлы в HD видео на Mac
4Videosoft 3D Converter
Преобразование между 2D и 3D видео видео, а также конвертировать между 3D видео форматов .
Aiseesoft Mac Video Enhancer
Улучшение качества видео от 4 аспектов и вращать, редактировать видео, как вам нравится .
ArKaos GrandVJ
Выполнение в режиме реального времени смешивания HD видео .
Frameline 47
Автоматическая видео база данных. Установите на несколько систем для создания видео сети
Apeaksoft Video Converter Ultimate
Конвертируйте и редактируйте любое видео и аудио на Mac с лучшим качеством
Источник
How to Convert VHS to Digital on Windows and Mac
by Christine Smith • 2021-07-21 16:31:00 • Proven solutions
You might have a huge collection of old VHS videos of beautiful moments with your family members and friends and with rising digital trends. You may surely love to convert VHS to digital files. Some of you may be thinking that this process might be too much complicated, so it will be good to take help from professionals, but actually, this task becomes much easier with some software tools. No need to learn any special technical skill for converting these files, simply follow the instructions provided in this quick tutorial and get out of all confusions with ease.
Part 1. Things you need before converting VHS files to digital files.
- 1. You will need a VCR, but don’t worry if you do not have your own because it is possible to get it easily online at a very cheap price range.
- 2. Prefer to buy an adapter unit named a video capture device as it will help you to make a connection between VCR and computer.
- 3. RCA Cable with male to male terminal connections.
- 4. A computer that is loaded with Windows.
Part 2. Setting and steps to record on Windows.
It is much easier to make software settings for recording tasks on Windows, and the steps can be followed quickly even by a non-technical person. Those who want to learn basic information about these steps can proceed as below:
- 1. First of all, you have to install software that usually comes with a video capture device. Some of you may face troubles installing this tool because it often occurs within a CD, and presently systems are CD drive less but don’t worry because it is possible to download this software from the internet directly on to your device and install it with suitable configurations.
- 2. Now you need to make the connection between your video capture device and computer; make sure that you connect yellow color plugs into yellow plugs at another end and similarly white plugs into their prescribed white location. Also, ensure that you have connected audio out as well as video out ports of VCR.
- 3. Once the above settings are finished, then the next task is to run the honestech TVR 2.5 program; you have to install it on your system using some online sources. After opening the front window of this software, you have to open the settings and select the name of your video capture device that is mostly presented as «OEM Device.»
- 4. It is time to turn on VCR by inserting the tape inside and then press the record button on the TVR program to start recording; when you want to play your recorded file, then simply press the play button on VCR.
In this way, you will be able to record videos on VCR and play them easily via system settings. But when you need to convert these VHS files into digital files, then you have to go little beyond these steps, but the procedure is again very simple, as described below.
Part 3. How to convert VHS to digital on Mac.
- 1. In order to convert VHS files into digital files, you need to install a window on the MAC device, and it can be done by using parallels as well as Bootcamp. You will be able to find window tutorial online, simply follow these steps to finish the conversion process.
- 2. Prefer to make use of a built-in software of VHS converter as it can extend easy support to mac, such as Elgato Video Capture.
- 3. If you are searching for a low-cost solution to complete this conversion task, then you will be glad to know that QTRecorder is the cheapest solution available in the market, and developer.apple.com develops it. It supports all types of VHS converter devices that can be connected to Windows for recording tasks.
Part 4. How to convert, compress and burn VHS files.
There are so many software tools available online to initiate the conversion process of VHS to digital files, but our first most consideration to do this job must be about the quality of output video as well as the cost-effectiveness of used tools. If you wish to get all desired features at one platform, then none other than Wondershare UniConverter can serve you best. This software tool is specially designed to serve users with easy to follow instructions, user-friendly interface, and numerous tools embedded inside the software so that conversion needs can be fulfilled in a more customized manner.
Wondershare UniConverter — Convert Digital VHS Files to Any Format

- Convert digital VHS files to any format like MP4, AVI, WMV, FLV, MKV, and other 1,000 formats.
- 90X faster-converting speed without losing any quality.
- Convert videos to optimized preset for almost all devices, like iPhone, iPad, Huawei phone, etc.
- Edit digital VHS files with trimming, cropping, adding watermark, editing subtitles, etc.
- Burn and customize videos to your DVD or Blu-ray disc with free DVD menu templates.
- Download or record videos from YouTube and other 10,000+ video sharing sites.
- Transfer videos from computer to iPhone, iPad, and other devices directly and vice versa.
- Versatile toolbox: Add video metadata, GIF maker, video compressor, and screen recorder.
- Supported OS: Windows 10/8/7/XP/Vista, macOS 11 Big Sur, 10.15 (Catalina), 10.14, 10.13, 10.12, 10.11, 10.10, 10.9, 10.8, 10.7, 10.6.
Steps on how to convert, compress, and burn digital VHS files:
Before the following steps, you’ll need to follow the instructions above to convert your VHS files to digital files. Then you could do the next steps.
Step 1 Add files to the VHS converter.
Once you have launched Wondershare UniConverter on your computer, then you can either simply use a drag-and-drop feature to bring your video from the computer or click the button to get your video for conversion. The loading task will not take more than a few seconds.
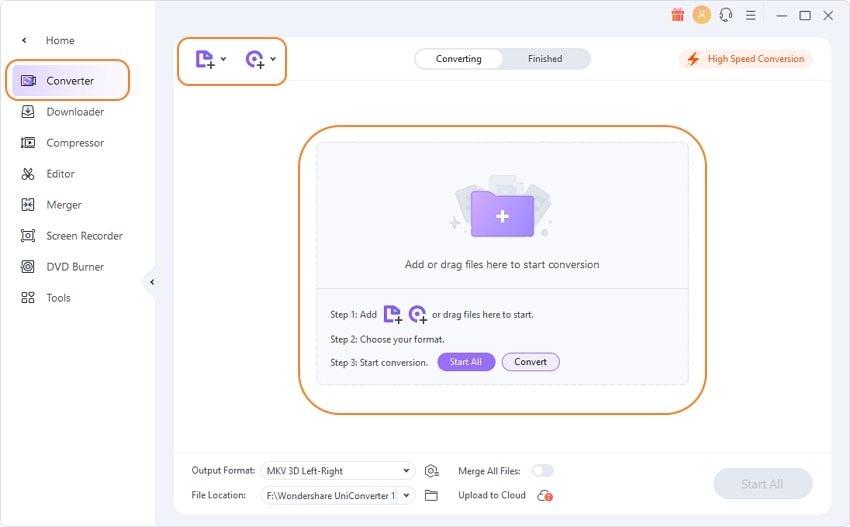
Step 2 Edit digital VHS video (Optional).
You will be glad to know that the Wondershare software tool also provides the opportunity to edit video files to any desired format so that the output video can be highly customized. Use editing tools present under the video thumbnail on Wondershare software to make all required changes.
Step 3 Select output format and compress video size.
The next step is to choose your video output format from the Output Format: list of supported formats. You can find all available formats under the Video tab.

Step 4 Convert digital VHS files to any format.
Finally, you can hit the Start All button on the screen, within very less time, your video file will be stored to your selected output folder, or you can find under the Finished tab.

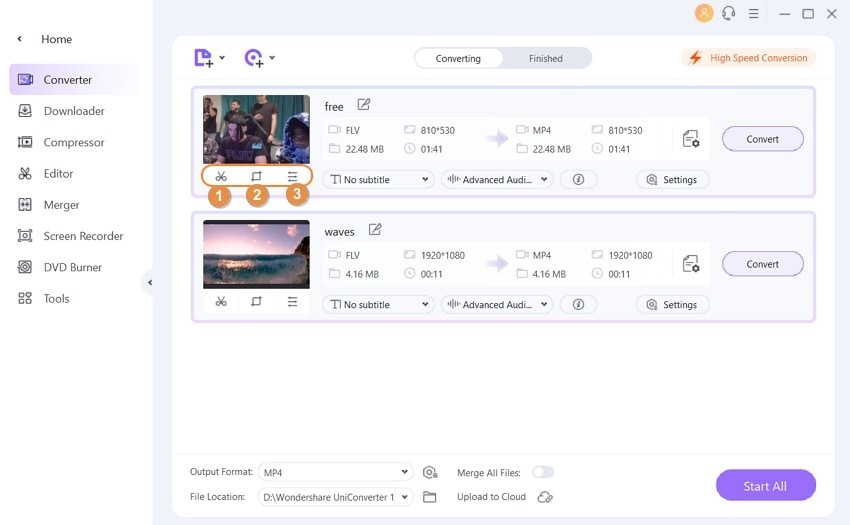
Bonus Step: Burn Converted Videos to DVD
If you need to burn the converted video to the DVD, you need to add it to the DVD Burner list by right-clicking on the converted video and select from the drop-down list.

You can choose the DVD template and adjust the DVD settings, or just use the default settings, then click the Burn button to start the burning process.

It’s so easy to use Wondershare UniConverter to record, convert, compress video and burn video to DVD, right? Have a free trial now!
Источник
Roxio Easy VHS to DVD для Mac
«Печально, что фильмы на VHS, Hi8 и Video8 со временем ухудшаются, в конечном итоге теряя исходное качество. Теперь вы можете сохранять в цифровом виде свои ценные видео и наслаждаться ими для будущих поколений «.
Эта фраза входит в комплект нового продукта Roxio «VHS to DVD For Mac».
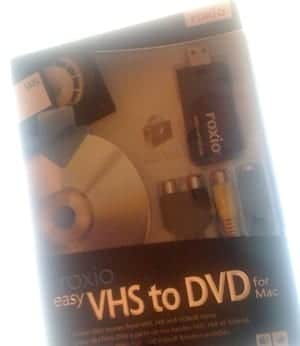
Среди содержимого мы находим подробное руководство на нескольких языках, которое, помимо прочего, объясняет в разделе требований, что нам нужна Mac OS X 10.4 или 10.5, то есть OS X Tiger или Leopard, в нем ничего не говорится о Снежный барс. Однако приступим к его установке.
Первое, что мы сделали, это подключили дигитайзер к порту USB 2.0 на iMac.
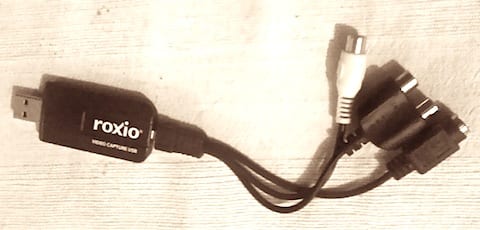
Первый аргумент в пользу: мы выяснили, что даже если мы установили прилагаемый DVD-контент, звуковая часть устройства была обнаружена как источник аудиовхода в Snow Leopard 10.6.1.
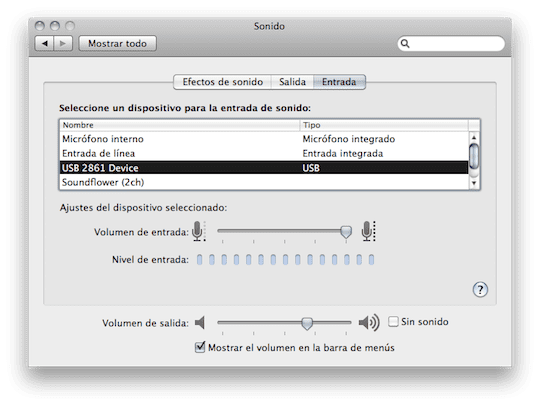
Это дает продукту дополнительную функциональность: мы можем использовать устройство для подключения любого аналогового аудиоисточника через два RCA. Мы уже знаем, что через миниджек встроенного входа Mac мы также можем это сделать, но для этой цели всегда лучше использовать RCA-соединение. В дополнение к этому у нас есть второй источник входного аналогового звука для нескольких приложений. Например: мы можем определить, что в GarageBand этот вход используется для захвата кассетной деки, и в то же время определить в Logic встроенный вход Mac для захвата голосовой деки. В любом случае, мы избавляемся от необходимости менять устройства для каждой цели.
Теперь мы переходим к проверке, можем ли мы сделать что-то с видео частью устройства без использования прилагаемого программного обеспечения, поэтому мы открываем iMovie и проверяем, что в качестве единственного источника входного сигнала у нас все еще есть камера iSight, встроенная в iMac, что очень плохо. Однако приступаем к установке содержимого диска, входящего в комплект поставки продукта.
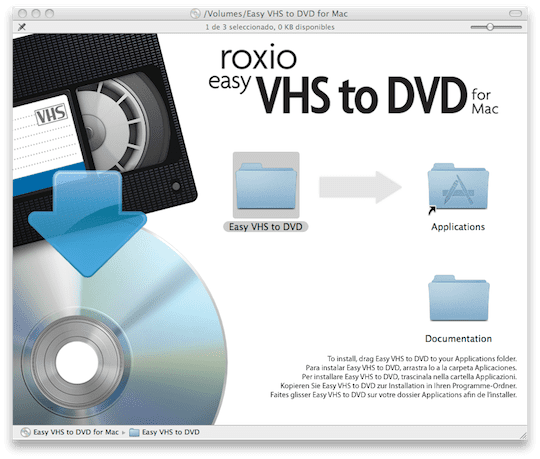
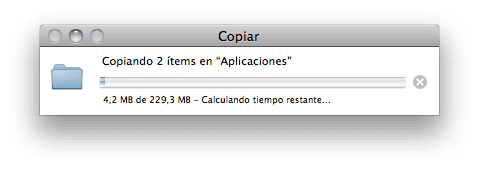
Установка проста: как обычно на Mac, вам нужно только перетащить папку «Easy VHS to DVD» в нашу папку «Приложения».
Мы приступаем к выполнению «Easy VHS to DVD Capture» и обнаруживаем, что в Интернете доступно обновление.
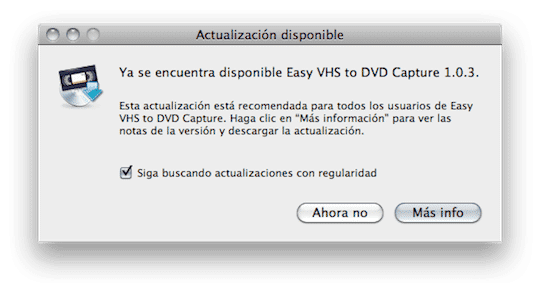
Мы нажимаем «Подробнее», и наш браузер по умолчанию открывается с указанием URL-адреса, по которому находится обновление.
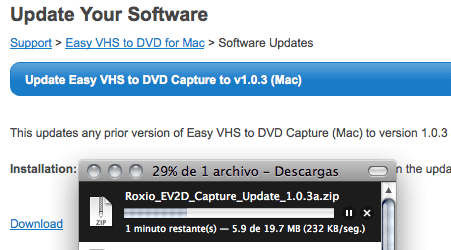
Здесь мы обнаруживаем несколько сложную часть для начинающих пользователей, так как загрузка сжатого образа диска в формате ZIP несложна, но тогда вам придется действовать вручную, чтобы заменить программное обеспечение.
Мы должны открыть распакованный ZIP-файл, оставив файл DMG на виду, который мы открываем, и находим следующее окно Finder:
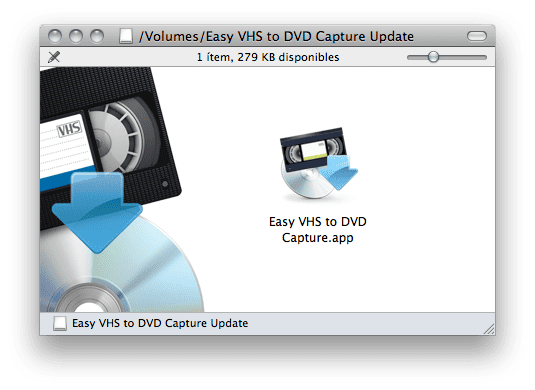
Здесь у неопытного пользователя могут возникнуть проблемы, поскольку у нас нет никаких автоматических обновлений. Кроме того, приложение находится не непосредственно в папке «Приложения», а в «Приложениях / Easy VHS to DVD», поэтому даже если мы нажмем верхнюю правую кнопку окна Finder, чтобы открыть боковую панель, где у нас есть прямой вид на расположение «Приложения», мы должны вручную найти расположение «Easy VHS to DVD», чтобы перетащить значок обновления и, таким образом, заменить инструмент.
Довольно приличным решением со стороны создателей этого образа диска могло бы быть ссылка на «Приложения / Easy VHS на DVD», как они сделали на диске, поставляемом с продуктом для «Приложения /», но лучше и более простым решением было бы что-то вроде включения в программу Roxio автоматического средства обновления, которое загружает само обновление и устанавливает его, как это делают многие другие продукты.
Но не все будет критичным, мы открываем «Easy VHS to DVD Capture», и нам просто нужно выполнить несколько простых шагов:
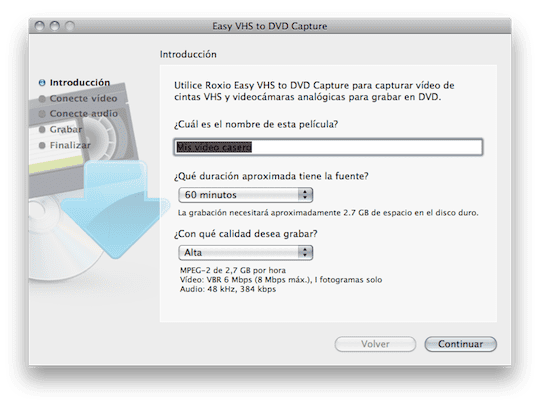
Каждый из двух вариантов качества не содержит технических деталей, чтобы лучше ориентироваться в окончательных результатах, которые мы хотим получить. однако фактическое качество во многом зависит от качества записываемого аналогового источника и / или устройства VHS и количества головок в нем.
Приблизительная продолжительность, кажется, не влияет на операцию захвата, кажется, что это просто предложить нам на следующем этапе возможность остановить запись по истечении этого времени.
После захвата он предлагает нам три варианта отправки результатов:
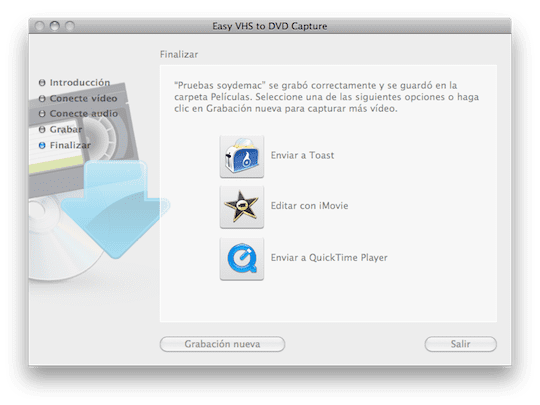
Первым вариантом, который мы попробовали, был «Редактировать с помощью iMovie», который создает новое событие с указанным нами именем, и мы можем начать работать, как обычно в iMovie.
Сделав еще один снимок, мы попробовали опцию «Отправить в тост» и нашли здесь очень положительный момент для этого продукта. На нашем Mac у нас есть продукт «Roxio Toast 10 Titanium Pro», и хотя «Toast 9 Basic», входящий в состав продукта, также установлен, процесс стал интеллектуальным, и наш «Toast 10», уже существующий на нашем компьютере, был автоматически открыт. . Отсюда процесс создания DVD очень прост.
Содержание статьи соответствует нашим принципам редакционная этика. Чтобы сообщить об ошибке, нажмите здесь.
Полный путь к статье: Я с Mac » Компьютеры Mac » аксессуары » Roxio Easy VHS to DVD для Mac
Источник


