- Installing Test Certificates
- Пошаговое руководство. Просмотр сертификатов с помощью оснастки MMC How to: View certificates with the MMC snap-in
- Просмотр сертификатов в оснастке MMC View certificates in the MMC snap-in
- Просмотр сертификатов с помощью средства диспетчера сертификатов View certificates with the Certificate Manager tool
- Просмотр сертификатов для локального устройства To view certificates for the local device
- Просмотр сертификатов для текущего пользователя To view certificates for the current user
- How to: View certificates with the MMC snap-in
- View certificates in the MMC snap-in
- View certificates with the Certificate Manager tool
- To view certificates for the local device
- To view certificates for the current user
- Intro to certificates
- Shared certificate stores
- Certificate storage per app container
- Cache
- Shared certificates and keys
- Certificate fields
- Version 1 fields
- Version 2 fields
- Version 3 extensions
Installing Test Certificates
To successfully install a test-signed driver package on a test computer, the computer must be able to verify the signature. To do that, the test computer must have the certificate for the certificate authority (CA) that issued the package’s test certificate installed in the computer’s Trusted Root Certification Authorities certificate store
The CA certificate must be added to the Trusted Root Certification Authorities certificate store only once. Once added, it can then be used to verify the signature of all drivers or driver packages, which were digitally signed with the certificate, before the driver package is installed on the computer.
The simplest way to add a test certificate to the Trusted Root Certification Authorities certificate store is through the CertMgr tool. This topic will describe the procedure for installing the test certificate, Contoso.com(test). This certificate is stored within the ContosoTest.cer file. For more information about how this certificate was created, see Creating Test Certificates.
The following command-line uses Certmgr.exe to install, or add, the Contoso.com(test) certificate to the test computer’s Trusted Root Certification Authorities certificate store:
The /add option specifies that the certificate in the ContosoTest.cer file is to be added to the specified certificate store.
The /s option specifies that the certificate is to be added to a system store.
The /r option specifies the system store location, which is either currentUser or localMachine.
Root specifies the name of the destination store for the local computer, which is either root to specify the Trusted Root Certification Authorities certificate store or trustedpublisher to specify the Trusted Publishers certificate store.
A successful run produces the following output:
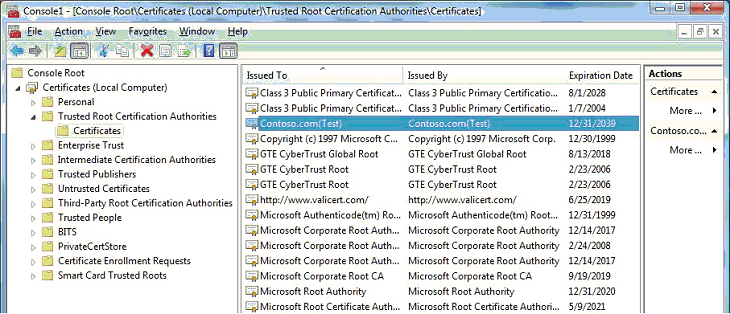
After the certificate is copied to the Trusted Root Certification Authorities certificate store (the local machine’s root store, not the user store), you can view it through the Microsoft Management Console (MMC) Certificates snap-in, as described in Viewing Test Certificates.
The following screenshot shows the Contoso.com(Test) certificate in the Trusted Root Certification Authorities certificate store.
You can also view the certificate at the command prompt:
Or, from PowerShell:
The Certmgr.exe tool is part of the Windows SDK and is typically installed to C:\Program Files (x86)\Windows Kits\10\bin\ \x86\certmgr.exe .
For more information about CertMgr and its command-line arguments, see CertMgr.
For more information about how to install test certificates, see Installing a Test Certificate on a Test Computer.
Пошаговое руководство. Просмотр сертификатов с помощью оснастки MMC How to: View certificates with the MMC snap-in
При создании защищенного клиента или службы можно использовать сертификат в качестве учетных данных. When you create a secure client or service, you can use a certificate as the credential. Например, общий тип учетных данных — это сертификат X. 509, который создается с помощью X509CertificateInitiatorClientCredential.SetCertificate метода. For example, a common type of credential is the X.509 certificate, which you create with the X509CertificateInitiatorClientCredential.SetCertificate method.
Существует три разных типа хранилищ сертификатов, которые можно проверить с помощью консоли управления (MMC) в системах Windows: There are three different types of certificate stores that you can examine with the Microsoft Management Console (MMC) on Windows systems:
Локальный компьютер. хранилище является локальным для устройства и является глобальным для всех пользователей на устройстве. Local computer: The store is local to the device and global to all users on the device.
Текущий пользователь: хранилище является локальным по отношению к текущей учетной записи пользователя на устройстве. Current user: The store is local to the current user account on the device.
Учетная запись службы. хранилище является локальным для определенной службы на устройстве. Service account: The store is local to a particular service on the device.
Просмотр сертификатов в оснастке MMC View certificates in the MMC snap-in
В следующей процедуре показано, как проверить магазины на локальном устройстве, чтобы найти соответствующий сертификат: The following procedure demonstrates how to examine the stores on your local device to find an appropriate certificate:
В меню Пуск выберите пункт выполнить и введите MMC. Select Run from the Start menu, and then enter mmc.
Откроется консоль MMC. The MMC appears.
В меню файл выберите команду Добавить или удалить оснастку. From the File menu, select Add/Remove Snap In.
Откроется окно Добавление или удаление оснасток . The Add or Remove Snap-ins window appears.
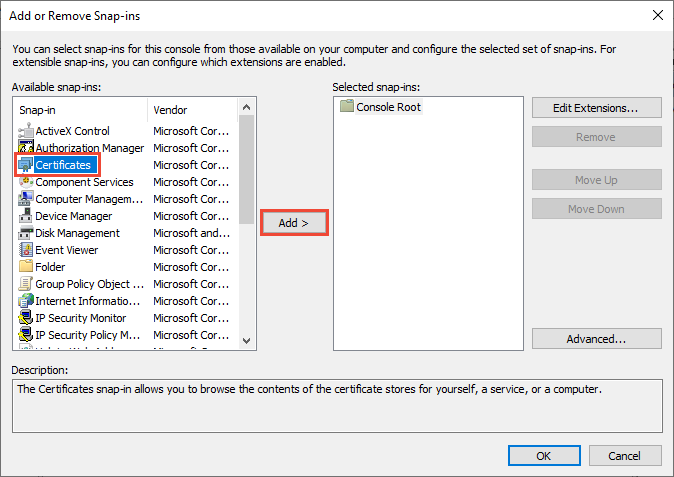
В списке Доступные оснастки выберите Сертификаты, а затем щелкните добавить. From the Available snap-ins list, choose Certificates, then select Add.
В окне оснастки «сертификаты » выберите учетная запись компьютера, а затем нажмите кнопку Далее. In the Certificates snap-in window, select Computer account, and then select Next.
При необходимости можно выбрать учетную запись пользователя для текущего пользователя или учетной записи службы для конкретной службы. Optionally, you can select My user account for the current user or Service account for a particular service.
Если вы не являетесь администратором устройства, вы можете управлять сертификатами только для учетной записи пользователя. If you’re not an administrator for your device, you can manage certificates only for your user account.
В окне Выбор компьютера оставьте выбранным параметр локальный компьютер и нажмите кнопку Готово. In the Select Computer window, leave Local computer selected, and then select Finish.
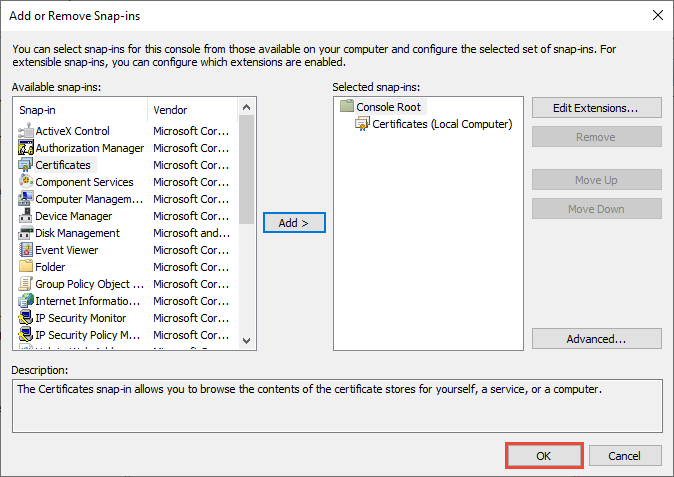
В окне Добавление или удаление оснастки нажмите кнопку ОК. In the Add or Remove Snap-in window, select OK.
Необязательно. в меню файл выберите сохранить или Сохранить как , чтобы сохранить файл консоли MMC для последующего использования. Optional: From the File menu, select Save or Save As to save the MMC console file for later use.
Чтобы просмотреть сертификаты в оснастке MMC, выберите корень консоли в левой области, а затем разверните узел Сертификаты (локальный компьютер). To view your certificates in the MMC snap-in, select Console Root in the left pane, then expand Certificates (Local Computer).
Появится список каталогов для каждого типа сертификатов. A list of directories for each type of certificate appears. Из каждого каталога сертификатов можно просматривать, экспортировать, импортировать и удалять свои сертификаты. From each certificate directory, you can view, export, import, and delete its certificates.
Просмотр сертификатов с помощью средства диспетчера сертификатов View certificates with the Certificate Manager tool
Вы также можете просматривать, экспортировать, импортировать и удалять сертификаты с помощью средства диспетчера сертификатов. You can also view, export, import, and delete certificates by using the Certificate Manager tool.
Просмотр сертификатов для локального устройства To view certificates for the local device
В меню Пуск выберите пункт выполнить , а затем введите certlm. msc. Select Run from the Start menu, and then enter certlm.msc.
Откроется средство диспетчера сертификатов для локального устройства. The Certificate Manager tool for the local device appears.
Для просмотра сертификатов в разделе Сертификаты — локальный компьютер в левой области разверните каталог для типа сертификата, который нужно просмотреть. To view your certificates, under Certificates — Local Computer in the left pane, expand the directory for the type of certificate you want to view.
Просмотр сертификатов для текущего пользователя To view certificates for the current user
В меню Пуск выберите пункт выполнить , а затем введите CertMgr. msc. Select Run from the Start menu, and then enter certmgr.msc.
Появится средство диспетчера сертификатов для текущего пользователя. The Certificate Manager tool for the current user appears.
Чтобы просмотреть сертификаты, в разделе Сертификаты — текущий пользователь в левой области разверните каталог для типа сертификата, который нужно просмотреть. To view your certificates, under Certificates — Current User in the left pane, expand the directory for the type of certificate you want to view.
How to: View certificates with the MMC snap-in
When you create a secure client or service, you can use a certificate as the credential. For example, a common type of credential is the X.509 certificate, which you create with the X509CertificateInitiatorClientCredential.SetCertificate method.
There are three different types of certificate stores that you can examine with the Microsoft Management Console (MMC) on Windows systems:
Local computer: The store is local to the device and global to all users on the device.
Current user: The store is local to the current user account on the device.
Service account: The store is local to a particular service on the device.
View certificates in the MMC snap-in
The following procedure demonstrates how to examine the stores on your local device to find an appropriate certificate:
Select Run from the Start menu, and then enter mmc.
The MMC appears.
From the File menu, select Add/Remove Snap In.
The Add or Remove Snap-ins window appears.
From the Available snap-ins list, choose Certificates, then select Add.

In the Certificates snap-in window, select Computer account, and then select Next.
Optionally, you can select My user account for the current user or Service account for a particular service.
If you’re not an administrator for your device, you can manage certificates only for your user account.
In the Select Computer window, leave Local computer selected, and then select Finish.
In the Add or Remove Snap-in window, select OK.

Optional: From the File menu, select Save or Save As to save the MMC console file for later use.
To view your certificates in the MMC snap-in, select Console Root in the left pane, then expand Certificates (Local Computer).
A list of directories for each type of certificate appears. From each certificate directory, you can view, export, import, and delete its certificates.
View certificates with the Certificate Manager tool
You can also view, export, import, and delete certificates by using the Certificate Manager tool.
To view certificates for the local device
Select Run from the Start menu, and then enter certlm.msc.
The Certificate Manager tool for the local device appears.
To view your certificates, under Certificates — Local Computer in the left pane, expand the directory for the type of certificate you want to view.
To view certificates for the current user
Select Run from the Start menu, and then enter certmgr.msc.
The Certificate Manager tool for the current user appears.
To view your certificates, under Certificates — Current User in the left pane, expand the directory for the type of certificate you want to view.
Intro to certificates
This article discusses the use of certificates in Universal Windows Platform (UWP) apps. Digital certificates are used in public key cryptography to bind a public key to a person, computer, or organization. The bound identities are most often used to authenticate one entity to another. For example, certificates are often used to authenticate a web server to a user and a user to a web server. You can create certificate requests and install or import issued certificates. You can also enroll a certificate in a certificate hierarchy.
Shared certificate stores
UWP apps use the new isolationist application model introduced in WindowsВ 8. In this model, apps run in low-level operating system construct, called an app container, that prohibits the app from accessing resources or files outside of itself unless explicitly permitted to do so. The following sections describe the implications this has on public key infrastructure (PKI).
Certificate storage per app container
Certificates that are intended for use in a specific app container are stored in per user, per app container locations. An app running in an app container has write access to only its own certificate storage. If the application adds certificates to any of its stores, these certificates cannot be read by other apps. If an app is uninstalled, any certificates specific to it are also removed. An app also has read access to local machine certificate stores other than the MY and REQUEST store.
Cache
Each app container has an isolated cache in which it can store issuer certificates needed for validation, certificate revocation lists (CRL), and online certificate status protocol (OCSP) responses.
Shared certificates and keys
When a smart card is inserted into a reader, the certificates and keys contained on the card are propagated to the user MY store where they can be shared by any full-trust application the user is running. By default, however, app containers do not have access to the per user MY store.
To address this issue and enable groups of principals to access groups of resources, the app container isolation model supports the capabilities concept. A capability allows an app container process to access a specific resource. The sharedUserCertificates capability grants an app container read access to the certificates and keys contained in the user MY store and the Smart Card Trusted Roots store. The capability does not grant read access to the user REQUEST store.
You specify the sharedUserCertificates capability in the manifest as shown in the following example.
Certificate fields
The X.509 public key certificate standard has been revised over time. Each successive version of the data structure has retained the fields that existed in the previous versions and added more, as shown in the following illustration.
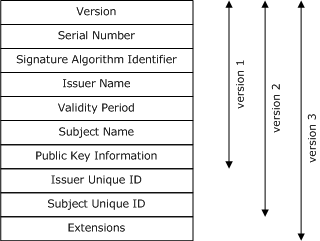
Some of these fields and extensions can be specified directly when you use the CertificateRequestProperties class to create a certificate request. Most cannot. These fields can be filled by the issuing authority or they can be left blank. For more information about the fields, see the following sections:
Version 1 fields
| Field | Description |
|---|---|
| Version | Specifies the version number of the encoded certificate. Currently, the possible values of this field are 0, 1, or 2. |
| Serial Number | Contains a positive, unique integer assigned by the certification authority (CA) to the certificate. |
| Signature Algorithm | Contains an object identifier (OID) that specifies the algorithm used by the CA to sign the certificate. For example, 1.2.840.113549.1.1.5 specifies a SHA-1 hashing algorithm combined with the RSA encryption algorithm from RSA Laboratories. |
| Issuer | Contains the X.500 distinguished name (DN) of the CA that created and signed the certificate. |
| Validity | Specifies the time interval during which the certificate is valid. Dates through the end of 2049 use the Coordinated Universal Time (Greenwich Mean Time) format (yymmddhhmmssz). Dates beginning with January 1st, 2050 use the generalized time format (yyyymmddhhmmssz). |
| Subject | Contains an X.500 distinguished name of the entity associated with the public key contained in the certificate. |
| Public Key | Contains the public key and associated algorithm information. |
Version 2 fields
An X.509 version 2 certificate contains the basic fields defined in version 1 and adds the following fields.
| Field | Description |
|---|---|
| Issuer Unique Identifier | Contains a unique value that can be used to make the X.500 name of the CA unambiguous when reused by different entities over time. |
| Subject Unique Identifier | Contains a unique value that can be used to make the X.500 name of the certificate subject unambiguous when reused by different entities over time. |
Version 3 extensions
An X.509 version 3 certificate contains the fields defined in version 1 and version 2 and adds certificate extensions.


