- Как отобразить скрытые файлы в macOS за 5 секунд
- Для любителей приложения Терминал
- Для любителей скриптов
- Самый быстрый способ
- Question: Q: How do I show hidden files on my mac
- Helpful answers
- Quickly Show/Hide Hidden Files on macOS Sierra, OS X El Capitan & Yosemite
- Updates
- The Quickest Way to Show/Hide Hidden Files
- Show/Hide Hidden Files the Long Way
- Show/Hide Hidden Files using Terminal Aliases
- Conclusion
- Question: Q: How to find hidden folders using Finder
- Helpful answers
Как отобразить скрытые файлы в macOS за 5 секунд
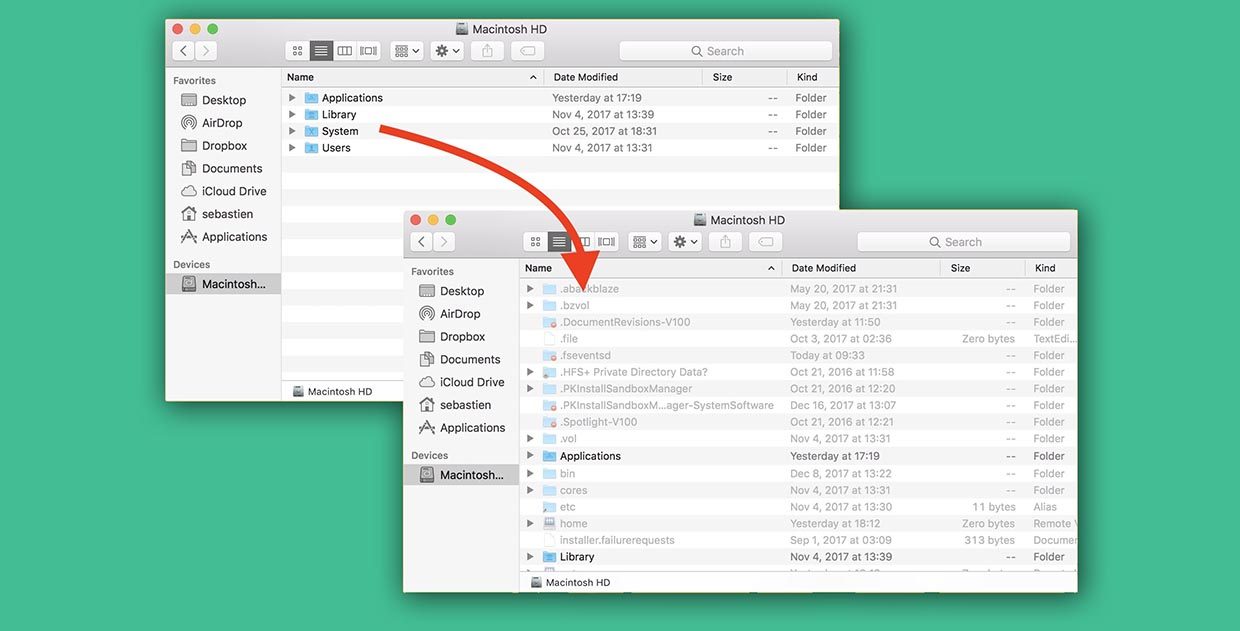
Изначально операционная система Apple не позволяет пользователю видеть скрытые папки и файлы на накопителях. Сделано это для стабильной работы системы и является своеобразной защитой от начинающего пользователя.
Доступ к срытым файлам может понадобиться для редактирования системных файлов или настроек приложений, для ручной очистки системы и в ряде других случаев.
Вот три способа отобразить скрытые данные в macOS.
Для любителей приложения Терминал
Большинство настроек и системных действий на Mac можно сделать через приложение Терминал. Включение и отключение скрытых файлов и папок – не исключение.
1. Запускаем приложение Терминал из Lounchpad или Spotlight.
2. Вводим команду:
defaults write com.apple.finder AppleShowAllFiles -boolean true ; killall Finder
Finder после этого перезапустится, а скрытые файлы и папку будут видны.
Для отключения опции следует использовать такую команду:
defaults write com.apple.finder AppleShowAllFiles FALSE ; killall Finder
Для любителей скриптов
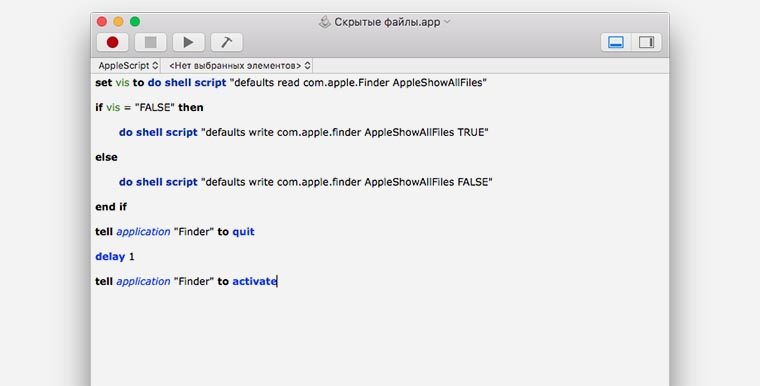
Можно создать целое приложение, которое в одно нажатие будет включать или отключать отображение скрытых файлов и папок.
1. Запускаем приложение Редактор скриптов из Lounchpad или Spotlight.
2. В строке меню выбираем Файл – Новый.
3. В открывшееся окно вставляем такой код:
set vis to do shell script “defaults read com.apple.Finder AppleShowAllFiles”
if vis = “FALSE” then
do shell script “defaults write com.apple.finder AppleShowAllFiles TRUE”
do shell script “defaults write com.apple.finder AppleShowAllFiles FALSE”
tell application “Finder” to quit
tell application “Finder” to activate
4. Остается выбрать пункт меню Файл – Сохранить и сохранить скрипт в виде приложения.
Теперь его можно поместить в Док и быстро включать или отключать отображение скрытых файлов и папок в Finder.
Самый быстрый способ
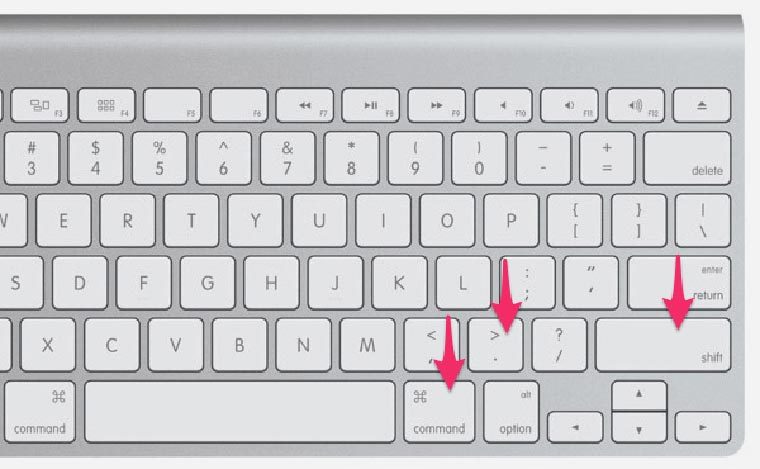
Для тех, кто не хочет возиться с редактором скриптов или терминалом, в Apple придумали сочетание клавиш.
Запоминаем шорткат: ⌘ + ⇧ +.
Одно нажатие и скрытые файлы отобразятся, еще одно и они снова станут скрытыми.
Источник
Question: Q: How do I show hidden files on my mac
How can I show hidden files on my Mac?
iMac, OS X Mavericks (10.9.2)
Posted on Jun 3, 2016 6:12 AM
Helpful answers
NOTE: shift+command+period toggles hidden files in Finder too!! (on macOS Sierra Ver 10.12.4)
No need to open terminal or manually relaunch Finder!
Apr 26, 2017 2:09 PM
Better solution: Use shift+command+period to toggle hidden files in Finder (on macOS Sierra Ver 10.12.4).
This may also work in prompts to open or save documents (see below post from VikingOSX Nov 7, 2016 5:16 AM )
Apr 26, 2017 2:23 PM
There’s more to the conversation
Loading page content
Page content loaded
Jun 3, 2016 6:15 AM
- Hi. You can try these steps:
- 1. Open Terminal found in Finder, go to Applications, choose Utilities
- 2. In Terminal, paste the following:
- 3. Press return after that.
- 4. Hold the ‘Option/alt’ key, then right click on the Finder icon in the dock and click Relaunch.
Jun 3, 2016 6:18 AM
If you want to hide or show hidden files on Mac, follow this guide. All you need to do is to perform a few simple commands via Terminal.
If you can’t remember those commands for the next time. Don’t worry, there were solutions to help you create aliases for those long commands. In the next time, you only need to enter the short ones.
Nov 7, 2016 1:26 AM
Applications that use the Cocoa (AppKit) NSOpenPanel and NSSavePanel classes that prompt to open or save documents — also permit the use of shift+command+period keyboard shortcut that toggles hidden files on and off in that panel.
Try it with TextEdit, Preview, etc.
Nov 7, 2016 5:16 AM
Applications that use the Cocoa (AppKit) NSOpenPanel and NSSavePanel classes that prompt to open or save documents — also permit the use of shift+command+period keyboard shortcut that toggles hidden files on and off in that panel.
Cool shortcut — I never knew this was possible.
Nov 7, 2016 7:15 AM
NOTE: shift+command+period toggles hidden files in Finder too!! (on macOS Sierra Ver 10.12.4)
No need to open terminal or manually relaunch Finder!
Apr 26, 2017 2:09 PM
Better solution: Use shift+command+period to toggle hidden files in Finder (on macOS Sierra Ver 10.12.4).
This may also work in prompts to open or save documents (see below post from VikingOSX Nov 7, 2016 5:16 AM )
Apr 26, 2017 2:23 PM
Question: Q: How do I show hidden files on my mac More Less
Источник
Quickly Show/Hide Hidden Files on macOS Sierra, OS X El Capitan & Yosemite
Updates
Added shortcut method available on macOS Sierra keyboard.
Method of showing/hiding hidden files tested and working on macOS Sierra.
Method of showing/hiding hidden files tested and working on Mac OS X El Capitan.
It seems like every day I search Google for the command to show hidden files on Mac OS X, not to mention Googling for the command to then hide those hidden files a few minutes later.
Today I decided to make a short and easy to remember alias to speed up the process. All I need do now is type showFiles and hideFiles whenever I need to show/hide OS X’s hidden files. Here’s how you can do it too.
The Quickest Way to Show/Hide Hidden Files
Since the release of macOS Sierra, when in Finder, it is now possible to use the shortcut:
Press once to show hidden files and again to hide them. If you’re using a version earlier than macOS Sierra, see Show/Hide Hidden Files using Terminal Aliases to setup a toggle command via terminal.
Thanks to Guido Schlabitz for making me aware of this new shortcut.
Show/Hide Hidden Files the Long Way
The long way to show hidden Mac OS X files is as follows:
- Open Terminal found in Finder > Applications > Utilities
- In Terminal, paste the following: defaults write com.apple.finder AppleShowAllFiles YES
- Press return
- Hold the ‘Option/alt’ key, then right click on the Finder icon in the dock and click Relaunch.
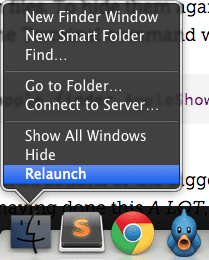
Relaunch Finder by right clicking the Finder Icon whilst holding the `option/alt` key
This will show all hidden files. To hide them again, follow the same steps but replace the Terminal command with:
It’s not the longest set of instructions or the biggest command to commit to memory but if you’re doing this a lot, it’s worth spending a few minutes now to save yourself a lot more time in the future.
Show/Hide Hidden Files using Terminal Aliases
A Terminal alias is a name or shortcut for one or multiple commands. Using an easy to remember alias, we can turn the above four step process into just one.
An alias can be made temporarily (just for the use of one terminal session) or permanently. As we want this to be a shortcut used now and in the future, let’s make it permanent:
- Open Terminal found in Finder > Applications > Utilities
- In Terminal, paste the following: sudo nano
/.bash_profile
Below that, paste the following: alias hideFiles=’defaults write com.apple.finder AppleShowAllFiles NO; killall Finder /System/Library/CoreServices/Finder.app’
/.bash_profile to refresh your profile and make the aliases available

Adding aliases to .bash_profile via Terminal
Now when you want to show hidden files, all you need type in Terminal is showFiles , then hideFiles when you want to hide them.
If you want to modify the behaviour or alias names, let’s take a closer look at the commands you just added:
alias tells Terminal we’re adding a new alias.
showFiles is the name of the alias. Change this to what you wish.
We then give the alias two commands. The first being:
This is the command to show hidden files and is ended with a semi-colon ; so we can then use the second command:
This will relaunch the Finder (to replicate the step of holding the ‘Option/alt’ key then right clicking the Finder icon in the dock).
Conclusion
With the aliases set up, all you need do in the future is type showFiles and hideFiles to show and hide Mac OS X’s hidden files respectively.
Aliases can be used to speed up your interaction with the Terminal. Set up an alias for navigating to your most used directories, to commit to a GitHub repo and so on.
Ian Lunn is a Front-end Developer with 12 years commercial experience, author of CSS3 Foundations, and graduate of Internet Technology. He creates successful websites that are fast, easy to use, and built with best practices.
Источник
Question: Q: How to find hidden folders using Finder
Really frustrated! I want Finder to show hidden files and folders. I’ve tried everything I could find in this forum and others to do so. This is what I have tried (repeatedly):
Finder>Go hold the option key
If you need to show it permanently
Open your Finder>Go> Home folder then command J to see view options
Then, relaunch Finder
Show Hidden Files Mac OS X El Capitan:
- Click “Finder” icon on your Mac dock.
- Open Terminal. Terminal is a utility that provides access to the OS X El Capitan operating system. It can be opened in one of two following ways:
- Select “Applications” on the left side, then on “Utilities“, and double-click on “Terminal“
- Open the OS X El Capitan Launchpad. Click the “Utilities” folder. Then, double click on “Terminal.”
- Enter the following text into the Terminal window, then press “Enter“: “defaults write com.apple.Finder AppleShowAllFiles YES”
- Exit the Terminal program. This can be done by selecting “Quit Terminal” from the Terminal menu.
- Restart Finder. Your new setting will take effect after you relaunch finder. To do so, hold down the “Alt” key and right-click or two-fingered click on the Finder icon. Select “Relaunch.”
Neither of these work for me. 🙁 Am using Macbook Air and El Capitan Version 10.11.4
MacBook Air, OS X El Capitan (10.11)
Posted on Jun 5, 2016 4:48 AM
Actually you post the screenshot the same way you posted the first screenshot. You don’t need the advanced editor. But, you found the folder you wanted. As far as why the Finder doesn’t, it doesn’t look in Hidden Folders. If you want to find everything on your Mac, I would recommend installing EasyFind from the App Store. It can locate any type of file/folder.
Posted on Jun 9, 2016 3:23 AM
Helpful answers
Spotlight (and thus Finder) will not search system folders by default and your user Library falls into that category. You can make it search system folders if you need to.
As already mentioned, if you know the path, just use Go to Folder.
In this case use this as the path
/ is an alias to your home folder.
Aalso note that the Profiles filed is likely not hidden, only the user Library folder is hidden.
You can acces the Library directly in Finder by holding down the Option key and selecting Library from the Go menu.
You can show the Library always by typing p,
cmd-h, cmd-j in the Finder, then check the box to show the Library folder.
You seem to know about both, so where does each of those options fail?
I Don’t use Thunderbird, so it may be that they hid their sub folders which would double down on Apple’s stupidity in hiding the Library folder.
Jun 9, 2016 3:15 AM
There’s more to the conversation
Loading page content
Page content loaded
Do not include the quotes.
defaults write com.apple.finder AppleShowAllFiles YES
Jun 5, 2016 5:05 AM
Which «hidden» folders are you trying to show?
The «Show Library Folder» option in View Options merely shows the user Library. It doesn’t show all hidden items in the file system.
If trying to show the user Library, what part doesn’t work?
Can you find the setting?
Can you check it?
There is no need to relaunch the Finder.
Jun 5, 2016 5:06 AM
You could make an AppleScript application that you place in your Dock, or even the Finder toolbar, and each time that you click it, hidden files/folders appear or disappear. If you decide to remove from the Finder window toolbar, then press the command key and click/drag the icon off. The following was tested on OS X 10.11.5.
Launch your Script Editor (Launchpad : Other : Script Editor). Copy and paste the following (see below) AppleScript into the Script Editor. Click the compile button (hammer icon). Now run it (black triangle button) with an open Finder window on your home directory. You want to save the content twice:
- Save the source code that you have just pasted as Text
- File Format: Text (this adds an applescript extension to your filename
- Save in Documents or your location choice for safe keeping.
- No check boxes selected
- Save as an Application (option + File menu : Save As…)
- File Format: Application
- Location: /Applications
Drag and drop from Applications to your Dock, or to the Finder window toolbar (short filename e.g. Nohide)
- Checkbox: Hide Extension
- Quit Script Editor
AppleScript:
— Attribution to, and submitted by Baltwo on Apple Support Community
try
do shell script «defaults read com.apple.finder AppleShowAllFiles»
on error
do shell script «defaults write com.apple.finder AppleShowAllFiles False»
end try
if ( do shell script «defaults read com.apple.finder AppleShowAllFiles») is equal to «False» then
do shell script «defaults write com.apple.finder AppleShowAllFiles True»
else
do shell script «defaults write com.apple.finder AppleShowAllFiles False»
end if
do shell script «killall Finder»
Источник


