- Test on an Android device or emulator
- Run on a real Android device
- Enable your device for development
- Run your app on the device
- Run your app on a virtual Android device using an emulator
- Enable virtualization support
- Emulator for native development with Android Studio
- Emulator for cross-platform development with Visual Studio
- Install Android emulator with Visual Studio
- Wormhole – подключаем смартфон к PC и транслируем изображение
- Обзор
- Скачать Wormhole
- Эмулируем Windows на Android
- Top 5 Android Window Manager: Multi-Window Is Possible
- Part 1: Top 5 Android window manager Apps
- 1. Multi Window
- Android Windows Manager
- 3. Multiwindow Launcher
- 4. Multi Window Manager (Phone)
- 5. Multi Screen
- Part 2: Fix Multi-window Problem with Samsung on Android 4.3
- Part 3: Further Reading — Android Manager to manage all Android apps and files
- Dr.Fone — Phone Manager (Android)
Test on an Android device or emulator
There are several ways to test and debug your Android application using a real device or emulator on your Windows machine. We have outlined a few recommendations in this guide.
Run on a real Android device
To run your app on a real Android device, you will first need to enable your Android device for development. Developer options on Android have been hidden by default since version 4.2 and enabling them can vary based on the Android version.
Enable your device for development
For a device running a recent version of Android 9.0+:
- Connect your device to your Windows development machine with a USB cable. You may receive a notification to install a USB driver.
- Open the Settings screen on your Android device.
- Select About phone.
- Scroll to the bottom and tap Build number seven times, until You are now a developer! is visible.
- Return to the previous screen, select System.
- Select Advanced, scroll to the bottom, and tap Developer options.
- In the Developer options window, scroll down to find and enable USB debugging.
For a device running an older version of Android, see Set Up Device for Development.
Run your app on the device
In the Android Studio toolbar, select your app from the run configurations drop-down menu.
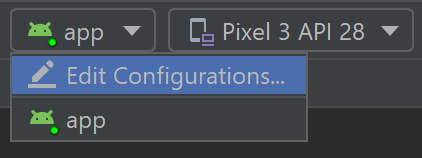
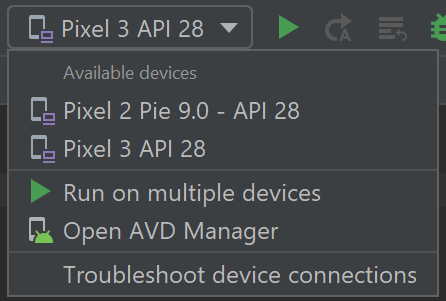
From the target device drop-down menu, select the device that you want to run your app on.
Select Run в–·. This will launch the app on your connected device.
Run your app on a virtual Android device using an emulator
The first thing to know about running an Android emulator on your Windows machine is that regardless of your IDE (Android Studio, Visual Studio, etc), emulator performance is vastly improved by enabling virtualization support.
Enable virtualization support
Before creating a virtual device with the Android emulator, it is recommended that you enable virtualization by turning on the Hyper-V and Windows Hypervisor Platform (WHPX) features. This will allow your computer’s processor to significantly improve the execution speed of the emulator.
To run Hyper-V and Windows Hypervisor Platform, your computer must:
- Have 4GB of memory available
- Have a 64-bit Intel processor or AMD Ryzen CPU with Second Level Address Translation (SLAT)
- Be running Windows 10 build 1803+ (Check your build #)
- Have updated graphics drivers (Device Manager > Display adapters > Update driver)
If your machine doesn’t fit this criteria, you may be able to run Intel HAXM or AMD Hypervisor. For more info, see the article: Hardware acceleration for emulator performance or the Android Studio Emulator documentation.
Verify that your computer hardware and software is compatible with Hyper-V by opening a command prompt and entering the command: systeminfo

In the Windows search box (lower left), enter «windows features». Select Turn Windows features on or off from the search results.
Once the Windows Features list appears, scroll to find Hyper-V (includes both Management Tools and Platform) and Windows Hypervisor Platform, ensure that the box is checked to enable both, then select OK.
Restart your computer when prompted.
Emulator for native development with Android Studio
When building and testing a native Android app, we recommend using Android Studio. Once your app is ready for testing, you can build and run your app by:
In the Android Studio toolbar, select your app from the run configurations drop-down menu.
From the target device drop-down menu, select the device that you want to run your app on.
Select Run в–·. This will launch the Android Emulator.
Once your app is installed on the emulator device, you can use Apply Changes to deploy certain code and resource changes without building a new APK.
Emulator for cross-platform development with Visual Studio
There are many Android emulator options available for Windows PCs. We recommend using Google’s Android emulator, as it offers access to the latest Android OS images and Google Play services.
Install Android emulator with Visual Studio
If you don’t already have it installed, download Visual Studio 2019. Use the Visual Studio Installer to Modify your workloads and ensure that you have the Mobile development with .NET workload.
Create a new project. Once you’ve set up the Android Emulator, you can use the Android Device Manager to create, duplicate, customize, and launch a variety of Android virtual devices. Launch the Android Device Manager from the Tools menu with: Tools > Android > Android Device Manager.
Once the Android Device Manager opens, select + New to create a new device.
You will need to give the device a name, choose the base device type from a drop-down menu, choose a processor, and OS version, along with several other variables for the virtual device. For more information, Android Device Manager Main Screen.
In the Visual Studio toolbar, choose between Debug (attaches to the application process running inside the emulator after your app starts) or Release mode (disables the debugger). Then choose a virtual device from the device drop-down menu and select the Play button в–· to run your application in the emulator.
Wormhole – подключаем смартфон к PC и транслируем изображение
Wormhole – дает возможность подключения смартфона (Android, iOS) к компьютеру с полным управлением (мышь, клавиатура). Проще говоря – Вы можете использовать свой смартфон в качестве системного блока или игровой консоли. Это как аналог Samsung Dex, только для всех желающих!
В этой записи я покажу вам, где скачать Wormhole, как установить, подключить, настроить управление и играть в мобильные игры на компьютере без эмулятора. Так же, давайте рассмотрим преимущества и для чего вам может пригодится эта программа:
- Вы можете играть в мобильные игры на компьютере без тяжелого эмулятора, при этом у вас будет мышь, клавиатура и большой экран.
- Смотрите фильмы, телевидение и остальной контент, который можно запустить на телефоне.
- Возможность быстрого обмена файлами между компьютером и телефоном.
- Работа с текстом становится проще за счет клавиатуры и большого экрана.
- Вы можете общается в мессенджерах прямо с ПК. Это удобно, когда Вы работаете и вам не нужно брать смартфон, чтоб ответить на сообщение.
- Преимущества: не грузит компьютер (хорошо для слабых ПК), нет задержки в передачи изображений, есть возможность отключения экрана на смартфоне, подключение по USB или WiFi, можно подключать Android, iOS, macOS, Windows (в скором времени Linux).
Обзор
Скачать Wormhole
Сразу хочу сказать, программа бесплатная, но есть некие ограничения в виде отсутствия управления с помощью клавиатуры. После установки у вас будет пробный период и все будет работать, но по истечению срока, управлять смартфоном Вы сможете только мышью.
Платная версия стоит 8 долларов (РАЗОВО). Мне эта программа очень понравилась, и я её купил, покупать ли вам, это ваше решение, но хочу добавить, что никакой толковой бесплатной альтернативы нет!
Перед тем, как перейти к установке, настройке и обзору, давайте установим программу на компьютер и приложение на смартфон. Делать это будем с официального сайта, оф. магазинов приложений и ссылку на 4pda я тоже оставлю:
4pda (только Windows & Android) — https://4pda.ru/forum/index.php?showtopic=1006856
Для Windows (оф. сайт) — https://er.run/download/win
Для Android:
Эмулируем Windows на Android
Новость о том, что смартфоны по мощности начинки приближаются к настольным решениям, уже облетела земной шарик столько раз, что пристыдила взрывную волну от Царь-Бомбы. У LG V10 оперативной памяти столько же, сколько на компьютере, с которого я печатаю этот текст. Так на что, позволь спросить, тратить все эти портативные мощности? Разумеется, на эмулирование! Не эмалирование, а эмулирование, не путай. Mupen64 я уже опробовал, причём экспериментальную версию. А теперь настала очередь… целой операционной системы!

Разумеется, не я первый этот логический путь размышлений прошёл, и на данный момент имеется несколько способов эмуляции Windows на смартфоне. Я поочерёдно рассмотрю каждый вариант, и если всё будет хорошо, то выделю по статье на каждый рабочий для меня способ. На данный момент их не так много.
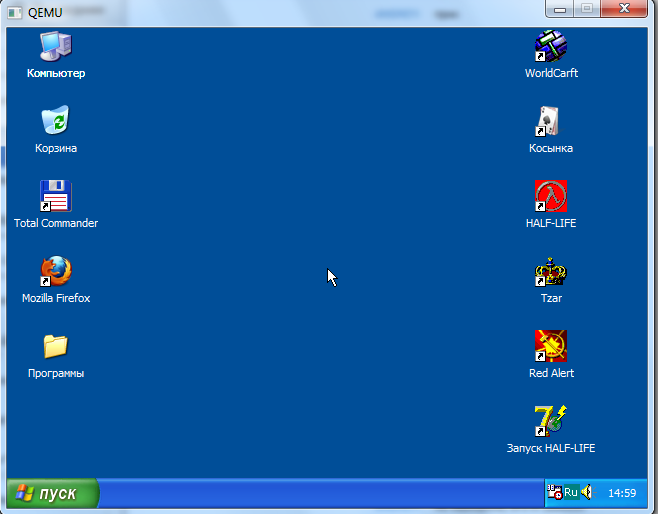
QEMU. Это бесплатная программа с открытым кодом, эмулирующая программное обеспечение Intel x86. Штучка мощная, кросс-платформенная и весьма популярная на Западе. На Android официально не портировалась, и появилась в этой статье исключительно за счёт работы энтузиастов. Впрочем, энтузиазма у них надолго не хватило, и поддержка порта на ARM прекратилась несколько лет назад. Да, текущая версия работает, причём весьма шустро. Есть только одна беда — Android 5.0 и выше не поддерживается, поэтому протестировать голый порт на моём D802 я не смогу.
Зато смогу протестировать остальные приложения, такие как Limbo и BOCHS. Limbo — тот же QEMU, но с настройками, упрощающими запуск и делающие программу более дружелюбной для неопытного пользователя. BOCHS немного отличается по схеме работы, однако использует аналогичную с QEMU SDL, в результате чего более стабилен, хотя и менее быстр.
Ещё одна возможность эмулировать Windows — через портированную на Android версию DosBox. Это самый трудоёмкий и затратный в плане интеллектуальных ресурсов способ, однако для игр он подходит неплохо. Скажем, в Diablo 2 можно играть спокойно. Да и сам DosBox, без монтированных ОС, полезен в игровом плане настолько, что по его возможностям нужно будет отдельную статью запилить.
Эмулировать я буду, понятное дело, не относительно свежие версии вроде Windows 7, а старичков — Windows 95/98/XP. Тест на работоспособность будет состоять собственно из самого запуска ОС по инструкции, выхода в Сеть, а также нескольких игр, как простых, так и тяжеловесных.
Так как «голый» QEMU я попробовать не смогу, предоставлю инструкцию, по которой можно будет установить и запустить приложение самостоятельно. Для начала понадобится, собственно, сам apk-файл за авторством человека с ником mamaich. После его установки необходимо распаковать архив SDL в корневую папку устройства. Далее, в свежераспакованной папке создаётся файл sdl.conf со следующим содержанием:
/sdl -L. -m 16 -boot c -hda 1Gb.img -usb -usbdevice tablet
После этого нужно найти образ операционной системы, переименовать его в 1Gb.img и переместить в папку SDL. После чего включаем само приложением и… молимся, чтобы всё запустилось. Для полноценной работы необходима подключенная мышка и клавиатура, но некоторые версии Windows, собранные специально для QEMU, привязывают часть функциональности грызуна на кнопки изменения громкости.
Я, признаться, впервые в жизни пожалел о том, что перешёл на Android 5. Два года назад, когда нужно было запустить Fallout 2 на D802, я сделал это именно через QEMU. Да, он вылетел спустя 10 минут, но за это время я успел хорошенько погулять свинцом по главной площади Сан-Франциско. Сейчас QEMU мне не доступен, и откатываться на предыдущую версию Android ради него я не планирую. Остаётся уповать на то, что BOCHS, Limbo и DosBox меня не разочаруют.
Top 5 Android Window Manager: Multi-Window Is Possible

Alice MJ
Jan 06, 2021 • Filed to: Fix Android Mobile Problems • Proven solutions
We all know that we can open multiple windows at the same time on the computer and one of them will be in front as the main operation window. So people are wondering if there is such a feature in Android phones and tablets. The answer is Yes.
Part 1: Top 5 Android window manager Apps
Android window manager is a system service, which is responsible for managing multiple windows. It decides which windows are visible, and how they are positioned on the screen. It also performs window transitions and animations when opening or closing an app or rotating the screen. Here are some Android window managers:
1. Multi Window
With Multi Window manager for Android, users can add their favorite apps to the sidebar and open whenever they want. The best feature is that you don’t need to root your devices in order to use this app. There are 6 stylish themes along with the app and you can choose one you like. And if you don’t know how to use this app, there is a instruction to teach you.

Android Windows Manager
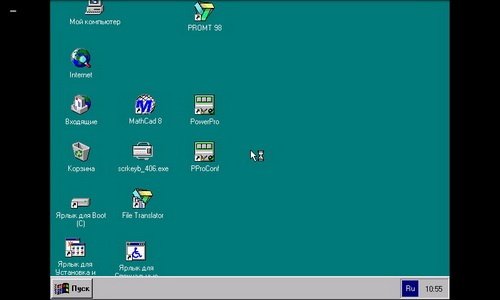
This is the perfect application for those of you who are reminiscent of computers running Windows operating system. Android Windows Manager is basically a file manager, which allows you to manage files in multiple windows. This app is designed to work on large-screen devices so if your phone doesn’t have a large screen you will probably encounter problems. You can rotate the opened windows as what you with your PC.

3. Multiwindow Launcher
Multiwindow Launcher is another free window manager. It is something like that you can see on a Mac computer, with a line of apps. And you can add your favorite apps and switch from one app to another. Some people may don’t like the line everywhere since you may accidentally tab it and go to other apps. If you don’t like ads, you have to upgrade to the pro version with some money.

4. Multi Window Manager (Phone)
This app makes all apps multi-window capable, but only adds the ones you add to the launch tray. It means you can drag an app from the launch bar and drop to any app. Then, it will launch in split screen. However, you have to root your phone to use it.

5. Multi Screen
Multi Screen is better to be called a window split manager. Users can two screens at the same time. It’s a good app for surfing online with your Android devices. You can read one webpage and another page at the same time or read one page and take notes. And for some photo lovers, they can compare one to another. And this app also supports customizing the size of the window. No root is required as well.

Part 2: Fix Multi-window Problem with Samsung on Android 4.3
Samsung has this feature with their phones. As the Android operating system updated to the 4.3 version, the multi window feature had to suffer, especially on Samsung devices like Galaxy SIII. It seems that the multi-window feature lost its functionalities. Still, there is a solution that will get your favorite feature worked in no time.
Step 1. Go to Settings — My Device — Home Screen Mode, select Easy Mode and then Apply

Step 2. Go back into Settings — My Device — Home Screen Mode, select Standard Mode and then Apply.
Step 3. Go to Settings — My Device — Display and enable Multi window by ticking the box next to this option. When the box is ticked means this option is enabled. Now if you long press the back key it should bring up the Multi window panel.

Part 3: Further Reading — Android Manager to manage all Android apps and files
Android is such a complex world, isn’t it? At times, you really need to download many third-party apps to help you realize some amazing features like multi-window. Want an reliable Android manager that allows you to view apps and files comprehensively, and install and uninstall many apps at one click?
Here comes a PC-based Android manager to help you.
![]()
Dr.Fone — Phone Manager (Android)
One Stop Solution to Manage Android files and apps
- Install and uninstall any apps from PC to Android in one click.
- Manage, export/import your music, photos, videos, contacts, SMS, Apps etc.
- Transfer iTunes to Android (vice versa).
- Manage your Android device on computer.
- Fully compatible with Android 8.0.


