- Getting started with WebView2 in Windows Forms
- Prerequisites
- Step 1 — Create a single-window app
- Step 2 — Install WebView2 SDK
- Step 3 — Create a single WebView
- Step 4 — Handle Window Resize Events
- Step 5 — Navigation
- Step 6 — Navigation events
- Step 7 — Scripting
- Step 8 — Communication between host and web content
- Next steps
- See also
- Getting in touch with the Microsoft Edge WebView team
- Введение в Windows Forms
- Создание графического приложения
- Запуск приложения
Getting started with WebView2 in Windows Forms
In this article, get started creating your first WebView2 app and learn about the main features of WebView2. For more information on individual APIs, navigate to API reference.
Prerequisites
Ensure you install the following list of pre-requisites before proceeding.
WebView2 Runtime or any Microsoft Edge (Chromium) non-stable channel installed on supported OS (currently Windows 10, Windows 8.1, and Windows 7).
The WebView team recommends using the Canary channel and the minimum required version is 82.0.488.0.
WebView2 currently does not support the .NET 5 and .NET Core designers.
Step 1 — Create a single-window app
Start with a basic desktop project that contains a single main window.
In Visual Studio, choose Windows Forms .NET Framework App > Next.

Enter values for Project name and Location. Choose .NET Framework 4.6.2 or later.

To create your project, choose Create.
Step 2 — Install WebView2 SDK
Use NuGet to add the WebView2 SDK to the project.
Hover on the project, open the contextual menu (right-click), and choose Manage NuGet Packages. .
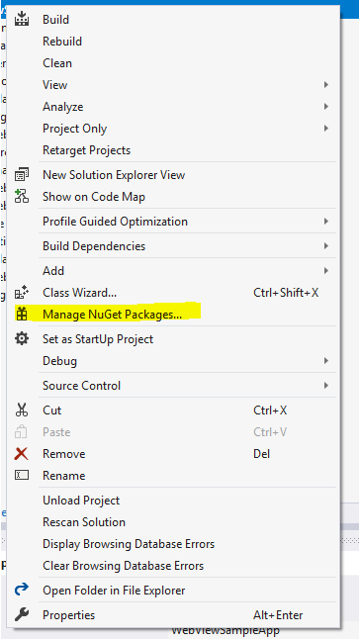
Manage NuGet Packages
In the search bar, type Microsoft.Web.WebView2 > choose Microsoft.Web.WebView2.

Start developing apps using the WebView2 API. To build and run the project, select F5 . The running project displays an empty window.
![]()
Step 3 — Create a single WebView
Add a WebView to your app.
Open the Windows Forms Designer.
Search for WebView2 in the Toolbox.
If you are using Visual Studio 2017, by default WebView2 may not display in the Toolbox. To enable the behavior, choose Tools > Options > General > set the Automatically Populate Toolbox setting to True .
Drag and drop the WebView2 control into the Windows Forms App.

Toolbox displaying WebView2
Set the (Name) property to webView .

Properties of the WebView2 control
The Source property sets the initial URI displayed in the WebView2 control. Set the Source property to https://www.microsoft.com .

The Source property of the WebView2 control
To build and run your project, select F5 . Ensure your WebView2 control displays https://www.microsoft.com.

If you are working on a high DPI monitor, you may have to configure your Windows Forms app for high DPI support.
Step 4 — Handle Window Resize Events
Add a few more controls to your Windows Forms from the toolbox, and then handle window resize events appropriately.
In the Windows Forms Designer, open the Toolbox.
Drag and Drop a TextBox into the Windows Forms App. Name the TextBox addressBar in the Properties Tab.
Drag and Drop a Button into the Windows Forms App. Change the text in the Button to Go! and name the Button goButton in the Properties Tab.
The app should look like the following image in the designer.

In the Form1.cs file, define Form_Resize to keep the controls in place when the App Window is resized.
To build and run your project, select F5 . Ensure the app displays similar to the following screenshot.

Step 5 — Navigation
Add the ability to allow users to change the URL that the WebView2 control displays by adding an address bar to the app.
Select F5 to build and run your project. Confirm that the app displays similar to the following screenshot.
In the Form1.cs file, to add the CoreWebView2 namespace, insert the following code snippet at the top.
In Form1.cs add the CoreWebView2 namespace by inserting the following code snippet at the top of Form1.cs .
In the Windows Forms Designer, double-click on the Go! button to create the goButton_Click method in the Form1.cs file. Copy and paste the following snippet inside the function. Now, the goButton_Click function navigates the WebView to the URL entered in the address bar.
To build and run your project, select F5 . Enter a new URL in the address bar, and select Go. For example, enter https://www.bing.com . Ensure the WebView2 control navigates to the URL.
Ensure a complete URL is entered in the address bar. An ArgumentException is thrown if the URL does not start with http:// or https://

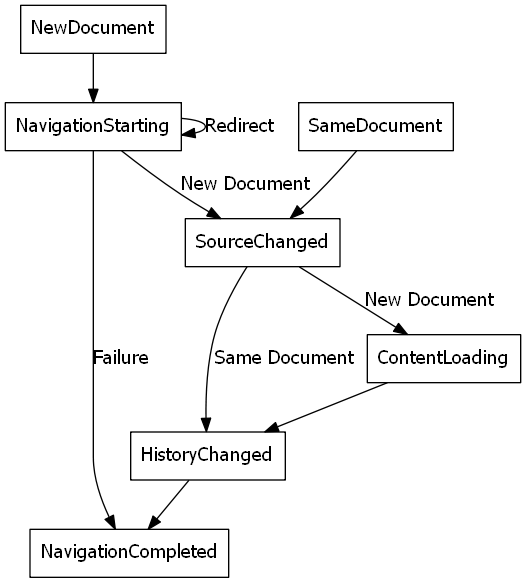
Step 6 — Navigation events
During webpage navigation, the WebView2 control raises events. The app that hosts WebView2 controls listens for the following events.
- NavigationStarting
- SourceChanged
- ContentLoading
- HistoryChanged
- NavigationCompleted
For more information, navigate to Navigation Events.
When an error occurs, the following events are raised and may depend on navigation to an error webpage.
- SourceChanged
- ContentLoading
- HistoryChanged
If an HTTP redirect occurs, there are multiple NavigationStarting events in a row.
To demonstrate how to use the events, start by registering a handler for NavigationStarting that cancels any requests not using HTTPS.
In the Form1.cs file, update the constructor to match the following code snippet and add the EnsureHttps function.
In the constructor, EnsureHttps is registered as the event handler on the NavigationStarting event on the WebView2 control.
To build and run your project, select F5 . Ensure when navigating to an HTTP site, the WebView remains unchanged. However, the WebView will navigate to HTTPS sites.
Step 7 — Scripting
You may use host apps to inject JavaScript code into WebView2 controls at runtime. You may task WebView to run arbitrary JavaScript or add initialization scripts. The injected JavaScript applies to all new top-level documents and any child frames until the JavaScript is removed. The injected JavaScript is run with specific timing.
- Run it after the creation of the global object.
- Run it before any other script included in the HTML document is run.
As an example, add scripts that send an alert when a user navigates to non-HTTPS sites. Modify the EnsureHttps function to inject a script into the web content that uses ExecuteScriptAsync method.
To build and run your project, select F5 . Ensure the app displays an alert when you navigate to a website that doesn’t use HTTPS.

Step 8 — Communication between host and web content
The host and web content may use postMessage to communicate with each other as follows:
- Web content in a WebView2 control may use window.chrome.webview.postMessage to post a message to the host. The host handles the message using any registered WebMessageReceived on the host.
- Hosts post messages to web content in a WebView2 control using CoreWebView2.PostWebMessageAsString or CoreWebView2.PostWebMessageAsJSON . These messages are caught by handlers added to window.chrome.webview.addEventListener .
The communication mechanism passes messages from web content to the host using native capabilities.
In your project, when the WebView2 control navigates to a URL, it displays the URL in the address bar and alerts the user of the URL displayed in the WebView2 control.
In the Form1.cs file, update your constructor and create an InitializeAsync function to match the following code snippet. The InitializeAsync function awaits EnsureCoreWebView2Async because the initialization of CoreWebView2 is asynchronous.
After CoreWebView2 is initialized, register an event handler to respond to WebMessageReceived . In the Form1.cs file, update InitializeAsync and add UpdateAddressBar using the following code snippet.
In order for the WebView to send and respond to the web message, after CoreWebView2 is initialized, the host injects a script in the web content to:
- Send the URL to the host using postMessage .
- Register an event handler to print a message sent from the host.
In the Form1.cs file, update InitializeAsync to match the following code snippet.
To build and run the app, select F5 . Now, the address bar displays the URI in the WebView2 control. Also, when you successfully navigate to a new URL, the WebView alerts the user of the URL displayed in the WebView.

Congratulations, you built your first WebView2 app.
Next steps
To continue learning more about WebView2, navigate to the following resources.
See also
- For a comprehensive example of WebView2 capabilities, navigate to WebView2Samples.
- For more information about WebView2, navigate to WebView2 Resources.
- For detailed information about the WebView2 API, navigate to API reference.
Getting in touch with the Microsoft Edge WebView team
Share your feedback to help build richer WebView2 experiences. To submit feature requests or bugs, or search for known issues, navigate to the Microsoft Edge WebView feedback repo.
Введение в Windows Forms
Для создания графических интерфейсов с помощью платформы .NET применяются разные технологии — Window Forms, WPF, приложения для магазина Windows Store (для ОС Windows 8/8.1/10). Однако наиболее простой и удобной платформой до сих пор остается Window Forms или формы. Данное руководство ставит своей целью дать понимание принципов создания графических интерфейсов с помощью технологии WinForms и работы основных элементов управления.
Создание графического приложения
Для создания графического проекта нам потребуется среда разработки Visual Studio. Поскольку наиболее распространенная пока версия Visual Studio 2013, то для данного руководства я буду использовать бесплатную версию данной среды Visual Studio Community 2013 которую можно найти на странице https://www.visualstudio.com/en-us/products/visual-studio-community-vs.aspx.
После установки среды и всех ее компонентов, запустим Visual Studio и создадим проект графического приложения. Для этого в меню выберем пункт File (Файл) и в подменю выберем New — > Project (Создать — > Проект). После этого перед нами откроется диалоговое окно создания нового проекта:

В левой колонке выберем Windows Desktop , а в центральной части среди типов проектов — тип Windows Forms Application и дадим ему какое-нибудь имя в поле внизу. Например, назовем его HelloApp. После этого нажимаем OK.
После этого Visual Studio откроет наш проект с созданными по умолчанию файлами:
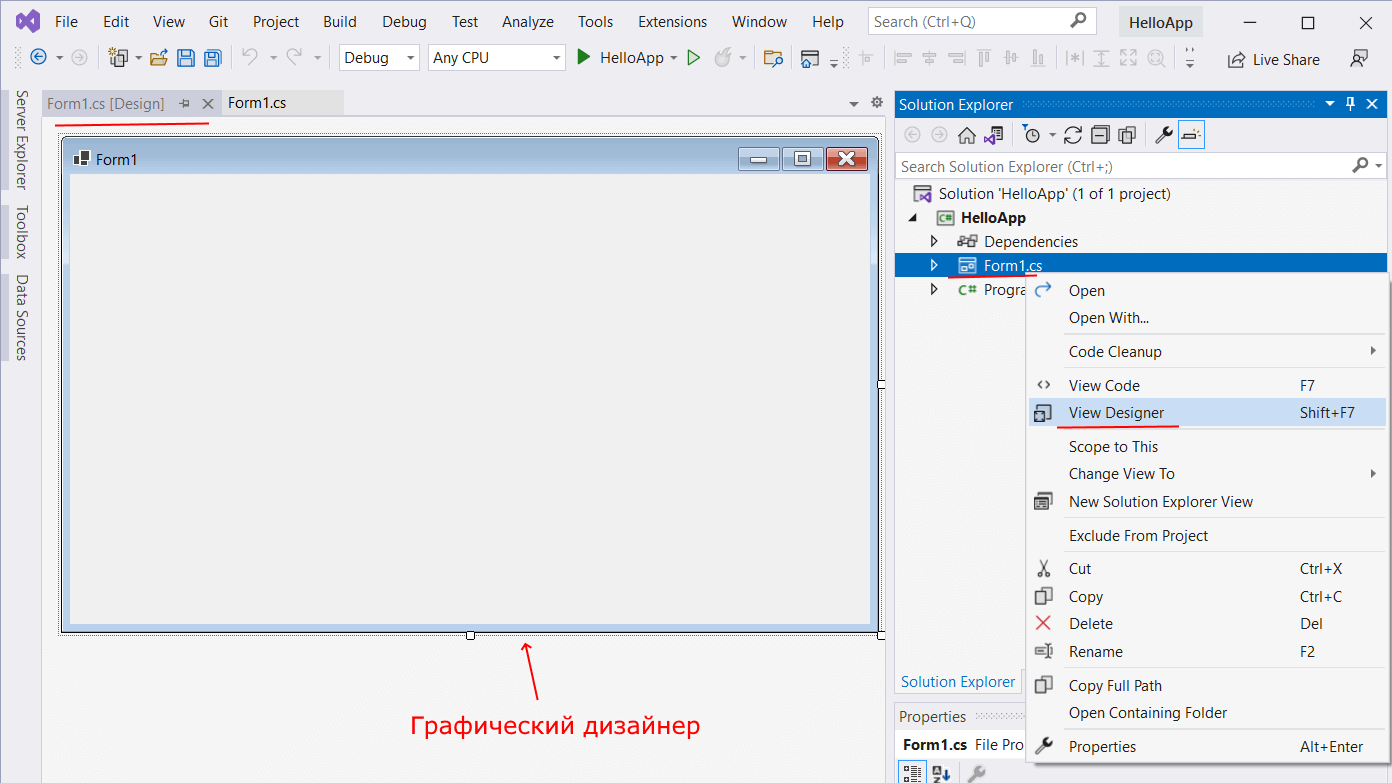
Большую часть пространства Visual Studio занимает графический дизайнер, который содержит форму будущего приложения. Пока она пуста и имеет только заголовок Form1. Справа находится окно файлов решения/проекта — Solution Explorer (Обозреватель решений). Там и находятся все связанные с нашим приложением файлы, в том числе файлы формы Form1.cs.
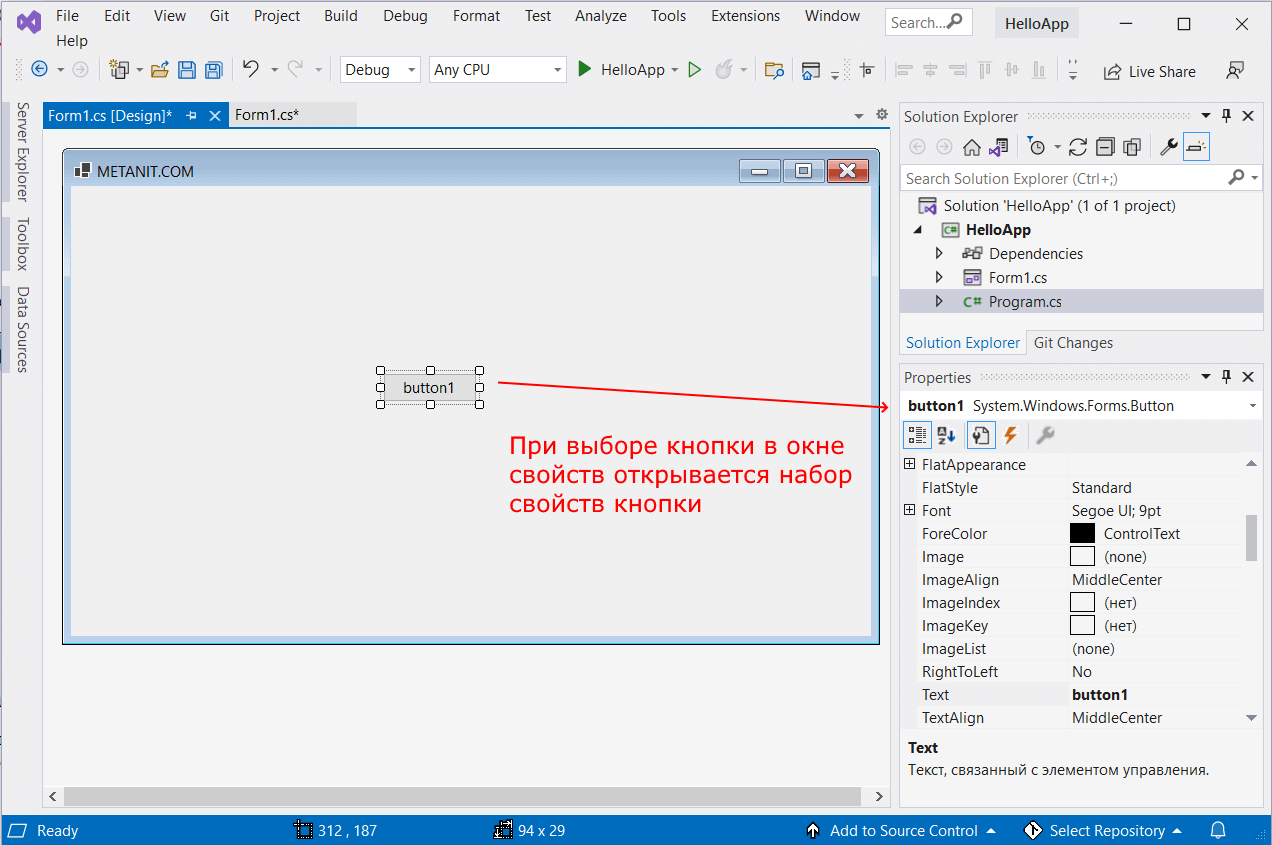
Внизу справа находится окно свойств — Properties. Так как у меня в данный момент выбрана форма как элемент управления, то в этом поле отображаются свойства, связанные с формой.
Теперь найдем в этом окне свойство формы Text и изменим его значение на любое другое:

Таким образом мы поменяли заголовок формы. Теперь перенесем на поле какой-нибудь элемент управления, например, кнопку. Для этого найдем в левой части Visual Studio вкладку Toolbox (Панель инструментов) . Нажмем на эту вкладку, и у нас откроется панель с элементами, откуда мы можем с помощью мыши перенести на форму любой элемент:
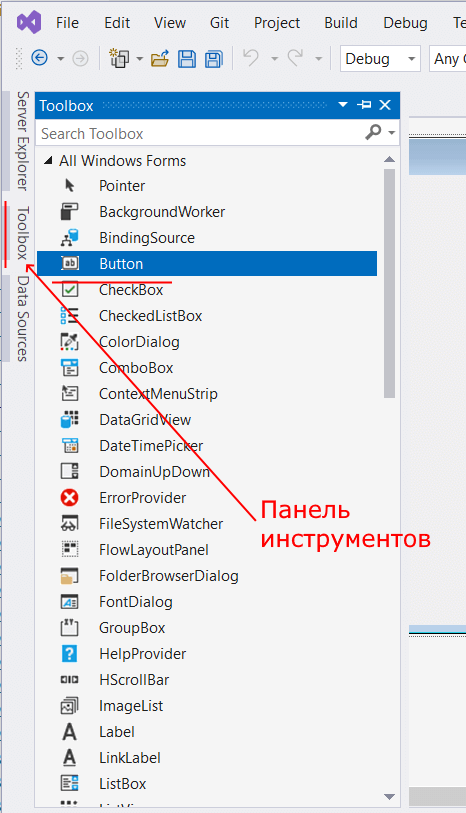
Найдем среди элементов кнопку и, захватив ее указателем мыши, перенесем на форму:
Это визуальная часть. Теперь приступим к самому программированию. Добавим простейший код на языке C#, который бы выводил сообщение по нажатию кнопки. Для этого мы должны перейти в файл кода, который связан с этой формой. Если у нас не открыт файл кода, мы можем нажать на форму правой кнопкой мыши и в появившемся меню выбрать View Code (Посмотреть файл кода):
Однако воспользуемся другим способом, чтобы не писать много лишнего кода. Наведем указатель мыши на кнопку и щелкнем по ней двойным щелчком. Мы автоматически попадаем в файл кода Form1.cs, который выглядит так:
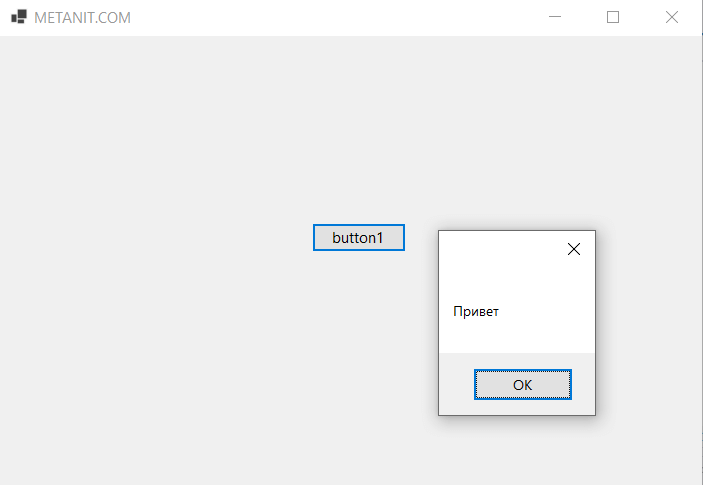
Добавим вывод сообщения по нажатию кнопки, изменив код следующим образом:
Запуск приложения
Чтобы запустить приложение в режиме отладки, нажмем на клавишу F5 или на зеленую стрелочку на панели Visual Studio. После этого запустится наша форма с одинокой кнопкой. И если мы нажмем на кнопку на форме, то нам будет отображено сообщение с приветствием.
После запуска приложения студия компилирует его в файл с расширением exe. Найти данный файл можно, зайдя в папку проекта и далее в каталог bin/Debug или bin/Release
Рассмотрев вкратце создание проекта графического приложения, мы можем перейти к обзору основных компонентов и начнем мы с форм.


