- Top 11 Image Viewers for Ubuntu and other Linux
- Best Image Viewers for Linux
- 1. Nomacs
- 2. Eye Of Gnome
- 3. Eye Of MATE Image Viewer
- 4. Geeqie
- 5. gThumb Image Viewer
- 6. Gwenview
- 7. Mirage
- 8. KPhotoAlbum
- 9. Shotwell
- 10. Ristretto
- 11. digiKam
- About Ankush Das
- How to view images from Linux terminal
- 1) Viewing images from terminal using display command
- 1.a) How to Install ImageMagick?
- 1.b) Viewing images with display command
- 2) How to display images from the terminal using fim command
- 2.a) Installing fim in Ubuntu/Debain
- 2.b) Viewing images with fim
- Closing Notes
Top 11 Image Viewers for Ubuntu and other Linux
Last updated August 10, 2020 By Ankush Das 46 Comments
It is probably a good idea to stick with the default system image viewer unless you want a specific feature (that’s missing) or if you crave for better user experience.
However, if you like to experiment, you may try out different image viewers. You could end up loving the new user experience of viewing the images or get hooked on to the extra features offered.
In this article, we have mentioned every kind of image viewers ranging from the simplest to the most advanced tool available for Ubuntu or any other Linux distro.
Best Image Viewers for Linux

Note: You should be able to find these image viewers listed in your software center or AppCenter. If you don’t find it there, we’ve mentioned the instructions for manual installation as well.
1. Nomacs

What’s good about it?
- Simple & Fast UI
- Image adjustment tools (color & size)
- Geolocation of the image
- Metadata information panel
- LAN Synchronization
- Fullscreen mode
A free and open source image viewer that does not come baked with any fancy features. However, Nomacs does support most of the common image file formats if you want to use it.
The user interface is very simple but it does offer some essential features for image adjustment (color, brightness, resize, crop, & cut). In addition to that, it also supports fullscreen mode, histogram, and a lot of different panels that you can toggle for metadata, edit history, and more such information.
How do I install it?
You can find it listed in the software center/AppCenter for easy installation. If you want to install it via terminal, you can take a look at their GitHub page or type in the command below:
2. Eye Of Gnome

What’s good about it?
- A dead simple image viewer
- Slideshow style (if that’s what you like)
- An image viewer tailored for GNOME desktop environment
This is a classic image viewer developed as a part of The GNOME Project a lot of years ago. Do note that this isn’t actively maintained anymore. But, it still works on Ubuntu’s latest LTS release and several other Linux distros.
If you want a dead simple image viewer where you browse through the images in a slideshow-type UI and get the meta info in the sidebar, Eye of GNOME should be your choice. One of the best for GNOME desktop environment!
How do I install it?
To manually install it on Ubuntu (or Ubuntu-based Linux distros) type in the following command:
For other distros and source, you should follow the GitHub page.
3. Eye Of MATE Image Viewer

What’s good about it?
- A simple image viewer
- Plugins supported
- An image viewer tailored for MATE desktop environment
Yet another simple image viewer with the basic functionalities of slideshow view and rotating images.
Even if doesn’t support any image manipulation feature, it does support numerous image file formats and can handle big image files.
How do I install it?
For Ubuntu/Ubuntu-based distros, type in the following command:
If you need help for other distros and the source, follow their GitHub page.
4. Geeqie

What’s good about it?
- A flexible image manager that supports plugins (you’ll find other image viewers supported as well)
- Information about the color profile
Geeqie is an impressive image manager and viewer. It supports other image viewers as plugins but does not offer any image manipulation tools.
If you need to know the color profile, image info, and manage/view a collection of images. It should be a good choice for that.
How do I install it?
Type in the terminal:
For the source, you can refer the GitHub page.
5. gThumb Image Viewer

What’s good about it?
- An all-in-one image viewer with the ability to manage, edit and view the images
- Reset EXIF orientation
- Convert image formats
- Find duplicate images
gThumb is an amazing image viewer with a lot of features. You get an impressive user interface to view/manage your images along with the basic image manipulation tools (crop, resize, color, and so on.)
You can also add comments to an image or reset the EXIF orientation info. It also gives you the ability to find duplicate images and convert image formats.
How do I install it?
You can enter this command in the terminal:
If that doesn’t work, head to the GitHub page for more info.
6. Gwenview

What’s good about it?
- A basic image viewer with common image manipulation tools to rotate and resize
- Feature extension using KIPI plugins
Gwenview is just another basic image viewer tailored for KDE desktop environment. However, you can install it on other desktop environments as well.
If you utilize the Konqueror web browser, you can use it as an embedded image viewer. Here, you can add comments/description to the image as well. In addition, it supports KIPI plugins.
How do I install it?
Type the following in the terminal to install it:
For the source, check out their GitHub page.
7. Mirage

What’s good about it?
- Customizable interface even it is a basic UI
- Basic image manipulation tools
- Command-line access
If you want a decent image viewer along with the ability to access it via command line, a fullscreen mode, slideshow mode, basic editing tools to resize/crop/rotate/flip, and a configurable interface – Mirage would be the simplest option.
It is a very fast and capable image viewer that supports a lot of image formats that include png, jpg, svg, xpm, gif, bmp, and tifff.
How do I install it?
You need to type in the following:
For the source code and other installation instructions, refer the GitHub page.
8. KPhotoAlbum

What’s good about it?
- Perfect image manager to tag and manage the pictures
- Demo databases
- Image compression
- Merge/Remove images to/from Stack
KPhotoAlbum is not exactly a dedicated image viewer but a photo manager to tag and manage the pictures you’ve got.
You can opt for slideshows to view the image along with the ability to compress images and search them using the labels/tags.
How do I install it?
You can install it via the terminal by typing in:
In either case, you can check for the official instructions on their website to get it installed on your Linux distro.
9. Shotwell

What’s good about it?
- Red-eye correction tool
- Upload photos to Facebook, Flickr, etc.
- Supports RAW file formats as well
Shotwell is a feature-rich photo manager. You can view and manage your photos. Although you do not get all the basic image manipulation tools baked in it – you can easily crop and enhance your photos in a single click (auto brightness/contrast adjustments).
How do I install it?
Go to the terminal and enter the following (Ubuntu/Ubuntu-based distros):
For more information, check out their GitHub page.
10. Ristretto

What’s good about it?
- A dead simple image viewer
- Fullscreen mode & Slideshow
A very straightforward image viewer where you just get the ability to zoom, view in fullscreen mode and view the images as a slideshow.
It is tailored for Xfce desktop environment – but you can install it anywhere.
How do I install it?
Even though it’s built for Xfce desktop environment, you can install it on any Ubuntu/Ubuntu-based distro by typing the following command in the terminal:
11. digiKam

What’s good about it?
- An all-in-one image viewer with advanced photo management features (editing/managing/viewing)
- Batch Queue Manager
- Light Table
digiKam is an advanced photo manager with some additional image manipulation tools. You get the ability to configure the database using SQLite or MySQL.
To enhance your experience of viewing images, it lets you choose the reduced version of images while you preview them. So, that becomes super fast even if you have a lot of images. You get several import/export options via Google, Facebook, Imgur, and so on. If you want a feature-rich image viewer, this is the one you should have installed.
How do I install it?
Type in the following command:
For more information, visit their GitHub page.
Wrapping Up
So, no matter whether you want a different user experience or a rich set of features and powerful tools to manage your photos – there’s something for everyone.
Which image viewer do you prefer to use? Is it the system’s default viewer?
Let us know in the comments below.
Like what you read? Please share it with others.
Filed Under: List Tagged With: image
About Ankush Das
A passionate technophile who also happens to be a Computer Science graduate. You will usually see cats dancing to the beautiful tunes sung by him.
I like pix, which is preinstalled with linux mint, it works fast and opens pretty much anything – a lot of image viewers can’t open webp files for example
all of them are the mainstream / default image viewers.
if nothing for you was here i suggest you use feh or xnview.
I have been looking for a viewer that can match my ACDC95 and cannot find. What I need is : “copy to” and “move to” options, image info bar in full screen, “fit to screen”, “rotate”, rename image” – so one would say basic options, but I found them only in XnView. XnView has everything, but there’s a mess in the preferences and it is way slower than 25 years old ACDC95. I will be looking further.
I have found an image viewer, its name is: Phototonic.
This program should be more popular as it’s worth it.
Programs like Gwenview or Geeqie, although still decent, don’t have the option to loop index after reaching first/last image. Geeqie, after renaming file, changes index position of the viewer (no options).
Irfanview with Wine is slower than Phototonic. ACDSee and Faststone (also with Wine) display large images more briskly, but the image quality is compromised (this is where the speed comes from). In addition, none of those Windows programs offer custom keyboard shortcuts.
Older versions of Xnview (81+) are not than bloated and, at least on my machine, 40% quicker than the newest version. That means that Phototonic and older Xnview are equal in terms of speed & quality. Unfortunately, Xnview’s default settings are there to show what the program can do, which means 90% of the users would need to use the ‘properties’ which are even more unfriendly. You need to learn by heart where the needed option is tucked under. If you reinstall your system frequently, Xnview will be a pain in dem Hintern.
Phototonic’s default setting are usable right off the bat. Keyboard customization is 3x easier than in Xnview. Options can be found with eyes closed in the settings. It has all I need and no much more. The program is very small and available with “sudo apt-get install phototonic”.
Thanks, Photonic is really great! Super fast, very good image quality. My new default viewer.
Источник
How to view images from Linux terminal
Linux has many GUI applications for viewing images. But have you ever tried a CLI application to view them or do you know if one exists?
Fortunately, while working with the ImageMagick tool I stumbled upon a command to view an image from the terminal.
The command name is “display”, which is part of the ImageMagick tool. This is a great tool that allows NIX users to view images from the terminal.
Also, I got another great tool called FIM for this purpose. We will show you how to install and use it to view images from the Linux terminal.
These commands use the system’s framebuffer to display images directly from the command line.
1) Viewing images from terminal using display command
ImageMagick is a free and open source, feature-rich, command-line based image manipulation tool. It is used to create, edit, compose, or convert bitmap images.
It can read and write images in a variety of formats (over 200) including PNG, JPEG, GIF, PDF, SVG, etc.
It can resize, mirror, rotate, transform images, adjust image colors, apply various special effects, etc. It also supports batch process, which allow you to process several images at once.
1.a) How to Install ImageMagick?
The ImageMagick package is included in the official repository of most Linux distributions. Use the distribution package manager to install it.
Make a note: Make sure you already have “Development Tools” installed on your Linux system as a prerequisite for this.
For RHEL/CentOS 6/7 systems, use the yum command to install ImageMagick:
For RHEL/CentOS 8 and Fedora systems, use the dnf command to install ImageMagick:
For Debian/Ubuntu systems, use the apt command or apt-get command to install ImageMagick:
For openSUSE systems, use the zypper command to install ImageMagick:
1.b) Viewing images with display command
To view any image file, run the ‘display’ command as follows. You can close the image by pressing the «Esc/q» button.

If you want to open an image with the specified size of the window, use the «-geometry» flag:
You can also input position information of the image with the ‘display’ command. The below command opens your image ‘800’ pixels from the top and ‘800’ pixels from the top left corner of your desktop:
If you want to ‘resize’ the image with the display command, use the following format.
Alternatively, you can use ‘%’ to resize the image:
2) How to display images from the terminal using fim command
FIM is a lightweight global image viewer designed specifically for Linux. But it is not limited to Linux and can be configured to run on other OS such as MS-Windows.
It is highly customizable and scriptable image viewer for users who are familiar with software’s like the VIM text editor.
It displays the image in full screen and can be easily controlled using the keyboard shortcuts. It’s a lightweight tool as it only depends on a few libraries.
It can open many file formats and can display images in the following video modes:
- Graphically, with the Linux framebuffer device
- Graphically, under X/Xorg, using the SDL library
- Graphically, under X/Xorg, using the Imlib2 library
- Rendered as ASCII Art in any textual console, using the AAlib library
The right video mode gets auto-detected or selected at runtime, and may be opted in/out before build at configure time, if desired. FIM stands for Fbi IMproved, which is the fork of the Fbi Image viewer.
2.a) Installing fim in Ubuntu/Debain
FIM can be easily installed on Debian/Ubuntu based systems as the package is available in the distribution official repository. For other distributions, you may need to compile it from the source.
2.b) Viewing images with fim
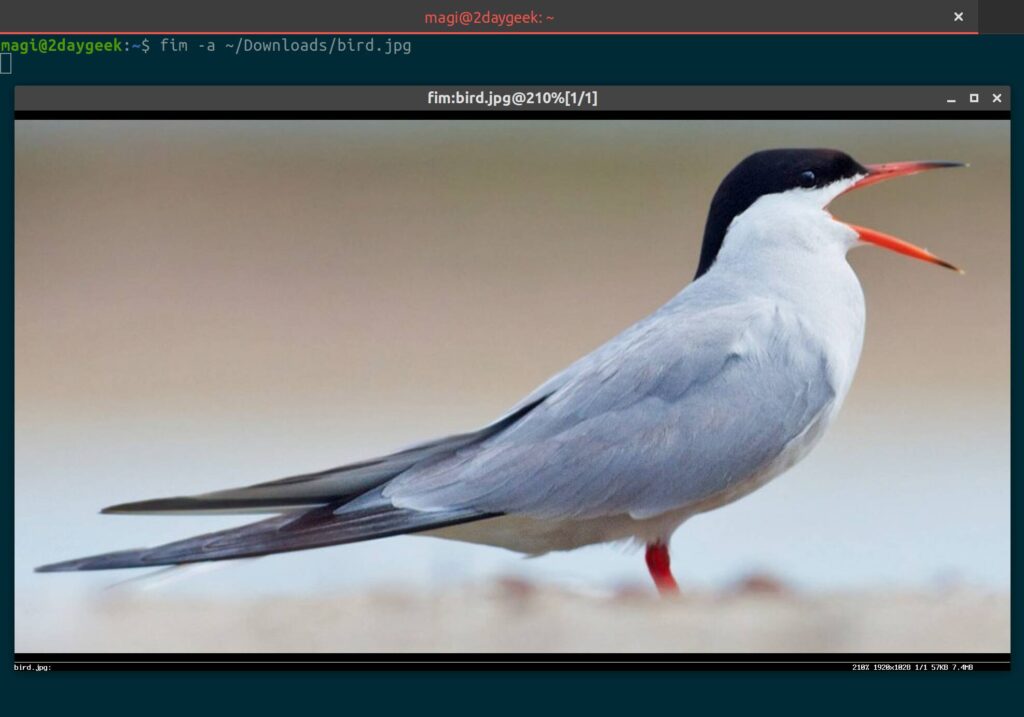
Once installed, you can display an image using the following command:
You can automatically zoom an image using the «-a» option:
If you want to open multiple image files in the current directory, use the wildcard to open them all. Use the “Pageup/Down” keyboard shortcuts to move to the next or previous image:
To view the image in ASCII format, you can use the “-t” flag:
The below keyboard shortcuts allow you to control the images:
- PageUp/Down : Prev/Next image
- +/- : Zoom in/out
- a : Autoscale
- w : Fit to width
- ESC/q : Quit
Closing Notes
In this article, we have explained various CLI commands that can be used to view images on a Linux terminal.
If you have any questions or feedback, feel free to comment below and we will get back to you as soon as we can. Happy Learning!
Источник


