- TCPView v4.0
- Introduction
- Using TCPView
- Using Tcpvcon
- Microsoft TCPView KB Article
- How to Check for Ports in Use in Windows 10
- Use Nirsoft CurrPorts
- Command Prompt Method
- TCPView
- How to Check Open Ports in Windows 10 Using CMD
- Way to Check Open Ports in Windows 10 Using CMD
- To find port-use with process names
- To find port-use with the process identifiers
- Scanning Open Ports in Windows: A Quick Guide
- NetStat.exe
- Using Task Manager to find which application is using the open port
- Tasklist.exe allows you to find the application using the open port from the command prompt
- TCPView.exe
- PortQry.exe
- Conclusion
- Get your free 30-day trial
- Get your free 30-day trial
TCPView v4.0
By Mark Russinovich
Published: March 23, 2021
 В Download TCPView (1.4 MB)
Run now from Sysinternals Live.
Introduction
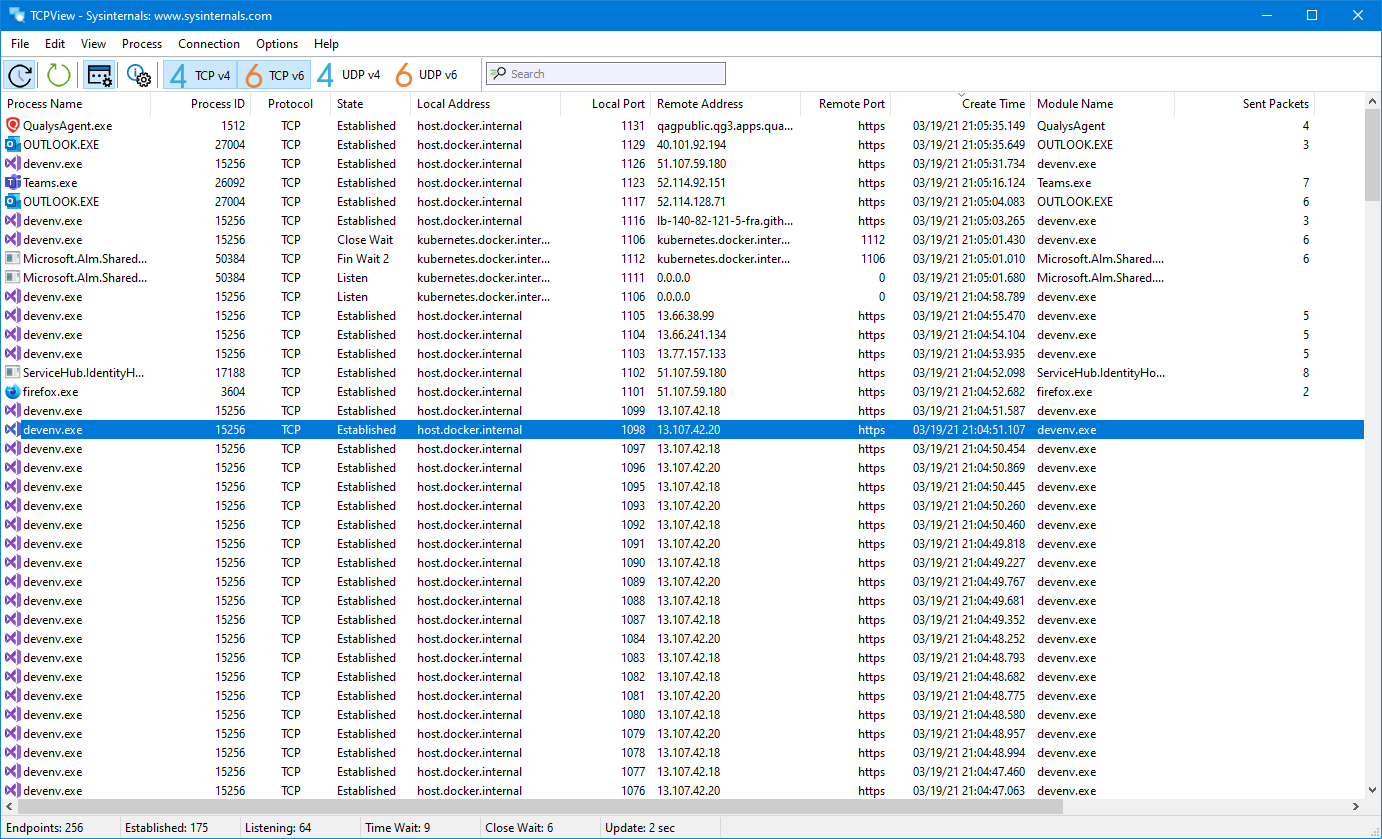
TCPView is a Windows program that will show you detailed listings of all TCP and UDP endpoints on your system, including the local and remote addresses and state of TCP connections. On Windows Server 2008, Vista, and XP, TCPView also reports the name of the process that owns the endpoint. TCPView provides a more informative and conveniently presented subset of the Netstat program that ships with Windows. The TCPView download includes Tcpvcon, a command-line version with the same functionality.
Using TCPView
When you start TCPView it will enumerate all active TCP and UDP endpoints, resolving all IP addresses to their domain name versions. You can use a toolbar button or menu item to toggle the display of resolved names. On Windows XP systems, TCPView shows the name of the process that owns each endpoint.
By default, TCPView updates every second, but you can use the Options|Refresh Rate menu item to change the rate. Endpoints that change state from one update to the next are highlighted in yellow; those that are deleted are shown in red, and new endpoints are shown in green.
You can close established TCP/IP connections (those labeled with a state of ESTABLISHED) by selecting File|Close Connections, or by right-clicking on a connection and choosing Close Connections from the resulting context menu.
You can save TCPView’s output window to a file using the Save menu item.
Using Tcpvcon
Tcpvcon usage is similar to that of the built-in Windows netstat utility:
Usage:
| Parameter | Description |
|---|---|
| -a | Show all endpoints (default is to show established TCP connections). |
| -c | Print output as CSV. |
| -n | Don’t resolve addresses. |
Microsoft TCPView KB Article
This Microsoft KB article references TCPView:
В Download TCPView (1.4 MB)
Run now from Sysinternals Live.
Runs on:
- Client: Windows 8.1 and higher.
- Server: Windows Server 2012 and higher.
—>
How to Check for Ports in Use in Windows 10

At any one time, there’s a whole bunch of information being sent between your Windows 10 PC and the endless void of the Internet. This is done using a process whereby network-dependent processes seek out TCP and UDP ports, which they use to communicate with the Internet. First, your data gets sent to remote ports at the destination or website your processes are trying to connect to, then it gets received at local ports back on your PC.
Most of the time, Windows 10 knows how to manage ports and ensure that traffic is being directed through the right ports so that those processes can connect with what they need to. But sometimes two processes may be assigned to one port, or maybe you just want to get a better picture of your network traffic and what’s going in and out.
That’s why wrote this guide that shows you how to get an overview of your ports and see which applications are using which ports.
Use Nirsoft CurrPorts
NirSoft is one of the best indie software developers, giving us great utilities, like PassView and WirelessKeyView. While some people will prefer checking their ports without installing third-party software (in which case, scroll down to the CMD method), CurrPorts is easily the fastest and most convenient way to view your ports.

Once you’ve installed CurrPorts, just open it to see a list of all your ports currently in use. If you’re looking for local ports in use, just click the “Local Port” column at the top to order the list by port number (handy if you’re looking for a specific one). You can do the same thing with remote ports, too.
If you want to really find specific ports, click the “Advanced Filters” icon at the top and enter your string in the format they suggest. It should look something like the below image.

Hit OK when you’re ready, and the list will filter down to your queries.
Command Prompt Method
The integrated – though not necessarily the simplest – way to check open ports is to use the trusty command prompt.
Click the Start button, type cmd , then right-click “Command Prompt” when it shows up in the search results. Click “Run as administrator.”
Once you’re in the elevated command prompt, enter the following command:
This will steadily bring up a list of ports that is probably quite long, along with the Windows processes that are using them. (You can press Ctrl + A , then Ctrl + C to copy all information to the clipboard.) On the average PC, there will be two main local IP addresses that contain ports on your PC.

The first, in our case, is “127.0.0.1.” This IP address is otherwise known as “localhost” or a “loopback address,” and any process listening to ports here is communicating internally on your local network without using any network interface. The actual port is the number you see after the colon. (See image below.)

The bulk of your processes will probably be listening to ports prefixed with “192.168.xxx.xxx,” which is your IP address. This means the processes you see listed here are listening for communications from remote Internet locations (such as websites). Again, the port number is the number after the colon.

TCPView
If you don’t mind installing a third-party app and want to have more control over what’s going on with all your ports, you can use a lightweight app called TCPView. This immediately brings up a list of processes and their associated ports.

What make this better than the command prompt is that you can actively see the ports opening, closing and sending packets. Just look for the green, red and yellow highlights. You can also reorder the list by clicking the column headings, making it easier to find the process you want or two separate processes vying for the same port.
If you do find a process or connection you want to close, just right-click that process. You can then select “End process,” which is exactly the same function as the one in Windows task manager. Or you can click “Close Connection” to leave the process open but stop it from listening on a given port.

If you’re having some trouble in Windows 10, then see whether a Windows update may be causing it. We also have a handy guide for managing the health of your hard drive in Windows 10.
Related:
Content Manager at Make Tech Easier. Enjoys Android, Windows, and tinkering with retro console emulation to breaking point.
How to Check Open Ports in Windows 10 Using CMD
In this article, you will see the procedure to Check Open Ports in Windows 10 Using CMD (or Command Prompt). When an app uses a TCP/IP port on your device in order to access a network, that port would be locked out – no other program may be able to use it. And while everything related to ports and traffic is usually taken care of on its own by the system, there might be situations when you might have to know the application that is blocking a specific port.
Here you can find some built-in ways to do so- specifically the ways to check open ports using CMD or Command Prompt. Apart from using the Command Prompt, you can even consider using some third-party applications that can easily list the ports and the apps or processes that are using them.
Way to Check Open Ports in Windows 10 Using CMD
Here is how to check open Ports in Windows 10 Using CMD –
To find port-use with process names
Follow along with these steps to get the list of ports in use and the names of the processes tied up with them respectively.
Step-1: Open Run dialog box by pressing Win+R hotkeys. Type cmd in the text box and hit Shift + Ctrl + Enter keys altogether.
Step-2: Hit Yes on the UAC prompt.
Step-3: This will let you access an elevated Command Prompt on the screen. Here, type in or copy-paste the below-given code and hit Enter.
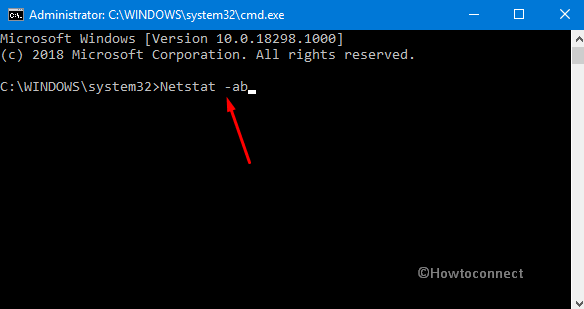
Wait for the entire result to load. Once you successfully run this command, simply scroll down to the port number you want to check. As shown below, you’ll be able to see the process’ name respectively below the port it is linked to.

To find port-use with the process identifiers
Usually, identifying the application which represented by a specific process name can be tricky. This method might help you identify the application that a process relates to.
Here also, first of all, launch the “Command Prompt” with admin rights using any of your preferred methods.
Copy-paste or type the below code and ensure to hit Enter.
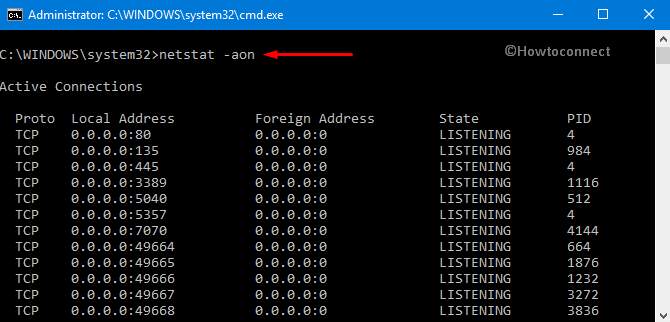
Finally, the result now will contain the “PID” or the process identifiers instead of the names. Simply scroll down to the port you want to check and note the PID corresponding to it.
Moving ahead, open Task Manager. To do so, perform a right-click on the taskbar and select the option namely “Task Manager”.
Go to the Processes tab. Right-click on the Name column and choose PID (see snapshot).
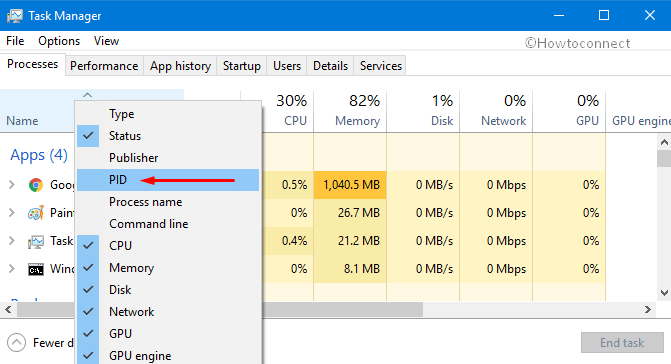
You just need to find the PID you note earlier. The ‘Name’ column corresponding to the PID must reveal the application associated with the port.
Scanning Open Ports in Windows: A Quick Guide
 This post has been reviewed and the information is still relevant as of June 2018.
When troubleshooting client or server side application network connectivity issues, it is often necessary to determine if access to a certain port that the application uses is being blocked.
In this article we’ll take a quick look at how to view open ports using a number of lightweight freeware tools for Microsoft Windows. You might just be surprised at how effective these free utilities are at helping you to scan open ports and get to the root of the problem. Also, don’t forget to check out the other two posts about scanning open ports in Windows which are a continuation of this post and use different solutions. Read Scanning Open Ports in Windows: A Quick Guide (part 2) here and Scanning Open Ports in Windows: Part 3 (NMAP) here.
NetStat.exe
The first tool of note is one many admin and support folk might have heard of; the Windows command line utility called netstat.exe. Netstat.exe, located in the Windows ‘System32’ folder, allows you to view ports that are open or in use on a particular host, but should not be confused with a network port scanner which actually probes a host for open ports.
To view which ports are listening (open) on a local host using netstat, from the command prompt type the following:
netstat –an ¦find /i “listening”
The results will be displayed across four columns – the protocol type, local IP address and associated port number, foreign IP address, and state – as shown in the image below. The column of interest in this case would be the second column.

By using the ‘o’ parameter as part of the netstat command, a fifth column will be displayed as part of the results. This column shows the application process ID (PID) associated with each open port. The full command would be as follows:
netstat –ano ¦find /i “listening”

Using Task Manager to find which application is using the open port
The PID information can be used to find which application is using the open port. For example, the image above shows PID 156 being associated with port 17500. By using Windows Task Manager (CTRL + SHIFT + ESC), we can see that PID 156 belongs to the application called Dropbox.exe.

Tasklist.exe allows you to find the application using the open port from the command prompt
The same thing can be done using tasklist.exe from the command prompt which is essentially the command line equivalent of the Windows Task Manager that will display the same information. Again, the column of interest in the results for tasklist.exe would be column two which shows the PID for each running application. Using both versions you can display other information such as the user account that the application is running under.
For a full list of parameters and further information, type “netstat /?” or “tasklist /?” in a command prompt.
TCPView.exe
Similar to netstat.exe is TCPView.exe which offers a more detailed representation of netstat.exe information in a graphical user interface (GUI). TCPView.exe is available for download from the Microsoft SysInternals website and runs as a standalone application that does not require installation. Using TCPView, not only can you scan open ports but you can also view local and remote TCP connection information such as packets sent and received, the protocol being used, as well as the initiating process.
PortQry.exe
Another really interesting tool to be aware of is PortQry.exe. PortQry.exe is available for download from the Microsoft Download Center and runs as a standalone command line application.
PortQry.exe allows you to scan open ports on a local or remote host. Once you have downloaded and extracted portqry.exe to your machine, open a command prompt, and type portqry.exe followed by a given parameter from the folder that contains the executable.
For example, typing “portqry.exe –local” will show TCP/UDP port usage for the local host. The information shown when using this parameter is similar to that of netstat.exe, however it also shows port statistics such as the number of port mappings and the number of ports in each state.
To view the TCP/UDP open port state of a remote host, type “portqry.exe –n [hostname/IP]” where [hostname/IP] is replaced with the hostname or IP address of the remote host. You can also specify to scan for a particular port using the “-e [port_number]” parameter, a particular range of ports using the “-r [start_range:end_range]” parameter, or a group of ports in a particular order using the “-o [port1, port2, port3]” parameter.
The image below shows portqry.exe being using to scan for “listening” ports on a remote host with an IP address of 192.168.0.7 and a port range of 150-160.

For a full list of parameters and further information, type “portqry.exe /?”.
Conclusion
This article has shown you how to scan open ports using a series of freeware utilities. These utilities will come in handy as part of troubleshooting network connectivity issues, forming part of your network auditing toolkit or contributing towards your vulnerability checks.
The ability to scan open ports using such utilities is a great thing to have. It can be useful to troubleshoot network issues and is also a critical aspect of the overall network security scanning strategy.
Get your free 30-day trial
Get immediate results. Identify where you’re vulnerable with your first scan on your first day of a 30-day trial. Take the necessary steps to fix all issues.
Get your free 30-day trial
Get immediate results. Identify where you’re vulnerable with your first scan on your first day of a 30-day trial. Take the necessary steps to fix all issues.


