Viewing windows event log

Windows Setup Log Files and Event Logs

Windows® Setup creates log files for all actions that occur during installation. If you are experiencing problems installing Windows, consult the log files to troubleshoot the installation.

WindowsВ Setup log files are available in the following directories:

Log location before Setup can access the drive.

Log location when Setup rolls back in the event of a fatal error.

Log location of Setup actions after disk configuration.

Used to log Plug and Play device installations.

Location of memory dump from bug checks.

Location of log minidumps from bug checks.

Location of Sysprep logs.

WindowsВ Setup Event Logs

WindowsВ Setup includes the ability to review the WindowsВ Setup performance events in the Windows Event Log viewer. This enables you to more easily review the actions that occurred during WindowsВ Setup and to review the performance statistics for different parts of WindowsВ Setup. You can filter the log so as to view only relevant items that you are interested in. The WindowsВ Setup performance events are saved into a log file that is named Setup.etl, which is available in the %WINDIR%\Panther directory of all installations. To view the logs, you must use the Event Viewer included with the Windows media that corresponds to the version of the customized image that you are building.

To view the logs on a computer that does not include the corresponding kit, you must run a script from the root of the media that installs the Event Trace for Windows (ETW) provider. From the command line, type:

where D is the drive letter of the Windows DVD media.

To view the WindowsВ Setup event logs

Start the Event Viewer, expand the Windows Logs node, and then click System.

In the Actions pane, click Open Saved Log and then locate the Setup.etl file. By default, this file is available in the %WINDIR%\Panther directory.

The log file contents appear in the Event Viewer.

To Export the log to a file

From the command line, use the Wevtutil or Tracerpt commands to save the log to an .xml or text file. For information about how to use these tools, see the command-line Help. The following commands show examples of how to use the tools:

Viewing windows event log

System Requirements

FullEventLogView vs MyEventViewer

Versions History

  • Version 1.61:
    • Fixed some high DPI mode issues.
  • Version 1.60:
    • Added ‘Tray Balloon On New Event’ option. This feature is active only when both ‘Put Icon On Tray’ and ‘Auto Refresh’ options are turned on. When it’s active, FullEventLogView displays every new event in a tray balloon.
    • Added ‘Start As Hidden’ option. When this option and ‘Put Icon On Tray’ option are turned on, the main window of FullEventLogView will be invisible on start.
  • Version 1.58:
    • Added ‘New FullEventLogView Instance’ under the File menu, for opening a new window of FullEventLogView.
  • Version 1.57:
    • Added ‘Log File’ column, which displays the log filename if the event was loaded directly from .evtx or .etl file.
  • Version 1.56:
    • In the the channel and provider fields of the ‘Advanced Options’ window — you can now choose the desired channel/provider from a combo-box.
  • Version 1.55:
    • When reading .etl files that store the event data inside EventPayload element of the XML, FullEventLogView now automatically converts the EventPayload from hexadecimal string to readable text, and displays it as the decsription of the event.
      For example, you can use this feature to view the Windows Update logs from C:\windows\logs\WindowsUpdate on Windows 10.
    • Added ‘Copy Clicked Cell’ option to the right-click context menu, which copies to the clipboard the text of cell that you right-clicked with the mouse.
  • Version 1.53:
    • Fixed bug: Wildcards didn’t work when using the ‘Search in full description string’ option.
    • Fixed to save the ‘Case Sensitive’ option of the Quick Filter in the .cfg file.
  • Version 1.52:
    • Added ‘Select All’ and ‘Deselect All’ to the ‘Column Settings’ window.
  • Version 1.51:
    • Added the ‘Clear All Events Of Selected Channel’ option to the context menu.
    • Increase the maximum size of the description filter string.
  • Version 1.50:
    • Fixed bug: FullEventLogView remained in memory if you closed the main window during events scanning.
    • Added ‘Clear All Events Of Selected Channel’ option (Under the file menu). For example: If you select an event that its channel is ‘System’, using this option will delete all system events.
    • Added /ClearChannelEvents command-line option, which clears all events of the specified channel, for example:
      FullEventLogView.exe /RunAsAdmin /ClearChannelEvents «Microsoft-Windows-Bits-Client/Operational»
    • Added 2 modes to description filter: ‘Search in description parameters’ and ‘Search in full description string’. In previous versions, the search was made inside description parameters, but some people reported it’s a bug. The search is now made by default inside the full description string, but this search mode is slower because it requires to load the metadata and format the description string before the filtering process.
  • Version 1.38:
    • Fixed bug: When trying to export events of remote computer from command-line, FullEventLogView loaded the events from local computer.
  • Version 1.37:
    • Added ‘Case Sensitive’ option to the Quick Filter window.
  • Version 1.36:
    • Added /RunAsAdmin command-line option for running FullEventLogView as administrator.
  • Version 1.35:
    • Added new options to the ‘Quick Filter’ feature, including the option to filter the list by Event ID.
  • Version 1.32:
    • When choosing to load only specific event IDs (From ‘Advanced Options’ window), the loading process is much faster.
  • Version 1.31:
    • Fixed bug: When connecting a remote computer the following error was displayed — Error 50: The request is not supported.
  • Version 1.30:
    • Fixed bug: FullEventLogView failed to display the event strings in the lower pane (‘Show Event Data + Description’ mode) and in the columns (‘Show Event Strings In Columns’ option).
    • You can now resize the properties window, and the last size/position of this window is saved in the .cfg file.
    • You can now send the data to stdout by specifying empty string as filename, for example:
      FullEventLogView.exe /scomma «» | more
  • Version 1.28:
    • Fixed the lower pane to use the right font size in high DPI mode.
    • Added option to choose another font (name and size) to display in the main window.
  • Version 1.27:
    • When exporting items with multiline description to tab-delimited file (Including the ‘Copy Selected Items’ option), FullEventLogView now put the description in quotes to ensure the exported data will be displayed properly in Excel and other programs.
  • Version 1.26:
    • Added support for saving as JSON file.
  • Version 1.25:
    • Added ‘Show Event Strings In Columns’ option (Under the Options menu). When it’s turned on, 10 new event string columns are added to the main table (‘String 1’, ‘String 2’, ‘String 3’. ). These columns display the strings from the event decsription and you can click the column header in order to sort the events according to the event strings.
  • Version 1.22:
    • Fixed bug: On some systems, FullEventLogView missed some of the events when using a time filter.
  • Version 1.21:
    • Added /cfg command-line option, which instructs FullEventLogView to use a config file in another location instead if the default config file, for example:
      FullEventLogView.exe /cfg «%AppData%\FullEventLogView.cfg»
  • Version 1.20:
    • Added option to filter according to strings of the event description (In ‘Advanced Options’ window).
    • Added ‘Quick Filter’ feature (View -> Use Quick Filter or Ctrl+Q). When it’s turned on, you can type a string in the text-box added under the toolbar and FullEventLogView will instantly filter the events table, showing only lines that contain the string you typed.
    • Fixed the lower pane to switch focus when pressing tab key.
  • Version 1.12:
    • Added option to specify time range in GMT (‘Advanced Options’ window).
    • Fix bug: When using /SaveDirect command-line option, the file was always saved according to the default encoding, instead of using the selected encoding in Options -> Save File Encoding.
  • Version 1.11:
    • Fixed bug: the process of exporting large amount of event log items from command-line was very slow, even when using /SaveDirect.
  • Version 1.10:
    • Added option to automatically read archive log files (In ‘Choose Data Source’ window). This option works only when you run FullEventLogView as administrator.
  • Version 1.06:
    • Fixed FullEventLogView to display event description properly when reading .evtx files from shadow copy (e.g: \\?\GLOBALROOT\Device\HarddiskVolumeShadowCopy3\Windows\System32\winevt\Logs )
    • Fixed bug: FullEventLogView displayed error message when trying to read .etl files.
  • Version 1.05:
    • FullEventLogView now displays an error message if it fails to load events from external evtx file or from remote computer.
    • Added ‘Choose Data Source’ icon to the toolbar.
  • Version 1.00 — First release.

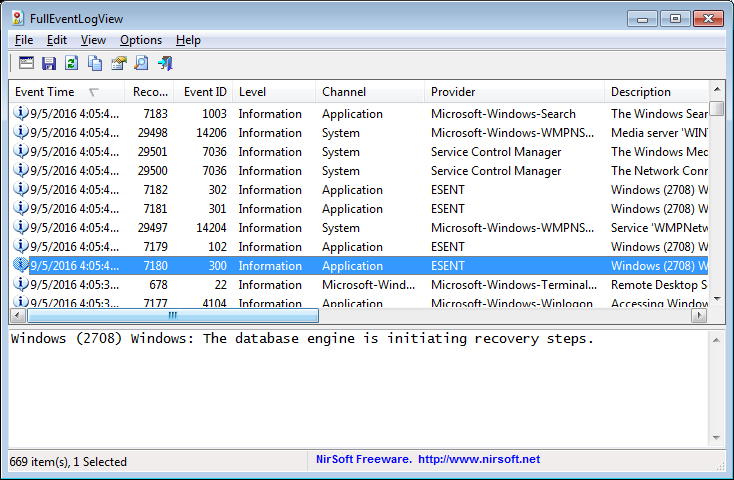
Start Using FullEventLogView

If you want to load the events from remote computer on your network or from event log files (.evtx), you should use the ‘Choose Data Source’ window (F7).

Lower Pane Display Mode

Refresh (F5) And Smooth Refresh (F8)

Auto Refresh Mode

Run As Administrator

Command-Line Options

Log file location Description
/ChannelFilter [1 — 3]
/EventIDFilter [1 — 3]
/ProviderFilter [1 — 3]
/ChannelFilterStr [Filter String]
/EventIDFilterStr [Filter String]
/ProviderFilterStr [Filter String]
.
.
.
You can use any variable inside the .cfg file in order to set the configuration from command line, here’s some examples:

In order to show only events with Event ID 8000 and 8001:
FullEventLogView.exe /EventIDFilter 2 /EventIDFilterStr «8000,8001»

In order show only events from Microsoft-Windows-Dhcp-Client/Admin channel:
FullEventLogView.exe /ChannelFilter 2 /ChannelFilterStr «Microsoft-Windows-Dhcp-Client/Admin»

In order to read events from .evtx files stored in c:\temp\logs :
FullEventLogView.exe /DataSource 3 /LogFolder «c:\temp\logs» /LogFolderWildcard «*»

In order to read events from remote computer:
FullEventLogView.exe /DataSource 2 /ComputerName «192.168.0.70»

In order to export events from remote computer into .csv file:
FullEventLogView.exe /scomma «c:\temp\remote_events.csv» /DataSource 2 /ComputerName «192.168.0.50»

You can find more command-line examples in the following Web pages:
How to export Windows events of remote computer to csv file from command line
How to export Windows events stored in .evtx file to csv file from command line

/ClearChannelEvents Clear all events of the specified channel, for example:
FullEventLogView.exe /RunAsAdmin /ClearChannelEvents «Microsoft-Windows-WLAN-AutoConfig/Operational» /cfg Start FullEventLogView with the specified configuration file. For example:
FullEventLogView.exe /cfg «c:\config\felv.cfg»
FullEventLogView.exe /cfg «%AppData%\FullEventLogView.cfg» /RunAsAdmin Run FullEventLogView as administrator. /stext Save the event log items into a simple text file. /stab Save the event log items into a tab-delimited text file. /scomma Save the event log items into a comma-delimited text file (csv). /stabular Save the event log items into a tabular text file. /shtml Save the event log items into HTML file (Horizontal). /sverhtml Save the event log items into HTML file (Vertical). /sxml Save the event log items into XML file. /sjson Save the event log items into JSON file. /SaveDirect Save the event log items in SaveDirect mode. For using with the other save command-line options ( /scomma, /stab, /sxml, and so on. ) When you use the SaveDirect mode, the event log items are saved directly to the disk, without loading them into the memory first. Be aware that the sorting feature is not supported in SaveDirect mode. /sort This command-line option can be used with other save options for sorting by the desired column. The parameter can specify the column index (0 for the first column, 1 for the second column, and so on) or the name of the column, like «Record ID» and «Event ID». You can specify the ‘

‘ prefix character (e.g: «

Channel») if you want to sort in descending order. You can put multiple /sort in the command-line if you want to sort by multiple columns.

Как использовать просмотр событий Windows для решения проблем с компьютером

Тема этой статьи — использование малознакомого большинству пользователей инструмента Windows: Просмотр событий или Event Viewer.

Для чего это может пригодиться? Прежде всего, если вы хотите сами разобраться что происходит с компьютером и решить различного рода проблемы в работе ОС и программ— данная утилита способна вам помочь, при условии, что вы знаете, как ее использовать.

Дополнительно на тему администрирования Windows

  • Администрирование Windows для начинающих
  • Редактор реестра
  • Редактор локальной групповой политики
  • Работа со службами Windows
  • Управление дисками
  • Диспетчер задач
  • Просмотр событий (эта статья)
  • Планировщик заданий
  • Монитор стабильности системы
  • Системный монитор
  • Монитор ресурсов
  • Брандмауэр Windows в режиме повышенной безопасности

Как запустить просмотр событий

Первый способ, одинаково подходящий для Windows 7, 8 и 8.1 — нажать клавиши Win + R на клавиатуре и ввести eventvwr.msc, после чего нажать Enter.

Еще один способ, который также подойдет для всех актуальных версий ОС — зайти в Панель управления — Администрирование и выбрать там соответствующий пункт.

И еще один вариант, который подойдет для Windows 8.1 — кликнуть правой кнопкой мыши по кнопке «Пуск» и выбрать пункт контекстного меню «Просмотр событий». Это же меню можно вызвать, нажав на клавиатуре клавиши Win + X.

Где и что находится в просмотре событий

Интерфейс данного инструмента администрирования можно условно разделить на три части:

  • В левой панели находится древовидная структура, в которой отсортированы события по различным параметрам. Кроме этого, сюда же можно добавить собственные «Настраиваемые представления», в которых будут отображаться лишь нужные вам события.
  • По центру, при выборе одной из «папок» слева будет отображаться сам список событий, а при выборе любого из них, в нижней части вы увидите более подробную информацию о нем.
  • В правой части собраны ссылки на действия, позволяющие отфильтровать события по параметрам, найти нужные, создать настраиваемые представления, сохранить список и создать задачу в планировщике заданий, которая будет связана с определенным событием.

Информация о событиях

Как я уже сказал выше, при выборе какого-либо события, в нижней части будет отображаться информация о нем. Эта информация может помочь найти решение проблемы в Интернете (впрочем, не всегда) и стоит понимать, какое свойство что означает:

  • Имя журнала — имя файла журнала, куда была сохранена информация о событии.
  • Источник — название программы, процесса или компонента системы, которое сгенерировало событие (если вы видите здесь Application Error), то имя самого приложение вы можете увидеть в поле выше.
  • Код — код события, может помочь найти информацию о нем в Интернете. Правда, искать стоит в англоязычном сегменте по запросу Event ID + цифровое обозначение кода + название приложения, вызывавшего сбой (поскольку коды событий для каждой программы уникальны).
  • Код операции — как правило, здесь всегда указано «Сведения», так что толку от этого поля мало.
  • Категория задачи, ключевые слова — обычно не используются.
  • Пользователь и компьютер — сообщает о том, от имени какого пользователя и на каком компьютере был запущен процесс, вызвавший событие.

Внизу, в поле «Подробности», вы можете также увидеть ссылку «Справка в Интернете», которая передает информацию о событии на сайт Microsoft и, по идее, должна отображать информацию о данном событии. Однако, в большинстве случаев вы увидите сообщение о том, что страница не найдена.

Чтобы найти информацию по ошибке, лучше воспользоваться следующим запросом: Имя приложения + Event ID + Код + Источник. Пример можете увидеть на скриншоте. Можно попробовать и поиск на русском языке, но на английском информативных результатов больше. Также для поиска подойдет текстовая информация об ошибке (кликните дважды по событию).

Примечание: на некоторых сайтах вы можете найти предложение скачать программы для исправления ошибок с тем или иным кодом, причем на одном сайте собраны все возможные коды ошибок — не стоит загружать таких файлов, они не исправят проблем, а с большой вероятностью повлекут за собой дополнительные.

Также стоит отметить, что большинство предупреждений не представляют из себя что-то опасное, а сообщения об ошибках также не всегда говорят о том, что с компьютером что-то не так.

Просмотр журнала производительности Windows

В просмотре событий Windows можно найти достаточное количество интересных вещей, например — посмотреть на проблемы с производительностью компьютера.

Для этого в правой панели откройте Журналы приложений и служб — Microsoft — Windows — Diagnostics-Perfomance — Работает и посмотрите, есть ли среди событий какие-либо ошибки — они сообщают о том, что какой-то компонент или программа привела к замедлению загрузки Windows. По двойному клику по событию, вы можете вызвать подробную информацию о нем.

Использование фильтров и настраиваемых представлений

Огромное количество событий в журналах приводит к тому, что в них сложно ориентироваться. К тому же, большинство из них не несут в себе критически важной информации. Лучший способ отобразить только нужные события — использовать настраиваемые представления: вы можете задать уровень событий, которые нужно отображать — ошибки, предупреждения, критические ошибки, а также их источник или журнал.

Для того, чтобы создать настраиваемое представление, нажмите соответствующий пункт в панели справа. Уже после создания настраиваемого представления, вы имеете возможность применить к нему дополнительные фильтры, кликнув по «Фильтр текущего настраиваемого представления».

Конечно, это далеко не все, для чего может пригодиться просмотр событий Windows, но это, как было отмечено, статья для начинающих пользователей, то есть для тех, кто вообще не знает о данной утилите. Быть может, она подвигнет к дальнейшему изучению этого и других инструментов администрирования ОС.

Читайте также:  Установка через флеш windows
Оцените статью