- Аналоги Virtual Audio Cable для Mac OS
- Альтернативы для Virtual Audio Cable для Mac OS
- Что в этом списке?
- macOS Big Sur и Mac M1: для музыкантов и саунд продюсеров
- Virtual Audio Cable for Mac
- Virtual Audio Cable for Mac OS X: Best alternatives Try out the alternative software to Virtual Audio Cable for Mac which was thoroughly picked by our editors to satisfy your needs.
- WireTap Studio Free
- Jack OS X Free
- Soundflower Free
- SooperLooper Free
- WIDI Audio To MIDI Audio Unit Free
- Know of any alternatives we haven’t found yet?
- Virtual Audio Cable for Zoom
- aracloud
- My Living Room: Live!
- VB-Audio Virtual Apps
- aracloud
- VB-Audio Virtual Apps
- My Living Room: Live!
- pskillen
- Virtual Audio Cable in Linux Ubuntu
- REDzero5
- cosmok
- Avistreams
- VB-Audio Virtual Apps
- AndyDelgado
- cekuhnen
- cekuhnen
- cosmok
- cosmok
- RockBastard
- VB-Audio Virtual Apps
- RockBastard
- VB-Audio Virtual Apps
- VB-Audio Virtual Apps
- JustPaul
- frisco
Аналоги Virtual Audio Cable для Mac OS
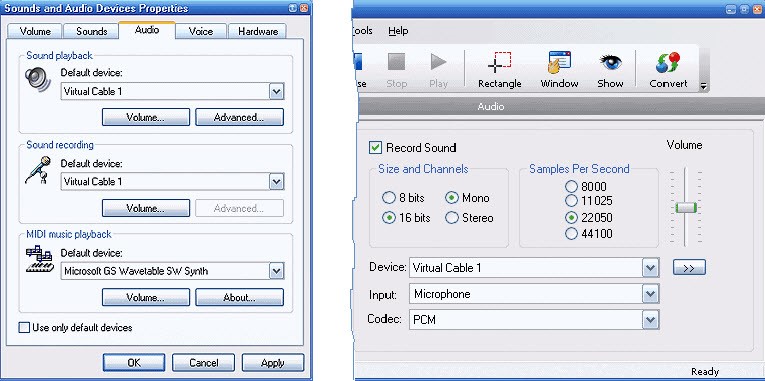
Virtual audio cable позволяет записать аудиопоток компьютера в реальном времени. Программа позволяет использовать несколько приложений одновременно.
Альтернативы для Virtual Audio Cable для Mac OS
Android iOS (iPhone / iPad)
JACK — профессиональный звуковой сервер-демон, который обеспечивает соединения в реальном времени с малой задержкой.
- Бесплатная Windows Mac OS

JACK — это профессиональный звуковой сервер-демон, который обеспечивает соединения в реальном времени с малой задержкой для аудио и MIDI-данных между приложениями, реализующий его API.
Soundflower — это расширение системы Mac OS X, которое позволяет приложениям передавать звук другим .
Soundflower — это расширение системы Mac OS X, которое позволяет приложениям передавать звук в другие приложения. Soundflower прост в использовании, он представляет собой аудио-устройство, позволяя любому приложению со звуками отправлять и получать аудио без какой-либо другой поддержки. Приложение является бесплатным, с открытым исходным кодом и работает на компьютерах Mac Intel и PPC.
Создавайте виртуальные аудиоустройства, чтобы получать звук из приложений.
- Условно бесплатная Mac OS
Хотите легко передавать звук между приложениями на вашем Mac? Создайте виртуальные аудиоустройства, чтобы получать звук из приложений и устройств ввода звука, а затем отправлять его в приложения обработки звука. Loopback дает вам мощную студийную микшерскую плату прямо в вашем компьютере!
Хост аудио плагинов.
- Бесплатная Windows Mac OS
Carla является хостом аудио плагинов, с поддержкой различных аудио драйверов и форматов плагинов.
Что в этом списке?
В списке находится программы которые можно использовать для замены Virtual Audio Cable на платформе Mac OS.
Это аналоги похожие по функционалу на Virtual Audio Cable, которые заменяют программу частично или полностью. Этот список содержит 4 замены.
С помощью пользователей мы собираем каталог похожих друг на друга программ, чтобы вы могли подобрать альтернативу и скачать их. На сайте можно скачать популярные программы для Windows, Mac Os, Android и iPhone
Источник
macOS Big Sur и Mac M1: для музыкантов и саунд продюсеров

Apple M1 и macOS Big Sur: вот что музыкальные продюсеры должны знать о совместимости DAW, плагинов и железа с новыми процессорами и новой операционной системой от Apple.
В то время как запуск новейших компьютеров Mac на базе чипа M1 от Apple вызывает большой ажиотаж, у музыкантов и саунд продюсеров которые пользуются macOS возникает более серьезный вопрос: следует ли им перейти на Big Sur, последнюю операционную систему Apple, или бежать в магазин за новеньким лептопом с чипом M1?
Можем смело сказать, по состоянию на конец 2020 года спешить не стоит, не с обновлением до Big Sur, не с покупкой нового компьютера на macOS и вот почему:
Если оставить в стороне тот факт, что любая новая ОС неизбежно будет иметь ошибки и нюансы — некоторые из которых могут быть еще не очевидны, — большая проблема заключается в совместимости. Пока у вас не будет «самого железного» подтверждения того, что ваша DAW, плагины и ваше железо (внешние аудио оборудование, например аудио интерфейсы, midi контроллеры работают и поддерживаются в Big Sur, обновление — не лучшая идея, особенно если вы находитесь в середине большого проекта и не хотите рисковать.
В качестве примечания: если вы хотите избежать случайного обновления Big Sur, вам следует убедиться, что опция автоматического обновления в инструменте обновления программного обеспечения вашего Mac отключена.
Стоит ли покупать ноутбук или компьютер с Mac M1?
Если вы подумываете о покупке Mac M1, есть еще одно соображение: ваше программное обеспечение не только должно быть совместимо с Big Sur, но также должно быть обновлено до статуса «Универсальный», чтобы работать изначально. Существует потенциальный обходной путь в виде Rosetta, технологии Apple, которая позволяет приложениям только для Intel работать на машинах M1, но еще неизвестно, какое влияние это окажет на производительность.
Более того, мы еще не знаем, насколько хорошо эти новые Mac работают как музыкальные станции. Например, если VST / AU плагины которые вы обычно используете не готовы для Apple Silicon M1, они запустятся через Rosetta 2 и возможно будет иметь проблемы с производительностью или корректностью работы. Хотя Apple обещает отличную производительность и более длительное время автономной работы, их заявления еще предстоит проверить.
Что и процессорами Intel?
Компания Apple все еще оставляет актуальную линейку компьютеров на базе процессоров Intel, как они заявляют полный переход на новые процессоры займет длительный период. Поэтому на сегодняшний день вы еще можете приобрести новый компьютер Mac c Intel на борту, но есть нюанс в том что с высокой долей вероятности он будет из коробки с предустановленной версией macOS Big Sur. Таким образом мы возвращаемся к дилемме, даже если ваше музыкальное программное обеспечение совместимо с оборудованием Mac на Intel, оно может не работать в вашей ОС.
В настоящее время очень немногие компании, помимо Apple (Logic Pro и GarageBand), полностью соответствуют требованиям. По этому именно на сегодняшний момент все же стоит подождать, да бы дать время производителям музыкального ПО и железа поработать над совместимостью их продуктов. Вот краткое изложение того, что говорят некоторые из основных музыкальных производителей
Обратите внимание что данная информация актуальна на конец 2020 года, по этому перед обновлением / покупкой нового компьютера сделайте обязательный чек лист на совместимости вашего музыкального программного обеспечения (DAW, критических плагинов и т.д.), а так же совместимости внешнего железа (аудио интерфейсы, контроллеры и т.д.) на официальных сайтах производителей!
Какие DAW совместимы с Apple Silicon?
Хотя не все DAW в настоящее время поддерживают Apple Silicon M1, некоторые из них по-прежнему хорошо работают через приложение Rosetta 2.
-Logic Pro X (полная поддержка Apple Silicon)
-Cubase (не поддерживается)
-Ableton Live 10 (не поддерживается, посмотрим, сможет ли Live 11). Может работать в Rosetta 2 (режим эмуляции).
-Bitwig Studio (не поддерживается, идет работа над обновлением)
-Studio One (не поддерживается, идет работа над обновлением)
-Fl Studio 20 (не поддерживается) — работает через Rosetta 2, но с проблемами производительности.
-Reaper (работает с бета-сборкой).
macOS Big Sur и Mac M1: совместимость музыкального программного обеспечения что говорят некоторые производители:
Native Instruments.
Хотя некоторые продукты NI готовы к Big Sur, большинство — нет, и компания заявляет: «В настоящее время мы проводим систематические тесты с окончательной версией macOS 11 (Big Sur), чтобы обеспечить полную совместимость наших программных и аппаратных продуктов как можно скорее.»
Universal Audio.
Программное обеспечение UA, включая UAD, Apollo и LUNA, в настоящее время несовместимо с Big Sur, — заявляет Universal Audio. «Совместимость программного обеспечения UA с Big Sur тщательно проверяется, и полная квалификация будет проведена в будущих обновлениях программного обеспечения. Мы рекомендуем дождаться объявления совместимости программного обеспечения UAD с Big Sur перед обновлением до этой новой операционной системы.
Между тем, что касается новых компьютеров Mac от Apple, UA говорит: «Программное обеспечение UA, включая UAD, Apollo и LUNA, в настоящее время несовместимо с компьютерными системами Apple M1. Совместимость программного обеспечения UA с компьютерами Mac M1 находится в стадии разработки, и полная квалификация будет проведена в будущих обновлениях программного обеспечения».
Denon DJ.
«Мы рекомендуем вам оставаться на вашей текущей ОС до тех пор, пока не будет сделано полное заявление о совместимости оборудования и программного обеспечения.»
Focusrite.
«Информация о совместимости для всех текущих продуктов приведена здесь. На сегодняшний день наше тестирование проводилось с использованием различных бета-версий macOS Big Sur.»
Nektar.
«Программное обеспечение Nektar было протестировано и, как известно, совместимо с MacOS 11 Big Sur. Если вы столкнетесь с сообщениями об ошибках в установщиках Nektar, просто щелкните установщик правой кнопкой мыши и выберите «Открыть», вы увидите аналогичное сообщение, но вам будет предоставлена возможность открыть установщик в любом случае.»
Pioneer DJ.
«В настоящее время мы проверяем совместимость нашего программного и аппаратного обеспечения с новой операционной системой. Мы ожидаем, что наше тестирование будет завершено к концу декабря 2020 года, и мы будем предоставлять обновления, когда сможем. До тех пор мы не можем гарантировать, что наши продукты совместимы с новой операционной системой. Пожалуйста, отложите обновление до macOS Big Sur, пока мы не подтвердим совместимость.»
PreSonus.
«Мы тестировали оборудование PreSonus на разрабатываемых сборках macOS 11.0 с момента их первоначального выпуска, и в настоящее время поддерживаемые продукты в Mac OS X 10.15.x работают с этими предварительными версиями macOS 11.0.x Big Sur. Мы советуем проявлять некоторую осторожность до обновления до Big Sur, так как всегда есть вероятность некоторых окончательных изменений без ведома нашей команды QA, которые могут повлиять на совместимость.»
RME.
«Интерфейсы готовы для macOS 11 Big Sur.
RME Audio серьезно относится к поддержке программного обеспечения и скомпилировали драйверы для использования с новой операционной системой Mac OS macOS 11 Big Sur с полной поддержкой компьютеров Intel и M1 (ARM).
Последний драйвер RME обеспечивает совместимость между macOS Big Sur и всеми аудио интерфейсами RME USB. Интерфейсы RME без USB (PCle, Thunderbolt и FireWire) и все устаревшие аудио интерфейсы, выпущенные с 2001 года, также готовы для macOS 11 Big Sur.
Скоро появится полная поддержка Digiface Dante и Digiface AVB.»
Roland.
«Программные инструменты Roland Cloud в настоящее время проходят тестирование с macOS Big Sur. Если вы используете наши продукты, мы рекомендуем вам не устанавливать macOS Big Sur после ее выпуска. Мы сообщим вам, как только завершим тестирование на совместимость. Обратитесь к разделу часто задаваемых вопросов и к нашим характеристикам продукта, чтобы получить самую свежую информацию о наших системных требованиях.»
Steinberg.
«Apple представила не только новую операционную систему, но и новую аппаратную платформу с системой Apple Silicon (SoC). Хотя многие из наших продуктов совместимы с macOS Big Sur в системах на базе Intel, обратите внимание, что мы не можем рекомендовать использовать системы на основе Apple Silicon на данный момент, пока мы не завершим наши тесты или не выпустим обновления для обеспечения совместимости нашего программного и аппаратного обеспечения.»
Источник
Virtual Audio Cable for Mac
Virtual Audio Cable by Eugene Muzychenko is an application that allows users to easily transfer audio streams between computer programs or various devices. Unfortunately, there is no version of Virtual Audio Cable for Mac available on the Internet. Instead, you can try the tools from this list to cope with the task. Here are some alternatives to Virtual Audio Cable for mac.
Virtual Audio Cable for Mac OS X: Best alternatives Try out the alternative software to Virtual Audio Cable for Mac which was thoroughly picked by our editors to satisfy your needs.
WireTap Studio Free
WireTap Studio is a professional audio recording, editing, and management solution, allowing you to manage and manipulate your audio with ease.

Jack OS X Free
Jack (the Jack Audio Connection Kit) is a low-latency audio server, written originally for the GNU/Linux operating system, and now with Mac OS X support. It can connect any number of different applications to a single hardware audio device;
Soundflower Free
Soundflower is a Mac OS X system extension that allows applications to pass audio to other applications. Soundflower is easy to use, it simply presents itself as an audio device, allowing any audio application to send and receive audio.
SooperLooper Free
SooperLooper is a live looping sampler capable of immediate loop recording, overdubbing, multiplying, reversing and more. It allows for multiple simultaneous multi-channel loops limited only by your computer’s available memory.
WIDI Audio To MIDI Audio Unit Free
WIDI Audio To MIDI Audio Unit is designed for real-time Audio to MIDI conversion. The unit receives input from an audio channel and performs real-time music recognition.
An equalizer is a tool that gives users the possibility to modify the balance.
Audio Record Wizard by NowSmart is a tool that allows users to record the audio coming from various.
GoldWave by GoldWave Inc. is a powerful and feature-rich audio editor, but unfortunately.
DJ Audio Editor by Program4Pc Inc., is an application that allows you to edit various types.
Sound Editor Deluxe by SED Systems Inc. is a powerful application that was designed to help you.
Know of any alternatives we haven’t found yet?
Feel free to add any alternative to Virtual Audio Cable for Mac that you know of.
Источник
Virtual Audio Cable for Zoom

aracloud
New Member
Is there a way to send Audio from Microphone throught OBS to feed into Zoom online meetings?
How can this be acieved?

My Living Room: Live!
Member
Your answer lies right there in your subject line 🙂
VB-Audio Virtual Apps
Install Virtual Audio Cable, set that as your monitor in OBS, set your sources in OBS to ‘monitor and output’, and set virtual audio cable as your mic in Zoom.
Use the OBS Virtual Cam to send your video.
You should be good to go!
aracloud
New Member
Your answer lies right there in your subject line 🙂
VB-Audio Virtual Apps
Install Virtual Audio Cable, set that as your monitor in OBS, set your sources in OBS to ‘monitor and output’, and set virtual audio cable as your mic in Zoom.
Use the OBS Virtual Cam to send your video.
You should be good to go!
My Living Room: Live!
Member

pskillen
New Member
Virtual Audio Cable in Linux Ubuntu
REDzero5
New Member

New Member
I realise this is late and a thread bump, but this is the first result on google and I just spent several hours working this out.
A combination of trial and error and a post by Christopher Donham here: https://unix.stackexchange.com/questions/576785/redirecting-pulseaudio-sink-to-a-virtual-source provide the solution. Christopher’s script:
Christopher recommended going into OBS settings, and setting the monitor to the new device. However, this causes audio lag so the audio is about 0.3 seconds behind the video. Instead:
1. Open OBS
2. Turn monitoring on for one of your devices (it should play through your speakers/headphones to begin with)
3. Run Christopher’s script
4. Select «Remapped Monitor of Virtual Speaker» as your microphone in teams/zoom/etc
Leave OBS on the default monitor, it seems to detect the virtual speaker automatically and switch itself to it. If you go into OBS settings and set «Monitoring Device» in the advanced section of audio settings, it causes an audio delay. I have no idea why.
cosmok
New Member
Avistreams
New Member
Your answer lies right there in your subject line 🙂
VB-Audio Virtual Apps
Install Virtual Audio Cable, set that as your monitor in OBS, set your sources in OBS to ‘monitor and output’, and set virtual audio cable as your mic in Zoom.
Use the OBS Virtual Cam to send your video.
You should be good to go!
I just wanna say I was not being able to solve this problem at all. But a search landed me here. I am a windows user and it worked like a charm really. thank you so much
Truly appreciate it. Life Saver!

AndyDelgado
New Member
cekuhnen
New Member
Thank you for this tip. I spend around 3 weeks looking this up till I reread your post and realized that to monitor you need to turn this on in advanced audio settings too and not just select VB Cables for monitoring in the main audio settings.
Again thank you !
So many youtube tutorials just go overboard here.
cekuhnen
New Member
Here is made you a quick tutorial
in short
make an audio input with a mic
in settings turn on monitor and select the vb cable
THEN and this is often overlooked or not explained online
go to edit > advanced audio settings > turn on monitor and output on
cosmok
New Member
cosmok
New Member
RockBastard
New Member
Your answer lies right there in your subject line 🙂
VB-Audio Virtual Apps
Install Virtual Audio Cable, set that as your monitor in OBS, set your sources in OBS to ‘monitor and output’, and set virtual audio cable as your mic in Zoom.
Use the OBS Virtual Cam to send your video.
You should be good to go!
JustPaul
New Member
frisco
New Member
Here is how I accomplish this using pulseaudio. Basically what we need to do is create 2 new sinks and one new source. I’m going to name them as follows:
- to_obs will be a new sink that goes to OBS and is recorded in OBS, but where the sound is not sent upstream. This will be used for audio from your videoconference, which you don’t want to send back upstream. It will also go to your speakers.
- to_obsmon will go to OBS to be recorded and sent back upstream. You would use this, for example, if you were were playing a video for people in your zoom chat, and want the audio both recorded and sent upstream.
- from_obs will be a source for sound coming out of OBS.
The complication here is that the only way to get sound out of OBS is through the monitor device, and there is only one. So while in an ideal world you would have two audio output streams from OBS, send one to zoom and both to your speakers, we are going to have to approach this differently. Instead, we’ll have pulseaudio direct both to_obs and to_obsmon to your speakers, and will send the audio output of OBS just to zoom, not to any real devices.
So then this is what you need to put in
/.config/pulse/default.pa . Note that to test this out, you can paste these into pacmd if you want to test things out. Also a reminder that to kill pulseaudio, you can run pulseaudio -k , and then it will re-read your new default.pa when it restarts (which may be automatic for many configurations). In my example, my real microphone is called nt5 and my speakers are called something complicated, so I’ll just call them speakers here for simplicity. You’ll have to edit accordingly.
Okay, let me break down what is going on here. In the first two lines, we create «virtual sinks.» A virtual sink is a sink that just passes audio along to another sink. Why is it useful? Because each sink has its own monitor. So anything you play to to_obs or to_obsmon will just come out of your speakers (because of maseter=speakers, which you will have to replace with the real name of your speakers from the output of pactl list short sinks ). But, it will be possible for OBS to distinguish what you’ve sent to to_obs from what you’ve sent to to_obsmon.
Next, we create a third sink called from_obs. This is a null sink, meaning pulseaudio will just discard the audio played to that sink. Again, the reason this is useful is that the null sink has a monitor source. Hence, even though the audio will not go to any real audio device, we want zoom to send the from_obs.monitor audio back upstream. The slight problem is that zoom will not give you an option to use a monitor source, because zoom thinks you want to use a real microphone, which should look like a hardware audio device. So this time we solve the problem using a virtual source, which, you guessed it, just copies data from some other source. We create a source called from_obs that just copies audio from the monitor of the from_obs sink, called from_obs.monitor. (Yes, there is both a source and a sink called from_obs.) Zoom will happily let you select the virtual from_obs source even while it hides from_obs.monitor.
Now you have to configure OBS. Under Settings -> Audio, you should configure two desktop audio devices. The primary one will be «To_OBS», and the second one will be «To_OBS (Monitored)» (which are the descriptions of to_obs and to_obsmon respectively). Also in the Audio settings, under Advanced set the monitoring device to «Monitor of OBS monitor sink.» Next, in the audio mixer panel, click the gear for any audio source and go to «Advanced Audio Properties». Make sure that «Desktop audio» is set to «Monitor Off,» while «Desktop Audio 2» is set to «Monitor and Output.» Finally, on your microphone source, you will probably want to click filters and add a Noise Suppression filter (RNNoise). I also add a compressor to mine. Then in the Zoom Audio settings, set «Suppress background noise» to «Low,» because now OBS is doing your noise suppression.
So in my experience what I’ve described so far is good enough to work with zoom, but isn’t quite good enough for webrtc-based conferencing systems like google meet. In these systems, people complain that they hear themselves echo, presumably because OBS is inserting delay that messes with the browser’s echo cancellation. So if you have that problem, you will need one more trick, which is to do the echo cancellation inside pulseaudio. That’s the purpose of the final line in the default.pa snippet above. The way echo cancellation works in pulseaudio is that you have to feed audio through in both directions—it’s essentially a virtual source and a virtual sink in one.
Hence, to make use of echo cancellation you need to do two things. First, instead of sending your zoom audio to «To_OBS», you’ll want to sent it to «To_OBS (echo cancelled with NT5)» (recall that NT5 is the name of my microphone—it will be something else for you). Second, instead of selecting NT5 as your microphone, you will want to select «NT5 (echo cancelled with To_OBS)». With this, there is only one tiny problem left. Sending your zoom audio to the echo-cancel sink «To_OBS (echo cancelled with NT5)» has no disadvantages—you can just do that all the time. However, there will be a slight degradation in audio quality if you use an echo cancelled microphone. So what you really want to do is send the echo cancelled microphone upstream, while recording your real microphone in OBS.
To record your raw microphone while sending echo-cancelled audio upstream, you need to go into OBS Settings -> Audio and select two microphone devices. For the main mic, choose the echo cancelled source. For Mic/Auxiliary Audio 2, select your raw mic device. Now once again to to Advanced Audio Properties and click «Monitor and Output» (or «Monitor only») for the main Mic (which is echo cancelled). Deselect all the track recordings so you don’t record this. Then for Mic/Aux 2 (the non-echo cancelled one), make sure it is set to «Monitor Off» and that recording is selected.
Источник


