- Настройка виртуальных хостов Apache
- Как работают виртуальные хосты Apache?
- Настройка виртуальных хостов Apache?
- Настройка виртуальных хостов с SSL
- Выводы
- How To Configure Apache Virtual Hosts In Ubuntu 18.04 LTS
- What is Apache Virtual Hosts?
- Configure Apache Virtual Hosts in Ubuntu 18.04 LTS
- Configure name-based virtual hosts
- How To Set Up Apache Virtual Hosts on Ubuntu 18.04 [Quickstart]
- Introduction
- Prerequisites
- Step 1 — Create the Directory Structure
- Step 2 — Grant Permissions
- Step 3 — Create Demo Pages for Each Virtual Host
- Step 4 — Create New Virtual Host Files
- Create the First Virtual Host File
- Copy First Virtual Host and Customize for Second Domain
- Step 5 — Enable the New Virtual Host Files
- Step 6 — Set Up Local Hosts File (Optional)
- Step 7 — Test your Results
- Related Tutorials
Настройка виртуальных хостов Apache
Apache — это один из самых популярных веб-серверов для размещения сайтов на хостингах и VPS, а также для создания тестовых окружений. Если на вашем сервере один сайт, то все довольно просто, все запросы, поступающие к серверу, отправляется этот единственный сайт. А что если сайтов несколько? Как Apache будет понимать кому адресован запрос?
Для решения этой задачи есть виртуальные хосты. В этой статье мы поговорим о том, как выполняется настройка виртуальных хостов Apache, а также как все это работает.
Как работают виртуальные хосты Apache?
Не будем пока о локальных системах. Если у вас есть веб-сайт, то наверное, вы занимались парковкой домена и уже знаете как все настраивается. Сначала используется DNS сервер, который выдает IP адрес вашего сервера всем клиентам, запросившим адрес этого домена. Затем клиенты отправляют запрос на ip вашего сервера, а веб-сервер уже должен его обработать.
Обычно, на хостингах один веб-сервер обслуживает десятки, а то и сотни сайтов. И как вы понимаете, все запросы поступают на один ip. Для распределения их между папками на сервере используется имя домена, которое передается вместе с запросом в HTTP заголовке «Host». Именно поэтому нужно выполнять парковку домена не только на DNS сервисе, но и на вашем сервере.
Вы настраиваете виртуальные хосты Apache, а затем веб-сервер сравнивает домен, переданный в заголовке «Host» с доступными виртуальными доменами и если находит совпадение, то возвращает содержимое настроенной папки или содержимое по умолчанию, или ошибку 404. Нужно сказать, что вы можете настроить виртуальный хост для любого домена, например, vk.com или losst.ru. Но пользователи смогут получить доступ к этому домену у вас, только если к вам будут поступать запросы от браузеров, в которых будет значиться этот домен. А теперь детальнее про настройку.
Настройка виртуальных хостов Apache?
Я уже подробно рассматривал как настроить Apache в отдельной статье. Поэтому не буду полностью расписывать здесь все конфигурационные файлы. Остановимся на файлах виртуальных хостов. Для удобства они вынесены в отдельные папки:
Ясно, что это разделение очень условно. Вы можете его убрать и добавлять свои виртуальные хосты прямо в основной конфигурационный файл. Все файлы из этих папок подключаются к нему с помощью директив Include. Но ведь так намного удобнее. В папке sites-available находятся все конфигурационные файлы, но они пока еще не активированы и отсюда не импортируются никуда. При активации нужного хоста на него просто создается ссылка в папку /etc/apache2/sites-enabled.
Для примера, создадим новый конфигурационный файл для виртуального хоста site1.ru. Для этого просто скопируем существующую конфигурацию для хоста по умолчанию — 000-default:
$ sudo cp /etc/apache2/sites-enabled/000-default.conf /etc/apache2/sites-enabled/site1.ru.conf
Сначала рассмотрим синтаксис того, что вы увидите в этом файле:
адрес_хоста_для прослушивания : порт >
ServerName домен
ServerAlias псевдоним_домена
ServerAdmin емейл@администратора
DocumentRoot /путь/к/файлам/сайта
ErrorLog /куда/сохранять/логи/ошибок/error.log
CustomLog /куда/сохранять/логи/доступа/access.log combined
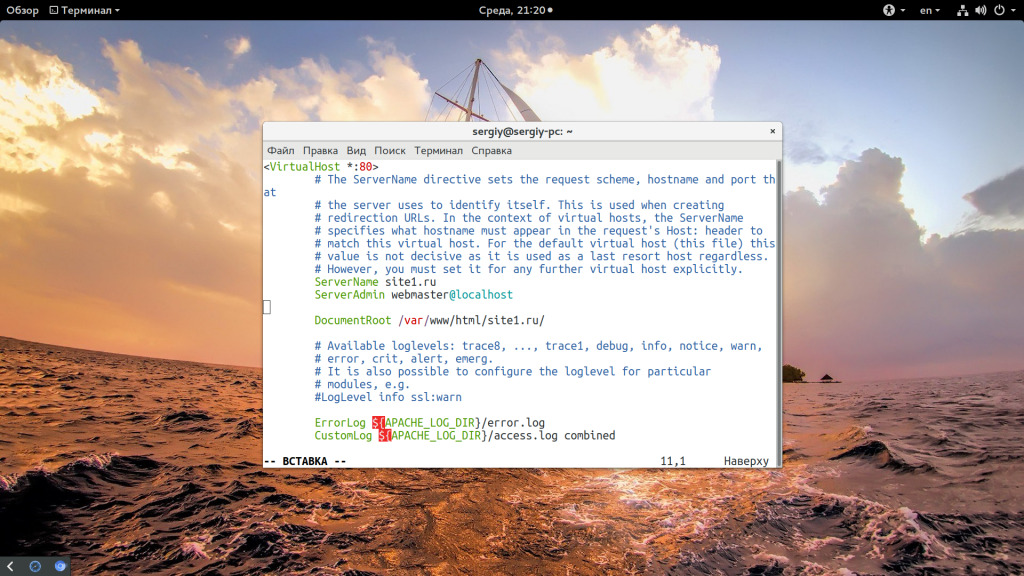
Это минимальная конфигурация, которую вам нужно указать, чтобы создать виртуальный хост Apache. Конечно, здесь вы можете использовать и другие директивы Apache, такие как Deny, Allow и многие другие. А теперь рассмотрим наш пример для тестового сайта site1.ru:
ServerName site1.ru
ServerAdmin webmaster@localhost
DocumentRoot /var/www/html/site1.ru/
ErrorLog $
CustomLog $
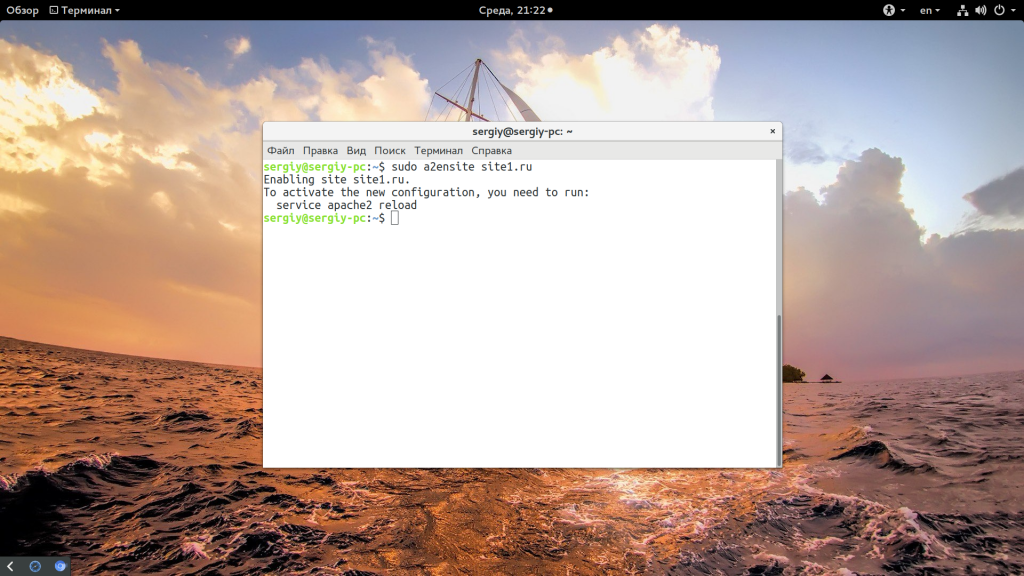
Здесь мы используем звездочку вместо ip адреса, это значит, что веб-сервер будет слушать соединения на всех адресах, как на внешнем, так и на localhost. Порт 80, это порт по умолчанию. Затем указываем домен, электронный адрес администратора, и путь к папке, в которой будут находиться данные сайта. Две строчки Log говорят куда сохранять логи, но добавлять их необязательно. Дальше, нам нужно активировать этот хост. Мы можем вручную создать ссылку или использовать уже заготовленную команду:
sudo a2ensite site1.ru
Затем перезапустите Apache:
sudo systemctl restart apache2
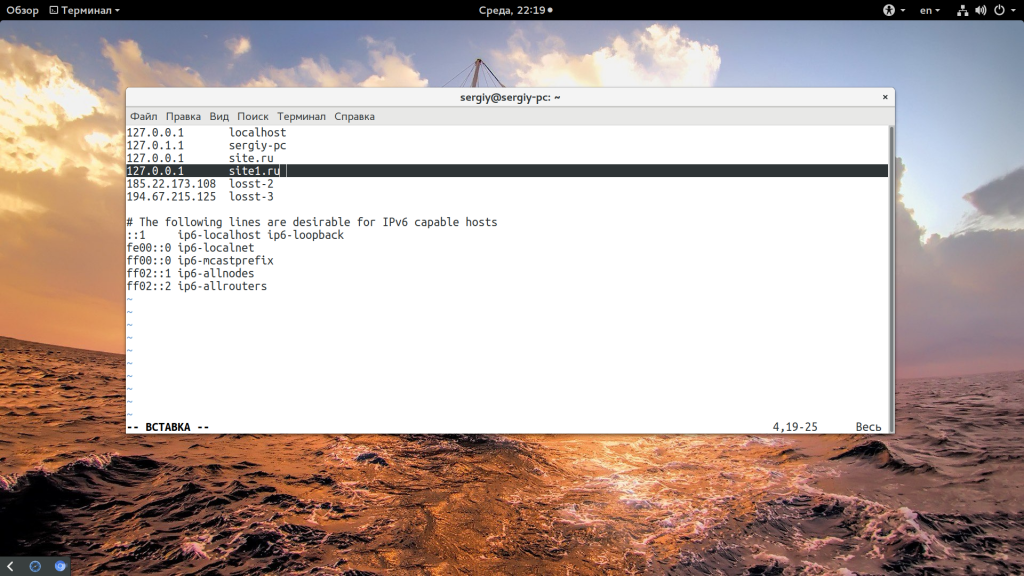
И нам осталось все это протестировать. Если ваш сервер имен еще не направляет запросы к домену на ваш ip, а вы хотите уже проверить как все работает, можно пойти обходным путем. Для этого достаточно внести изменения в файл /etc/hosts на машине, с которой вы собрались открывать сайт. Этот файл, такой себе локальный DNS. Если компьютер находит ip для домена в нем, то запрос в интернет уже не отправляется. Если вы собираетесь тестировать с той же машины, на которую установлен Apache2, добавьте:
sudo vi /etc/hosts
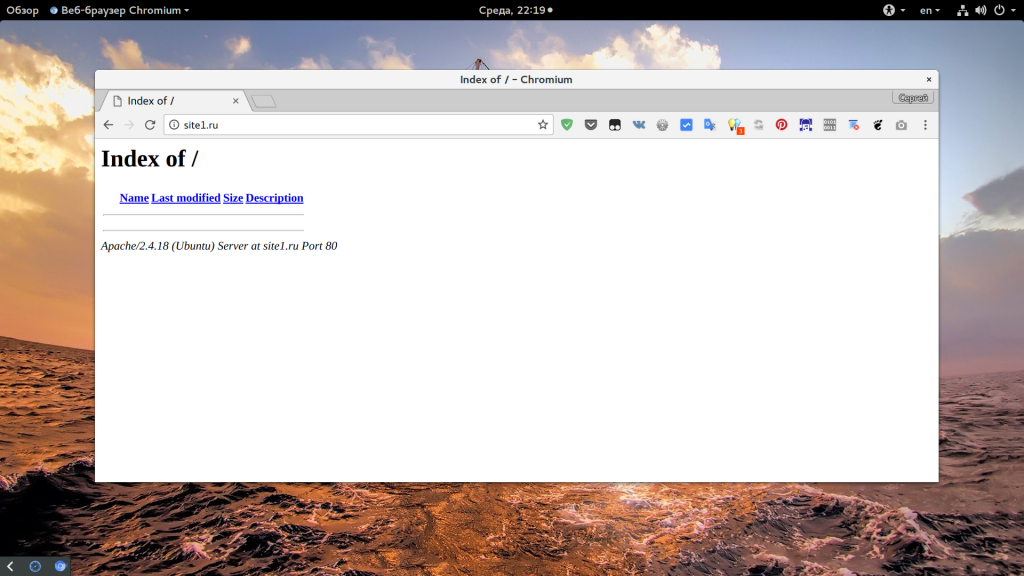
Если же это будет другой компьютер, то вместо 127.0.0.1 нужно использовать адрес вашего сервера, на котором установлен Apache. Затем можете открыть сайт в браузере:
Настройка виртуальных хостов с SSL
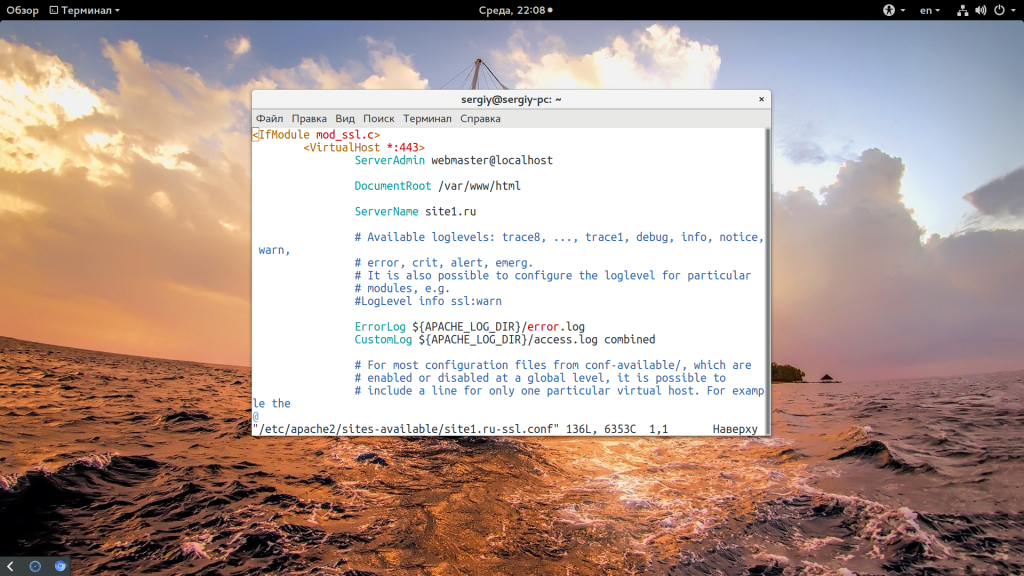
Если вы хотите использовать современный безопасный протокол https для работы вашего виртуального хоста, то вам кроме обычного хоста на порту 80 будет необходимо создать виртуальный хост на порту 443. Здесь будет не так много отличий, вот пример, для нашего сайта site1.ru:
ServerAdmin webmaster@localhost
DocumentRoot /var/www/html
ServerName site1.ru
ErrorLog $
CustomLog $
SSLEngine on
SSLCertificateFile /etc/ssl/certs/ssl-cert-snakeoil.pem
SSLCertificateKeyFile /etc/ssl/private/ssl-cert-snakeoil.key
SSLOptions +StdEnvVars
Теперь о каждой новой строчке более подробно:
- — весь код в этой секции будет выполнен только в том случае, если активирован модуль mod_ssl. Это нужно для безопасности, чтобы если модуль не активирован, то код не вызывал ошибок;
- SSLEngine — включает поддержку SSL;
- SSLCertificateFile, SSLCertificateKeyFile — пути к файлам сертификата и приватного ключа;
- SSLOptions — для скриптов php, cgi и других мы передаем стандартные SSL опции.
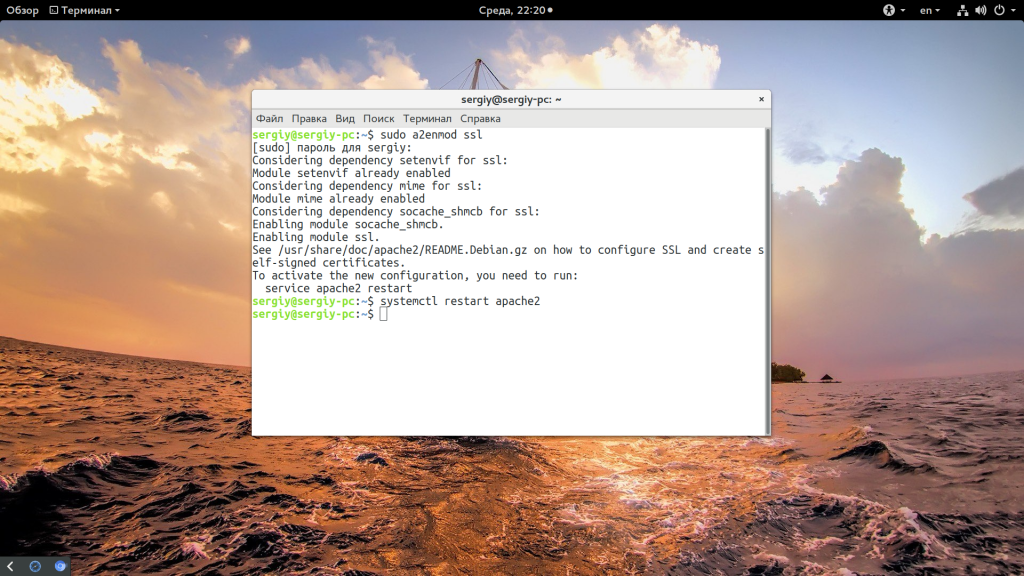
Вот и все. Как видите, не так сложно. Осталось перезапустить Apache и проверить как все работает:
sudo a2enmod ssl
sudo a2ensite site1.ru-ssl
sudo systemctl restart apache2
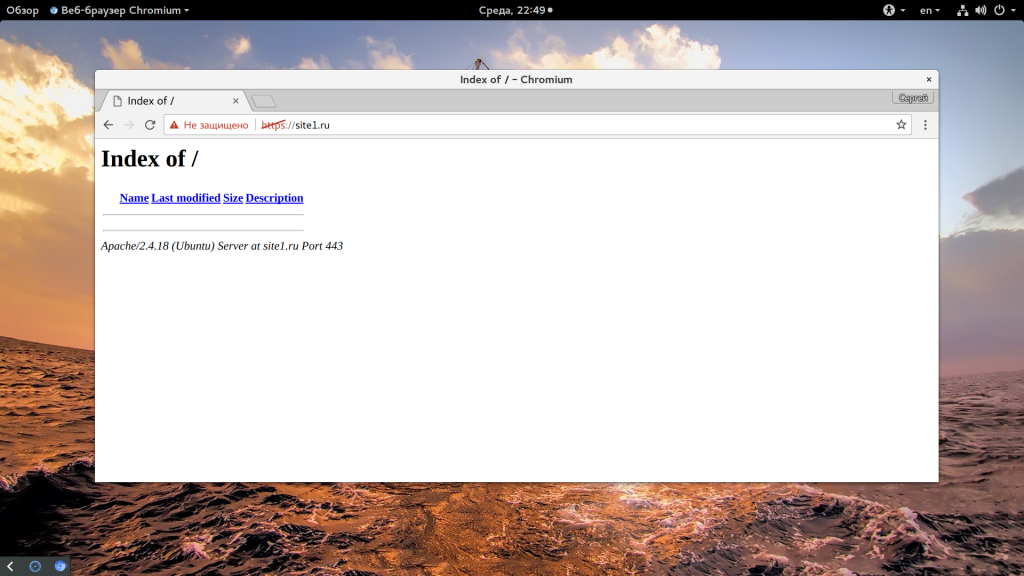
Затем откройте https адрес в браузере:
Выводы
В этой статье мы рассмотрели как выполняется настройка виртуальных хостов Apache. Как видите, один веб-сервер может обслуживать сотни сайтов, а создание виртуальных хостов apache совсем не сложно. Надеюсь, эта статья была вам полезной. Если у вас остались вопросы, спрашивайте в комментариях!
Источник
How To Configure Apache Virtual Hosts In Ubuntu 18.04 LTS
What is Apache Virtual Hosts?
Virtual Host term refers to the method of running more than one website such as host1.domain.com, host2.domain.com, or www.domain1.com, www.domain2.com etc., on a single system. There are two types of Virtual Hosting in Apache, namely IP-based virtual hosting and name-based virtual hosting. With IP-based virtual hosting, you can host multiple websites or domains on the same system, but each website/domain has different IP address. With name-based virtual hosting, you can host multiple websites/domains on the same IP address. Virtual hosting can be useful if you want to host multiple websites and domains from a single physical server or VPS. Hope you got the basic idea of Apache virtual hosts. Today, we are going to see how to configure Apache virtual hosts in Ubuntu 18.04 LTS.
Configure Apache Virtual Hosts in Ubuntu 18.04 LTS
My test box IP address is 192.168.225.22 and host name is ubuntuserver.
First, we will see how to configure name-based virtual hosts in Apache webserver.
Configure name-based virtual hosts
1. Install Apache webserver
Make sure you have installed Apache webserver. To install it on Ubuntu, run:
Once apache is installed, test if it is working or not by browsing the apache test page in the browser.
Open your web browser and point it to http://IP_Address or http://localhost. You should see a page like below.
Good! Apache webserver is up and working!!
2. Create web directory for each host
I am going to create two virtual hosts, namely ostechnix1.lan and ostechnix2.lan.
Let us create a directory for first virtual host ostechnix1.lan. This directory is required for storing the data of our virtual hosts.
Likewise, create a directory for second virtual host ostechnix2.lan as shown below.
The above two directories are owned by root user. We need to change the ownership to the regular user.
Here, $USER refers the currently logged-in user.
Next, set read permissions to the Apache root directory i.e /var/www/html/ using command:
We do this because we already created a separate directory for each virtual host for storing their data. So we made the apache root directory as read only for all users except the root user.
We have created required directories for storing data of each virtual host, setup proper permissions. Now, it is time to create some sample pages which will be served from each virtual host.
3. Create demo web pages for each host
Let us create a sample page for ostechnix1.lan site. To do so, run:
Add the following lines in it:
Save and close the file.
Likewise, create a sample page for ostechnix2.lan site:
Add the following lines in it:
Save and close the file.
4. Create configuration file for each host
Next, we need to create configuration files for each virtual host. First, let us do this for ostechnix1.lan site.
Copy the default virtual host file called 000-default.conf contents to the new virtual host files like below.
Please be mindful that you must save all configuration files with .conf extension at the end, otherwise it will not work.
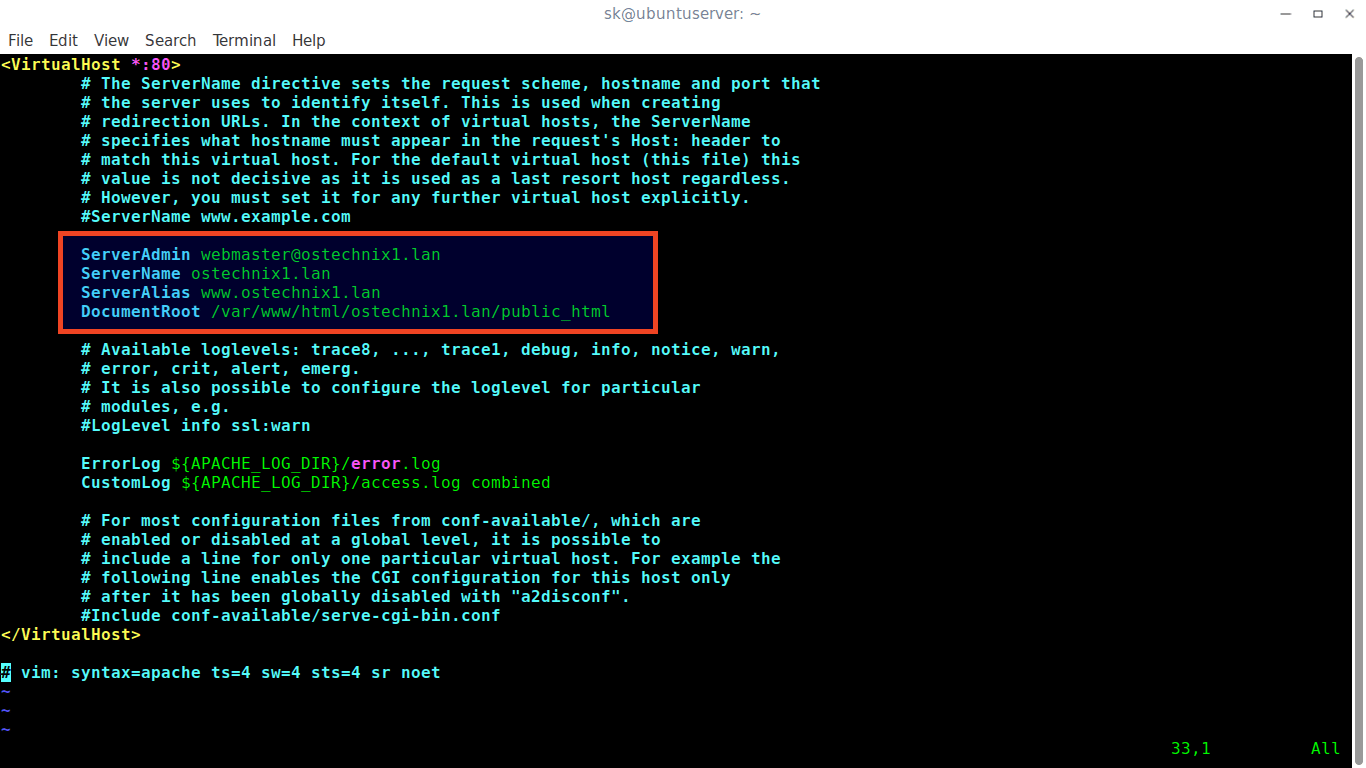
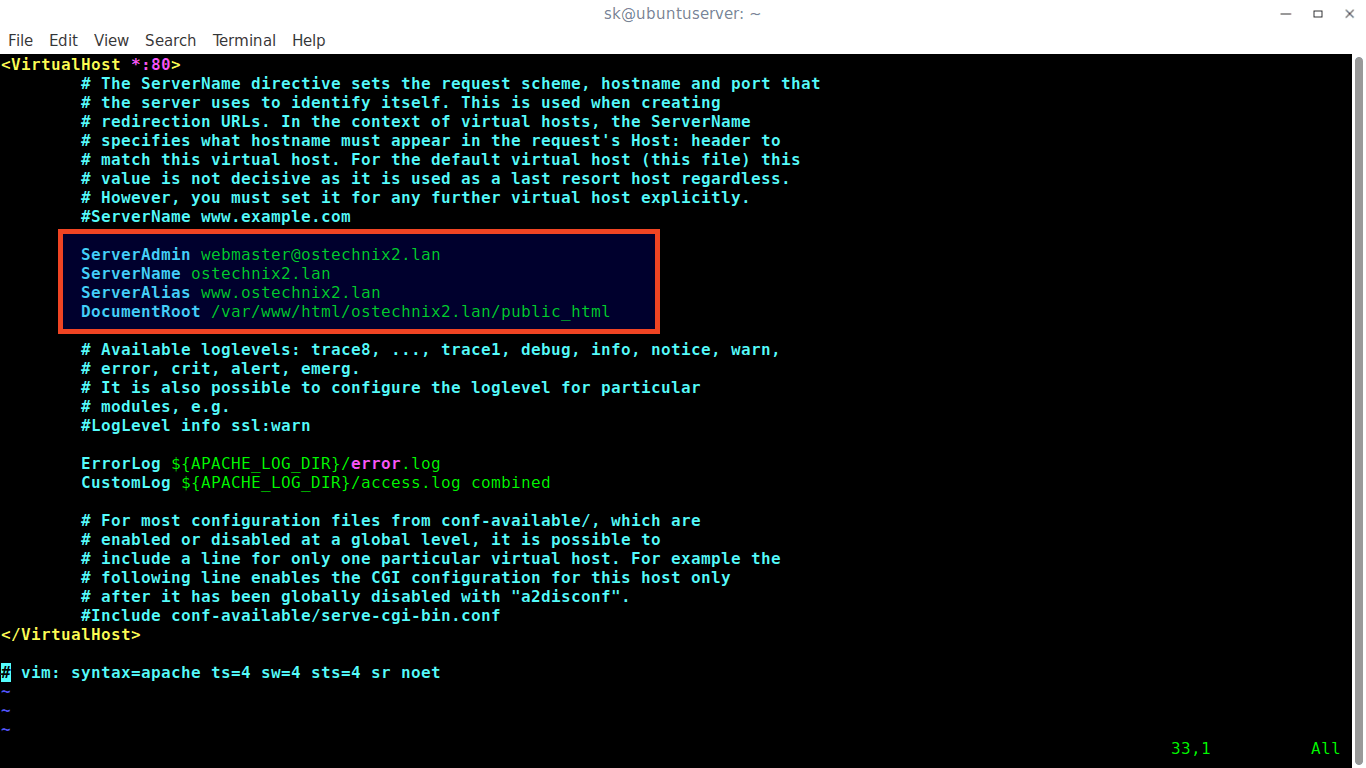
Now, modify the configuration files to match with our virtual hosts.
Edit ostechnix.lan1.conf file:
Edit/modify ServerAdmin, ServerName, ServerAlias and DocumentRoot values matches to virtual host.
Save and close the file.
Next, edit ostechnix2.lan.conf file:
Make the necessary changes.
Save/close the file.
5. Enable virtual host configuration files
After making the necessary changes, disable the default virtual host config file i.e 000.default.conf, and enable all newly created virtual host config files as shown below.
Restart apache web server to take effect the changes.
That’s it. We have successfully configured virtual hosts in Apache. Let us go ahead and check whether they are working or not.
6. Test Virtual hosts
Open /etc/hosts file in any editor:
Add all your virtual websites/domains one by one like below.
Please note that if you want to access the virtual hosts from any remote systems, you must add the above lines in each remote system’s /etc/hosts file.
Save and close the file.
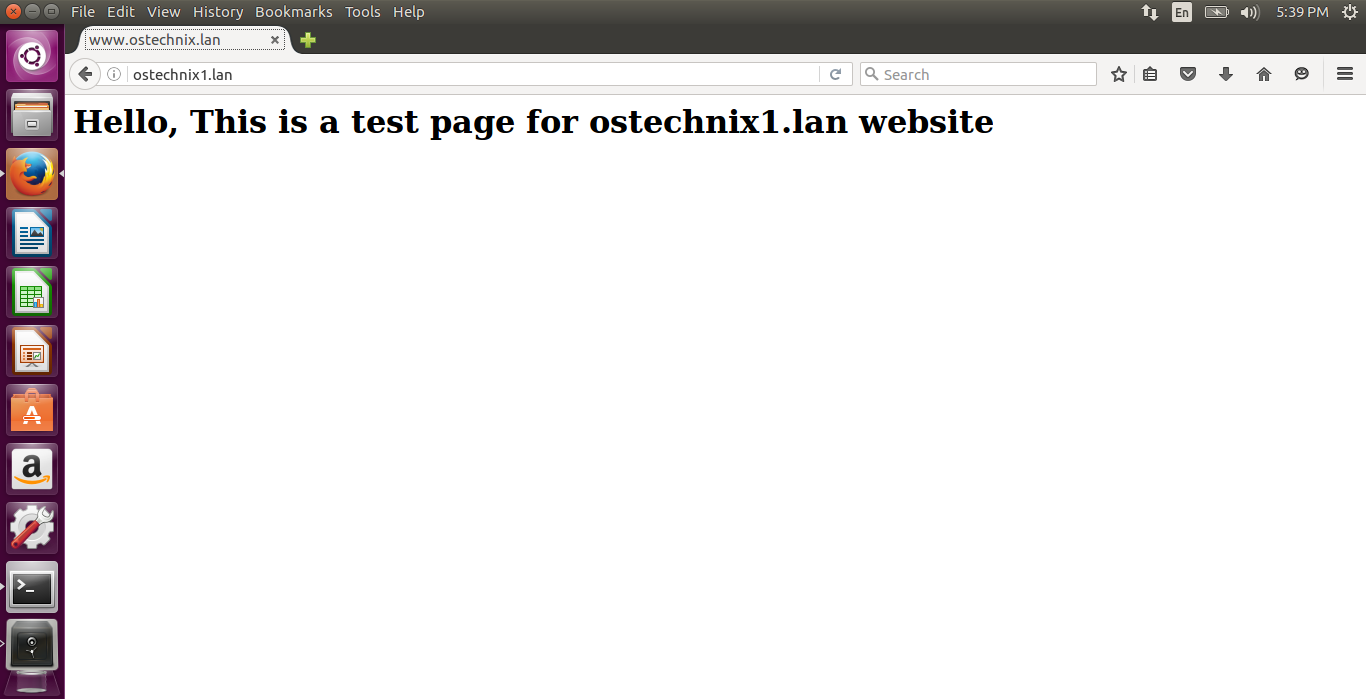
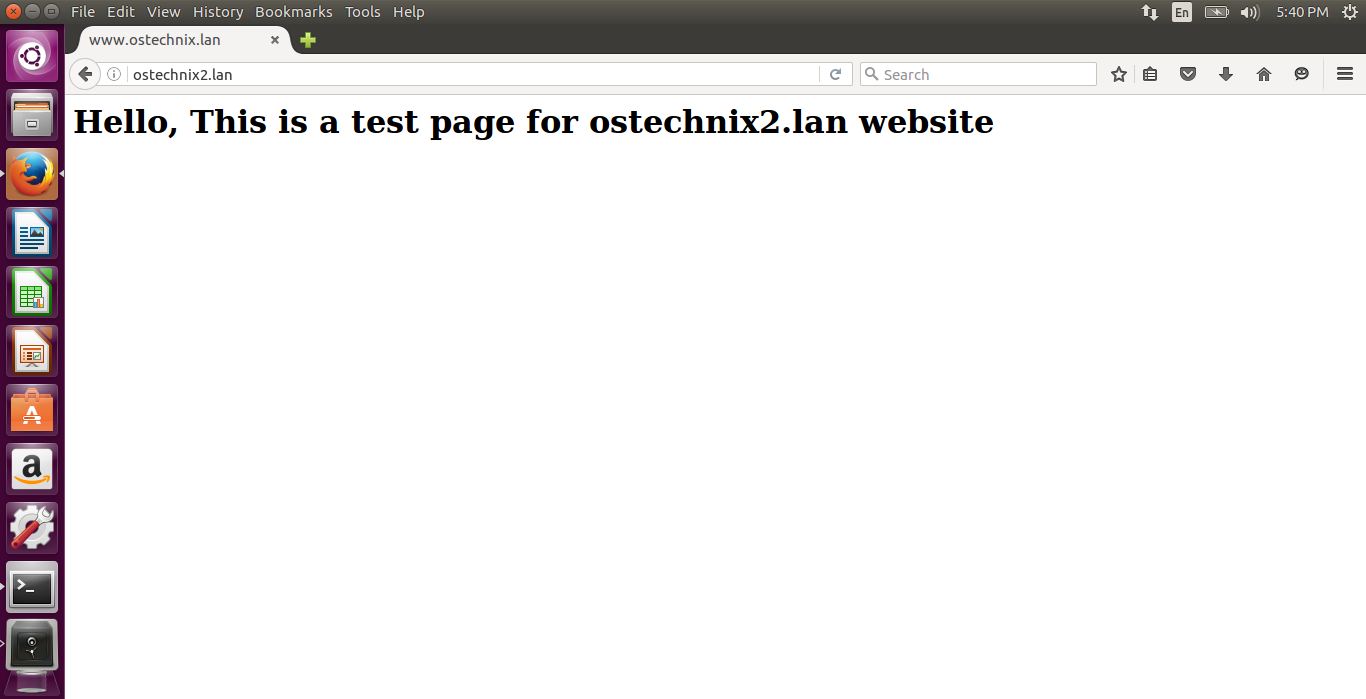
Open up your web browser and point it to http://ostechnix1.lan or http://ostechnix2.lan.
ostechnix1.lan test page:
ostechnix2.lan test page:
Congratulations! You can now be able to access your all websites. From now on, you can upload the data and serve them from different websites.
Источник
How To Set Up Apache Virtual Hosts on Ubuntu 18.04 [Quickstart]
Published on February 19, 2020
Introduction
This tutorial will guide you through setting up multiple domains and websites using Apache virtual hosts on an Ubuntu 18.04 server. During this process, you’ll learn how to serve different content to different visitors depending on which domains they are requesting.
For a more detailed version of this tutorial, with more explanations of each step, please refer to How To Set Up Apache Virtual Hosts on Ubuntu 18.04.
Prerequisites
In order to complete this tutorial, you will need access to the following on an Ubuntu 18.04 server:
- A sudo user on your server
- An Apache2 web server, which you can install with sudo apt install apache2
Step 1 — Create the Directory Structure
We’ll first make a directory structure that will hold the site data that we will be serving to visitors in our top-level Apache directory. We’ll be using example domain names, highlighted below. You should replace these with your actual domain names.
Step 2 — Grant Permissions
We should now change the permissions to our current non-root user to be able to modify the files.
Additionally, we’ll ensure that read access is permitted to the general web directory and all of the files and folders it contains so that pages can be served correctly.
Step 3 — Create Demo Pages for Each Virtual Host
Let’s create some content to serve, we’ll make a demonstration index.html page for each site. We can open up an index.html file in a text editor for our first site, using nano for example.
Within this file, create a domain-specific HTML document, like the following:
Save and close the file, then copy this file to use as the basis for our second site:
Open the file and modify the relevant pieces of information:
Save and close this file as well.
Step 4 — Create New Virtual Host Files
Apache comes with a default virtual host file called 000-default.conf that we’ll use as a template. We’ll copy it over to create a virtual host file for each of our domains.
Create the First Virtual Host File
Start by copying the file for the first domain:
Open the new file in your editor (we’re using nano below) with root privileges:
We will customize this file for our own domain. Modify the highlighted text below for your own circumstances.
At this point, save and close the file.
Copy First Virtual Host and Customize for Second Domain
Now that we have our first virtual host file established, we can create our second one by copying that file and adjusting it as needed.
Start by copying it:
Open the new file with root privileges in your editor:
You now need to modify all of the pieces of information to reference your second domain. The final file should look something like this, with highlighted text corresponding to your own relevant domain information.
Save and close the file when you are finished.
Step 5 — Enable the New Virtual Host Files
With our virtual host files created, we must enable them. We’ll be using the a2ensite tool to achieve this goal.
Next, disable the default site defined in 000-default.conf :
When you are finished, you need to restart Apache to make these changes take effect and use systemctl status to verify the success of the restart.
Your server should now be set up to serve two websites.
Step 6 — Set Up Local Hosts File (Optional)
If you haven’t been using actual domain names that you own to test this procedure and have been using some example domains instead, you can test your work by temporarily modifying the hosts file on your local computer.
On a local Mac or Linux machine, type the following:
Using the domains used in this guide, and replacing your server IP for the your_server_IP text, your file should look like this:
Save and close the file. This will direct any requests for example.com and test.com on our computer and send them to our server.
Step 7 — Test your Results
Now that you have your virtual hosts configured, you can test your setup by going to the domains that you configured in your web browser:
You should see a page that looks like this:
You can also visit your second page and see the file you created for your second site.
If both of these sites work as expected, you’ve configured two virtual hosts on the same server.
If you adjusted your home computer’s hosts file, delete the lines you added.
Related Tutorials
Here are links to more additional guides related to this tutorial:
Источник
