- Virtual Webcam Driver
- 2 Answers 2
- Виртуальная веб-камера (эмулятор)
- Что такое виртуальная веб-камера?
- Для чего нужен эмулятор веб-камеры?
- Где скачать виртуальную веб-камеру?
- Virtual webcam driver windows
- Configuring the virtual webcam driver
- Default cameras and Multi View
- Virtual webcam, its driver and common issues
- OBS Virtualcam 2.0.5
Virtual Webcam Driver
I want to develop a virtual webcam driver which from User mode I’ll pass image to it and it will display as webcam output.
I don’t want to use DirectX filter and CSourceStream etc. Because they don’t work on some programs which doesn’t use DirectX for capturing webcam image.
I have to write a kernel mode device driver so.
Any ideas? I tried testcap from DDK samples, but it doesn’t process image from user mode and doesn’t get any input, just it displays 7 colors in webcam.
Any help would be greatly appreciated. Thanks
I tried code from here: http://tmhare.mvps.org/downloads.htm (find Capture Source Filter)
It worked well when I compiled it in Yahoo, MSN, but it crashed AIM, Internet Explorer Flash Webcam, Firefox Flash webcam and Skype. I got crash in QueryInterface after 8 time call to that, I found it with tracing it with a lot of tricks..
Now I know, it crashes on 8th call to HRESULT CVCamStream::QueryInterface(REFIID riid, void **ppv)
8th call when it reaches to last if, I mean: return CSourceStream::QueryInterface(riid, ppv);
It’s in 17th line of Filters.cpp
Why do you think I’m getting crash??
Thank you all for guiding me to find correct solution which is DirectShow, not driver

2 Answers 2
There are several APIs from Microsoft which provide access to image data.
- Twain: Used for single image capture from scanners, etc.
- WIA: This seems to have degenerated to a single image codec library.
- VfW: A very old (Win16) API which really works only Video-File encoding/decoding, but has support for some video acquisition.
- DirectShow: previously part in the DirectX SDK, currently in the Platform SDK. This is the place to go for current (general) streaming solutions.
- Windows Media/Media Foundation: This seems more to be geared at video playback/reencoding.
- Manufacturer Specific Libraries: Pylon/Halcon/Imaging Control/.
To create image acquisition devices under windows, you have to provide either a device (driver) which implements the streamclasses interfaces (or newer Avstream) or you have to write a usermode COM object which has to be added to the VideoInputCategory enumerator.
The Avstream sample provides everything for a real image acquisition device. Only the lower layer for the actual device really is missing.
If you can design a device, you should either create it DCAM or UVC compatible. For both there are built-in drivers supplied by windows.
How to write a software source device :
You have to create a DirectShow filter which provides at least one output pin and register this under the VideoInputCategory. There may be several interfaces certain applications require from a capture application, but these depend on the application itself. Simple applications to try out filters are GraphEdit and AMCap which are supplied in the Plattform SDK.
_InstanceID is a GUID created for this ‘virtual device’ entry.
Виртуальная веб-камера (эмулятор)
Что такое виртуальная веб-камера?
Это специальный драйвер для компьютера, который добавляет в систему новую веб-камеру. Изображение в эту виртуальную веб-камеру транслирует специальная программа. Например, при установке программы AlterCam в систему устанавливается драйвер виртуальной камеры с названием AlterCam Virtual Camera (именно так устройство будет называться в Диспетчере Устройств Windows). Сама же программа AlterCam умеет отправлять в эту виртуальную веб-камеру видео из различных источников. Это может быть и видео с реальной веб-камеры (причём с применёнными в реальном времени эффектами, добавленным текстом, итд), и видео из произвольного видеофайла, и видео с рабочего стола. Или даже комбинация нескольких источников видео в одном кадре виртуальной веб-камеры.
Для чего нужен эмулятор веб-камеры?
Применений у эмулятора веб-камеры множество. Все они связаны либо с улучшением трансляции видео в реальном времени с имеющейся веб-камеры, либо с необходимостью подменить видео с настоящей веб-камеры другим (так называемая «фейковая камера»). Приведём несколько примеров.
- Допустим, вы ведёте онлайн-вебинар. Вы можете брать видео с реальной камеры, но при этом вы ничего не сможете добавить в кадр. С помощью виртуальной камеры, вы можете взять видео с вашей настоящей камеры и наложить на него необходимый текст, логотип, или даже демонстрировать рабочий стол компьютера.
- Довольно часто виртуальные камеры используются для различных веб-чатов (чатрулетка и ей подобные), когда видео со своей веб-камеры показывать не хотелось бы, а других посмотреть хочется 🙂 В этом случае в виртуальную веб-камеру можно вещать предварительно записанный видеофайл, либо просто любой видеофайл на ваш вкус. Стоит заметить, что в большинстве подобных чатов стандартные названия виртуальных камер запрещены. То есть чат вас не пустит. В этом случае надо просто переименовать виртуальную веб-камеру во что-то более нейтральное, например, Logitech C920 (так называется реальная камера и врядли ее забанят). В программе AlterCam переименовать виртуальную камеру очень просто — это делается в Настройках на вкладке «Виртуальная вебкамера». Не забудьте перезапустить браузер после переименования камеры и заново подключиться к чату с выбором веб-камеры. Если ваш рандом-чат по-прежнему не видит камеры или не пускает, попробуйте перезагрузить Windows. Если и это не помогло, то может помочь смена браузера.
- Просто провести весело время с друзьями. Воспользуйтесь множеством эффектов для вебкамеры — они будут отображаться в вашем видеочате в реальном времени.
- А еще вы сможете использовать камеру смартфона в качестве вебкамеры. Для этого на смартфон устанавливается приложение IP-камеры и видео с этой IP-камеры с помощью AlterCam принимается и тут же передаётся в виртуальную веб-камеру на компьютере.
Вкратце о возможностях виртуальной веб-камеры рассказали в ролике:
Где скачать виртуальную веб-камеру?
Существует несколько схожих программ. Мы рекомендуем скачать AlterCam. Этот инсталляционный файл установит драйвер виртуальной веб-камеры и саму программу AlterCam. Программа обладает достаточно обширным функционалом, вы можете использовать множество источников видео для виртуальной камеры, комбинировать их в одном кадре, применять эффекты, накладывать текст. При желании, вы можете отдельно установить виртуальный микрофон (на вкладке «Аудио» в программе) и изменять голос в чатах в реальном времени. Само собой, доступна и запись видео с виртуальной камеры в файл.
Надеюсь, статья оказалась полезной для вас и вы поделитесь ей с друзьями. Вот специальные кнопочки:
Virtual webcam driver windows
For this to work with skype you will need to download the 32 bit version (skype is 32 bit only)
We’ve developed a virtual webcam driver so you can use any of the cameras you add into ispy in applications like Skype, Messenger, Flash, web conferencing tools etc. It’s free and what’s more, with an ispy subscription you can use this driver remotely. 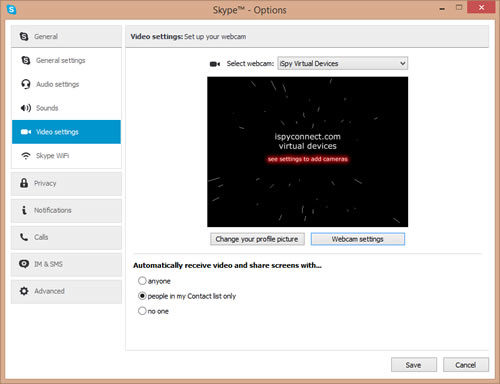
- Download the Virtual Webcam Driver
- Unzip the file
- Run the install.bat file. Depending on your settings, Windows may block this as it has been downloaded from the internet. If this happens click «More info» and «Run anyway» to install.
- You may need to restart your computer for the driver to show up in third party software
Configuring the virtual webcam driver
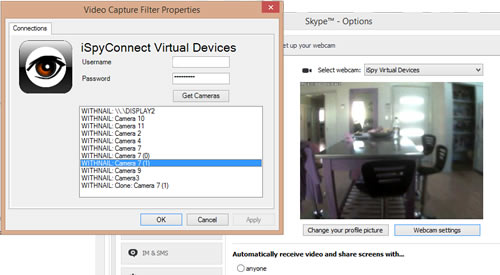
Integrating with Skype:
- Click Tools — Options — Video Settings
- Select «iSpy Virtual Devices» in the webcam dropdown (if you don’t see this run the install.bat file again and check it is installing successfully. You will need Administrator privileges to install this. Try restarting skype and restarting your PC)
- Enter your iSpyConnect.com login information in the settings dialog and click «Get Cameras». iSpy will need to be running and signed into your account in web settings to get a list of available cameras.
- Click to select a camera. The live feed from that camera will then start playing in the video preview window.
- Click OK
The driver will remember your selection. To clear your configuration remove your login details from settings and click «Get Cameras» again.
Default cameras and Multi View
To setup default cameras, open ispy and click «Options — Default Device Manager». You can then select 1 or more cameras to display in the default video feed to the virtual device driver.
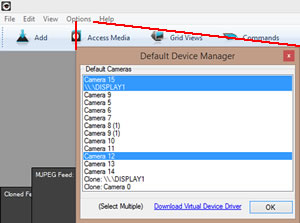
When you then connect a third party application to the virtual device driver ispy will return a multi cam feed of your selected devices. You can change your camera selections in ispy and the feed into skype will be updated live without having to go back into properties which makes it easy to swap in and out video feeds.
Virtual webcam, its driver and common issues
This article only applies to ManyCam for Windows only.
Virtual Webcam and its driver are core components and a vital part of ManyCam. ManyCam’s driver creates a virtual copy of your camera and allows you to use it as a video source in multiple applications simultaneously. In other words, ManyCam receives the video stream coming from the video source and is able to direct it to several applications at a time through ManyCam’s virtual webcam.
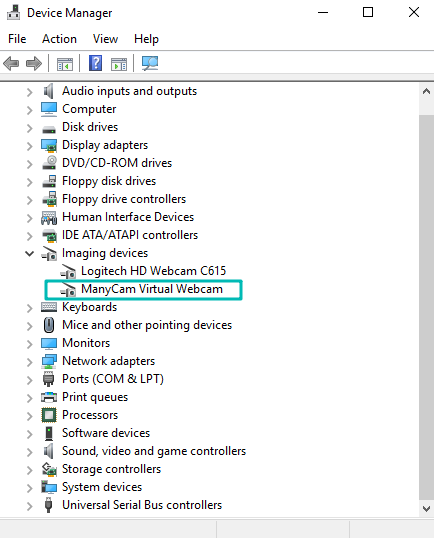
After the installation, ManyCam Virtual Webcam will be available as a webcam option like any other webcam; its driver is located in the Imaging devices section in your Device Manager (Device Manager → Imaging Devices → ManyCam Virtual Webcam).
Communication with the driver failed
This is a very common error that might occur for different reasons. The very first step to address this issue is to install all the latest Windows updates.
The next step is to uninstall and reinstall ManyCam to get rid of the old driver and install the new one. The procedure is as follows:
Please proceed with the options below in case none of the above helped:
If you have Windows 7
ManyCam driver requires the KB3033929 update, which might be missing from your system. You can download it from the Microsoft Update catalog. Please follow the link and choose the proper version for your system — x86 or x64. Don’t forget to restart your machine once the update is installed.
This update is not required for Windows 8.1 or Windows 10 since these systems already contain all the components necessary.
If you have Windows 10
Windows 10 updates may uninstall some software during minor or major updates. This is where you might get this error. Clean installation, as described above, usually resolves the issue, however, if the error still persists, please don’t hesitate to contact our Helpdesk. Don’t forget to mention in your request that you have already tried to uninstall and reinstall ManyCam after you installed all the latest Windows updates.
OBS Virtualcam 2.0.5
NOTE: The horizontal flip option is bugged and will likely cause crashes. Please do not use it. If you need to flip your video, either flip the sources in OBS itself, or flip on the receiving end (i.e. in Zoom, Skype, etc.)
This plugin provides a DirectShow Output as a virtual webcam.
How to use:
OBS Virtualcam has two main methods for outputting video from OBS. The first is the Preview output, which is enabled from the Tools menu. This output will provide exactly what you see in the Preview in OBS, including any changes or scenes you might switch to. This is the most common method, and probably what you would want to use.
Preview Output:
1. Select Tools -> VirtualCam in the main OBS Studio window
2. Press the Start button, then close the dialog
3. Open your program (Zoom, Hangouts, Skype, etc.) and choose OBS-Camera as your webcam
The next method is a filter that you can add to any scene or source, if you only want to output that specific scene or source, and nothing else.
Source Filter:
1. Add a VirtualCam filter to the scene/source you want to output to the virtual camera
2. Choose a camera target then press Start
3. If the button does not change to Stop, it means the camera is already in use, and you must choose a different camera or stop the other output first.
4. Open your program (Zoom, Hangouts, Skype, etc.) and choose the camera you selected as the target as your webcam
Why are the resolution and framerate sometimes not the same as my OBS output settings?
If you open an OBS-Camera device in a 3rd party application before starting the output in OBS, OBS-Camera will default to 1080p 30fps. If you start OBS first, it will use whatever is set as the Output resolution and framerate in OBS Studio’s options, under Settings -> Video.
Does this plugin support other platforms?
For Linux, you can use the Video4Linux sink plugin for OBS Studio. Directions on how to configure it are available from that link. Work is underway to provide a similar plugin for macOS, but there is no ETA.


