- Создание виртуальных машин EFI в программе VirtualBox
- Создание виртуальных машин EFI в программе VirtualBox
- Виджеты на рабочий стол
- В Экселе не двигается курсор по ячейкам: в чем может быть проблема?
- Не работает правая кнопка мыши в Excel: где кроется проблема?
- Не работает фильтр в Excel: загвоздка, на которую мы часто не обращаем внимания
- Не отображаются листы в Excel: как вернуть вкладки без танцев с бубнами
- 1. Виртуальные машины EFI: специфика
- 2. Создание виртуальной машины EFI
- 3. Запуск виртуальной машины EFI с загрузочной флешки UEFI
- Install Windows 10 in VirtualBox (UEFI)
- Content
- Install VirtualBox on your system
- Create a new Virtual Machine for Windows 10
- Configuring VirtualBox for Windows 10 installation
- Download Windows 10 ISO
- Install Windows 10 in VirtualBox
- VirtualBox mouse pointer Capture
- Windows 10 installation
- Fix the screen resolution for Windows 10 in VirtualBox
- Install VirtualBox Guest Additions
- Test full-screen mode
- Enable Shared Folder
- Enable Shared Clipboard
- Enable files drag and drop
- Conclusion
Создание виртуальных машин EFI в программе VirtualBox

Создание виртуальных машин EFI в программе VirtualBox

Виджеты на рабочий стол

В Экселе не двигается курсор по ячейкам: в чем может быть проблема?

Не работает правая кнопка мыши в Excel: где кроется проблема?

Не работает фильтр в Excel: загвоздка, на которую мы часто не обращаем внимания

Не отображаются листы в Excel: как вернуть вкладки без танцев с бубнами
В число возможностей бесплатного гипервизора VirtualBox от компании Oracle Corporation включена поддержка виртуальных машин на базе ПО EFI – по сути, эмуляция физических компьютеров на базе BIOS UEFI. В этой статье поговорим об особенностях виртуальных машин EFI и рассмотрим процесс их создания в программе VirtualBox.
1. Виртуальные машины EFI: специфика
Как и компьютеры на базе прошивки нового формата – BIOS UEFI, виртуальные машины EFI поддерживают работу с виртуальными жесткими дисками GPT, быстрее запускаются, перезагружаются, входят в режим сна и выходят из него. Более заметными улучшения в производительности виртуальных машин EFI будут на физических компьютерах, работающих на базе BIOS UEFI и с установленными на GPT-диски операционными системами.
Как и на компьютеры с BIOS UEFI, на виртуальные машины EFI можно установить только 64-битные редакции операционных систем. И только операционные системы с цифровой подписью, которые смогут пройти проверку Secure Boot. Как и реальная BIOS UEFI, эмулируемый программой VirtualBox интерфейс EFI позволяет загружаться только с загрузочных устройств UEFI – загрузочных ISO-образов и USB-устройств, адаптированных под работу UEFI. Кстати, о загрузке с USB-устройств.
У виртуальных машин VirtualBox обычных и EFI разные эмуляторы прошивки – вызываемой клавишей F12 при запуске машин среды по типу BIOS на физических компьютерах. Эмулятор прошивки обычных виртуальных машин примитивен: прошивка являет собой лишь перечень устройств загрузки, причем актуальный для старых компьютеров – дискета, оптический диск, сеть, жесткий диск.

Эмулятор прошивки EFI же содержит некоторые настройки эмулируемых комплектующих,

а в приоритете загрузки вместо упраздненной дискеты предусматривается запуск виртуальной машины с более актуальных на сегодняшний день устройств – загрузочных флешек и прочих USB-носителей.

Во всем остальном виртуальные машины работают так же, как и обычные – устанавливаются на виртуальный жесткий диск, предусматривают настройку эмуляции аппаратной части, при установке дополнений для гостевой ОС обеспечивают связь последней с основной ОС (хост-системой, установленной на физическом компьютере) в виде возможности перетаскивания объектов, общих буфера обмена и папок с данными. Как и для обычных, для виртуальных машин EFI в программе VirtualBox реализован экспорт-импорт конфигурации для случаев переноса на другой компьютер или переустановки операционной системы.
2. Создание виртуальной машины EFI
Процесс создания виртуальной машины EFI от создания обычной машины будет отличаться лишь на этапе настройки. Первые шаги по созданию виртуальной машины в обоих случаях будут одинаковыми.
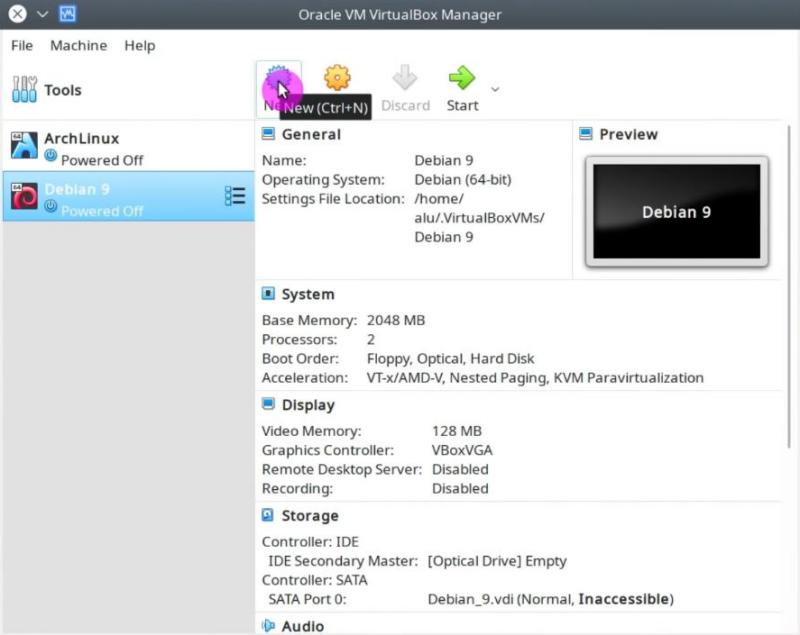
В окне главном окне VirtualBox жмем кнопку «Создать». В появившемся окошке мастера выбираем «Экспертный режим».

Выбираем операционную систему, ее версию, указываем имя и путь сохранения папки с данными конфигурации виртуальной машины. Указываем выделяемый объем оперативной памяти. И задаем настройки жесткого диска – либо указываем существующий, либо, как в нашем примере, создаем новый.

Далее задаем детальные характеристики виртуального жесткого диска: указываем место хранения его файла, определяем размер, можем оставить предустановленными «родной» формат файла VirtualBox VDI и динамический тип. Жмем «Создать» по итогу.

После того как виртуальная машина будет создана, в главном окне VirtualBox кликаем ее и жмем кнопку «Настроить».

В окне настроек переключаемся на вертикальную вкладку «Система» и в первой горизонтальной вкладке «Материнская плата» ставим галочку опции «Включить EFI». Жмем «Ок».

Запускаем виртуальную машину.

Появится окошко выбора загрузочного ISO-образа для виртуального привода, с которого далее будет осуществлена загрузка виртуальной машины. Клик по значку папки откроет проводник Windows, где можно указать путь к образу установочного диска с нужной операционной системой.

Если на компьютере нет загрузочного ISO-образа нужной операционной системы, но дистрибутив записан на загрузочную флешку UEFI, загрузить виртуальную машину EFI можно с этой флешки.
3. Запуск виртуальной машины EFI с загрузочной флешки UEFI
Чтобы виртуальную машину EFI запустить с загрузочной флешки UEFI, заходим в настройки выключенной машины. В разделе «USB» проверяем, чтобы была выставлена галочка включения контроллера USB. Затем выбираем либо контроллер USB 2.0, либо USB 3.0 (3.0 совместим с 2.0). Далее подключаем флешку: жмем кнопку с плюсиком и из перечня подсоединенных к компьютеру USB-устройств выбираем флешку. Применяем все это кнопкой «Ок».

Запускаем виртуальную машину и сразу же жмем клавишу F12 для входа в прошивку. Теперь осталось только задать приоритет загрузки с USB-устройства, как показано на втором и третьем скриншоте в начале статьи.
Может быть и так, что без установки плагина для VirtualBox (Extension Pack) работа виртуальных машин с USB-устройствами будет некорректной. Как установить плагин? Его необходимо прежде скачать с официального сайта VirtualBox.

Далее в главном окне программы VirtualBox жмем клавиши Ctrl+G, заходим в раздел «Плагины», нажимаем кнопку открытия проводника и указываем путь к скачанному файлу-плагину.

Подтверждаем установку плагина.

Соглашаемся с условиями лицензии.

Дожидаемся сообщения об успешном завершении операции и кнопкой «Ок» подтверждаем сохранение внесенных настроек.
Install Windows 10 in VirtualBox (UEFI)
Some Linux users face a problem of the need to run Windows-specific utilities in Linux. The simplest and reliable way to do that is to use Windows in a virtual machine inside Linux. In this post, you will learn how to install Windows 10 in VirtualBox and make this Windows system completely functional including full-screen mode, shared clipboard, shared folder and other handy features that help integrate Virtual environment and your main system.
Content
VirtualBox is an application developed and maintained by Oracle that allows you to install operating systems in a virtual environment inside other operating systems. Thanks to VirtualBox we can install several operating systems, including Windows 10, in our main Linux system. VirtualBox is very intuitive to use but some tips are required to make an installed system fully functional.
Install VirtualBox on your system
VirtualBox is a very popular application in Linux. So, it is available in most of the official repositories of the most used Linux distributions. You should be able to find it in your Software Center.
However, it is possible that the version in the repositories is a bit out of date. If you want to download the latest version or if you are using Windows or macOS, then you can download it from the VirtualBox website.
Create a new Virtual Machine for Windows 10
To install Windows 10 in VirtualBox it is necessary to create a virtual machine. Click on the New button. You can also do it with the keyboard shortcut CTRL + N.
In the opened window, you have to type the name of a new virtual machine. If you type the name Windows 10, VirtualBox will complete the rest of the fields. However, if it does not detect everything correctly, you can modify some of the fields. Then click on the Next button:

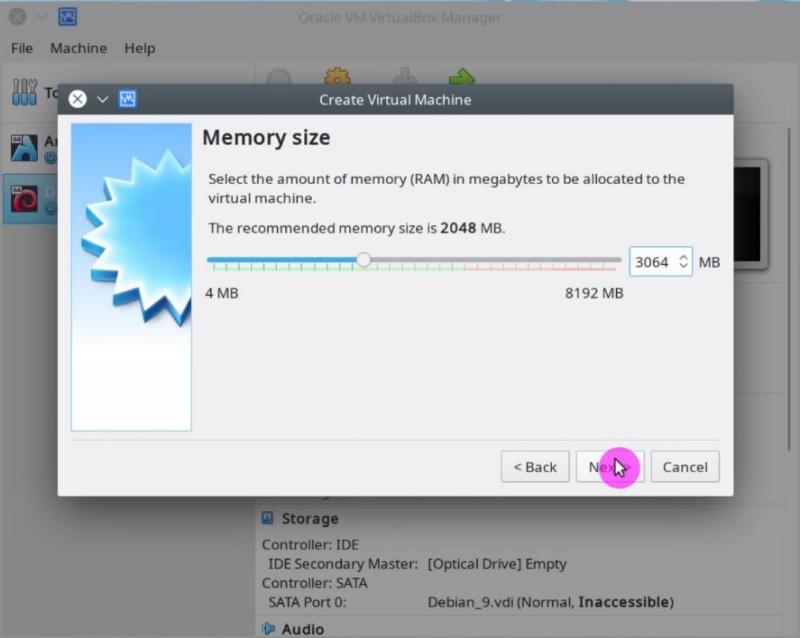
Next, you have to define the size of the RAM that the new virtual machine will use. For Windows 10 the recommended size is at least 3Gb. Then, click on the Next button:
After that, you need to choose the virtual hard disk that the virtual machine will use. Normally you have to create a new one. So, choose the second option and click on the Create button:
![]()
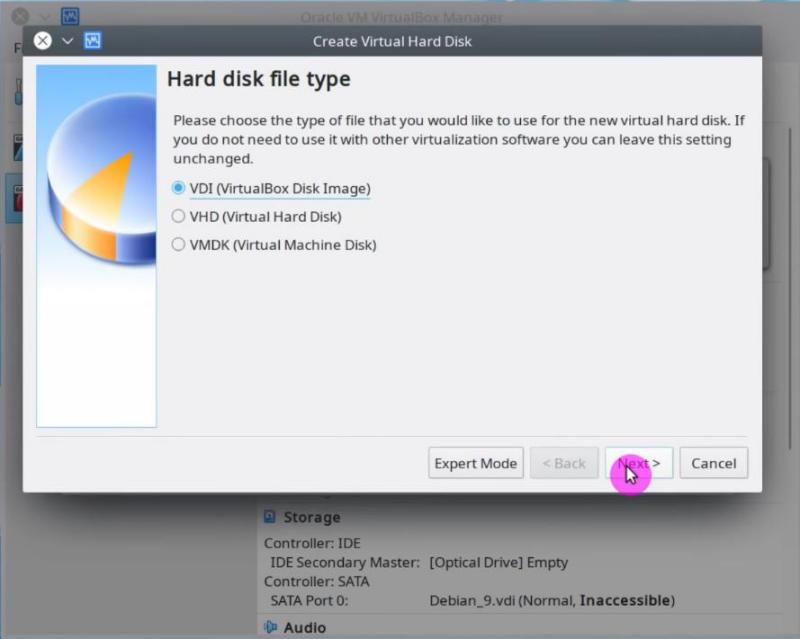
Then you have to choose the type of hard disk. There are three options, choose the first one (VDI):
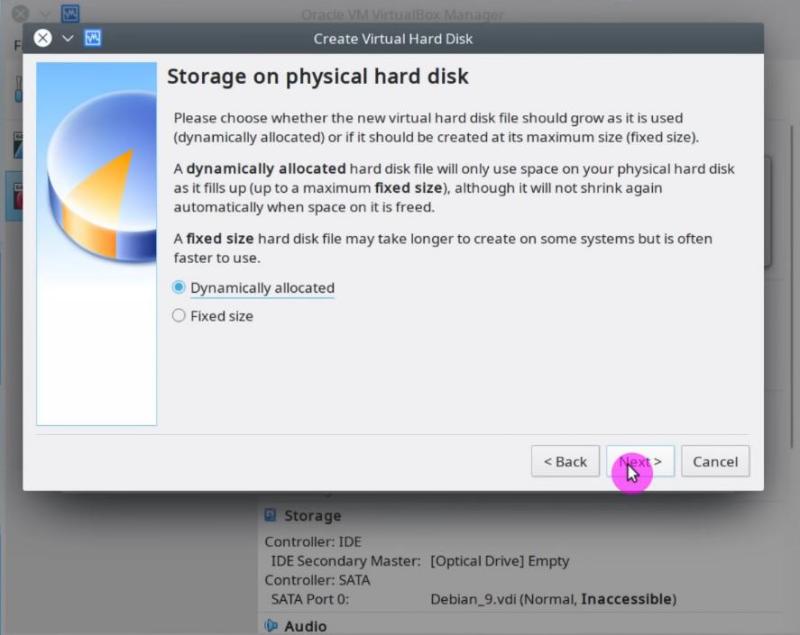
In the next window, choose Dynamically Allocated. This way the virtual disk will use only the amount of space that is taken by the virtual system instead of the maximum allocated space. This option helps to use the disk space more effectively:
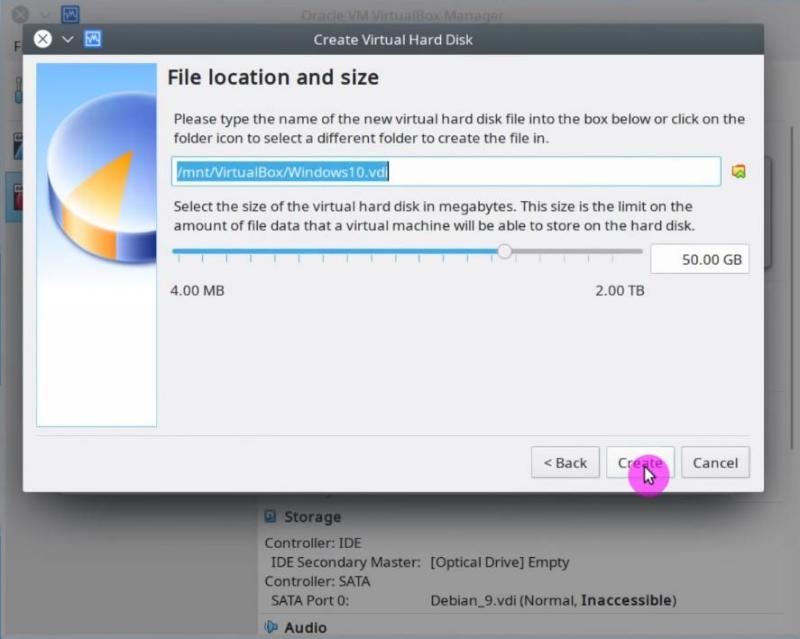
Finally, you have the option to set the path where the virtual hard disk file will be located and its size:
After this, the virtual machine will be created.
Configuring VirtualBox for Windows 10 installation
There are a few more things to be adjusted before you can use it to install Windows 10.
First, from the main VirtualBox window select the Windows 10 virtual machine and click on the Settings button:

Now you will see the options of this virtual machine. On the left side click on the System section and then the Motherboard tab, and enable EFI because Window 10 requires the EFI mode:
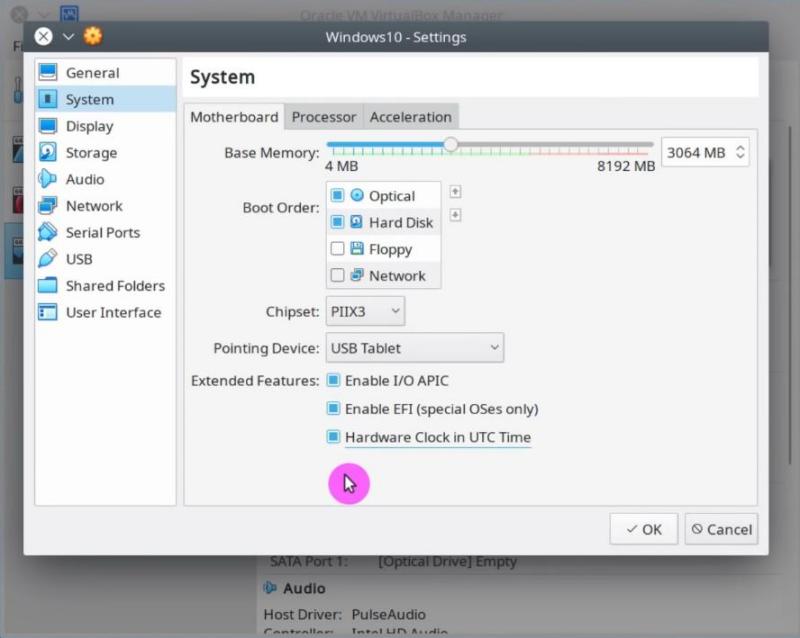
Then, in the Processor tab increase the number of processor cores to be used by the virtual machine. Check how many cores VirtualBox will allow you to use without warning. In my case, I have 4 cores and VirtualBox allows me to allocate 2 cores for the virtual machine without any harm for my main system:

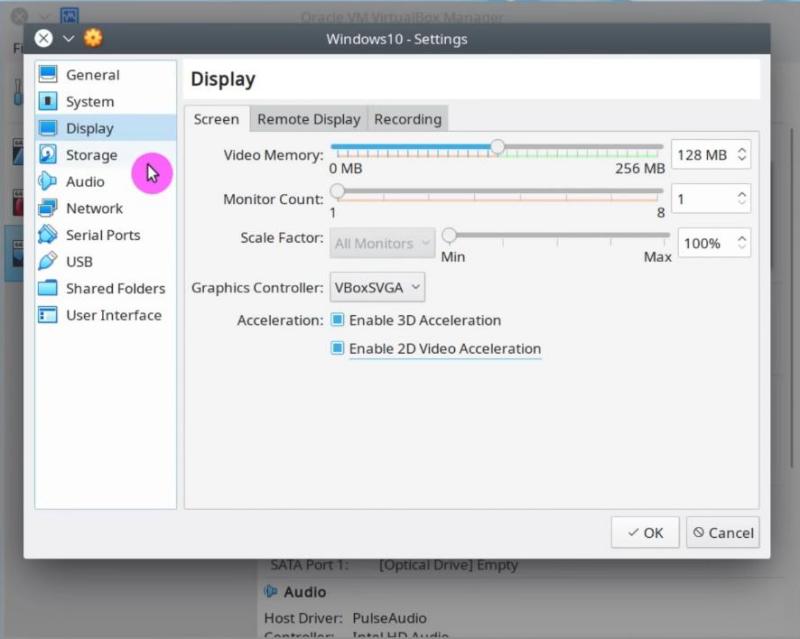
After this, click on the Display section and increase the amount of Video Memory for the virtual machine. I recommend 128Mb minimum. Also for Windows 10, you need to enable 3D and 2D Video Acceleration:
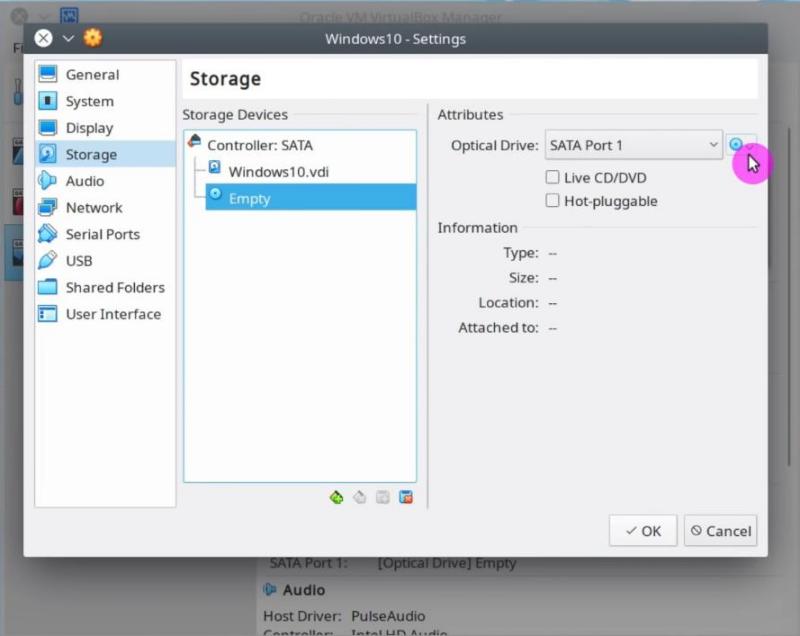
Now, it is necessary to define the location of the ISO file of the Windows 10 ISO image. Click on the Storage section, and select the small disk icon that says Empty. Then, click on the disk image on the right side and select your Windows 10 ISO image:
Next, click on the Ok button.
Download Windows 10 ISO
In case you do not have the Window 10 ISO image, you can download it from the Microsoft website:
Then, add this ISO image to VirtualBox as shown above.
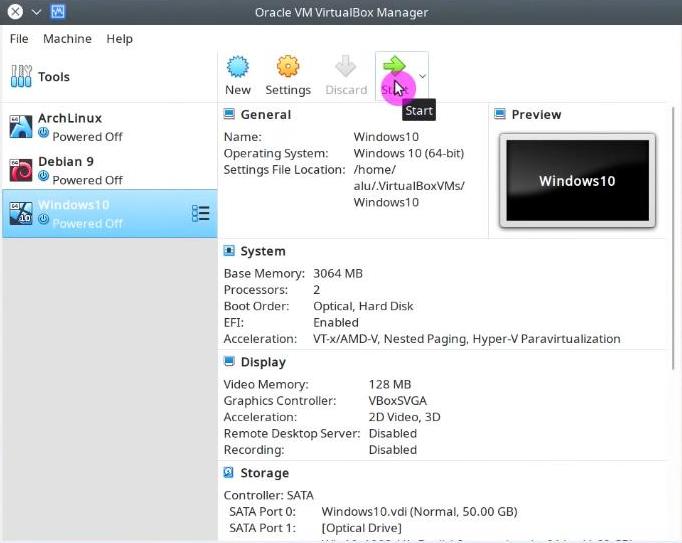
Install Windows 10 in VirtualBox
Now you can start the virtual machine. Select it and click on the Start button:
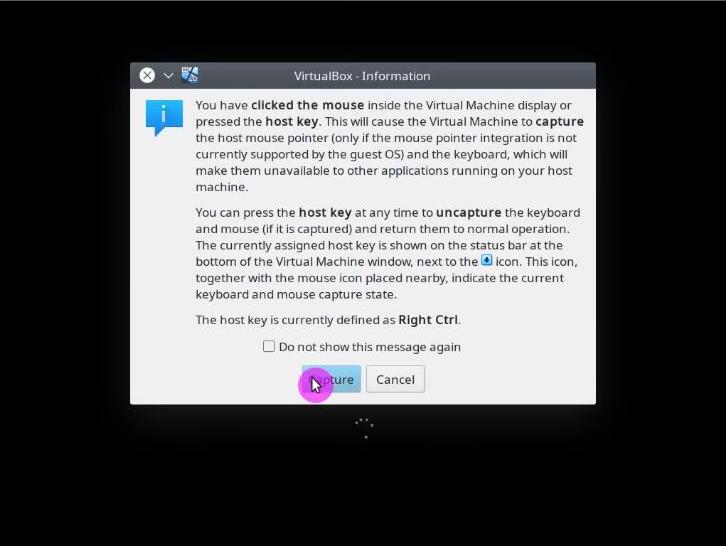
VirtualBox mouse pointer Capture
When you start the virtual machine you will be asked if you want the guest system (Windows 10) to capture the events of the mouse and keyboard. Read the instructions on how to use mouse integration with VirtualBox and agree to Capture:
The rest of the process is the standard Windows 10 installation.
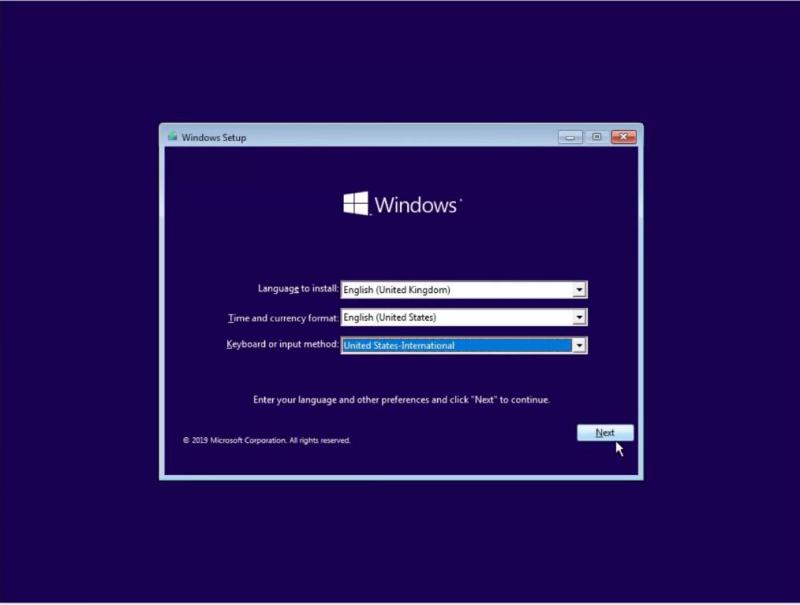
Windows 10 installation
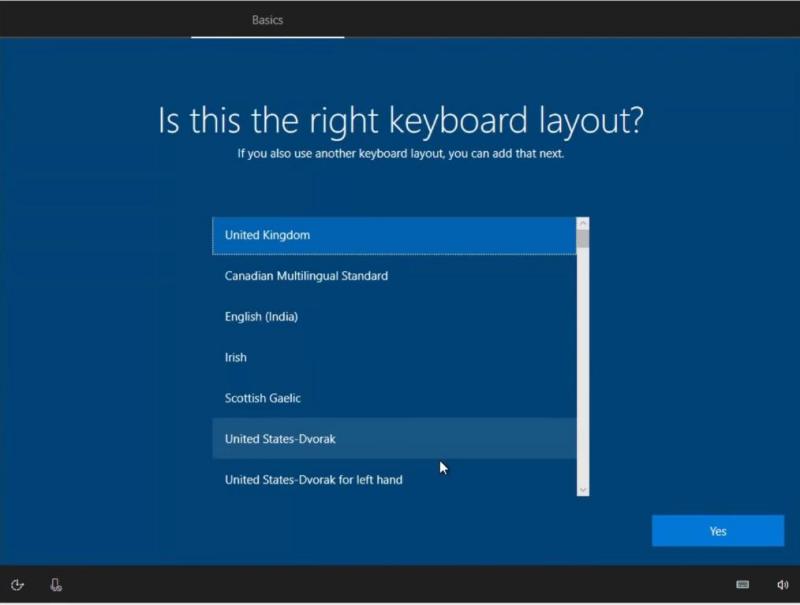
First, choose the language, keyboard layout, and time format:
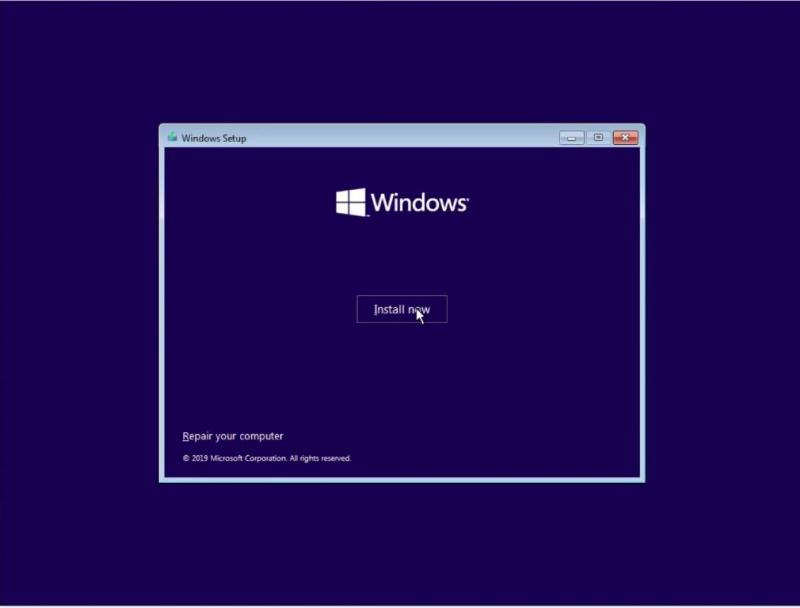
After that, click on the Install Now option:
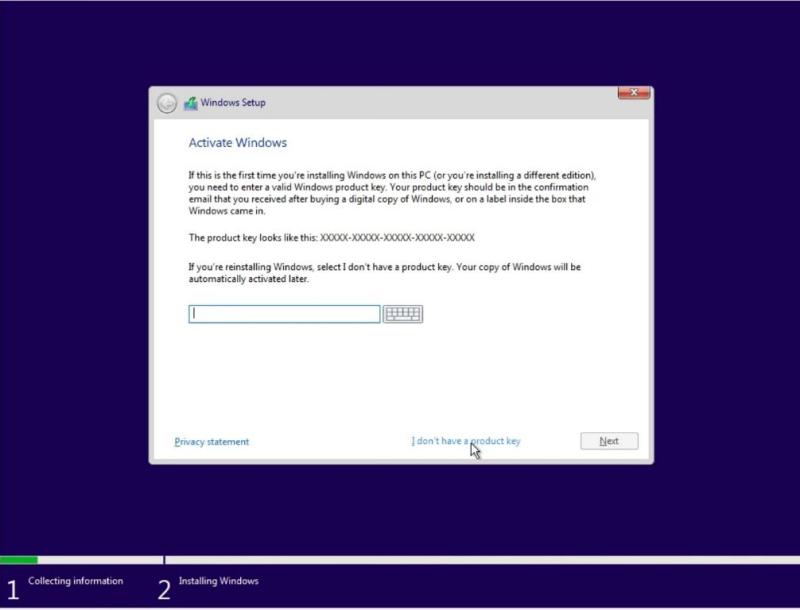
If you have a valid Windows 10 license, you can add it on the following screen. If not, you can click on the option I don’t have a product key and continue in a trial mode:
If you downloaded the ISO from the Microsoft website, it will contain several types of systems. You can select whatever version you prefer. I select Windows 10 PRO:

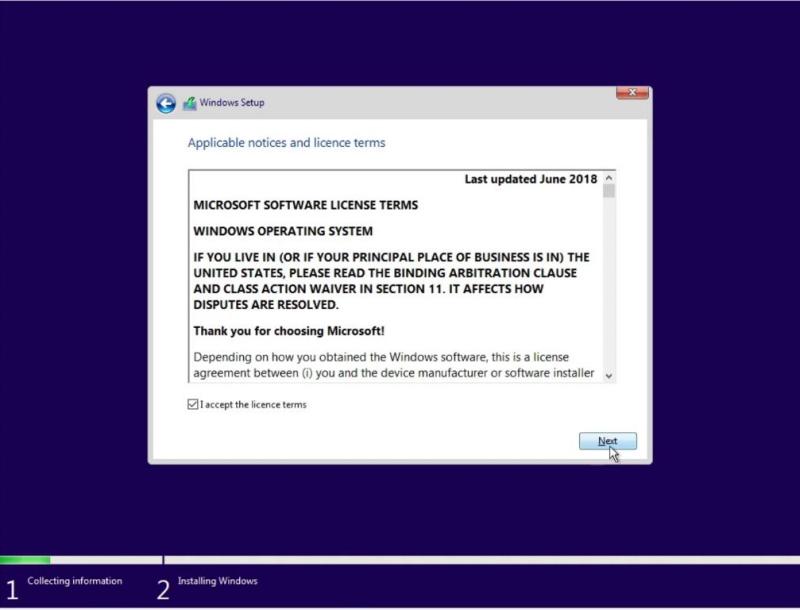
Accept the terms of the license and continue:
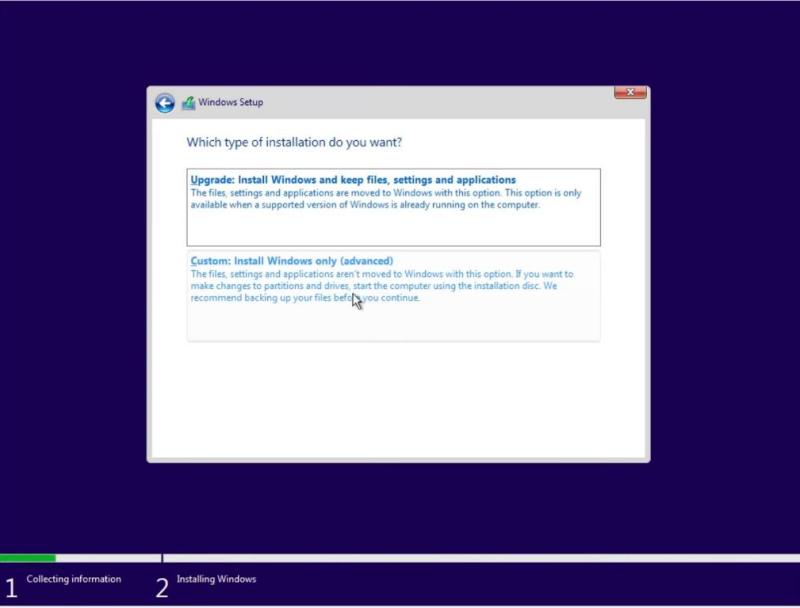
As the hard disk is newly created and has no partition created you will have to choose the Custom: Install Windows only option:
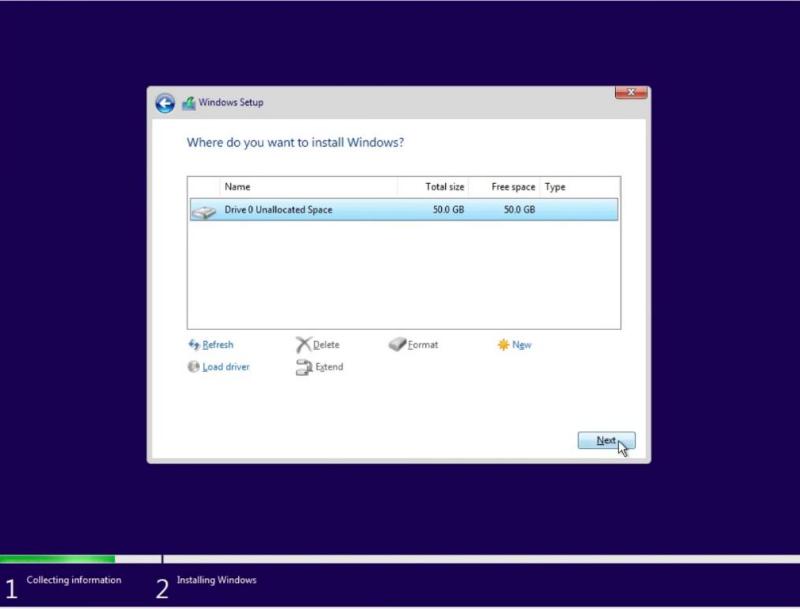
In this screen, you will only have to select the only visible disk and click on the Next button. The installer will create and format the partition automatically:
Then, it will start the installation:
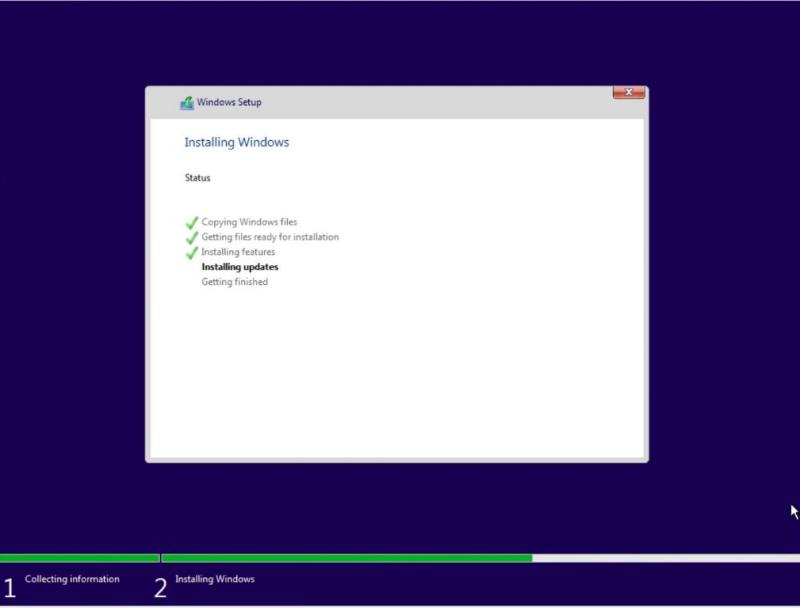
The Windows 10 installer will restart virtual machine several times. This is normal. After the restart, you will need to provide the information on your region:
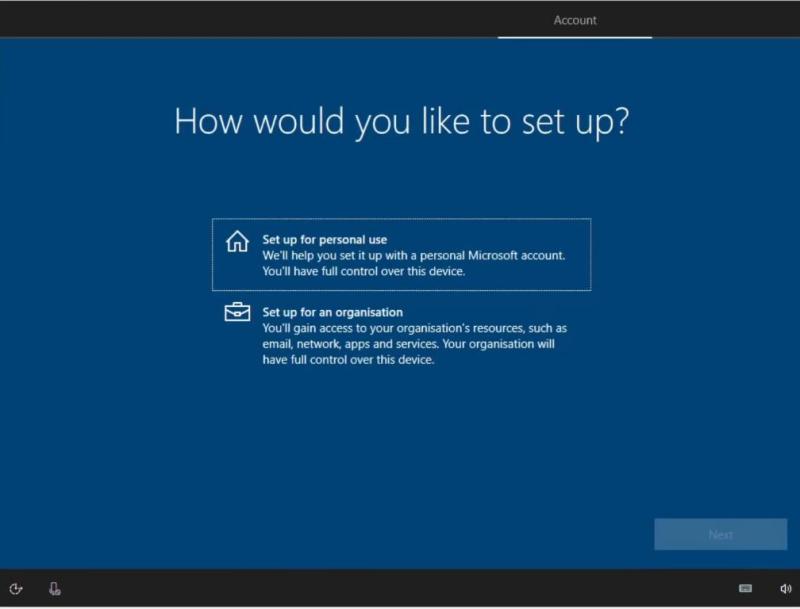
Then, you can choose to configure it for personal or business use. Likely, you will need to choose for personal use:
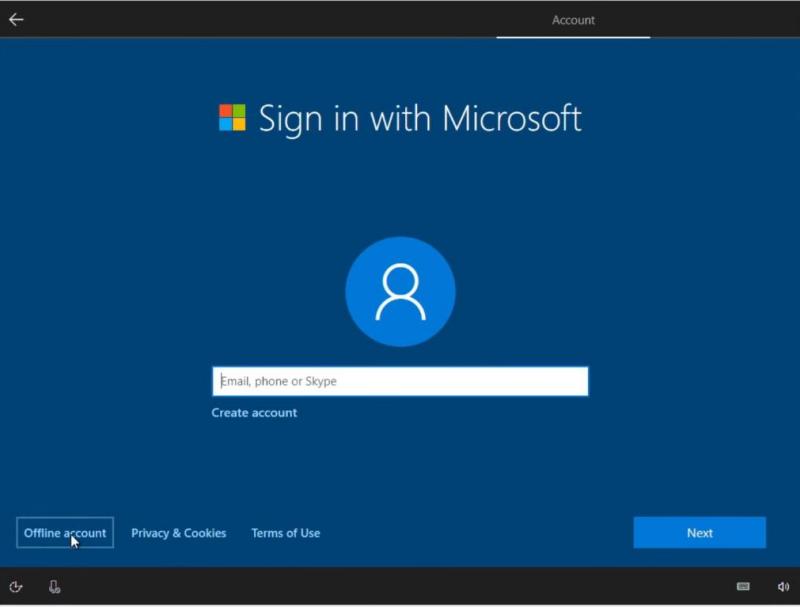
Next, you can log in to your Microsoft account or skip it by choosing Offline account:
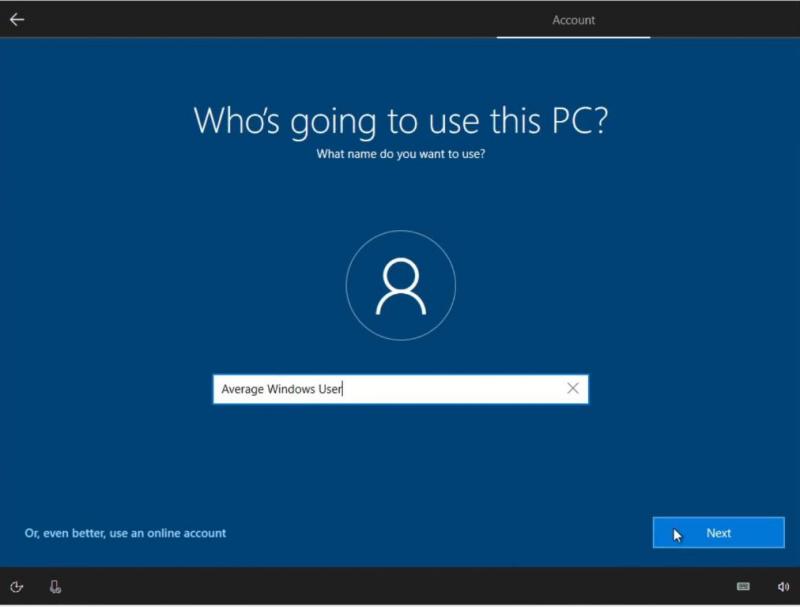
Type the name of the user who will use the system:
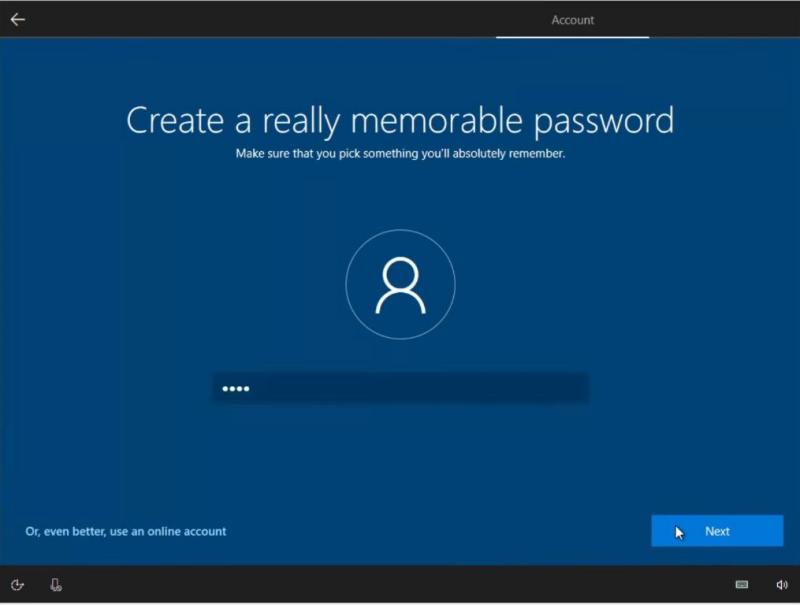
Set a password for the system:
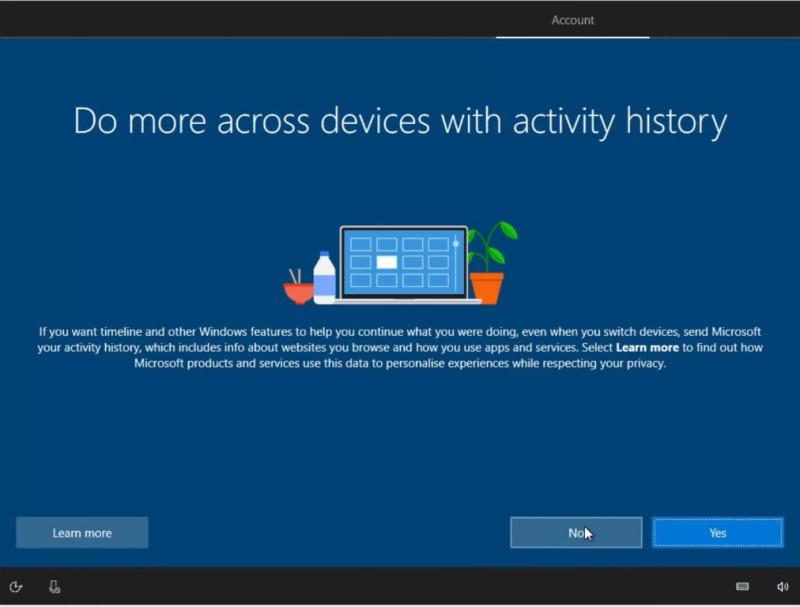
If you do not use multiple Windows 10 devices, you can skip this section:
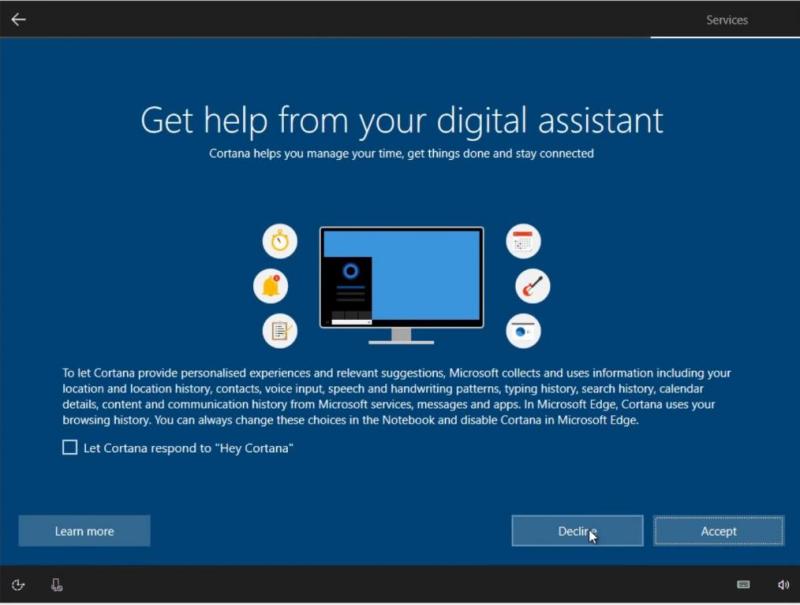
The following screen corresponds to the Cortana configuration. Probably, you won’t need it in a virtual machine, so you can also skip this section:
Configure your privacy settings. I usually disable all options in this screen:
![]()
Finally, you have to wait about half an hour to complete the install and then you will be able to log in to your Windows 10 in VirtualBox:
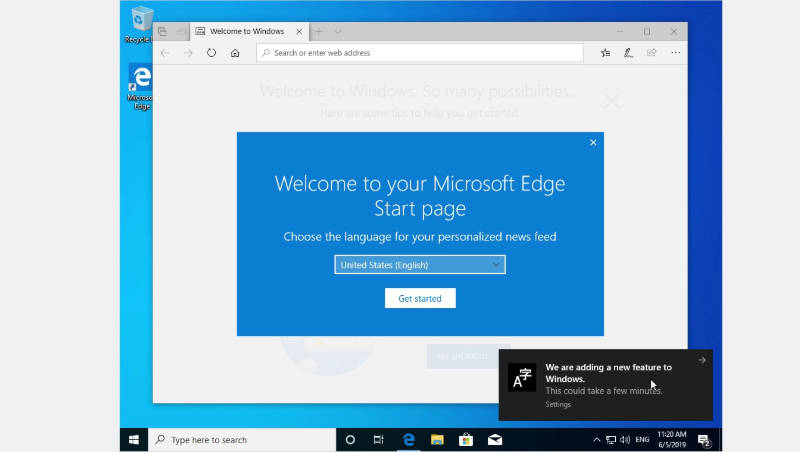
At this stage, Windows 10 is correctly installed but it is not fully functional. So, you need to do a few additional steps to get maximum from your Windows 10 in VirtualBox.
Fix the screen resolution for Windows 10 in VirtualBox
One of the first things you will notice is that this Windows screen is too small and not adapted to the size of your screen (see the image above). To fix that and also enable some additional features, you need to install VirtualBox Guest Additions.
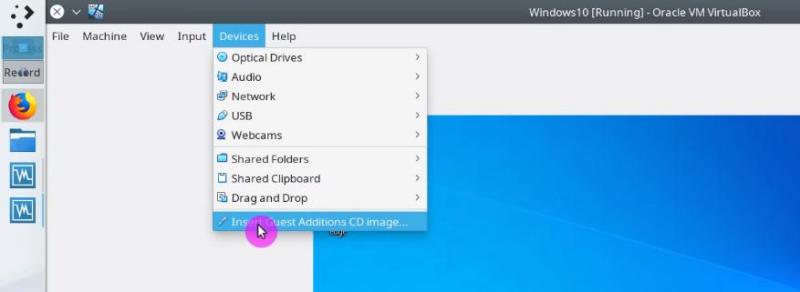
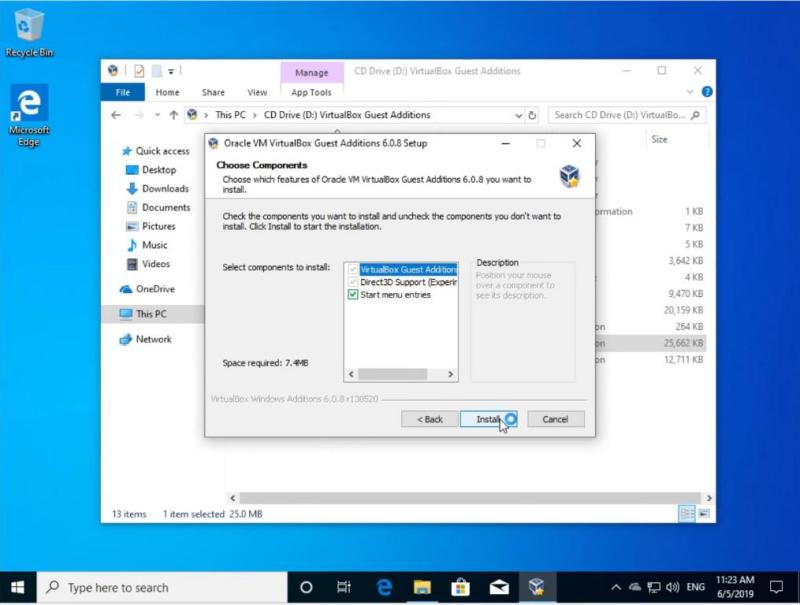
Install VirtualBox Guest Additions
Go to Devices in the VirtualBox menu of the running Windows 10 and click on the Insert Guest Additions CD image option:
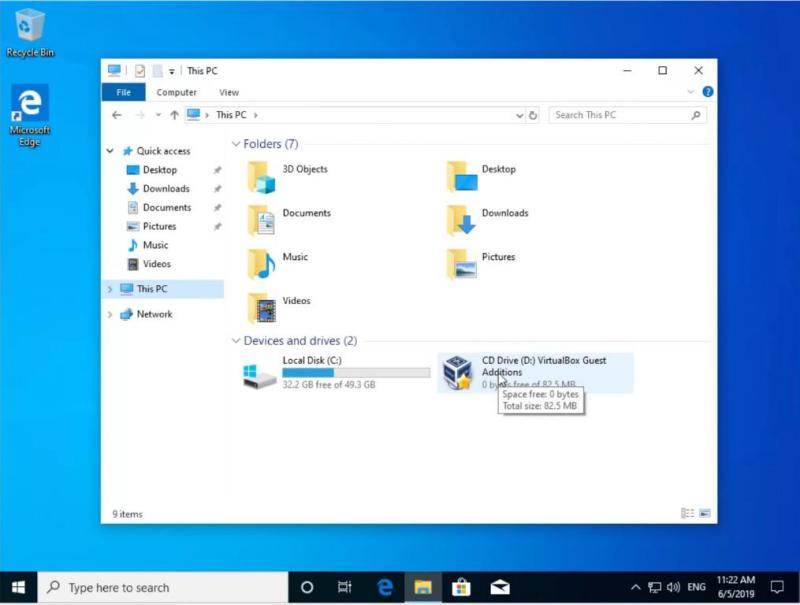
Then, in your Windows 10 system, open the file manager and go to This PC on the left side. In the Devices and Drives section, you will find the VirtualBox Guest Additions CD:
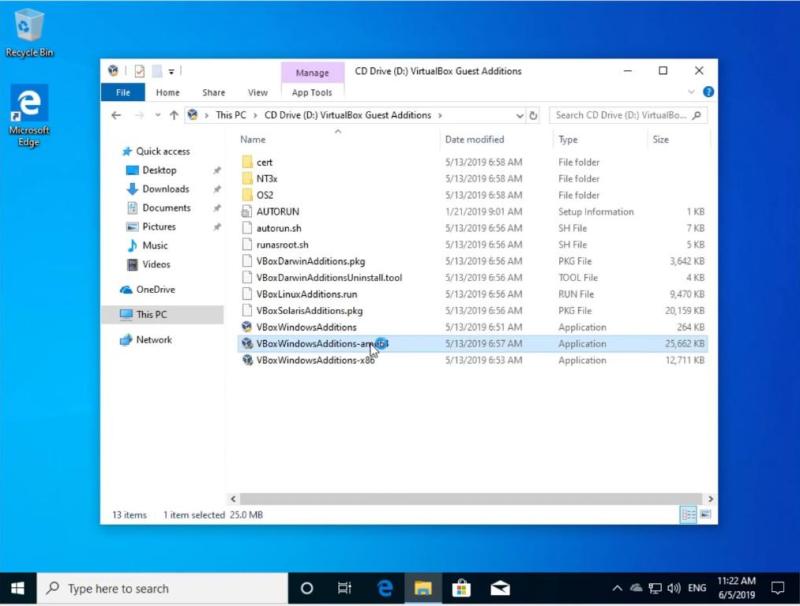
Once you have entered the image, you will see many different files. If the installed Windows 10 is 64-bit, you have to install the VBoxWindowsAdditions-amd64 file but if the system is 32-bit then you have to install VBoxWindowsAdditions-x86. Most Likely, you have the 64-bit system. So, install it by double-clicking on the file:
During the installation, keep all options by default:
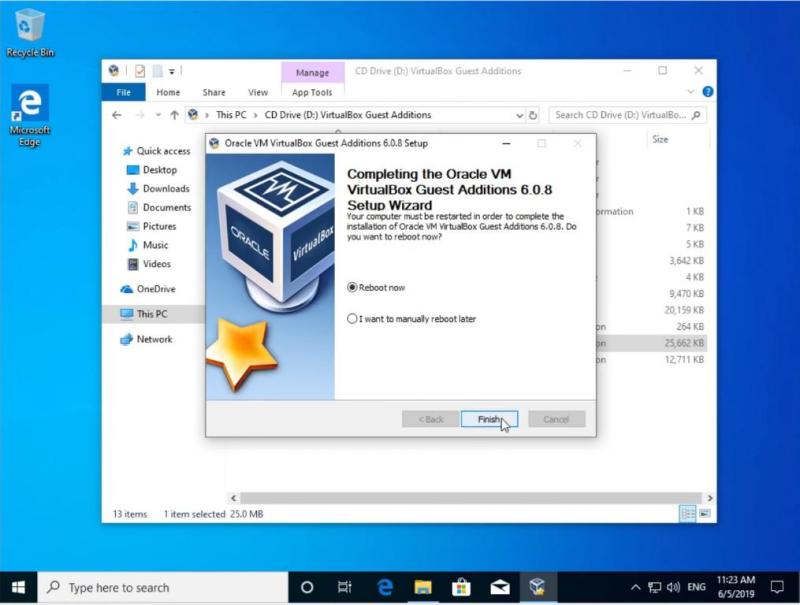
Note: The screen will blink several times during the installation process. This is normal and there is nothing to worry about, just wait for the installation to finish.
Once the installation is complete, it is necessary to restart the system to apply the changes:
When you start your system, your Windows 10 screen will adapt to the size of your real screen:
Test full-screen mode
You can even view this Windows 10 in the full-screen mode. To that end, go to the View menu and click on the full-screen mode option or simply press the keys right CTRL + F:
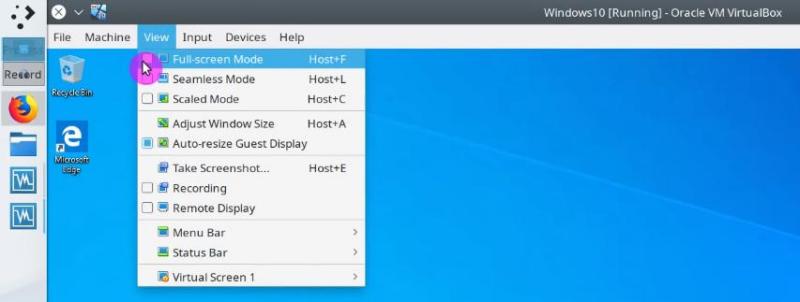
So, you can enjoy full-screen mode. To exit from the full-screen use the same shortcut right CTRL + F.
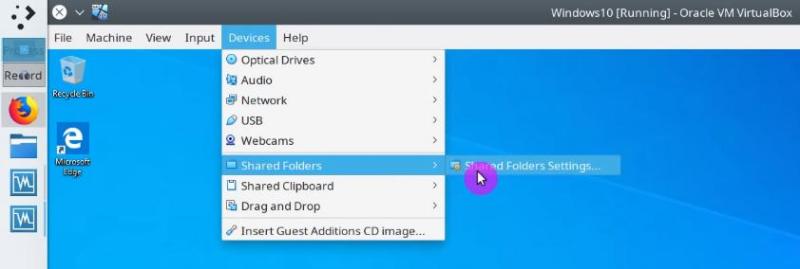
Enable Shared Folder
When working with virtual machines it is also convenient to share files between the host and the guest systems. This can be achieved with a Shared Folder.
To enable it, go to the Devices menu and in the Shared Folders category click on the Shared Folders Settings option:
In the opened window, select the Machine Folders option and click on the small folder icon on the right side:
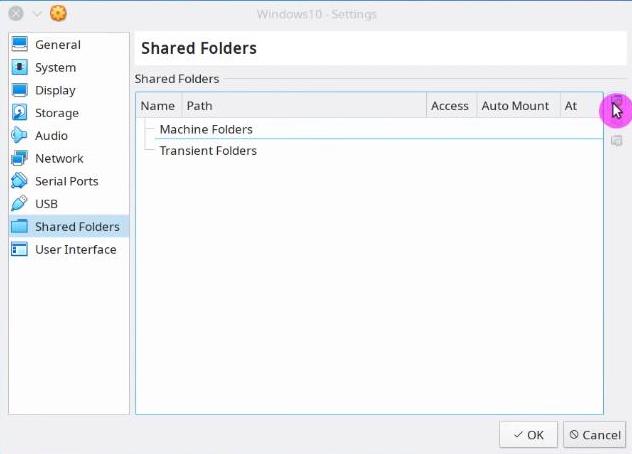
In Folder Path field, choose the path of the folder you want to share. In my case, I usually share my Public folder. If you want to increase the security of the folder you can check the Read-Only option to prevent Windows 10 from modifying the contents of this folder. This way only Linux system can modify this folder. It is also better to make the folder mount automatically and make it permanent:

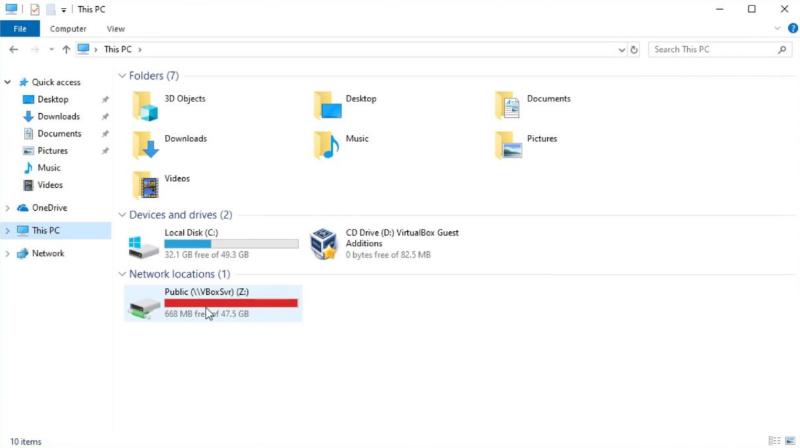
In the end, reboot the Windows 10 system to apply the new configuration.
After the reboot, you will find the shared folder in This PC section of the Windows 10 file manager. You can now use it to share files between to your Linux and Windows systems:
In the case of a Linux system as a guest, the process of enabling the shared folder is little different. Check out my post about How to enable a VirtualBox shared folder for Linux guest systems.
Enable Shared Clipboard
Another productive feature is the sharing of the clipboard between the two systems. That is, when you copy the text in one system, it will also be available in the other.
To enable this feature, you have to install VirtualBox Guest Additions as you have seen above, then go to the Devices menu and in the Shared Clipboard section click on the Bidirectional option.

Now if you can share the clipboard content on both systems.
Enable files drag and drop
Finally, you can also enable bidirectional drag and drop of files to share them between systems. I recommend using a shared folder for this purpose because a shared folder is more reliable. But you may try the drag and drop too.
To enable it, go to the Devices menu and in the Drag and Drop section click on the Bidirectional option:
Now, you can drag a file from your host system and drop it to the Windows 10. It should also work the other way, but it did not work for me. Again, that’s why I recommend using a shared folder.
Conclusion
These were the essential steps to get Windows 10 working in VirtualBox. If you are required to use some Windows application but you run Linux as your main OS, this can be a lifesaver. Install Windows 10 in VirtualBox and running Windows programs inside it is not an ideal solution, but it is very reliable. All Windows programs will work correctly.
You can also try using emulators like Wine, but in my experience, very few Windows applications run well in Wine. Many users also prefer to dual boot Linux and Windows, but I am against such option. So, I think installing Windows in VirtualBox is the best solution to get Windows programs working in Linux.


