- Установка Guest Additions Tools в macOS Catalina на VirtualBox
- Virtualbox guest addition mac os
- 14.2. Known Issues
- Install Guest Additions on macOS 10.15 Catalina. #79
- Comments
- end2endzone commented Feb 24, 2021
- Disable Gatekeeper
- Check Gatekeeper is disabled
- Disable SIP (System Integrity Protection)
- Check SIP is disabled
- Allow Oracle identifier for kext
- Change ownership and permissions on filesystem
- Install Guest Additions
- Check clipboard sharing is working
- Revert disabled security features
- Enable Gatekeeper
- Enable SIP
- codeclinic commented Mar 29, 2021
- end2endzone commented Mar 31, 2021
- NoWhereMan1979 commented May 5, 2021 •
- end2endzone commented May 8, 2021
- NoWhereMan1979 commented May 8, 2021
Установка Guest Additions Tools в macOS Catalina на VirtualBox
Guest Additions Tools в Oracle VirtualBox это набор утилит и драйверов для гостевой операционной системы для оптимизации работы ОС и расширения функционала по интеграции с гипервизором (общие папки, перетаскивание файлов между основной и гостевой ОС через drag-and-drop, синхронизация времени и т.д). Guest Additions Tools это аналог VmWare Tools и Integration Services в Hyper-V. В этой статье мы поговорим об особенностях установки Guest Additions на виртуальной машине с macOS.
Guest Additions доступны для macOS, начиная с VirtualBox 6.0. Но есть небольшая засада от Apple с версией macOS 10.15 Catalina.
Стандартный способ установки Guest Additions в macOS (который нормально работал до версии macOS 10.15):
- Загрузите и войдите на виртуальную машину с macOS;
- В интерфейсе VirtualBox выберите Devices ->Insert Guest Additions CD image…
- Диск появится на рабочем столе ОС macOS, откройте его;
- Запустите (откройте) VBoxDarwinAdditions.pkg;
- Пройдите через процесс установки (просто наживайте Next);
- На определенном этапе macOS запросит разрешения для Oracle. Нажмите кнопку, чтобы перейти в System Preferences и предоставьте запрошенные права;
- Если вы забыли/неправильно щелкнули на шаге 6, перейдите в раздел системных настроек macOS (System Preferences -> Security & Privacy -> General) . В нижней части будет вопрос о том, чтобы предоставить разрешения для Oracle. Сделайте это.
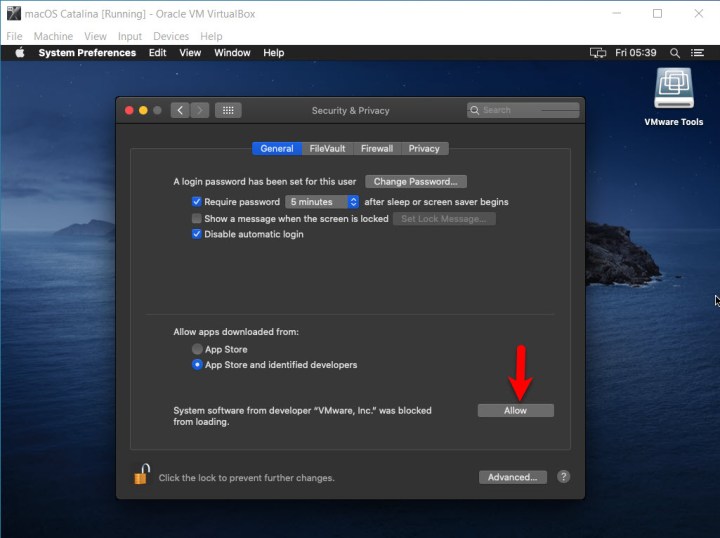
Так было раньше. Сейчас этого окошка для предоставления разрешений вы не увидите. Вместо него вы получите вот такое сообщение от macOS.
Давайте разбираться:
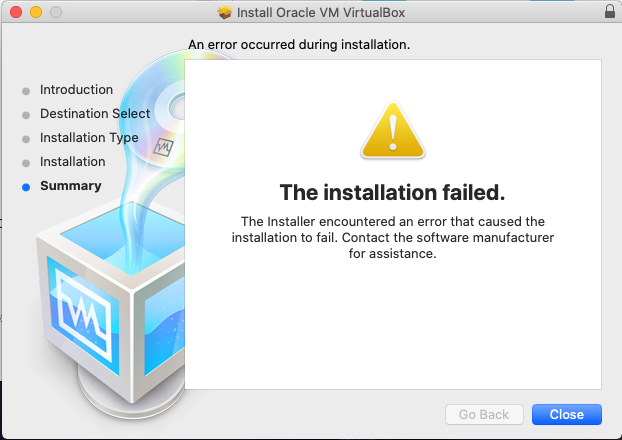
- Начнем с того, что в macOS 10.15 Apple ввел новые требования к подписанию кода, поэтому установка Guest Additions завершится неудачей. Однако, если вы перезагрузитесь и примените Шаг 7 из списка выше, общий буфер обмена будет работать.
Есть другой путь установки Guest Additions изнутри macOS.
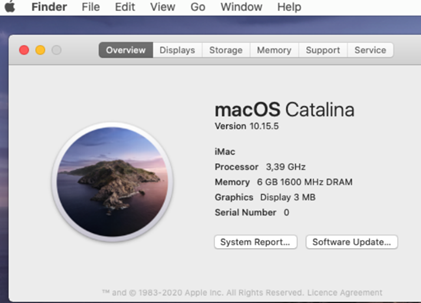
Итак, у нас есть исходная виртуальная машина VirtualBox с macOS 10.15.5 Catalina
- На гостевом Mac, запустите Terminal и введите следующие команды для перезагрузки в Recovery Mode:
sudo nvram «recovery-boot-mode=unused»
(после нажатия ENTER macOS попросит ввести пароль администратора)
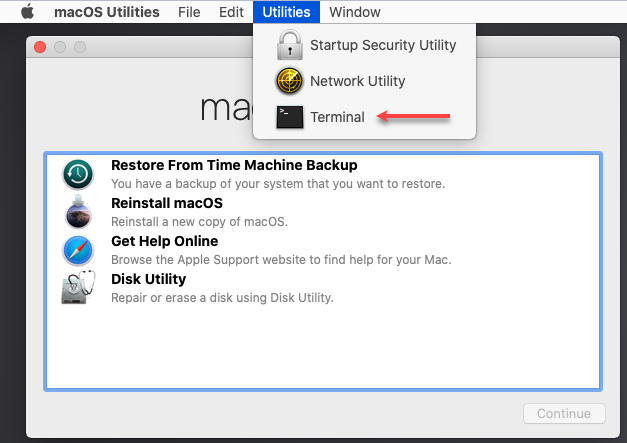
sudo reboot - После перезагрузки в Recovery mode, запустите Utilities -> Terminal.
Введите следующие команды:
# csrutil disable
# spctl kext-consent add VB5E2TV963
# nvram -d recovery-boot-mode
# reboot - Загрузите macOS в обычном режиме и в окне Terminal выполните:
sudo mount -uw /
sudo chown :admin /System/Library/Extensions/
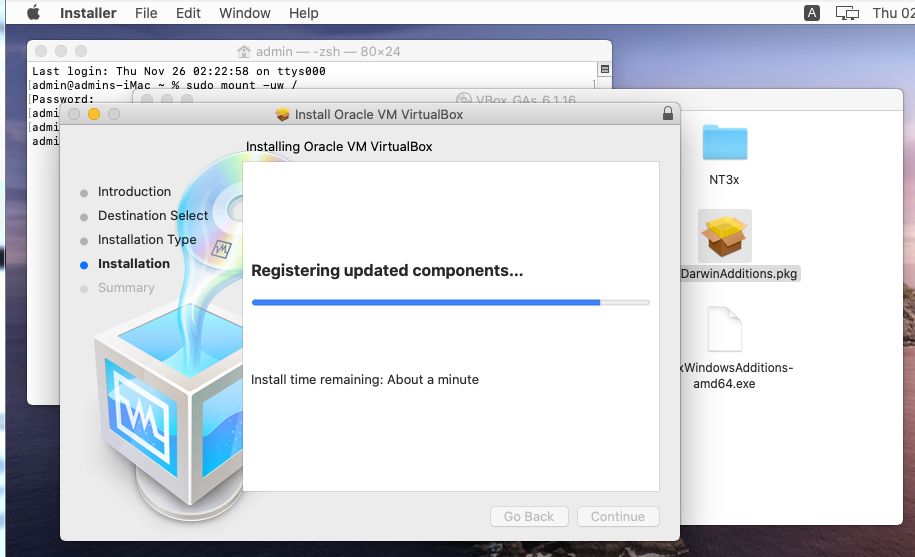
sudo chmod 775 /System/Library/Extensions/ - Запустите инсталлятор Guest Additions и пройдите через весь процесс установки до конца. (По идее, все пройдет нормально и установится успешно).
Установка пакета Oracle VM VirtualBox должна пройти успешно.Закройте окно установщика.
- По окончании установки Guest Additions, переключитесь в Terminal, и выполните команды:
sudo chown :wheel /System/Library/Extensions/
sudo chmod 755 /System/Library/Extensions/
sudo nvram «recovery-boot-mode=unused»
sudo reboot - После перезагрузки снова попадаем в Recovery mode. Опять запускаем Terminal и вводим команды:
# csrutil enable
# nvram -d recovery-boot-mode
# reboot
Ваша macOS перезагрузится еще раз.
Ну вот и все. Всё установилось. Guest Additions работают.
Источник
Virtualbox guest addition mac os
Some Oracle VM VirtualBox features are labeled as experimental. Such features are provided on an «as-is» basis and are not formally supported. However, feedback and suggestions about such features are welcome. A comprehensive list of experimental features is as follows:
Hardware 3D acceleration support for Windows, Linux, and Oracle Solaris guests
Hardware 2D video playback acceleration support for Windows guests
Mac OS X guests (Mac OS X hosts only)
ICH9 chipset emulation
Host CD/DVD drive passthrough
Support of iSCSI using internal networking
Using Oracle VM VirtualBox and Hyper-V on the same host
14.2. Known Issues
The following section describes known problems with this release of Oracle VM VirtualBox. Unless marked otherwise, these issues are planned to be fixed in later releases.
Poor performance when using Oracle VM VirtualBox and Hyper-V on the same host. To fix this, certain Windows features like «Hyper-V Platform», «Virtual Machine Platform» and «Windows Hypervisor Platform» must be turned off, followed by a host reboot.
Additionally, the Microsoft Device Guard and Credential Guard hardware readiness tool might have to be used in order to turn off more features. For example, by running the following command:
Disabling Device Guard and Credential Guard features will have an impact on the overall security of the host. Please contact your Administrator beforehand regarding this.
The following Guest SMP (multiprocessor) limitations exist:
Poor performance with 32-bit guests on AMD CPUs. This affects mainly Windows and Oracle Solaris guests, but possibly also some Linux kernel revisions. Partially solved for 32-bit Windows NT, 2000, XP, and 2003 guests. Requires the Guest Additions to be installed.
Poor performance with 32-bit guests on certain Intel CPU models that do not include virtual APIC hardware optimization support. This affects mainly Windows and Oracle Solaris guests, but possibly also some Linux kernel revisions. Partially solved for 32-bit Windows NT, 2000, XP, and 2003 guests. Requires the Guest Additions to be installed.
NX (no execute, data execution prevention) only works for guests running on 64-bit hosts and requires that hardware virtualization be enabled.
Guest control. On Windows guests, a process started using the guest control execute support will not be able to display a graphical user interface unless the user account under which it is running is currently logged in and has a desktop session.
Also, to use accounts without or with an empty password, the guest’s group policy must be changed. To do so, open the group policy editor on the command line by typing gpedit.msc , open the key Computer Configuration\Windows Settings\Security Settings\Local Policies\Security Options and change the value of Accounts: Limit local account use of blank passwords to console logon only to Disabled.
Compacting virtual disk images is limited to VDI files. The VBoxManage modifymedium —compact command is currently only implemented for VDI files. At the moment the only way to optimize the size of a virtual disk images in other formats, such as VMDK or VHD, is to clone the image and then use the cloned image in the VM configuration.
OVF import/export:
OVF localization, with multiple languages in a single OVF file, is not yet supported.
Some OVF sections like StartupSection, DeploymentOptionSection, and InstallSection are ignored.
OVF environment documents, including their property sections and appliance configuration with ISO images, are not yet supported.
Remote files using HTTP or other mechanisms are not yet supported.
Neither scale mode nor seamless mode work correctly with guests using OpenGL 3D features, such as with Compiz-enabled window managers.
The RDP server in the Oracle VM VirtualBox extension pack supports only audio streams in format 22.05kHz stereo 16-bit. If the RDP client requests any other audio format there will be no audio.
Preserving the aspect ratio in scale mode works only on Windows hosts and on Mac OS X hosts.
On Mac OS X hosts, the following features are not yet implemented:
CPU frequency metric
Mac OS X guests:
Mac OS X guests can only run on a certain host hardware. For details about license and host hardware limitations. See Section 3.1.1, “Mac OS X Guests” and check the Apple software license conditions.
Oracle VM VirtualBox does not provide Guest Additions for Mac OS X at this time.
The graphics resolution currently defaults to 1024×768 as Mac OS X falls back to the built-in EFI display support. See Section 3.14.1, “Video Modes in EFI” for more information on how to change EFI video modes.
Mac OS X guests only work with one CPU assigned to the VM. Support for SMP will be provided in a future release.
Depending on your system and version of Mac OS X, you might experience guest hangs after some time. This can be fixed by turning off energy saving. Set the timeout to «Never» in the system preferences.
By default, the Oracle VM VirtualBox EFI enables debug output of the Mac OS X kernel to help you diagnose boot problems. Note that there is a lot of output and not all errors are fatal. They would also show when using a physical Apple Macintosh computer. You can turn off these messages by using the following command:
To revert to the previous behavior, use the following command:
It is currently not possible to start a Mac OS X guest in safe mode by specifying the -x option in VBoxInternal2/EfiBootArgs extradata.
Oracle Solaris hosts:
USB support on Oracle Solaris hosts requires Oracle Solaris 11 version snv_124 or later. Webcams and other isochronous devices are known to have poor performance.
Host Webcam passthrough is restricted to 640×480 frames at 20 frames per second due to limitations in the Oracle Solaris V4L2 API. This may be addressed in a future Oracle Solaris release.
No ACPI information, such as battery status or power source, is reported to the guest.
No support for using wireless adapters with bridged networking.
Crossbow-based bridged networking on Oracle Solaris 11 hosts does not work directly with aggregate links. However, you can use dladm to manually create a VNIC over the aggregate link and use that with a VM. This limitation does not exist in Oracle Solaris 11u1 build 17 and later.
Neither virtio nor Intel PRO/1000 drivers for Windows XP guests support segmentation offloading. Therefore Windows XP guests have slower transmission rates comparing to other guest types. Refer to MS Knowledge base article 842264 for additional information.
Guest Additions for OS/2. Seamless windows and automatic guest resizing will probably never be implemented due to inherent limitations of the OS/2 graphics system.
Some guest operating systems predating ATAPI CD-ROMs may exhibit long delays or entirely fail to boot in certain configurations. This is most likely to happen when an IDE/ATAPI CD-ROM exists alone on a primary or secondary IDE channel.
Источник
Install Guest Additions on macOS 10.15 Catalina. #79
Comments
end2endzone commented Feb 24, 2021
On macOS 10.15 Catalina, Guest Additions cannot be installed by default. The installation cannot be completed as normal because the OS now require packages to be digitally signed. To get around this security limitation, you need to disable multiple security features in order to install the package. I think this applies to macOS 10.14 as well.
I managed to install Guest Additions using VirtualBox version 6.1.16 on Windows 7 to share the clipboard values between the host and the guest. If someone else wants to install this, here is the whole process:
Disable Gatekeeper
- Be sure to exit System Preferences on your Mac.
- Open a Terminal
- Enter the command sudo spctl —master-disable .
Check Gatekeeper is disabled
- Click on System Preferences on your Mac Dock.
- Choose Security & Privacy.
- Look at Allow apps download from:, it should be set to Anywhere . If it is, you are done.
- If not, click the lock icon at the bottom left of the screen.
- Choose the Anywhere option under Allow apps downloaded from. Prior to making the change, this option wasn’t available.
- Click the unlocked lock again to keep the change.
Disable SIP (System Integrity Protection)
- Restart your computer in Recovery mode.
- Launch Terminal from the Utilities menu.
- Run the command csrutil disable .
- Restart your computer.
I tried pressing F12 , F8 and even ESC key in order to configure VirtualBox to boot into the EFI shell but was not able to do so. In the end, this comment from issue 46 had the solution:
- In your VM’s terminal enter the following command to reboot in recovery mode:
sudo nvram recovery-boot-mode=unused && sudo shutdown -r now - Once in recovery mode open a terminal in Utilities -> Terminal .
- Run the commands you want like:
csrutil disable
spctl kext-consent add VB5E2TV963
(note the last command is explained in steps below) - Enter the following command to exit recovery mode:
nvram -d recovery-boot-mode && shutdown -r now - And you’ll get back into normal macOS.
Check SIP is disabled
You can verify that SIP is disabled with the command:
csrutil status
which should display:
System Integrity Protection status: disabled. .
Allow Oracle identifier for kext
- Restart your computer in Recovery mode. Refer to previous section to know how to do this.
- Launch Terminal from the Utilities menu.
- Run the command spctl kext-consent add VB5E2TV963 .
- Restart your computer.
VB5E2TV963 is the code for oracle.
Change ownership and permissions on filesystem
Enable writing to /System/Library/Extensions/ .
In your VM’s terminal enter the following commands:
Install Guest Additions
At this point, the installation of Guest Addition should succeed. Proceed with normal installation instructions.
- On VirtualBox emulation window, click on Devices menu.
- Select Insert Guest Additions CD image. .
- In your VM, click on the new CD image on the desktop.
- Click on VBoxDarwinAdditions.pkg .
- Follow the instructions on screen.
- A reboot is required after the installation.
Check clipboard sharing is working
Check that clipboard is shared between the host and the guest.
- On VirtualBox emulation window, click on Devices menu.
- Select menu Shared Clipboard , Bidirectional .
- In your VM, open a terminal.
- Select text.
- Right-click on the selected text and select Copy .
- On your host, open a note taking appplication.
- Right-click and select Paste .
Revert disabled security features
Enable Gatekeeper
- Be sure to exit System Preferences on your Mac.
- Open a Terminal
- Enter the command sudo spctl —master-enable .
Enable SIP
- Restart your computer in Recovery mode.
- Launch Terminal from the Utilities menu.
- Run the command csrutil enable .
- Restart your computer.
The text was updated successfully, but these errors were encountered:
codeclinic commented Mar 29, 2021
Thanks for this info. I’ve tried so many different combinations and this is the first and only one that actually works.
Should we revert the /System/Library/Extensions/ back to its original ownership and permissions? If so, do you know what they should be set to?
Also, do you know if the VBox GA’s will persist if I update the OS to Big Sur? I know that installing Vbox GA’s on Big Sur is currently not-doable, so not sure if it’s safe to update.
end2endzone commented Mar 31, 2021
I’m glad it helped you.
I did not tried to revert permission changes on /System/Library/Extensions/. I am using this VM as a test machine so I don’t really care about vulnerabilities related to this change.
I do not have plans to upgrading to Big Sur. Like you said, I have read the same posts about compatibility problem with GA on Big Sur. I don’t know if the installation will persist. Actually the files may still be available but they may not load. Installing on Catalina and then upgrading to Big Sur might be a possible workaround. If you every try, keep me posted.
NoWhereMan1979 commented May 5, 2021 •
I did instructions but what i got was share clip board. no full screen, no shared folders. tested on Catalina in Virtual Box 6.1.22.
Thanks for help.
end2endzone commented May 8, 2021
Hi. I am sorry but I did not tried the Shared Folder feature of VirtualBox so I cannot help you with that.
What I did for file sharing.
If you need to share files from macOS, you can enable samba file share from within macos directly. You can search for mac enable file share samba on google for multiple instructions guide. For example, this or this seems to be good starting points.
To enable a higher resolution or full screen.
You need to change settings in Virtualbox to enable custom resolutions. Since I am on Windows, I executed the following batch file which enabled 1600×900 resolution :
You need to change the variable VM_NAME to the actual name of of your virtual machine inside VirtualBox. Mine was named MacOS Catalina 10.15 . I prefer having a windowed maximum resolution of 1600×900 instead of full screen. You might only have to change 1600×900 by 1920×1080 to enable full screen on your side.
I have left the web site references were I have found this information. Feel free to take a look at them. They might explain in details what all these commands are doing.
NoWhereMan1979 commented May 8, 2021
Hi. I am sorry but I did not tried the Shared Folder feature of VirtualBox so I cannot help you with that.
What I did for file sharing.
If you need to share files from macOS, you can enable samba file share from within macos directly. You can search for mac enable file share samba on google for multiple instructions guide. For example, this or this seems to be good starting points.
To enable a higher resolution or full screen.
You need to change settings in Virtualbox to enable custom resolutions. Since I am on Windows, I executed the following batch file which enabled 1600×900 resolution :
You need to change the variable VM_NAME to the actual name of of your virtual machine inside VirtualBox. Mine was named MacOS Catalina 10.15 . I prefer having a windowed maximum resolution of 1600×900 instead of full screen. You might only have to change 1600×900 by 1920×1080 to enable full screen on your side.
I have left the web site references were I have found this information. Feel free to take a look at them. They might explain in details what all these commands are doing.
Thank a lot. It is better than 1024×768 that i was stuck in. ☺
Источник

 Введите следующие команды:

 Установка пакета Oracle VM VirtualBox должна пройти успешно.Закройте окно установщика.


