- Установка macOS Mojave на Virtualbox
- How to Install macOS on VirtualBox
- Everything You Need to Get Started with Installing macOS on VirtualBox
- Extract macOS Sierra
- Creating a mac Virtual Machine on Windows
- Configuring Your VirtualBox to Run macOS High Sierra
- Running VirtualBox and the macOS Installer
- About The Author
Установка macOS Mojave на Virtualbox
Порой возникает необходимость воспользоваться операционной системой отличной от установленной на компьютере. Есть разные методы сделать это в зависимости от ситуации и одним из таких способов будет запустить нужную операционку в виртуальной машине. Процесс не сложный, однако есть некоторые нюансы и занимающий много времени.
В данном примере рассмотрим установку Mac OS Mojave 10.14.6 в VirtualBox на Windows 10. В качестве процессора будет использован AMD Ryzen 3 2200G хотя на процессорах Intel все аналогично за небольшими изменениями, о которых будет сказано дальше.
Для запуска Mac OS в виртуальной машине VirtualBox нам потребуется сама программа которую можно бесплатно скачать на официальном сайте и пакет дополнений для гостевых операционных систем (Oracle VM VirtualBox Extension Pack) который можно загрузить там же. Устанавливайте последнюю версию которая будет на сайте, а в данном случае использовалась версия VirtualBox 6.1.
Так же необходим установочный диск с macOS Mojave. Вы можете воспользоваться образом, использовавшимся в данном примере скачав Mac OS Mojave 10.14.6 здесь или тут. Части архива взаимозаменяемые, так что можно загружать откуда вам больше нравится. Хеш образа диска SHA256: E700465D24B5D81CC694013D22497DDC6BD2EE6CAAF83BDCFA3B6792796BB4B2 .
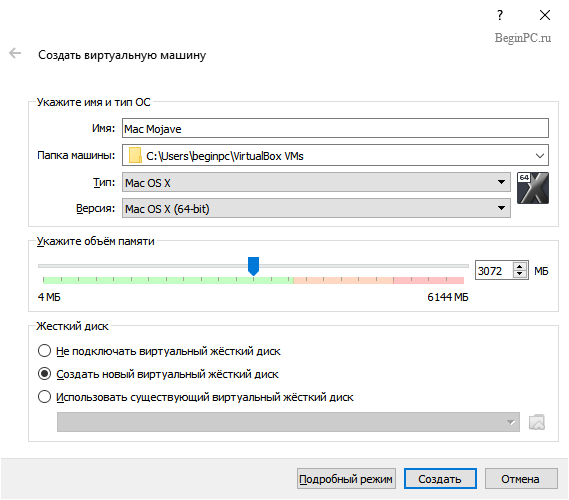
Останавливаться на установке программы мы не будем, желающие могут ознакомиться с подробной инструкцией на нашем сайте. Запускаете программу и нажимаете кнопку «Создать». Затем мы переключились в «Экспертный режим» нажав соответствующую кнопку внизу появившегося окна. Вводим имя нашей машины, лучше английскими символами и указываем тип операционной системы и ее разрядность, в данном случае Mac OS X
Папку машины, где хранятся ее настройки можно не менять. Передвигаем ползунок оперативной памяти выделив примерно половину имеющейся, но в красную зону лучше не залезать. Отмечаем «Создать новый виртуальный жесткий диск» и нажимаем кнопку «Создать».
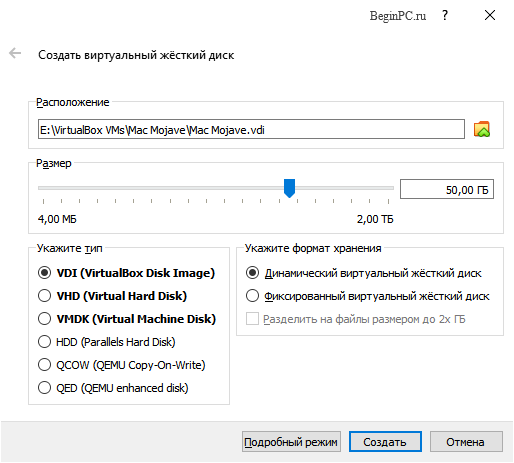
Теперь нужно указать папку, где будет располагаться создаваемый виртуальный жесткий диск и его размер. Имейте в виду, что потом изменить размер диска Мак не позволит, так что сразу указывайте нужный вам размер. Тип и формат хранения можно сделать как на скриншоте.
После этого виртуальная машина будет создана. Выделяем ее в левой колонке и нажимаем кнопку «Настроить» в верхней панели. Выбираем в левой колонке открывшего окна пункт «Система». Здесь нужно указать в списке порядок загрузки первым оптический диск.
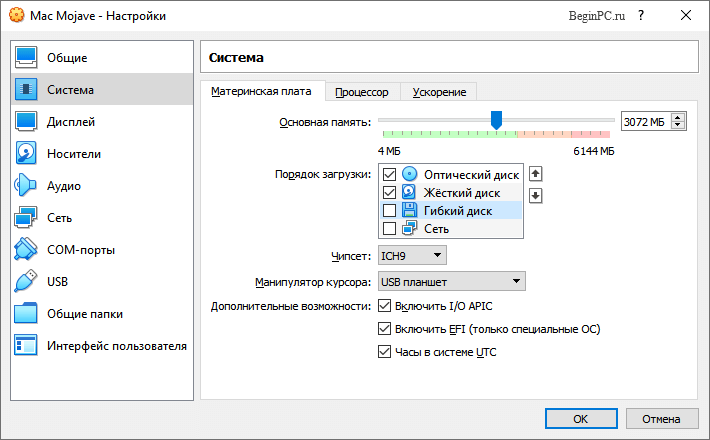
На вкладке «Процессор» выбираете сколько ядер процессора выделить для работы Mac OS и предел загрузки CPU. Кроме того, здесь и на вкладке «Ускорение» есть дополнительные настройки, которыми можно «поиграться» если в процессе загрузки ОС будет возникать ошибка. Все зависит от конкретных комплектующих вашего компьютера. Порой помогает отключение Nested Paging, а в моем случае включение галочки у пункта «Включить Nested VT-x/AMD» приводило к тому, что установка заканчивалась сообщением attempting system restart mach reboot .
В разделе «Дисплей» настраивается размер видеопамяти, выделенный виртуальной машине, а также тип графического контроллера и режимы ускорения. Их можно оставить по умолчанию или подбирать в случае проблем с запуском.
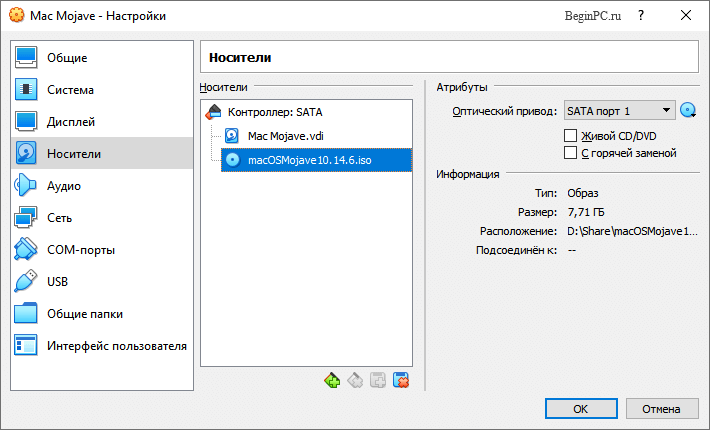
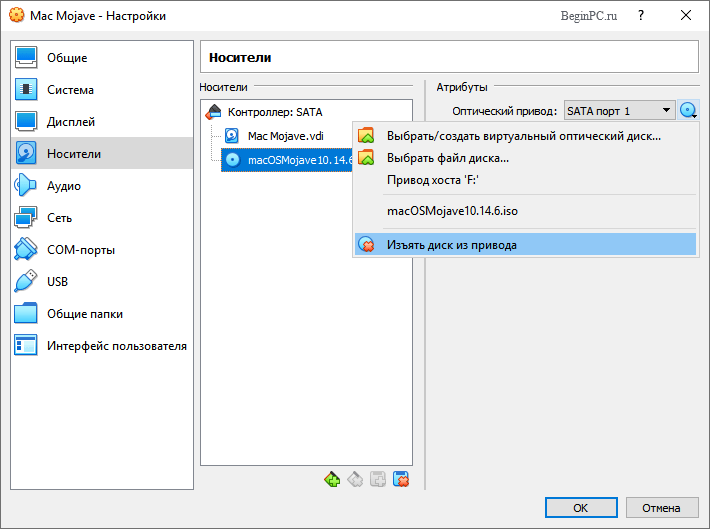
Переходим к разделу настроек «Носители». Здесь уже присутствует виртуальный жесткий диск, созданный нами на начальном этапе. Нам нужно указать оптический диск, с которого будет происходить установка Mac. Для этого выбираем его, нажав на «Пусто» и затем щелкаем по синему значку диска в верхней правой части окна. В открывшемся меню нужно указать местоположение образа нашего установочного диска или привод если он находится в нем. В результате должно получиться как на изображении ниже.
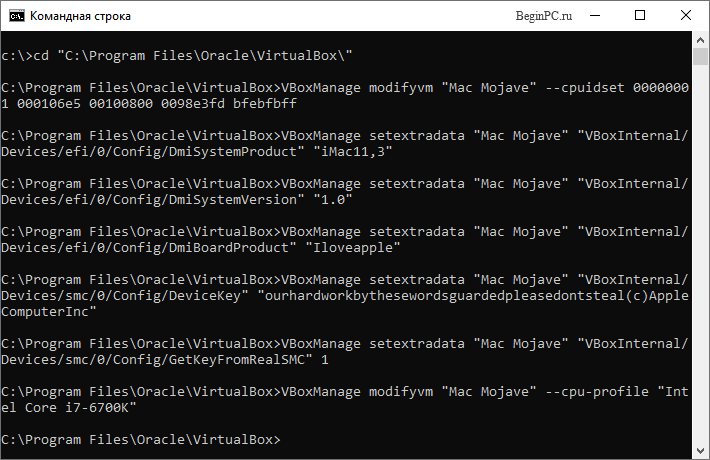
Теперь важный момент, сохраняем выполненные настройки и обязательно закрываем программу VirtualBox. Это нужно чтобы можно было сделать некоторые настройки виртуальной машины с помощью VBoxManage. Запускаем командную строку Windows и переходим в папку с установленной программой VirtualBox. Если вы не меняли путь по умолчанию при установке, то команда будет такой, в противном случае подставьте свой путь.
Дальше нужно выполнить последовательно следующие команды, но заменив Имя Виртуальной Машины на реальное имя, указанное вами при ее создании.
Если у вас процессор AMD, то выполните дополнительно команду
Если при этом получаете сообщение об ошибке VBoxManage.exe: error: Invalid parameter ‘—cpu-profile’ , то попробуйте указать другой процессор, например:
Также можно сразу указать нужное разрешение экрана виртуальной машины выполнив следующую команду, где последние два числа как раз указывают ширину и высоту в пикселах. Впрочем, это всегда можно будет изменить в последствии снова выполнив эту команду с другим разрешением.
На этом все подготовительные мероприятия закончены и можно переходить непосредственно к установке Mac OS Mojave в виртуальную машину. Снова запускаем VirtualBox, выбираем нашу машину и нажимаем кнопку «Запустить» в верхней панели. Откроется окно виртуальной машины VirtualBox и побегут строчки, показывающие процесс первоначальной загрузки операционной системы.
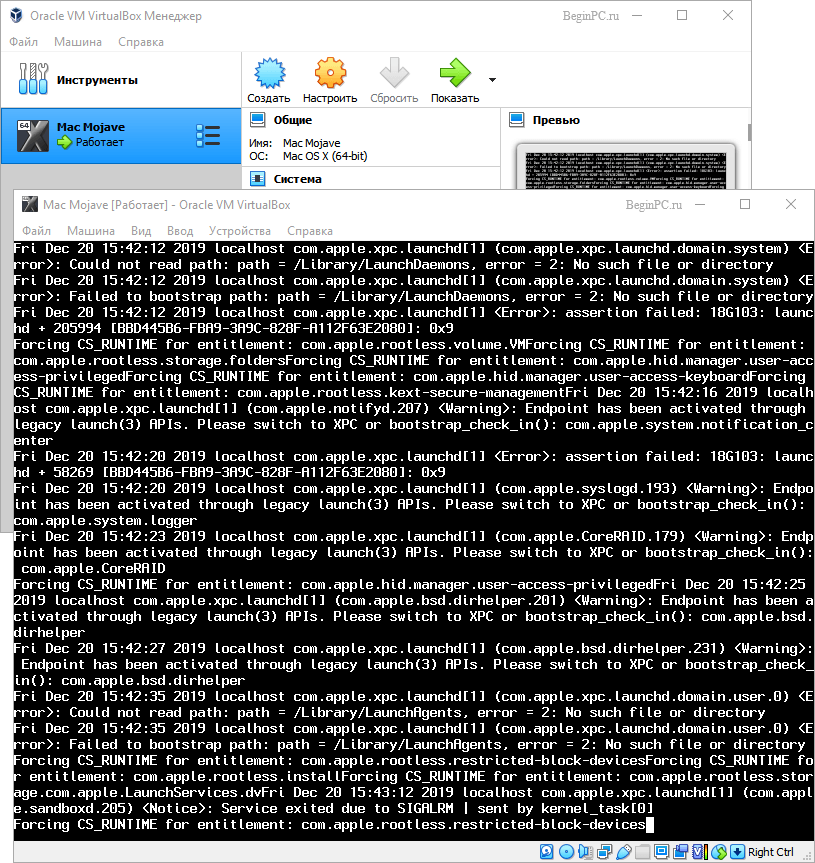
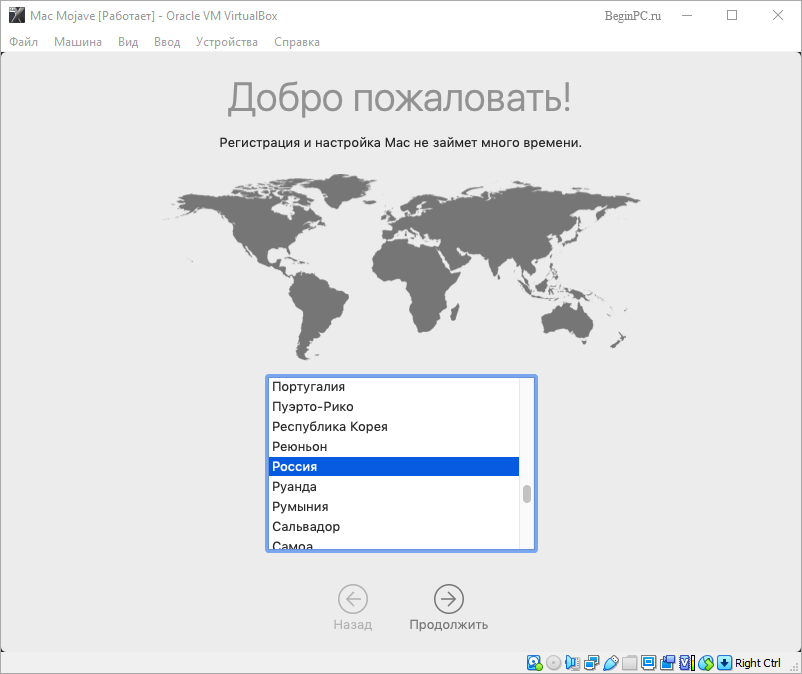
В некоторые моменты может казаться, что установка зависла, тогда можно ориентироваться на индикатор активности виртуального жесткого диска внизу окна программы. Теперь можно расслабиться и помедитировать пока не появится экран выбора языка, где указываем русский и щелкаем по стрелке вправо расположенной под ним. Прежде чем выполнять саму установку ОС необходимо инициализировать диск, поэтому на следующем шаге в окне «Утилиты MacOS» выбираем «Дисковая утилита».

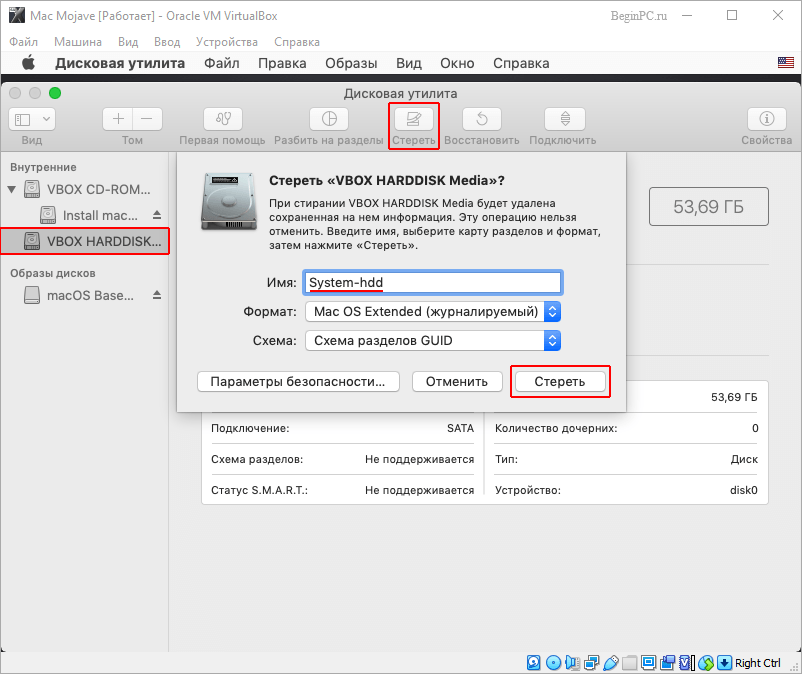
В левом столбце выбираем наш виртуальный жесткий диск и нажимаем кнопку «Стереть» на верхней панели. Появится запрос на подтверждение действия, где можно задать какое-нибудь имя нашему диску и нажать снова «Стереть».
После завершения подготовки диска закрываем «Дисковая утилита» и снова попадаем в окно «Утилиты macOS», где теперь надо выбрать пункт «Установка macOS» и кликнуть «Продолжить». В следующем окне для продолжения установки будет предложено нажать соответствующую кнопку, а затем принять лицензионное соглашение. Дальше предложат выбрать диск для установки операционной системы, просто выделяем наш диск и щелкаем стрелку вправо после чего начнется установка MacOS на ваш компьютер.
В какой-то момент система без предупреждения перезагрузится и снова будет черный экран с бегущими строчками. Нам этого не надо, поскольку установка начнется опять с самого начала. Выключаем виртуальную машину закрыв окно с ней. Идем в ее настройки, выбираем наш iso образ с macOS Mojave и отключаем его от машины.
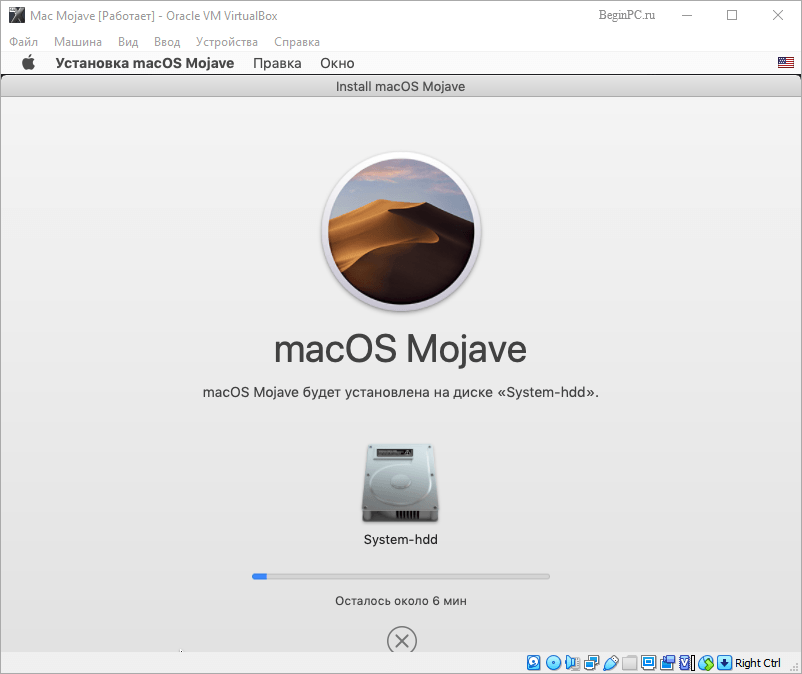
Сохраняем настройки, снова запускаем виртуальную машину VirtualBox и теперь установка продолжится непосредственно с жесткого диска. Когда первоначальная загрузка на черном фоне завершится, появится эмблема Эппл и индикатор оставшегося времени, верить которому не стоит. Это самый долгий этап установки macOS на Virtualbox по окончании которого виртуальная машина снова перезагрузится.
Если вместо продолжения установки вы видите UEFI Interactive Shell, то придется запустить ее самому. Для этого нужно последовательно выполнить команды:
Фактически процесс установки завершен, осталось только выполнить первоначальные настройки и можно пользоваться. Выбираете страну из списка, затем раскладку клавиатуры, вопрос по миграции и Apple ID, если у вас нет Apple ID то пропустите соответствующий шаг нажав «Настроить позже».
Затем укажите имя вашей учетной записи и пароль. Дальше будут вопросы экспресс-настройки, которые можно оставить по умолчанию или настроить на свой вкус нажав «Настроить параметры».

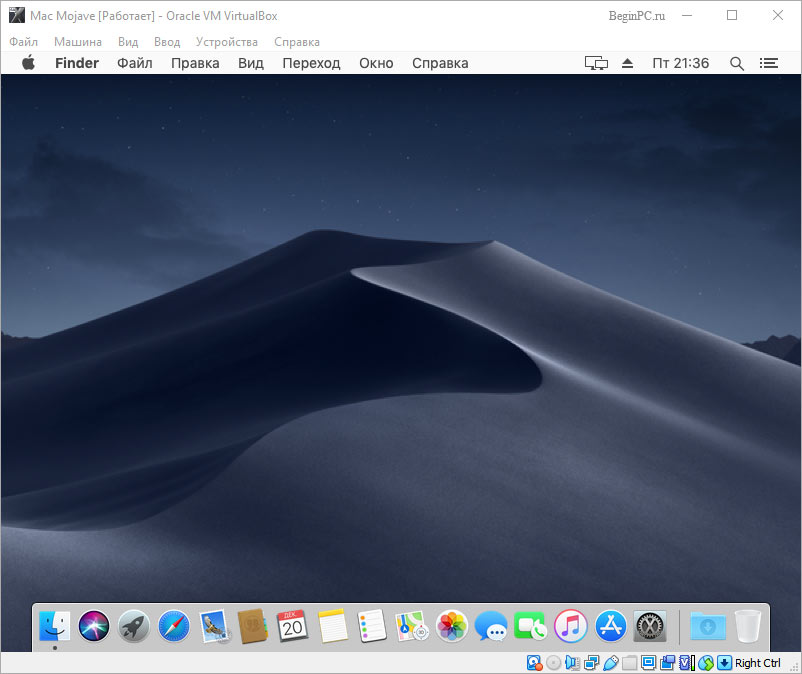
После окончания всех настроек будет показан рабочий стол MacOS Mojave знаменующий окончание установки.
Хотя установка занимает много времени, последующая загрузка происходит довольно быстро. Стоит иметь в виду, что иногда по каким-то причинам в процессе загрузки может произойти ошибка хотя до этого все работало. В этом случае достаточно просто запустить загрузку заново.
Источник
How to Install macOS on VirtualBox

Windows, macOS – which one do you want to use today? On a traditional setup, you’re stuck with one or the other. But with virtual box, you actually have macOS on a Windows PC.
It’s the freedom that computer users have enjoyed with Linux and other operating systems.
But Apple has made it difficult to install their operating system on anything other than their own hardware. All of that is changing, and Virtual Box is responsible for it and the rise of the Hackintosh.
New to hackintosh? Learn more about it in our what is hackintosh? overview.
Note: A lot of people will be able to get a mac virtual machine one Windows running smoothly, but sound doesn’t seem to work well. That’s really not an issue because you’ll still be able to access all of your apps and software.
I also recommend that you have access to a real Mac. You might be able to find some distributions of the High Sierra ISO online, but there is always a risk when downloading from an unofficial source. Instead, borrow a Mac from a friend, or use your own and download the High Sierra OS from the App Store.
Everything You Need to Get Started with Installing macOS on VirtualBox
Before we go through the steps on how to install macOS on Virtual Box, let’s get everything together that you’ll need to get started.
- Open up your Mac
- Go to the App Store
- Type in “High Sierra”
You’ll want to search for your desired operating system (we’ll be using High Sierra), and Download it.

Note: You’ll need a decent computer to be able to run Virtual Box. Your computer will need to meet these minimum requirements:
- Dual core processor
- 4GB Ram or higher
- 64-bit
If your computer doesn’t meet these requirements, you won’t be able to run macOS properly. You’ll be able to download VirtualBox from the official website. I’m not going to go through the installation process, as the website will have all of the information you need to be able to install VirtualBox.
I do recommend that you read all of the documentation and ask any questions that you have in the community section of the website.
VirtualBox 6.0 was just released, so it’s definitely a great time to get started with your own macOS.

Extract macOS Sierra
Make sure you’ve downloaded High Sierra, and then you’ll want to run a few commands from your terminal . You’ll be able to open the terminal at: Applications > Utilities > Terminal. Once inside of the terminal, you’ll want to run the following commands:
Go to your desktop and rename the file, removing the “.cdr” extension. You need this extension to read “.iso” for it to work properly.
You’ve successfully created your own ISO file so that you can bootup your macOS.
The next step is to copy the file over to your Windows machine (using a large USB drive seems to work best). This file will be mounted in your virtual machine later on in the article, so it’s very important that this step is completed successfully.
Creating a mac Virtual Machine on Windows
You’ll want to create a virtual machine, and this is really easy. You’ll open up VirtualBox and click New. You’ll want to have the following parameters selected or entered before clicking Next.
- Name: High Sierra
- Type: Mac OS X
- Version: Mac OS X (64-bit)
Pay attention when selecting the version because you may find that High Sierra is offered as a version when you go to install it. But if it’s not, you can just choose the settings I listed above and they should work fine.

You’ll then be proceeding through all of the settings.
When you come up to the RAM setting, you’ll want to be generous. VirtualBox requires a minimum of 4GB or RAM to run, but the more the better.

You’ll want to provide at least 4GB to your macOS, or 4096MB to be precise. A general rule of thumb is that if you can spare it, supply more RAM to your virtual machine. RAM will allow the operating system to put more information into memory and retrieve it faster.
For better overall performance, supply as much RAM as you can.
The next steps are also important, and they’ll include:
- Hard Disk: Choose the “Create a virtual hard disk now” setting.
- Choose VDI when choosing the hard disk type.
- Choose Fixed Size instead of Dynamic for added speed.
- Set the size of the drive to at least 25GB.
You’ll now have your virtual machine using the RAM and disk space properly, and you’ll have to work your way through a few screen prompts before having everything setup properly.

Configuring Your VirtualBox to Run macOS High Sierra
We’ve made a lot of progress so far, and now it’s time to configure your virtual machine properly. You’ll see in the main window of VirtualBox that “High Sierra” is listed. Click on this and then click on the “Settings” button.
You’ll want to go to “System” and make sure that the following are unchecked on the Motherboard tab:

Click on the Processor tab and make sure that you have 2 or more CPUs set for your virtual machine.

The next few settings are rather simple:
- Display: Video Memory with a minimum of 128MB
- Storage: Click “Empty” and then click on the CD at the top right. Choose your High Sierra ISO file
Now you’ll need to click “Ok,” and save all of the changes you’ve made. Close out your VirtualBox now.
Apple is very strict on the system that their operating system runs on, so it’s very important that you do your best to configure your virtual machine in such a way that it tricks the installer to thinking you’re on a retail machine.
We’ll now be going into the Windows command prompt.
You’ll do this by:
- Clicking the Start Menu
- Typing “Command Prompt”
- Right-clicking on the Command Prompt desktop app
- Choosing Run as administrator

It’s very important to follow all of the following command prompts exactly. Your goal is to run each command, one by one, hitting the Enter button and waiting for the command to complete successfully.
Remember that VirtualBox needs to be closed before running these commands, or it won’t work properly.
You have to make sure that the virtual machine is properly named “High Sierra” for this method to work. If not, you’ll be able to go back and make changes to the name to get everything to work properly.
Once all of the commands are completed, and there are no errors, you’ll then be able to open up your VirtualBox and get macOS High Sierra installed properly on VirtualBox.
It’s a long process, but we’re almost done with your installation.
Running VirtualBox and the macOS Installer
You’ve almost learned how to install macOS on VirtualBox entirely, and we’re on the home stretch. You’ll want to open up your VirtualBox and then click on your virtual machine that you set up earlier.
Now, click “Start.”
There will be a lot of information displayed on the screen as everything starts running. I recommend stepping away from the machine and letting it run for a few minutes before coming back. Some errors can hang for 5 minutes or longer.

If you’ve done everything properly, you can be confident that the installer will boot properly.
You’ll eventually be presented with the option to pick a Language. If you’ve reached this point, you’re doing very well and are almost ready to run your macOS.
The next steps can be followed:
- Choose your desired language, and click
- Click “Disk Utility” and then
- Click “View” and then “Show All Devices.”
- Click on your empty virtual drive that has been setup and click “Erase.”
- Choose the following settings:
- Name: Macintosh HD
- Format: Mac OS Extended (Journaled)
- Scheme: GUID Partition Map
- Click “Erase” and close Disk Utility when the process is complete.
- Click “Reinstall macOS.”
- Click “Continue.”
You’ll come up to one point where you’ll be asked to choose a hard drive, and you’ll want to select the Macintosh HD partition that you just created with the Disk Utility.
We’ve successfully copied all of the files on the virtual machine, but we’re not done just yet.
Exit your virtual machine and then go back to your virtual machine’s settings. You’ll need to change up your Storage settings. Click on your ISO for High Sierra in the “Storage Tree.” You’ll click that CD icon just like we did earlier and then choose “Remove Disk from Virtual Disk.”
You need to do this to unlink the ISO from your virtual machine.
Start up your virtual machine and you should come across a black screen with the EFI Internal Shell. You’ll want to look for FS1. If this is listed in yellow, click on the virtual machine and then type fs1: and hit the Enter button.
You should be in the fs1 directory.
Type in the following commands:
- cd “macOS Install Data”
- cd “Locked Files”
- cd “Boot Files”
Now we’ll run the installer by running: boot.efi and hitting enter.
If everything goes well, you’ll come across a graphical installer and will just have to work through the prompts. The virtual machine will reboot eventually and then you’ll need to go through the settings and the rest of the setup process.
Soon enough, you’ll be right inside of macOS, where you’ll be able to start using your mac virtual machine on Windows.
Having a virtualbox mac OS is the easiest method of using mac as and when you need it. In addition, using virtualbox is far less complicated than the dual boot hackintosh method we have looked at previously.
About The Author
David Ingram
David has been interested in computers for over 25 years. From playing games on his parents computer as a kid in the early 90s, to building his first PC in 2003 (and many more since then). He has a passion for everything related to computing and this site is dedicated to helping others find the info they need.
Источник


