- How to Install VirtualBox Guest Additions on CentOS 8
- Requirements
- Step 1: Installing EPEL on CentOS 8
- Step 2: Installing Kernel Headers and Build Tools
- Step 3: Install VirtualBox Guest Additions in CentOS 8
- Install VirtualBox Guest Additions Graphically
- Install VirtualBox Guest Additions Manually
- If You Appreciate What We Do Here On TecMint, You Should Consider:
- Как установить гостевые дополнения VirtualBox на CentOS 8
- Установка гостевых дополнений в гостевой системе CentOS
- Выводы
- Install VirtualBox Guest Additions in CentOS, RHEL & Fedora
- How to Install VirtualBox Guest Additions in CentOS
- Install Guest Additions via a GUI
- Install Guest Additions via a Terminal
- If You Appreciate What We Do Here On TecMint, You Should Consider:
How to Install VirtualBox Guest Additions on CentOS 8
When you first install a virtual machine with a GUI on VirtualBox, the screen size is usually scaled-down and the user experience is usually quite bland. To improve the appearance and functionality of a virtual machine, VirtualBox provides a set of software packages and drivers known as VirtualBox guest additions in the form of an ISO image known as VBoxGuestAdditions.iso. The image is then mounted onto the guest system and the guest additions are thereafter installed.
The VirtualBox guest additions enable the functionalities listed below:
- Improved the graphical display/appearance.
- Mouse pointer integration between the host and guest machine.
- Shared folders between the host and guest system.
- Copy & paste and cut & paste functionality between the host and the guest system.
Requirements
VirtualBox guest additions can be installed on both Linux and Windows systems. In this guide, we will walk you through the installation of VirtualBox guest additions on CentOS 8.
Step 1: Installing EPEL on CentOS 8
To start off, begin by installing the EPEL repository, in short for Extra Packages for Enterprise Linux, which is a repository that provides extra open-source software packages for RedHat flavors such as CentOS and Fedora.
To install the EPEL repository on CentOS 8, run the following dnf command on the terminal.
![]() Install Epel in CentOS 8
Install Epel in CentOS 8
Once installed, confirm the version installed by running the command.
![]() Confirm EPEL Repository
Confirm EPEL Repository
Step 2: Installing Kernel Headers and Build Tools
With the EPEL repository installed, proceed and install the kernel headers and build tools required to install the guest additions as shown.
![]() Install Kernel Headers in CentOS 8
Install Kernel Headers in CentOS 8
Once installed, confirm that the version of kernel-devel corresponds to the version of your Linux kernel by running these commands:
![]() Confirm Kernel Version
Confirm Kernel Version
The output clearly indicates a conflict between the two versions. The kernel-devel version is 4.18.0-147.8.1.el8_1.x86_64 whilst the Linux kernel version is 4.18.0-80.el8.x86_64.
To resolve the issue, update the Linux kernel by running the command:
![]() Update Kernel in CentOS 8
Update Kernel in CentOS 8
Once prompted, press ‘Y’ and hit ENTER to continue with the update. When the update the complete, reboot your CentOS 8 system.
During the reboot, be sure to boot into the latest kernel entry that corresponds to the kernel-devel version. This is usually the first entry as you can see.
![]() CentOS Grub Menu
CentOS Grub Menu
Once the system is done with booting, log in and once again confirm that the kernel-devel version now matches the version of the Linux kernel.
![]() Check Kernel Version
Check Kernel Version
The two versions are now in sync. Great! Now you can go ahead and install VirtualBox guest additions.
Step 3: Install VirtualBox Guest Additions in CentOS 8
There are two ways to install guest additions, and we will cover both ways here:
Install VirtualBox Guest Additions Graphically
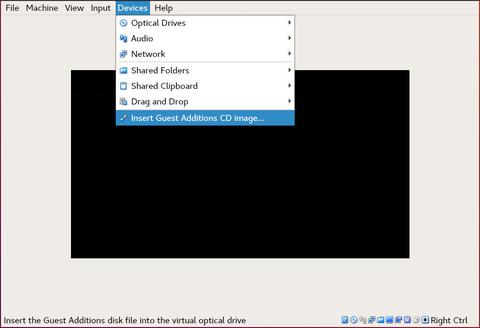
To install the VirtualBox guest additions, Head out to the menu bar and click Devices –> Insert Guest Additions CD image.
![]() Select Guest Additions
Select Guest Additions
A pop will appear as shown. From here, you can take two approaches:
![]() Run Guest Additions
Run Guest Additions
You can hit ‘Run‘ and later authenticate when prompted. Thereafter, you will see some verbose output on the terminal. Once the installation is done, reboot the system and boot into a full-screen.
Install VirtualBox Guest Additions Manually
The second option is to install a command-line. To achieve this, choose ‘Cancel’ option and thereafter, open your terminal and create a mount point for the guest additions ISO image.
Next, mount the ISO image on the mount point.
Then finally navigate to the mount location and run the VirtualBox installer script.
Once the script is done running, you will immediately observe the screen panning to full size. If this doesn’t happen in your case, reboot your system and finally boot into your full-screen CentOS 8 virtual machine 🙂
![]() CentOS Desktop in Full View
CentOS Desktop in Full View
To enable mouse pointer integration, navigate to ‘Shared Clipboard‘ –> ‘Bidirectional‘. This enables you to copy and paste content between the host and guest system.
![]() Share Clipboard in Virtualbox
Share Clipboard in Virtualbox
We hope this article has been helpful to you, If you encounter any challenges, please reach out to us. Thank you.
If You Appreciate What We Do Here On TecMint, You Should Consider:
TecMint is the fastest growing and most trusted community site for any kind of Linux Articles, Guides and Books on the web. Millions of people visit TecMint! to search or browse the thousands of published articles available FREELY to all.
If you like what you are reading, please consider buying us a coffee ( or 2 ) as a token of appreciation.

We are thankful for your never ending support.
Источник
Как установить гостевые дополнения VirtualBox на CentOS 8
VirtualBox — это кроссплатформенное программное обеспечение виртуализации с открытым исходным кодом, которое позволяет запускать несколько гостевых операционных систем (виртуальных машин) одновременно.
VirtualBox предоставляет набор драйверов и приложений (гостевые дополнения VirtualBox), которые могут быть установлены в гостевой операционной системе для расширения функциональных возможностей гостя, таких как общие папки, общий буфер обмена, интеграция указателя мыши, улучшенная поддержка видео и многое другое.
В этой статье объясняется, как установить гостевые дополнения VirtualBox на гостевых компьютерах CentOS 8.
Установка гостевых дополнений в гостевой системе CentOS
VirtualBox поставляется с ISO-файлом образа с именем «VBoxGuestAdditions.iso», который содержит установщики гостевых дополнений для всех поддерживаемых гостевых операционных систем. Этот файл находится на хост-машине и может быть смонтирован на гостевом компьютере с помощью диспетчера VirtualBox GUI. После установки вы можете установить дополнения в гостевой системе.
Выполните следующие действия, чтобы установить гостевые дополнения VirtualBox на рабочий стол CentOS 8 или гостевой сервер.
Откройте диспетчер графического интерфейса VirtualBox.
Запустите гостевую виртуальную машину CentOS.
Войдите на гостевую машину как пользователь root или sudo и установите пакеты, необходимые для сборки модулей ядра:
В меню виртуальной машины выберите «Устройства» -> «Вставить образ компакт-диска с гостевыми дополнениями», как показано на изображении ниже:
Если вы получаете сообщение об ошибке, что в гостевой системе нет CD-ROM, остановите виртуальную машину, откройте настройки машины. Перейдите на вкладку «Хранилище» и добавьте новое устройство CD-ROM, нажав на знак плюса (Добавляет оптическое устройство). После этого перезагрузите виртуальную машину.
Откройте гостевой терминал CentOS, создайте новый каталог и смонтируйте файл ISO:
Перейдите во вновь созданный каталог и выполните сценарий VBoxLinuxAdditions.run чтобы начать установку гостевых дополнений:
Параметр —nox11 указывает программе установки не создавать окно xterm.
Результат будет выглядеть следующим образом:
Перезагрузите гостевую систему CentOS, чтобы изменения вступили в силу:
После загрузки виртуальной машины войдите в нее и убедитесь, что установка прошла успешно и модуль ядра загружен с помощью команды lsmod :
Результат будет выглядеть примерно так:
Если команда не возвращает никаких результатов, это означает, что модуль ядра VirtualBox не загружен.
Вот и все. Вы установили гостевые дополнения VirtualBox на гостевом компьютере с CentOS.
Теперь вы можете включить общий буфер обмена и поддержку Drag’n Drop на вкладке «Хранилище» настроек виртуальной машины, включить 3D-ускорение на вкладке «Отображение», создать общие папки и многое другое.
Выводы
Установка гостевых дополнений VirtualBox улучшает производительность виртуальной машины и повышает удобство использования.
Чтобы найти дополнительную информацию о гостевых дополнениях, посетите официальную страницу документации по гостевым дополнениям VirtualBox .
Если у вас есть вопросы, оставьте комментарий ниже.
Источник
Install VirtualBox Guest Additions in CentOS, RHEL & Fedora
VirtualBox Guest Additions are software (typically device drivers and other special system applications) that enable seamless integration between the host and guest systems. They help you make the best out of your guest operating system for better performance and usability.
Some of the features offered by Guest Additions include mouse pointer integration, Drag’n’Drop functionality, shared clipboard, shared folders, enhanced video support, time sync, generic host/guest communication pathways, seamless windows and more.
Guest Additions are designed to be installed in a virtual machine, once a guest operating system has been installed.
In this article, we will explain how to install VirtualBox Guest Additions on CentOS and RHEL based distributions such Fedora and Scientific Linux.
How to Install VirtualBox Guest Additions in CentOS
1. First start by enabling the EPEL repository on your CentOS/RHEL guest operating system to install some required packages needed for the installation process as shown.
2. Next, update each package on your guest system including the kernel to the latest version that is both available and resolvable, as shown. Once the upgrade process is done, reboot your system to complete the upgrade process and start using the new kernel.
3. Once update process completes, install all kernel headers, developer tools and other related packages that are required for installing the guest additions from source as shown.
4. Next, set the KERN_DIR environment variable to kernel source code directory (/usr/src/kernels/$(uname -r)) and export it at the same time as shown.
5. Now, you can mount the Guest Additions ISO and run the installer in two ways:
Install Guest Additions via a GUI
If you have a desktop environment installed, use this option, from the Virtual machine menu bar, go to Devices => click on Insert Guest Additions CD image to mount the Guest Additions ISO file in your guest OS.
![]() Mount Guest Additions ISO on CentOS
Mount Guest Additions ISO on CentOS
A dialog window will open up, asking you to Run the installer, click on the Run to execute it. This will in turn open a terminal which shows the installation details (follow the on-screen instructions).
![]() Install Guest Additions in CentOS
Install Guest Additions in CentOS ![]() Installing Guest Additions on CentOS
Installing Guest Additions on CentOS
Install Guest Additions via a Terminal
Login into terminal and run the following commands to mount the Guest Additions ISO file, move into the directory where the guest additions ISO has been mounted, inside there you will find VirtualBosx guest addition installers for various platform, run the one for Linux, as follows.
6. Once the installation is complete, power off your guest system to perform certain settings as explained below.
Note: If you don’t have a desktop environment installed, you can install Gnome 3 desktop or skip the next section. You should be good to go.
7. Now you need to enable the shared clipboard and drag’n’drop functionality for your guest operating system. From the CentOS, RHEL and Fedora guest machine settings, go to General => Advanced and enable these two options from there, click on the drop down options to select an option.
![]() Enable Shared Clipboard in CentOS Virtualbox
Enable Shared Clipboard in CentOS Virtualbox
Once you are done, click on OK to save the settings and boot your guest OS and confirm that the changes you have just made are working as expected.
That’s it! VirtualBox Guest Additions make your life simple while using guest operating systems by enabling seamless integration between the host and guest systems. If you face any problems during installation, use the feedback form below to ask any questions.
If You Appreciate What We Do Here On TecMint, You Should Consider:
TecMint is the fastest growing and most trusted community site for any kind of Linux Articles, Guides and Books on the web. Millions of people visit TecMint! to search or browse the thousands of published articles available FREELY to all.
If you like what you are reading, please consider buying us a coffee ( or 2 ) as a token of appreciation.
We are thankful for your never ending support.
Источник


