- Увеличение размера виртуального диска в VirtualBox для гостевой операционной системы Oracle Linux
- Increase VirtualBox Disk Size
- Linux guest without using LVM
- Linux guests using LVM
- How To Increase Virtualbox Disk Size For Dynamically Allocated Disks
- Find Out If Your Virtual Disk is Dinamically Allocated
- BackUp Your Virtual Hard Disk
- Increase Virtualbox Disk Size For Dynamically Allocated Disks
- Use Gparted to Expand the File System of Your Guest OS
Увеличение размера виртуального диска в VirtualBox для гостевой операционной системы Oracle Linux
В данном посте пошагово описывается способ расширения размера дискового раздела root операционной системы Oracle Linux за счет увеличения виртуального диска VirtualBox.
Могут возникнуть случаи, когда заранее выделенного места на дисковом пространстве гостевой операционной системы (далее ОС) Oracle Enterprise Linux (далее OEL) в виртуальной машине может быть недостаточно. В такой ситуации, есть возможность расширить дисковое пространство (виртуальный диск) на гостевой операционной системе средствами VirtualBox и системными средствами ОС OEL, не пересоздавая виртуальную машину. Под гостевой ОС подразумевается операционная система, которая устанавливается, настраивается и работает на виртуальной машине. В данном посте описывается ситуация, когда заполняется дисковое пространство на корневом дисковом разделе root. Для расширения дискового пространства системного диска гостевой ОС Oracle Linux, надо выполнить следующие шаги:
- Проверить текущий размер диска гостевой ОС.
- Настроить диск виртуальной машины в VirtualBox.
- Расширить системный диск гостевой операционной системы.
1. Проверка текущего размера расширяемого локального диска гостевой ОС.
Проверяется текущий размер дискового раздела root гостевой ОС с помощью инструментов командной строки.
Анализируя полученный результат, можно заключить, что в корневом разделе (/) (в данном случае /dev/mapper/ol-root) свободно 350М из имеющихся 8 Гб.
Проверяется размер диска в гостевой Oracle Linux.
Результат команды fdisk показывает, что размер виртуального диска /dev/sda 10.7 Гб и из них 8585 MB (то есть 8 Гб) используется корневым разделом – /dev/mapper/ol-root: 8585 MB.
После этого можно приступать к расширению дискового пространства корневого раздела.
2. Настройка диска виртуальной машины в VirtualBox.
Необходимо остановить гостевую операционную систему Oracle Linux. Надо убедиться, что виртуальная машина выключена, а не находится в состоянии сохранения. Также перед продолжением, необходимо удалить снэпшоты (snapshots), которые ассоциируются с виртуальной машиной, если они используются в VirtualBox. Это поможет определить, что модифицируется корректный виртуальный диск, и что все будет правильно работать после модификации.
Для настройки расширения диска виртуальной машины в VirtualBox, надо войти в меню «Файл» и выбрать «Менеджер виртуальных носителей», как показано на скриншоте ниже.

В «Менеджере виртуальных носителей» можно увидеть все виртуальные диски существующих виртуальных машин. В данном примере их три. Изменение размера виртуального диска будет выполняться для OEL-fdisk.vdi, у которой размер диска 10 Гб. Выбирается OEL-fdisk.vdi и по нажатию на «Свойства» можно получить доступ к дополнительной информации и опциям, среди которых есть и изменение размера диска.

Размер диска увеличивается на 2 Гб в пункте «Размер», то есть был 10 Гб и теперь назначается 12 Гб.

3. Расширение корневого раздела (/) гостевой операционной системы внутри виртуальной машины.
Теперь необходимо запустить виртуальную машину на Oracle Linux и распределить появившееся дисковое пространство. Для этого можно использовать утилиту fdisk и проверить размер раздела диска /dev/sda, где находится корневой раздел (/).
Видно, что размер диска изменился с 10 на 12 Гб. Теперь надо сделать это новое пространство видимым для системы и нужного раздела. Запускается утилита fdisk для удаления и пересоздания LVM, данные пользователей останутся без изменений.
Выбирается ключ «m» для получения списка команд. Из списка выбирается ключ «p» для вывода данных таблицы разделов (партицирования).
Удаляется второй раздел ключом «d», т.к. основной раздел по умолчанию находится во втором разделе:
Создается новый основной раздел ключом «n» и начальные и конечные значения секторов оставляются по умолчанию:
После создания нового раздела проверяются текущие значения таблицы разделов (партицирования):
Меняется системный идентификатор для созданного раздела с помощью ключа «t» и шестнадцатеричного кода 8e, который обозначает Linux LVM. Таким образом, тип раздела сменится с Linux на Linux LVM.
Все изменения на диск записываются ключом «w».
Новые изменения разделов вступят в силу после следующей перезагрузки операционной системы. В связи с этим перезагружается операционная система.
После перезагрузки ОС проверяются настройки физического раздела диска.
и изменяется размер физического диска:
Проверяются размер и другие настройки логического размера диска.
Далее расширяется логический диск с помощью команды lvextend:
Ошибка выше возникает из-за того, что в этой логической группе уже есть логический том, который занимает место и не дает расшириться на 10 Гб. В данном случае можно распределить логическому тому все свободное дисковое пространство, используя приведенную ниже команду:
Проверяются настройки логического размера диска после его расширения:
Применяются изменения для логического раздела диска.
Проверяются размеры разделов из чего видно, что корневой раздел (/) (в данном случае /dev/mapper/ol-root) расширился с 8 Гб на 10 Гб и свободно стало 2.4 Гб вместо 350 Мб.
На этом завершается процесс увеличения размера корневого диска гостевой операционной системы Oracle Enterprise Linux, работающей в VirtualBox.
Источник
Increase VirtualBox Disk Size
We shall be using VirtualBox version 5.2.6, if yours is older than that then you may want to update it. There are a few important details changed in the UI in this release and you may have difficulty in following them if your version is a bit older.
Logical Volume Manager, or LVM, makes the matter a little more intricate but that’s fine, we will handle that case as well in this tutorial.
Linux guest without using LVM
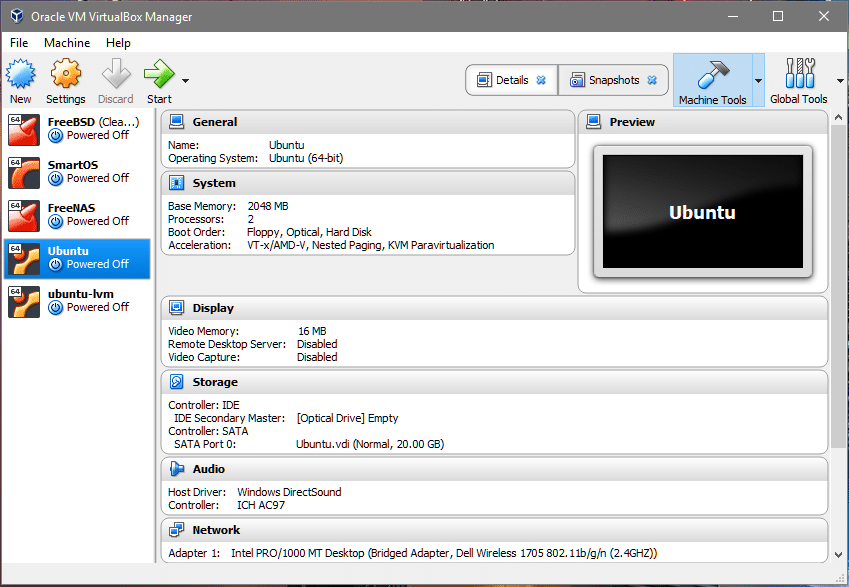
The first thing to do when resizing a disk is to get the correct disk name which you will be modifying. From the VirtualBox dashboard go to the VM that you wish to enlarge. Make sure that the machine is in Powered Off state.
- Select the machine from the left corner under its storage menu get the name of the virtual disk on which the operating system is installed. In our case the disk is named vdi (Normal 20.00GB).

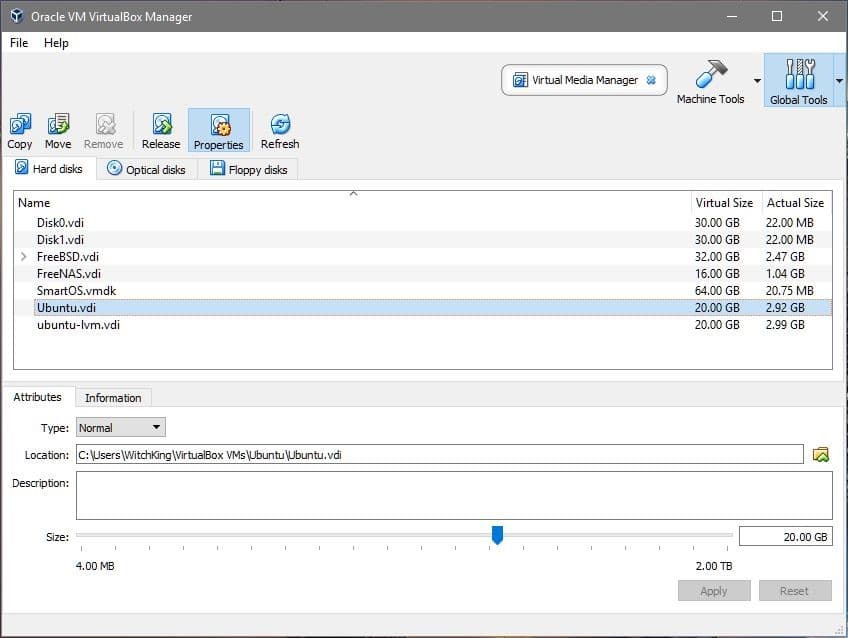
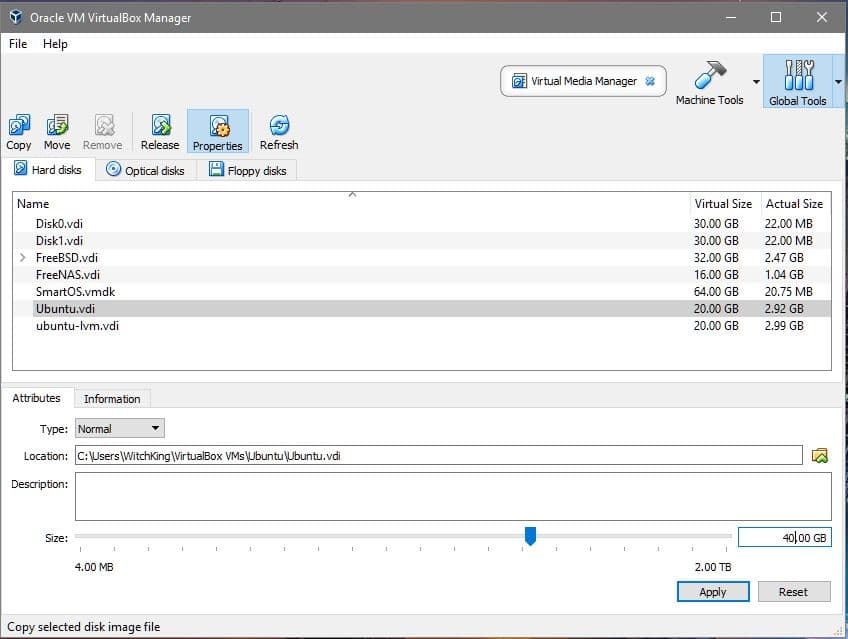
- Now click on the Global Tools button on the top-right corner of the dashboard.
- You can see a lot of virtual disks listed in the section. The one that interests us is Ubuntu.vdi as we learned in Step-1. Select the appropriate disk name that your VM uses and adjust its size to the value you desire. We will be increasing its size from 20GB to 40GB. Click apply before going back to Machine Tools.
- Now we can start the VM and have a look at the guest operating system. Start the VM, login, open the terminal and enter:
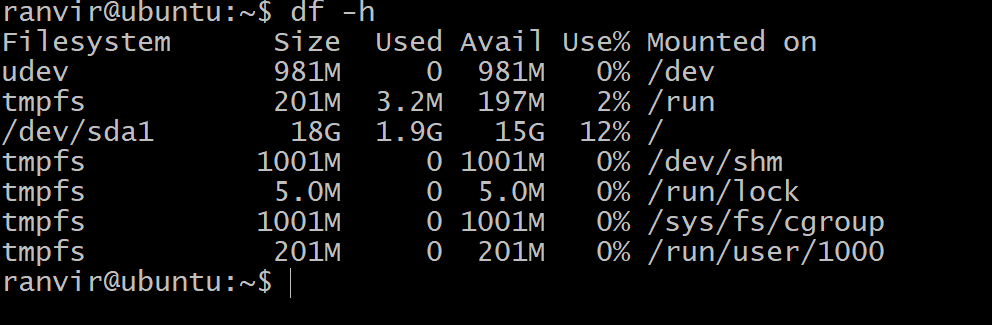 The available space for the root filesystem is not showing any increase in storage space. To understand why you can run the following command to list all the storage block devices attached to the VM:
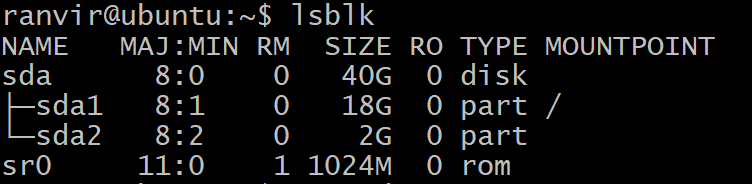 There’s a block device sda, 40G in size which is of the type It has been partitioned into sda1, of size 20G (on top of which sits the root filesystem) and the rest is unallocated. The /(root) partition is the one that is supposed to grow in our case. There’s also the swap partition sda2. To resize the root partition it is safer for us to turn off the Virtual Machine.
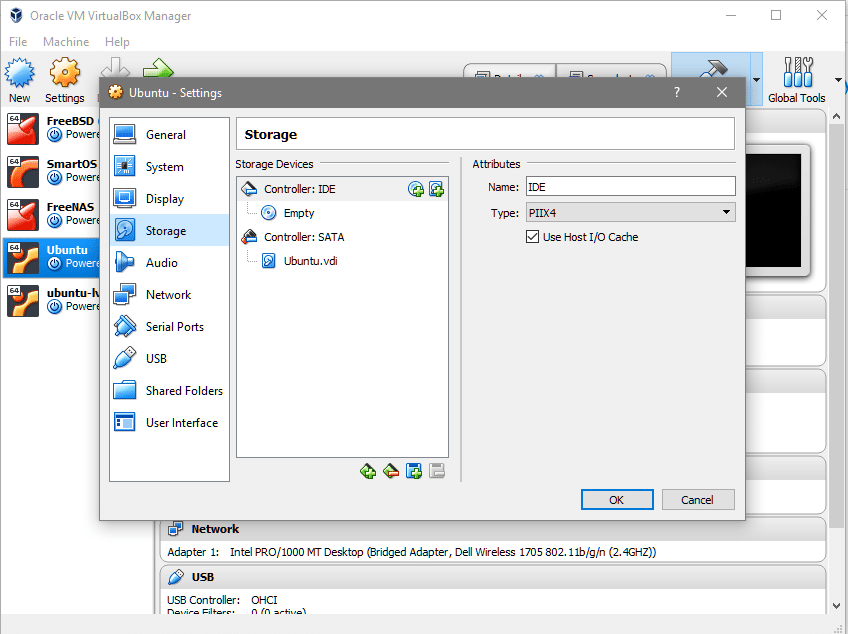 Under the IDE controller, you can see that there is no optical disk attached. You can click where it says Empty, click on CD icon on the extreme right (under Attributes section), select the gparted iso file and mount it under the Controller: IDE.


 This is where a lot of things would differ for different people. In the above case, we have just one main partition for /(root) mounted on sda1. You may have a different filesystem to grow and you would have to increase the size of corresponding partition. The case above works for the default installation of Ubuntu 16.04 LTS.
 That’s it! Now, upon rebooting the system you will notice that the VM’s filesystem have more space available for you to work with.
Linux guests using LVM
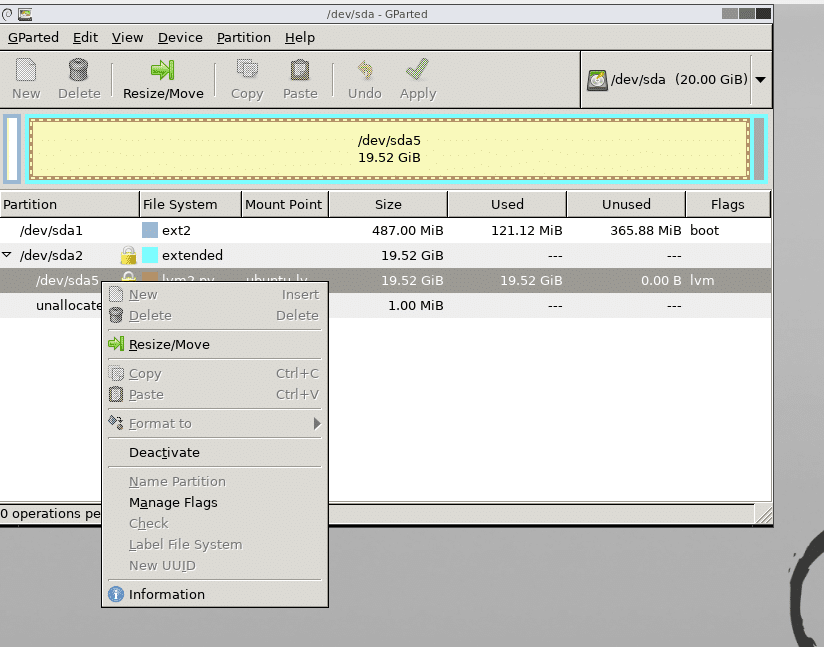
If the guest operating system is using LVM then we need to modify a couple of steps. First of all, when you are in the gparted UI, you would notice that there’s a lock icon next to the LVM paritions. Right-click on those partitions and select the deactivate option to enable resizing them.
Reboot the system and open terminal once you have grown the desired partitions.
The next thing to do is to make the lvm partitioning scheme aware of the changes made. As the root user, run the command below to see the list of physical volumes available:

You can see that there’s 20G of space made newly available to the physical volume /dev/sda5 to grow the physical volume run:
Источник
How To Increase Virtualbox Disk Size For Dynamically Allocated Disks
In this tutorial, I’m going to show you how to increase Virtualbox disk size for dynamically allocated storage. This method will only work if your virtual disk is in .vdi or vhd format. I also assume that your host OS is Linux. If you want to know how to increase the size of a fixed size disk, then read the next article.
Find Out If Your Virtual Disk is Dinamically Allocated
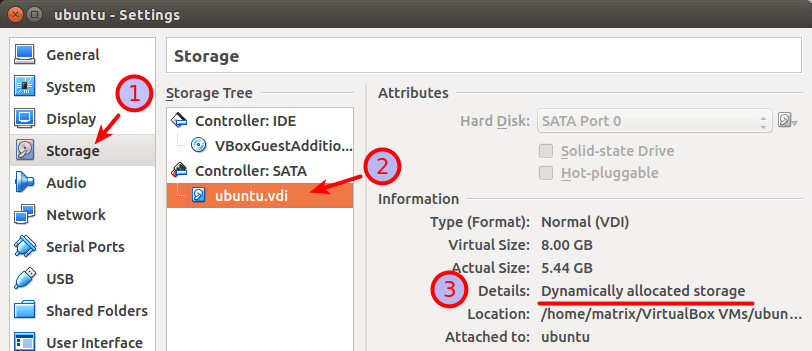
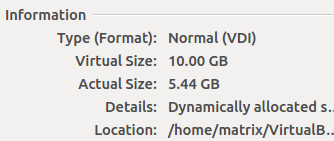
Open you virtual machine settings and click Storage on the left pane. Select your virtual disk under Storage Tree. You can see the information about your virtual disk on the right. You can see that my virtual disk is dynamically allocated.
BackUp Your Virtual Hard Disk
Before we increase the size of our virtual hard disk, it’s always a good idea to make a backup of it in case something go wrong.
First, right click on the location line and copy the location of your virtual hard disk.

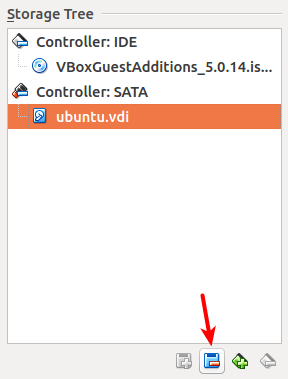
Then click the minus icon to remove the virtual disk from virtual machine.
Next open up a terminal on your host OS and run the following command to backup the virtual hard disk.
Repalce the location with the real location of your virtual disk. For example, I executed this command:
Note that because the location of my virtual disk contains space, so I added double quotes around the location. Make sure your backup disk name is different from the origial disk name.
Increase Virtualbox Disk Size For Dynamically Allocated Disks
Now you can use the vboxmanage comand to enlarge your virtual disk. The syntax is as follows:
Specify the new size in Megabytes. For instance, I entered the following command to increase my virtual disk to 10GB.
You can’t make your virtual disk smaller using this command.
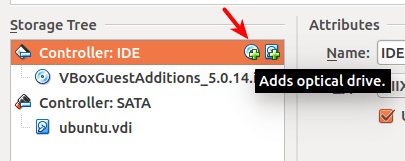
Now open your virtualbox settings to attach the virtual disk back to your virtual machine. Click the plus icon, and select Add Hard Disk.
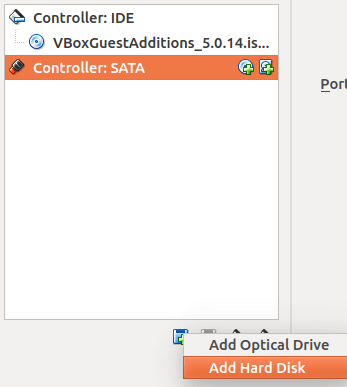
Choose your enlarged virtual disk. Once your added your virtual disk back, you can check out the new size of it. You can see that my virtual disk is now 10GB in size.
Use Gparted to Expand the File System of Your Guest OS
Although your virtual disk size is increased, your guest OS can’t use all of them right now. So you need to boot your virtual machine from a Live CD/DVD that contains Gparted to enlarge the file system of your guest OS.
To boot your virtual machine from a Live CD/DVD, follow these steps.
Open you virtual machine settings and click Storage on the left pane. Under storage tree, click Controller: IDE then click the optical drive icon to add a Live CD/DVD image file. I use the ubuntu live ISO file because it contains Gparted.
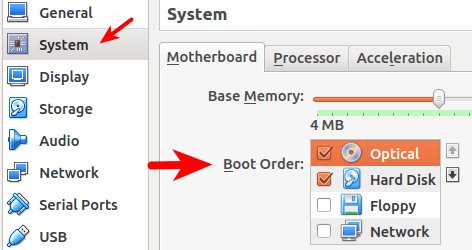
Now click System on the left pane, in Boot Order, make sure Optical is first on the list. Save your settings and start your virtual machine.
Now you are in a Live OS. Open Gparted program.
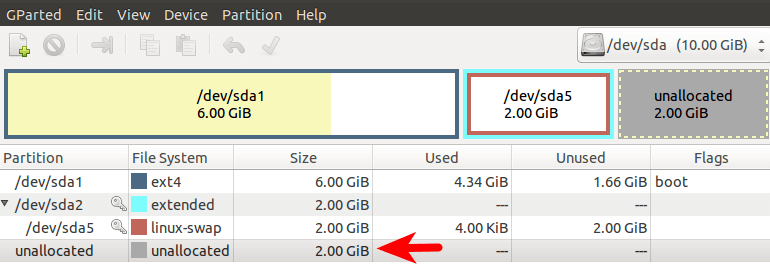
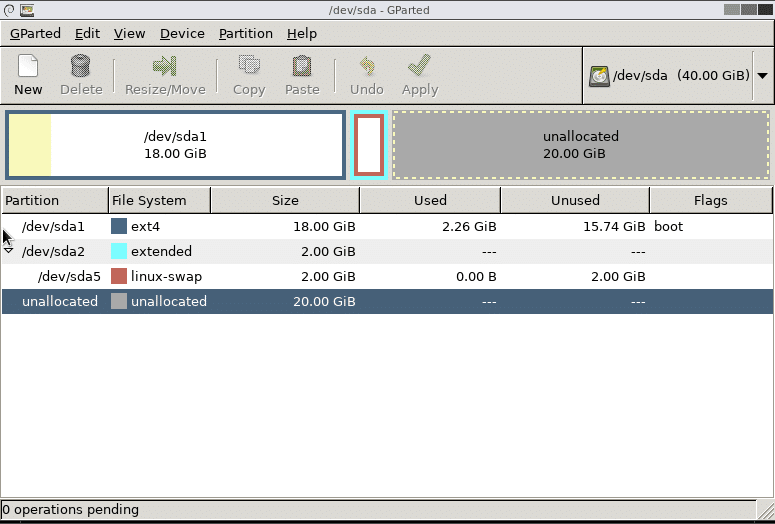
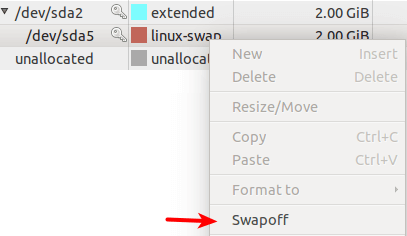
As you can see there’re 2GB of unallocated space. To use this unallocated space, first disable swap partition. Right click on the linux-swap partition and select swapoff.
Then right click on linux-swap partion and select delete. Next right click on the extended partition and select delete. Apply your changes.
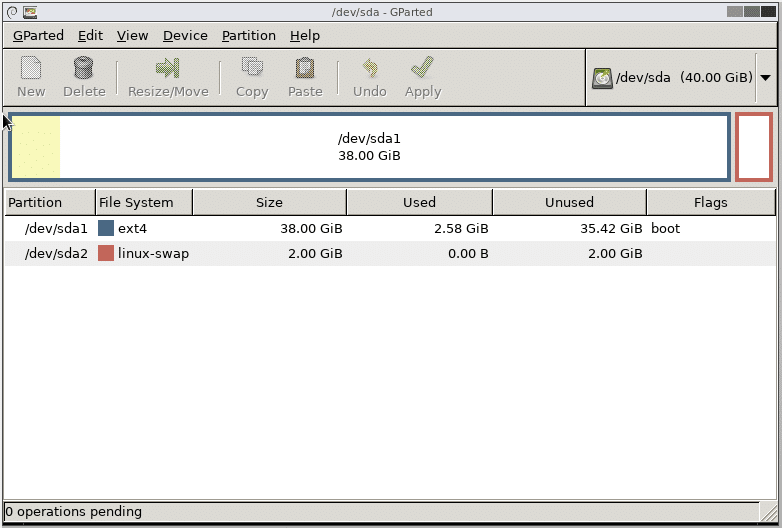
Now you can enlarge your root file system. After you enlarged your root file system, shut down your virtual machine and boot it for virtual disk. You should be able to use the extra spaced added.
Источник


