- Create a Windows Forms app in Visual Studio with Visual Basic
- Create a project
- Create the application
- Add a button to the form
- Add a label to the form
- Add code to the form
- Run the application
- Next steps
- Руководство. Начало работы с Visual Basic в Visual Studio Tutorial: Get started with Visual Basic in Visual Studio
- Создание проекта Create a project
- Добавление рабочей нагрузки (необязательно) Add a workload (optional)
- Вариант 1: использование диалогового окна «Новый проект» Option 1: Use the New Project dialog box
- Вариант 2: использование меню «Сервис» Option 2: Use the Tools menu bar
- Создание приложения для запроса имени Create a «What Is Your Name» application
- Создание приложения «Калькулятор» Create a «Calculate This» application
- Быстрые ответы на часто задаваемые вопросы Quick answers FAQ
- Что такое Visual Basic? What is Visual Basic?
- Что такое Visual Studio? What is Visual Studio?
- Что такое консольное приложение? What is a console app?
- Что такое .NET Core? What is .NET Core?
- Следующие шаги Next steps
Create a Windows Forms app in Visual Studio with Visual Basic
In this short introduction to the Visual Studio integrated development environment (IDE), you’ll create a simple Visual Basic application that has a Windows-based user interface (UI).
If you haven’t already installed Visual Studio, go to the Visual Studio downloads page to install it for free.
If you haven’t already installed Visual Studio, go to the Visual Studio downloads page to install it for free.
Some of the screenshots in this tutorial use the dark theme. If you aren’t using the dark theme but would like to, see the Personalize the Visual Studio IDE and Editor page to learn how.
Create a project
First, you’ll create a Visual Basic application project. The project type comes with all the template files you’ll need, before you’ve even added anything.
Open Visual Studio 2017.
From the top menu bar, choose File > New > Project.
In the New Project dialog box in the left pane, expand Visual Basic, and then choose Windows Desktop. In the middle pane, choose Windows Forms App (.NET Framework). Then name the file HelloWorld .
If you don’t see the Windows Forms App (.NET Framework) project template, cancel out of the New Project dialog box and from the top menu bar, choose Tools > Get Tools and Features. The Visual Studio Installer launches. Choose the .NET desktop development workload, then choose Modify.

Open Visual Studio 2019.
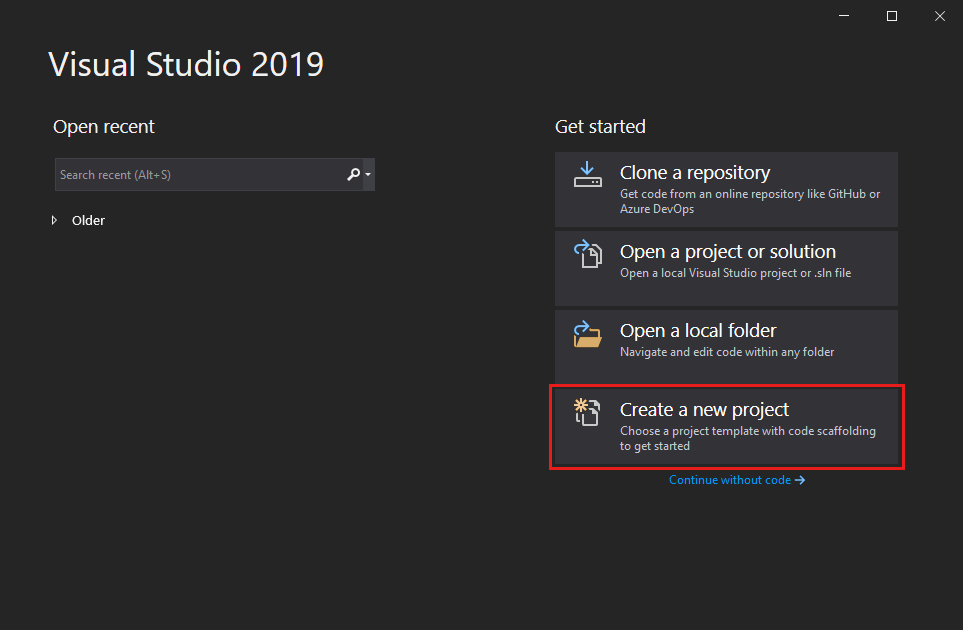
On the start window, choose Create a new project.
On the Create a new project window, choose the Windows Forms App (.NET Framework) template for Visual Basic.
(If you prefer, you can refine your search to quickly get to the template you want. For example, enter or type Windows Forms App in the search box. Next, choose Visual Basic from the Language list, and then choose Windows from the Platform list.)

If you do not see the Windows Forms App (.NET Framework) template, you can install it from the Create a new project window. In the Not finding what you’re looking for? message, choose the Install more tools and features link.

Next, in the Visual Studio Installer, choose the Choose the .NET desktop development workload.
After that, choose the Modify button in the Visual Studio Installer. You might be prompted to save your work; if so, do so. Next, choose Continue to install the workload. Then, return to step 2 in this «Create a project» procedure.
In the Configure your new project window, type or enter HelloWorld in the Project name box. Then, choose Create.

Visual Studio opens your new project.
Create the application
After you select your Visual Basic project template and name your file, Visual Studio opens a form for you. A form is a Windows user interface. We’ll create a «Hello World» application by adding controls to the form, and then we’ll run the app.
Add a button to the form
Click Toolbox to open the Toolbox fly-out window.

(If you don’t see the Toolbox fly-out option, you can open it from the menu bar. To do so, View > Toolbox. Or, press Ctrl+Alt+X.)
Click the Pin icon to dock the Toolbox window.

Click the Button control and then drag it onto the form.
In the Appearance section (or the Fonts section) of the Properties window, type Click this , and then press Enter.
(If you don’t see the Properties window, you can open it from the menu bar. To do so, click View > Properties Window. Or, press F4.)
In the Design section of the Properties window, change the name from Button1 to btnClickThis , and then press Enter.
If you’ve alphabetized the list in the Properties window, Button1 appears in the (DataBindings) section, instead.
Add a label to the form
Now that we’ve added a button control to create an action, let’s add a label control to send text to.
Select the Label control from the Toolbox window, and then drag it onto the form and drop it beneath the Click this button.
In either the Design section or the (DataBindings) section of the Properties window, change the name of Label1 to lblHelloWorld , and then press Enter.
Add code to the form
In the Form1.vb [Design] window, double-click the Click this button to open the Form1.vb window.
(Alternatively, you can expand Form1.vb in Solution Explorer, and then click Form1.)
In the Form1.vb window, between the Private Sub and End Sub lines, type or enter lblHelloWorld.Text = «Hello World!» as shown in the following screenshot:

Run the application
Click the Start button to run the application.

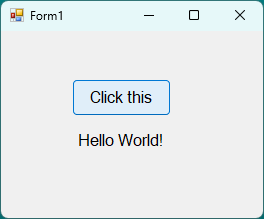
Several things will happen. In the Visual Studio IDE, the Diagnostics Tools window will open, and an Output window will open, too. But outside of the IDE, a Form1 dialog box appears. It will include your Click this button and text that says Label1.
Click the Click this button in the Form1 dialog box. Notice that the Label1 text changes to Hello World!.
Close the Form1 dialog box to stop running the app.
Next steps
To learn more, continue with the following tutorial:
Руководство. Начало работы с Visual Basic в Visual Studio Tutorial: Get started with Visual Basic in Visual Studio
В этом руководстве по Visual Basic вы будете работать со средой Visual Studio для создания и запуска нескольких разных консольных приложений. Вы также ознакомитесь с некоторыми возможностями интегрированной среды разработки (IDE) Visual Studio. In this tutorial for Visual Basic (VB), you’ll use Visual Studio to create and run a few different console apps and explore some features of the Visual Studio integrated development environment (IDE) while you do so.
Установите Visual Studio бесплатно со страницы скачиваемых материалов Visual Studio, если еще не сделали этого. If you haven’t already installed Visual Studio, go to the Visual Studio downloads page to install it for free.
Установите Visual Studio бесплатно со страницы скачиваемых материалов Visual Studio, если еще не сделали этого. If you haven’t already installed Visual Studio, go to the Visual Studio downloads page to install it for free.
Создание проекта Create a project
Сначала мы создадим проект приложения Visual Basic. First, we’ll create a Visual Basic application project. Для этого типа проекта уже имеются все нужные файлы шаблонов, что избавляет вас от лишней работы. The project type comes with all the template files you’ll need, before you’ve even added anything!
Откройте Visual Studio 2017. Open Visual Studio 2017.
В верхней строке меню последовательно выберите Файл > Создать > Проект. From the top menu bar, choose File > New > Project.
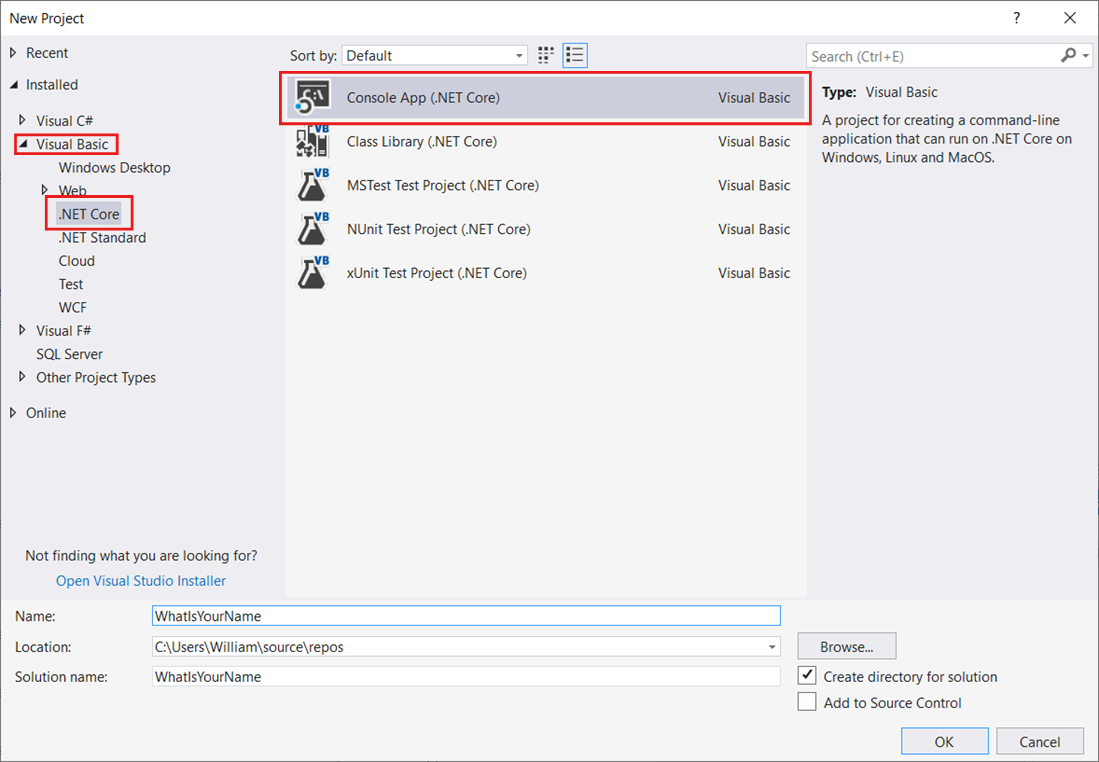
В левой области диалогового окна Новый проект разверните узел Visual Basic и выберите .NET Core. In the New Project dialog box in the left pane, expand Visual Basic, and then choose .NET Core. На средней панели выберите Консольное приложение (.NET Core) . In the middle pane, choose Console App (.NET Core). Назовите проект WhatIsYourName. Then name the project WhatIsYourName.
Добавление рабочей нагрузки (необязательно) Add a workload (optional)
Если шаблон проекта Консольное приложение (.NET Core) отсутствует, его можно получить, добавив рабочую нагрузку Кроссплатформенная разработка .NET Core. If you don’t see the Console App (.NET Core) project template, you can get it by adding the .NET Core cross-platform development workload. Добавить ее можно одним из двух способов в зависимости от того, какие обновления Visual Studio 2017 установлены на вашем компьютере. You can add this workload in one of the two following ways, depending on which Visual Studio 2017 updates are installed on your machine.
Вариант 1: использование диалогового окна «Новый проект» Option 1: Use the New Project dialog box
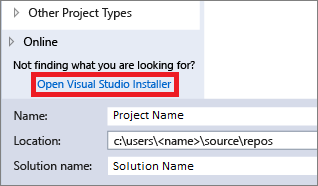
Щелкните ссылку Открыть установщик Visual Studio в левой области диалогового окна Новый проект. Click the Open Visual Studio Installer link in the left pane of the New Project dialog box.
Запускается Visual Studio Installer. The Visual Studio Installer launches. Выберите рабочую нагрузку Кроссплатформенная разработка .NET Core и затем элемент Изменить. Choose the .NET Core cross-platform development workload, and then choose Modify.

Вариант 2: использование меню «Сервис» Option 2: Use the Tools menu bar
Закройте диалоговое окно Создать проект и в верхней строке меню выберите Сервис > Получить средства и компоненты. Cancel out of the New Project dialog box and from the top menu bar, choose Tools > Get Tools and Features.
Запускается Visual Studio Installer. The Visual Studio Installer launches. Выберите рабочую нагрузку Кроссплатформенная разработка .NET Core и затем элемент Изменить. Choose the .NET Core cross-platform development workload, and then choose Modify.
На некоторых снимках экрана в этом учебнике используется темная тема. Some of the screenshots in this tutorial use the dark theme. Если вы не используете темную тему, но хотите переключиться на нее, см. страницу Персонализация интегрированной среды разработки и редактора Visual Studio. If you aren’t using the dark theme but would like to, see the Personalize the Visual Studio IDE and Editor page to learn how.
Запустите Visual Studio 2019. Open Visual Studio 2019.
На начальном экране выберите Создать проект. On the start window, choose Create a new project.

В окне Создание проекта выберите Visual Basic в списке языков. In the Create a new project window, choose Visual Basic from the Language list. Затем выберите Windows в списке платформ и Консоль в списке типов проектов. Next, choose Windows from the Platform list and Console from the project types list.
Применив фильтры по языку, платформе и типу проекта, выберите шаблон Консольное приложение и щелкните Далее. After you apply the language, platform, and project type filters, choose the Console Application template, and then choose Next.

Если шаблон Консольное приложение отсутствует, его можно установить в окне Создание проекта. If you do not see the Console Application template, you can install it from the Create a new project window. В сообщении Не нашли то, что искали? выберите ссылку Установка других средств и компонентов. In the Not finding what you’re looking for? message, choose the Install more tools and features link.

После этого в Visual Studio Installer выберите рабочую нагрузку Кроссплатформенная разработка .NET Core. Then, in the Visual Studio Installer, choose the .NET Core cross-platform development workload.

Затем нажмите кнопку Изменить в Visual Studio Installer. After that, choose the Modify button in the Visual Studio Installer. Вам может быть предложено сохранить результаты работы; в таком случае сделайте это. You might be prompted to save your work; if so, do so. Выберите Продолжить, чтобы установить рабочую нагрузку. Next, choose Continue to install the workload. После этого вернитесь к шагу 2 в процедуре Создание проекта. Then, return to step 2 in this «Create a project» procedure.
В поле Имя проекта окна Настроить новый проект введите WhatIsYourName. In the Configure your new project window, type or enter WhatIsYourName in the Project name box. Нажмите кнопку Далее. Then, choose Next.
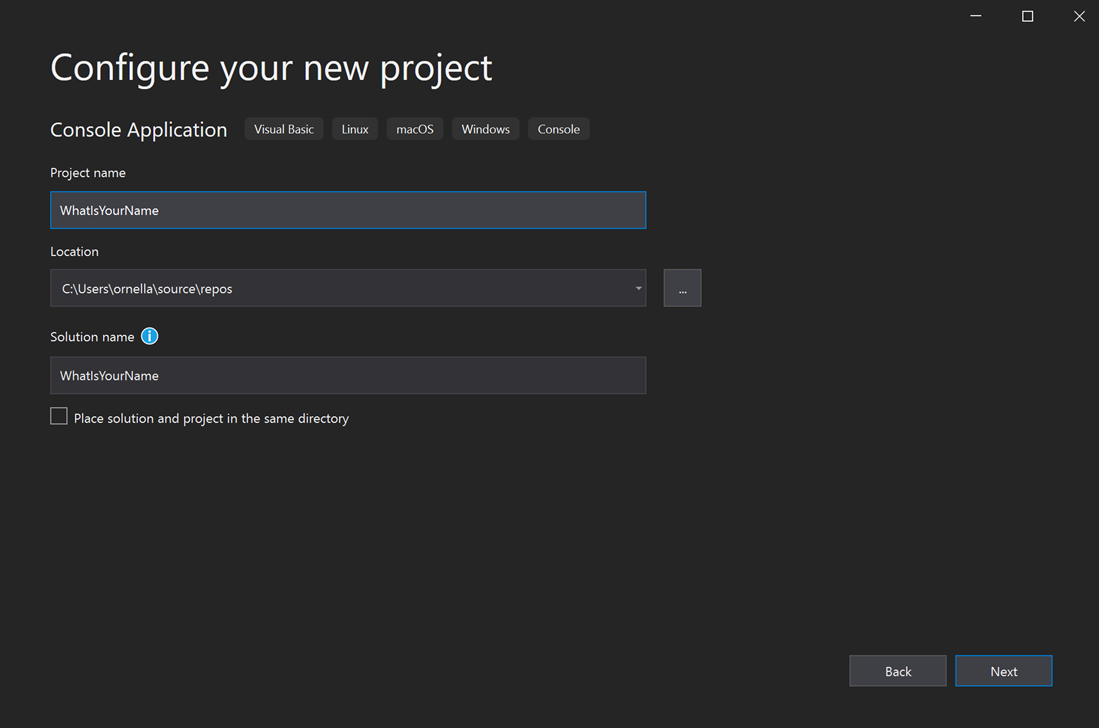
В окне Дополнительные сведения для целевой платформы должна быть указана версия .NET Core 3.1. In the Additional information window, .NET Core 3.1 should already be selected for your target framework. Если это не так, выберите .NET Core 3.1. If not, select .NET Core 3.1. Затем нажмите Создать. Then, choose Create.

Новый проект открывается в Visual Studio. Visual Studio opens your new project.
Создание приложения для запроса имени Create a «What Is Your Name» application
Давайте создадим приложение, которое запрашивает имя пользователя, а затем выводит его вместе с датой и временем. Let’s create an app that prompts you for your name and then displays it along with the date and time. Вот как это сделать. Here’s how:
Откройте проект WhatIsYourName, если он еще не открыт. If it is not already open, then open your WhatIsYourName project.
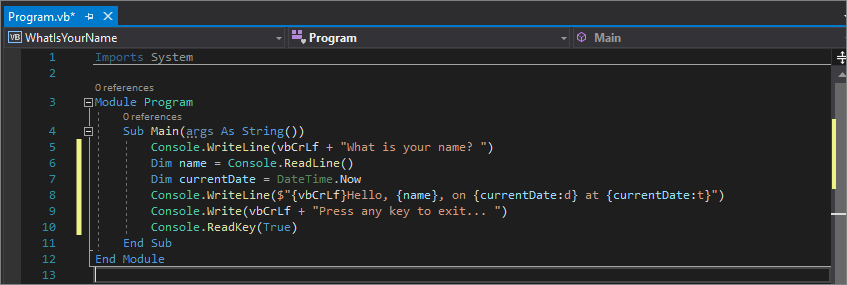
Введите следующий код Visual Basic между первой открывающей скобкой после строки Sub Main(args As String()) и строкой End Sub : Enter the following Visual Basic code immediately after the opening bracket that follows the Sub Main(args As String()) line and before the End Sub line:
Этот код заменяет существующие операторы WriteLine, Write и ReadKey. This code replaces the existing WriteLine, Write, and ReadKey statements.
Нажмите зеленую кнопку Пуск или клавишу F5, чтобы создать и запустить свое первое приложение. Use the green Start button, or press F5 to build and run your first app.
Когда откроется окно консоли, введите свое имя. When the console window opens, enter your name. Окно консоли должно выглядеть так, как показано на следующем снимке экрана: Your console window should look similar to the following screenshot:
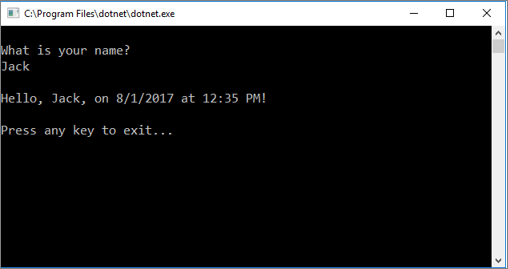
Для закрытия консольного окна нажмите любую клавишу. Press any key to close the console window.
В проекте WhatIsYourName введите следующий код Visual Basic между первой открывающей скобкой после строки Sub Main(args As String()) и строкой End Sub : In the WhatIsYourName project, enter the following Visual Basic code immediately after the opening bracket that follows the Sub Main(args As String()) line and before the End Sub line:
Этот код заменяет существующие операторы WriteLine, Write и ReadKey. This code replaces the existing WriteLine, Write, and ReadKey statements.
Нажмите зеленую кнопку Пуск или клавишу F5, чтобы создать и запустить свое первое приложение. Use the green Start button, or press F5 to build and run your first app.
Когда откроется окно консоли, введите свое имя. When the console window opens, enter your name. Окно консоли должно выглядеть так, как показано на следующем снимке экрана: Your console window should look similar to the following screenshot:
Для закрытия консольного окна нажмите любую клавишу. Press any key to close the console window.
Создание приложения «Калькулятор» Create a «Calculate This» application
Откройте Visual Studio 2017 и в верхней строке меню выберите Файл > Создать > Проект. Open Visual Studio 2017, and then from the top menu bar, choose File > New > Project.
В левой области диалогового окна Новый проект разверните узел Visual Basic и выберите .NET Core. In the New Project dialog box in the left pane, expand Visual Basic, and then choose .NET Core. На средней панели выберите Консольное приложение (.NET Core) . In the middle pane, choose Console App (.NET Core). Назовите файл CalculateThis. Then name the file CalculateThis.
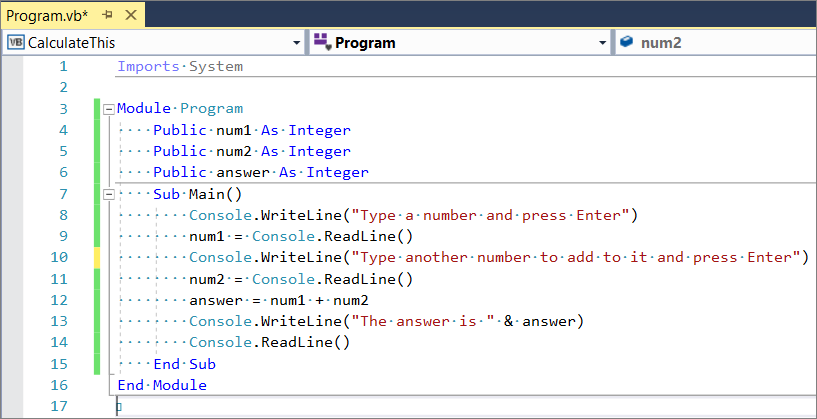
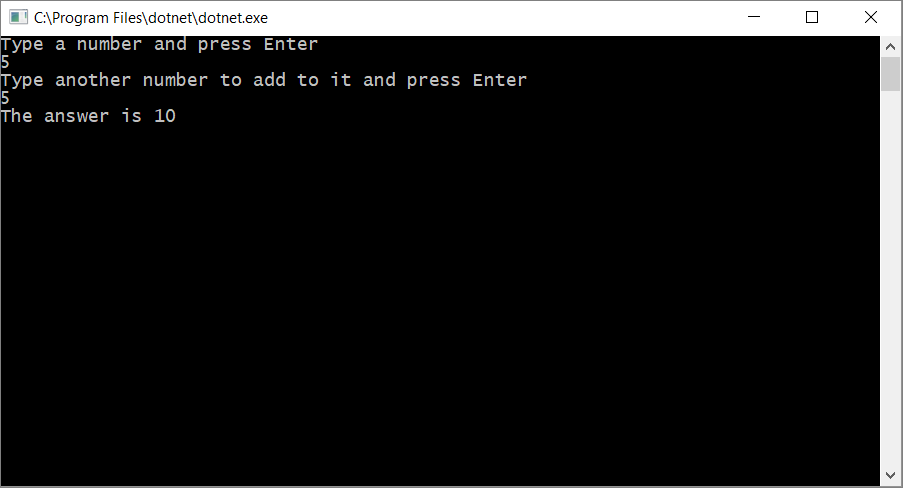
Введите следующий код между строками Module Program и End Module : Enter the following code between the Module Program line and End Module line:
Окно кода должно выглядеть так, как показано на следующем снимке экрана: Your code window should look like the following screenshot:
Щелкните CalculateThis, чтобы запустить программу. Click CalculateThis to run your program. Окно консоли должно выглядеть так, как показано на следующем снимке экрана: Your console window should look similar to the following screenshot:
На начальном экране выберите Создать проект. On the start window, choose Create a new project.
В окне Создание проекта выберите Visual Basic в списке языков. In the Create a new project window, choose Visual Basic from the Language list. Затем выберите Windows в списке платформ и Консоль в списке типов проектов. Next, choose Windows from the Platform list and Console from the project types list.
Применив фильтры по языку, платформе и типу проекта, выберите шаблон Консольное приложение и щелкните Далее. After you apply the language, platform, and project type filters, choose the Console Application template, and then choose Next.
Затем в поле Имя проекта окна Настроить новый проект введите CalculateThis. Then, in the Configure your new project window, type or enter CalculateThis in the Project name box. Затем щелкните Далее. Then, choose Next.
В окне Дополнительные сведения для целевой платформы должна быть указана версия .NET Core 3.1. In the Additional information window, .NET Core 3.1 should already be selected for your target framework. Если это не так, выберите .NET Core 3.1. If not, select .NET Core 3.1. Затем нажмите Создать. Then, choose Create.
Введите следующий код между строками Module Program и End Module : Enter the following code between the Module Program line and End Module line:
Окно кода должно выглядеть так, как показано на следующем снимке экрана: Your code window should look like the following screenshot:
Щелкните CalculateThis, чтобы запустить программу. Click CalculateThis to run your program. Окно консоли должно выглядеть так, как показано на следующем снимке экрана: Your console window should look similar to the following screenshot:
Быстрые ответы на часто задаваемые вопросы Quick answers FAQ
Ниже приведен краткий список вопросов и ответов, с помощью которого вы сможете ознакомиться с некоторыми основными понятиями. Here’s a quick FAQ to highlight some key concepts.
Что такое Visual Basic? What is Visual Basic?
Visual Basic — это типобезопасный язык программирования, который прост в изучении. Visual Basic is a type-safe programming language that’s designed to be easy to learn. Он является производным от языка BASIC (Beginner’s All-purpose Symbolic Instruction Code — универсальный код символических инструкций для начинающих). It is derived from BASIC, which means «Beginner’s All-purpose Symbolic Instruction Code».
Что такое Visual Studio? What is Visual Studio?
Visual Studio — это интегрированный набор средств разработки. Visual Studio is an integrated development suite of productivity tools for developers. Его можно рассматривать как программу для создания приложений. Think of it as a program you can use to create programs and applications.
Что такое консольное приложение? What is a console app?
Консольное приложение принимает входные данные и выводит результаты в окне командной строки (также называется консоль). A console app takes input and displays output in a command-line window, also known as a console.
Что такое .NET Core? What is .NET Core?
.NET Core — это дальнейший этап развития платформы .NET Framework. .NET Core is the evolutionary next step of the .NET Framework. В то время как платформа .NET Framework позволяла использовать один и тот же код в средах разных языков программирования, в .NET Core появилась возможность использовать один и тот же код на разных платформах. Where the .NET Framework allowed you to share code across programming languages, .NET Core adds the ability to share code across platforms. Более того, это платформа с открытым кодом. Even better, it’s open source. (Как .NET Framework, так и .NET Core включают в себя готовые библиотеки, предоставляющие определенные функциональные возможности, а также среду CLR, которая выступает в роли виртуальной машины для выполнения кода.) (Both the .NET Framework and .NET Core include libraries of prebuilt functionality as well as a common language runtime (CLR), which acts as a virtual machine in which to run your code.)
Следующие шаги Next steps
Поздравляем с завершением этого учебника! Congratulations on completing this tutorial! Для получения дополнительных сведений перейдите к следующему руководству. To learn even more, see the following tutorial.


