- Русские Блоги
- Настройка среды разработки GoLang в коде Visual Studio
- Настройка среды разработки GoLang в коде Visual Studio
- 1. Установка GoLang
- 2. Введение в плагин GoLang
- Три, плагин установки
- 1. Установите код Visual Studio версии 0.10.2.
- 2. Установите плагин
- 3. Установите переменную среды GOPATH
- 4. Включите автосохранение
- 5. Установите Git
- В-четвертых, настройте плагин
- 1. Нажмите Настройки пользователя
- 2. Выполнять команды
- 3. Используйте
- Интеллектуальная рекомендация
- Пошаговая загрузка файла Spring MVC-09 (на основе файла загрузки клиента Servlet3.0 + Html5)
- Создайте многоканальное окно в приложениях Win32
- Путь к рефакторингу IOS-APP (3) Введение в модульное тестирование
- Tree——No.617 Merge Two Binary Trees
- Настройка Visual Studio Code для Go
- Установка
- Настройка
- Установка отладчика
- Заключение
- Visual Studio Code on Linux
- Installation
- Debian and Ubuntu based distributions
- RHEL, Fedora, and CentOS based distributions
- openSUSE and SLE-based distributions
- AUR package for Arch Linux
- Nix package for NixOS (or any Linux distribution using Nix package manager)
- Installing .rpm package manually
- Updates
- Node.js
- Setting VS Code as the default text editor
- xdg-open
- Debian alternatives system
- Windows as a Linux developer machine
- Windows Subsystem for Linux
- Next steps
- Common questions
- Azure VM Issues
- Debian and moving files to trash
- Conflicts with VS Code packages from other repositories
- «Visual Studio Code is unable to watch for file changes in this large workspace» (error ENOSPC)
- I can’t see Chinese characters in Ubuntu
- Package git is not installed
- The code bin command does not bring the window to the foreground on Ubuntu
- Cannot install .deb package due to «/etc/apt/sources.list.d/vscode.list: No such file or directory»
- Cannot move or resize the window while X forwarding a remote window
- Using the custom title bar
- Broken cursor in editor with display scaling enabled
- Repository changed its origin value
Русские Блоги
Настройка среды разработки GoLang в коде Visual Studio
Настройка среды разработки GoLang в коде Visual Studio
Автор: chszs, не разрешается воспроизводить без разрешения блоггеров. При перепечатке с разрешения необходимо указать автора и домашнюю страницу блога:http://blog.csdn.net/chszs
Visual Studio Code — мой любимый инструмент разработки. Итак, если вы можете настроить среду разработки GoLang на Visual Studio Code для разработки программ GoLang, это, несомненно, очень интересно. Эта статья посвящена этому процессу.
1. Установка GoLang
Установка GoLang на Windows относительно проста, и этот процесс пропущен.
Следует отметить, что при установке GoLang необходимо убедиться, что две переменные среды, одна из которых является переменной среды GOROOT, а вторая — переменная среды PATH, должны содержать значение $ GOROOT \ bin.
2. Введение в плагин GoLang
Для инструментов разработки кода Visual Studio существует отличный плагин GoLang, его домашняя страница:https://github.com/microsoft/vscode-go
Особенности этого плагина включают в себя:
- Цветной код
- Завершение кода (используя gocode)
- сегмент кода
- Быстрая подсказка (используйте godef)
- Перейти к определению (используйте godef)
- Поиск ссылок (используя go-find-reference)
- Схема документа (с использованием плана)
- Переименовать (использовать gorename)
- Сохранить сборку (используя go build и go test)
- Форматирование кода (используя goreturns или goimports или gofmt)
- Отладочный код (с использованием delve)
Три, плагин установки
1. Установите код Visual Studio версии 0.10.2.
Перейти на официальный сайт:https://code.visualstudio.com/
Скачайте Visual Studio Code версии 0.10.2, процесс установки пропущен.
2. Установите плагин
Войдите в интерфейс кода Visual Studio, используйте сочетание клавиш Ctrrl + Shift + p, откройте командную панель, выберите «Расширения: установить расширение» и дождитесь загрузки списка имен плагинов (этот шаг медленнее в Китае).
Затем введите go в поле ввода «ext install», выберите go 0.6.15, нажмите «установить», после завершения установки требуется перезапустить среду разработки, нажмите кнопку «Перезагрузить», чтобы автоматически обновить среду.
3. Установите переменную среды GOPATH
Установите переменную среды GOPATH в системе Windows, мое значение D: \ tools \ VSCode \ works
Отсутствующие переменные среды GOPATH обычно сообщают об ошибках типа «$ GOPATH not set».
4. Включите автосохранение
Настоятельно рекомендуется включить функцию автосохранения. Способ открытия: выберите меню «Файл» и нажмите «Автосохранение».
5. Установите Git
Процесс установки Git на Windows опущен. Не забудьте настроить git \ bin в переменную окружения PATH.
В-четвертых, настройте плагин
Параметры конфигурации Visual Studio Code поддерживают параметры подключаемого модуля GoLang, которые можно настроить с помощью параметров пользовательских настроек или параметров рабочей области. Его можно найти в меню Файл-> Настройки.
1. Нажмите Настройки пользователя
Если переменная среды GOPATH не установлена, то она должна быть установлена здесь.
2. Выполнять команды
1) Установить гокод
2) Установите godef
3) Установить голинт
4) Установить Go-Find-ссылки
5) Установить Go-контур
6) Установить гортани
7) Установить имя
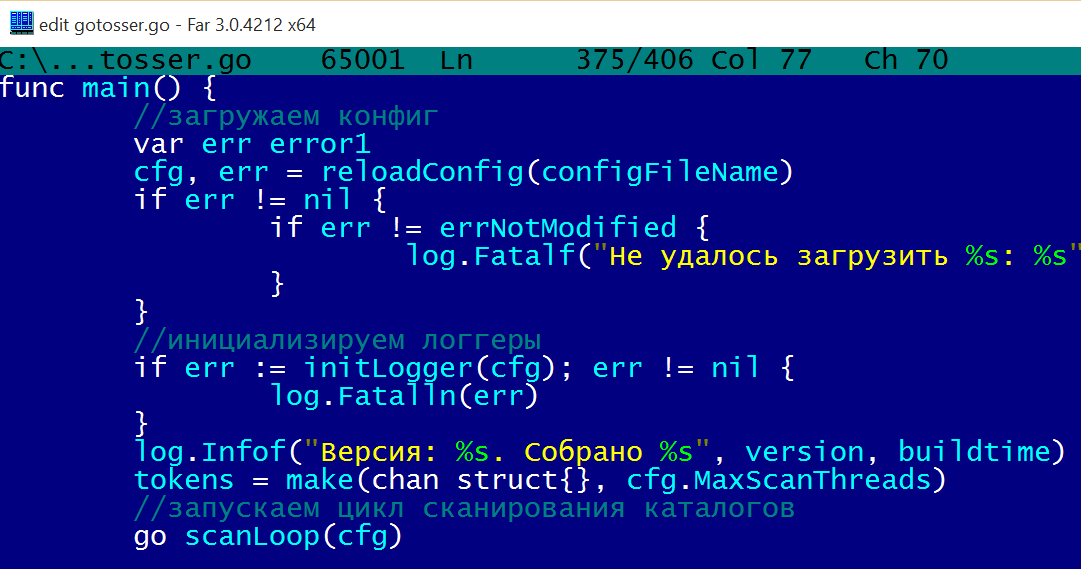
3. Используйте
После завершения вышесказанного очень удобно начинать разработку GoLang. как показано на рисунке:
Давайте снова поделимся учебником моего учителя по искусственному интеллекту. Нулевой основе! Легко понять! Смешно и с юмором! Также принесите желтые кусочки! Я надеюсь, что вы присоединитесь к нашей команде искусственного интеллекта!https://blog.csdn.net/jiangjunshow
Интеллектуальная рекомендация

Пошаговая загрузка файла Spring MVC-09 (на основе файла загрузки клиента Servlet3.0 + Html5)
пример тестовое задание Исходный код Несмотря на загрузку файлов в Servlet3.0 +, мы можем очень легко программировать на стороне сервера, но пользовательский интерфейс не очень дружелюбен. Одна HTML-ф.

Создайте многоканальное окно в приложениях Win32
Создайте многоканальное окно в приложениях Win32, создайте несколько оконных объектов одного и того же класса Windows, а окна объектов разных классов окон. .

Путь к рефакторингу IOS-APP (3) Введение в модульное тестирование
IOS-APP реконструкция дороги (1) структура сетевых запросов IOS-APP реконструкция дороги (два) Модельный дизайн При рефакторинге нам нужна форма, позволяющая вносить смелые изменения, обеспечивая при .
Tree——No.617 Merge Two Binary Trees
Problem: Given two binary trees and imagine that when you put one of them to cover the other, some nodes of the two trees are overlapped while the others are not. You need to merge them into a new bin.
Источник
Настройка Visual Studio Code для Go

В этой заметке я опишу как установить бесплатный кроссплатформенный редактор кода от Microsoft — Visual Studio Code и настроить его для работы с языком Go.
Когда я только начинал изучать Go, для написания программ мне с головой хватало встроенного в Far редактора с подсветкой синтаксиса.
С увеличением объёма кода в проектах назревала потребность в инструментах для удобного рефакторинга, обнаружения ошибок в момент написания исходного текста, а не после компиляции, быстрого просмотра подсказок по функциям из сторонних пакетов. Тогда я задумался о полноценной IDE. Go-плагин для atom на тот момент оказался нерабочим, поэтому выбор пал на среду LiteIDE, которая мне понравилась за простоту установки и наличие отладчика из коробки. LiteIDE я использовал последние полтора года.

Прошло какое-то время. Я прочитал несколько книг по Go, множество статей на сайте 4gophers.ru, узнал про golint, govet, про соглашения о написании кода в Go подобные pep8 в Python, и понял, что возможностей LiteIDE мне стало мало. Запуск трёх хоткеев для build, vet, lint стал напрягать. Уже не помню как, мне на глаза попался редактор Visual Studio Code, который у меня так и прижился.
Ниже будет рассмотрен процесс установки и настройки VSC для пользователей Windows. Думаю, что под другие ОС, вы сможете это сделать самостоятельно.
Установка
Итак, будем считать, что у нас уже установлена последняя версия Go x64, настроен GOROOT и GOPATH.
64-битная версия нужна, чтобы иметь возможность включить отладку go-кода в VSC. Если у вас 32-битная Windows и/или 32-битный Go, то всё, что написано в этой заметке будет для вас актуально, за исключением раздела про установку отладчика.
- Заходим на сайт VSC https://www.visualstudio.com/ru-ru/products/code-vs.aspx и качаем версию установщика для Windows.
- Запускаем установщик (VSCodeSetup-stable.exe), везде жмём Next, а в конце Install.
- Запускаем VSC.
- Идём в меню View — Command Palette (Ctrl-Shift-P)
- Во всплывающей строке вводим ext inst и выбираем пункт Extensions: Install Extension
- Затем либо выбираем из списка расширение go, либо дописываем слово go, чтобы отфильтровать список. Нас интересует расширение от lukehoban. Ставим его, нажав на облако. Обязательно в конце перезапускаем VSC руками или нажав кнопку Restart now.

Настройка
Далее необходимо установить дополнительные пакеты для Go и отредактировать конфигурационный файл пользователя VSC.
Пакеты можно установить двумя способами.
- Открываем в VSC любой go-файл, после чего в нижнем правом углу увидим сообщение “Analysis Tools Missing”. Надо нажать на это сообщение и недостающие пакеты установятся автоматически.
- Можно установить пакеты, выполнив в командной строке следующие инструкции:
Проверьте, что папка %GOPATH%\bin у вас добавлена в переменную окружения PATH.
После этого идём в меню File — Preferences — User Settings.
В файл settings.json, который будет открыт справа, вставляем настройки и сохраняем файл (Ctrl-S):
Если все установилось нормально, то мы должны увидеть подсветку синтаксиса, автодополнение кода, подсказку по параметрам функций, подсказки govet и golint и т.п.
Для проверки работоспособности можно нажать правой кнопкой мыши в окне редактирования go-файла и выбрать пункт меню Format Code. Если код отформатировался и не отобразилось сообщение “Analysis Tools Missing”, то всё работает как надо.
ВАЖНО. Форматирование и проверка кода работают после сохранения редактируемого файла. Не забывайте периодически сохраняться или включите автосохранение в настройках.
Установка отладчика
Автор go-плагина в качестве отладчика предлагает установить delve. Процесс установки описан тут, я приведу краткую инструкцию того, как это делал я.
- Скачиваем 64-битный tdm-gcc, который необходим для сборки delve из исходников. http://tdm-gcc.tdragon.net/download
- Устанавливаем tdm-gcc с параметрами по умолчанию, например, в каталог C:\TDM-GCC-64
- Клонируем исходный код delve, переходим в каталог с ним и запускаем команду сборки:
> cd c:\temp
> git clonehttps://github.com/derekparker/delve/
> cd c:\temp\delve
Если у вас Go 1.5, необходимо выполнить команду ниже. Если же у вас Go 1.6, то можно пропустить этот шаг.
> set GO15VENDOREXPERIMENT=1
> C:\TDM-GCC-64\bin\mingw32-make.exe install
Ошибок при компиляции возникнуть не должно.
Напомню, у вас должен быть установлен 64-битный Go.
Для 32-битного я не проверял данную процедуру.
Если у кого получится собрать delve для 32-битной windows, напишите в комментариях. - Проверяем, что в %GOPATH%\bin появился файл dlv.exe
- Перезапускаем VSC, идём в меню View — Debug.
- На верхней панели в левой части экрана жмём на значок шестерёнки, откроется пустой файл launch.json, вставляем в него настройки и сохраняем файл:
Всё. После этого должна заработать отладка.

Заключение
В целом работать с VSC приятнее, чем с LiteIDE. Фоновый lint и vet, поддержка git (самые необходимые команды), сокращают время на поиск ошибок и обслуживание кода.
Я только не нашёл, как делать Build по хоткею или из меню. Хотя, в LiteIDE я выполнял build, чтобы удостовериться, что код собирается без ошибок, а в VSC это проверяется “на лету” и если исходный текст содержит ошибки, внизу будет отмечено их количество.
Источник
Visual Studio Code on Linux
Installation
See the Download Visual Studio Code page for a complete list of available installation options.
By downloading and using Visual Studio Code, you agree to the license terms and privacy statement.
Debian and Ubuntu based distributions
The easiest way to install Visual Studio Code for Debian/Ubuntu based distributions is to download and install the .deb package (64-bit), either through the graphical software center if it’s available, or through the command line with:
Note that other binaries are also available on the VS Code download page.
Installing the .deb package will automatically install the apt repository and signing key to enable auto-updating using the system’s package manager. Alternatively, the repository and key can also be installed manually with the following script:
Then update the package cache and install the package using:
RHEL, Fedora, and CentOS based distributions
We currently ship the stable 64-bit VS Code in a yum repository, the following script will install the key and repository:
Then update the package cache and install the package using dnf (Fedora 22 and above):
Or on older versions using yum :
Due to the manual signing process and the system we use to publish, the yum repo may lag behind and not get the latest version of VS Code immediately.
Visual Studio Code is officially distributed as a Snap package in the Snap Store:

You can install it by running:
Once installed, the Snap daemon will take care of automatically updating VS Code in the background. You will get an in-product update notification whenever a new update is available.
Note: If snap isn’t available in your Linux distribution, please check the following Installing snapd guide, which can help you get that set up.
Learn more about snaps from the official Snap Documentation.
openSUSE and SLE-based distributions
The yum repository above also works for openSUSE and SLE-based systems, the following script will install the key and repository:
Then update the package cache and install the package using:
AUR package for Arch Linux
To get more information about the installation from the AUR, please consult the following wiki entry: Install AUR Packages.
Nix package for NixOS (or any Linux distribution using Nix package manager)
There is a community maintained VS Code Nix package in the nixpkgs repository. In order to install it using Nix, set allowUnfree option to true in your config.nix and execute:
Installing .rpm package manually
The VS Code .rpm package (64-bit) can also be manually downloaded and installed, however, auto-updating won’t work unless the repository above is installed. Once downloaded it can be installed using your package manager, for example with dnf :
Note that other binaries are also available on the VS Code download page.
Updates
VS Code ships monthly and you can see when a new release is available by checking the release notes. If the VS Code repository was installed correctly, then your system package manager should handle auto-updating in the same way as other packages on the system.
Note: Updates are automatic and run in the background for the Snap package.
Node.js
Node.js is a popular platform and runtime for easily building and running JavaScript applications. It also includes npm, a Package Manager for Node.js modules. You’ll see Node.js and npm mentioned frequently in our documentation and some optional VS Code tooling requires Node.js (for example, the VS Code extension generator).
If you’d like to install Node.js on Linux, see Installing Node.js via package manager to find the Node.js package and installation instructions tailored to your Linux distribution. You can also install and support multiple versions of Node.js by using the Node Version Manager.
To learn more about JavaScript and Node.js, see our Node.js tutorial, where you’ll learn about running and debugging Node.js applications with VS Code.
Setting VS Code as the default text editor
xdg-open
You can set the default text editor for text files ( text/plain ) that is used by xdg-open with the following command:
Debian alternatives system
Debian-based distributions allow setting a default editor using the Debian alternatives system, without concern for the MIME type. You can set this by running the following and selecting code:
If Visual Studio Code doesn’t show up as an alternative to editor , you need to register it:
Windows as a Linux developer machine
Another option for Linux development with VS Code is to use a Windows machine with the Windows Subsystem for Linux (WSL).
Windows Subsystem for Linux
With WSL, you can install and run Linux distributions on Windows. This enables you to develop and test your source code on Linux while still working locally on a Windows machine. WSL supports Linux distributions such as Ubuntu, Debian, SUSE, and Alpine available from the Microsoft Store.
When coupled with the Remote — WSL extension, you get full VS Code editing and debugging support while running in the context of a Linux distro on WSL.
See the Developing in WSL documentation to learn more or try the Working in WSL introductory tutorial.
Next steps
Once you have installed VS Code, these topics will help you learn more about it:
- Additional Components — Learn how to install Git, Node.js, TypeScript, and tools like Yeoman.
- User Interface — A quick orientation to VS Code.
- User/Workspace Settings — Learn how to configure VS Code to your preferences through settings.
Common questions
Azure VM Issues
I’m getting a «Running without the SUID sandbox» error?
You can safely ignore this error.
Debian and moving files to trash
If you see an error when deleting files from the VS Code Explorer on the Debian operating system, it might be because the trash implementation that VS Code is using is not there.
Run these commands to solve this issue:
Conflicts with VS Code packages from other repositories
Some distributions, for example Pop!_OS provide their own code package. To ensure the official VS Code repository is used, create a file named /etc/apt/preferences.d/code with the following content:
«Visual Studio Code is unable to watch for file changes in this large workspace» (error ENOSPC)
When you see this notification, it indicates that the VS Code file watcher is running out of handles because the workspace is large and contains many files. Before adjusting platform limits, make sure that potentially large folders, such as Python .venv , are added to the files.watcherExclude setting (more details below). The current limit can be viewed by running:
The limit can be increased to its maximum by editing /etc/sysctl.conf (except on Arch Linux, read below) and adding this line to the end of the file:
The new value can then be loaded in by running sudo sysctl -p .
While 524,288 is the maximum number of files that can be watched, if you’re in an environment that is particularly memory constrained, you may want to lower the number. Each file watch takes up 1080 bytes, so assuming that all 524,288 watches are consumed, that results in an upper bound of around 540 MiB.
Arch-based distros (including Manjaro) require you to change a different file; follow these steps instead.
Another option is to exclude specific workspace directories from the VS Code file watcher with the files.watcherExclude setting. The default for files.watcherExclude excludes node_modules and some folders under .git , but you can add other directories that you don’t want VS Code to track.
I can’t see Chinese characters in Ubuntu
We’re working on a fix. In the meantime, open the application menu, then choose File > Preferences > Settings. In the Text Editor > Font section, set «Font Family» to Droid Sans Mono, Droid Sans Fallback . If you’d rather edit the settings.json file directly, set editor.fontFamily as shown:
Package git is not installed
This error can appear during installation and is typically caused by the package manager’s lists being out of date. Try updating them and installing again:
The code bin command does not bring the window to the foreground on Ubuntu
Running code . on Ubuntu when VS Code is already open in the current directory will not bring VS Code into the foreground. This is a feature of the OS which can be disabled using ccsm .
Under General > General Options > Focus & Raise Behaviour, set «Focus Prevention Level» to «Off». Remember this is an OS-level setting that will apply to all applications, not just VS Code.
Cannot install .deb package due to «/etc/apt/sources.list.d/vscode.list: No such file or directory»
This can happen when sources.list.d doesn’t exist or you don’t have access to create the file. To fix this, try manually creating the folder and an empty vscode.list file:
Cannot move or resize the window while X forwarding a remote window
If you are using X forwarding to use VS Code remotely, you will need to use the native title bar to ensure you can properly manipulate the window. You can switch to using it by setting window.titleBarStyle to native .
Using the custom title bar
The custom title bar and menus were enabled by default on Linux for several months. The custom title bar has been a success on Windows, but the customer response on Linux suggests otherwise. Based on feedback, we have decided to make this setting opt-in on Linux and leave the native title bar as the default.
The custom title bar provides many benefits including great theming support and better accessibility through keyboard navigation and screen readers. Unfortunately, these benefits do not translate as well to the Linux platform. Linux has a variety of desktop environments and window managers that can make the VS Code theming look foreign to users. For users needing the accessibility improvements, we recommend enabling the custom title bar when running in accessibility mode using a screen reader. You can still manually set the title bar with the Window: Title Bar Style ( window.titleBarStyle ) setting.
Broken cursor in editor with display scaling enabled
Due to an upstream issue #14787 with Electron, the mouse cursor may render incorrectly with scaling enabled. If you notice that the usual text cursor is not being rendered inside the editor as you would expect, try falling back to the native menu bar by configuring the setting window.titleBarStyle to native .
Repository changed its origin value
If you receive an error similar to the following:
Use apt instead of apt-get and you will be prompted to accept the origin change:
Источник


