- Учебник. Создание консольного приложения .NET в Visual Studio Code Tutorial: Create a .NET console application using Visual Studio Code
- Предварительные требования Prerequisites
- Создание приложения Create the app
- Запуск приложения Run the app
- Улучшение приложения Enhance the app
- Дополнительные ресурсы Additional resources
- Следующие шаги Next steps
- Пошаговое руководство. создание традиционного классического приложения Windows (C++) Walkthrough: Create a traditional Windows Desktop application (C++)
- Предварительные требования Prerequisites
- Создание проекта для настольных систем Windows Create a Windows desktop project
- Создание проекта для классических приложений Windows в Visual Studio 2019 To create a Windows desktop project in Visual Studio 2019
- Создание проекта для классических приложений Windows в Visual Studio 2017 To create a Windows desktop project in Visual Studio 2017
- Создание проекта для классических приложений Windows в Visual Studio 2015 To create a Windows desktop project in Visual Studio 2015
- Создание кода Create the code
- Запуск классического приложения Windows To start a Windows desktop application
- Добавление функциональных возможностей в функцию WinMain To add functionality to the WinMain function
- Добавление функциональных возможностей в функцию WndProc To add functionality to the WndProc function
- Сборка кода Build the code
- Сборка примера To build this example
Учебник. Создание консольного приложения .NET в Visual Studio Code Tutorial: Create a .NET console application using Visual Studio Code
В этом учебнике показано, как создать и запустить консольное приложение .NET с помощью Visual Studio Code и .NET CLI. This tutorial shows how to create and run a .NET console application by using Visual Studio Code and the .NET CLI. Задачи проекта, такие как создание, компиляция и запуск проекта, выполняются с помощью .NET CLI, Project tasks, such as creating, compiling, and running a project are done by using the .NET CLI. поэтому вы можете следовать этому руководству, используя при желании другой редактор кода и выполняя команды в терминале. You can follow this tutorial with a different code editor and run commands in a terminal if you prefer.
Предварительные требования Prerequisites
- Установленная платформа Visual Studio Code с расширением C#. Visual Studio Code with the C# extension installed. См. сведения об установке расширений Visual Studio Code из Marketplace. For information about how to install extensions on Visual Studio Code, see VS Code Extension Marketplace.
- Пакет SDK для .NET 5.0 или более поздней версии The .NET 5.0 SDK or later
Создание приложения Create the app
Создайте проект консольного приложения .NET с именем HelloWorld. Create a .NET console app project named «HelloWorld».
Запустите Visual Studio Code. Start Visual Studio Code.
В главном меню выберите Файл > Открыть папку (в macOS выберите File > Open. (Файл > Открыть)). Select File > Open Folder (File > Open. on macOS) from the main menu.
В диалоговом окне Открытие папки создайте папку HelloWorld и щелкните Выбрать папку (в macOS щелкните Open (Открыть)). In the Open Folder dialog, create a HelloWorld folder and click Select Folder (Open on macOS).
Имя папки по умолчанию преобразуется в имя проекта и имя пространства имен. The folder name becomes the project name and the namespace name by default. Вы добавите код позже в этом учебнике. Предполагается, что пространство имен проекта — HelloWorld . You’ll add code later in the tutorial that assumes the project namespace is HelloWorld .
Откройте терминал в Visual Studio Code, выбрав в основном меню пункт Вид > Терминал. Open the Terminal in Visual Studio Code by selecting View > Terminal from the main menu.
Откроется окно Терминал с командной строкой в папке HelloWorld. The Terminal opens with the command prompt in the HelloWorld folder.
В окне терминала введите следующую команду: In the Terminal, enter the following command:
Этот шаблон создает простое приложение Hello World. The template creates a simple «Hello World» application. Он вызывает метод Console.WriteLine(String) для вывода «Hello World!» в окне консоли. It calls the Console.WriteLine(String) method to display «Hello World!» in the console window.
Код шаблона определяет класс Program с одним методом Main , который принимает в качестве аргумента массив String. The template code defines a class, Program , with a single method, Main , that takes a String array as an argument:
Main — точка входа в приложение. Это метод, который автоматически вызывается средой выполнения при запуске приложения. Main is the application entry point, the method that’s called automatically by the runtime when it launches the application. Все аргументы, предоставленные в командной строке при запуске приложения, доступны через массив args. Any command-line arguments supplied when the application is launched are available in the args array.
Запуск приложения Run the app
Выполните следующие команды в окне терминала: Run the following command in the Terminal:
В программе отобразится сообщение «Hello World!», The program displays «Hello World!» после чего она завершится. and ends.

Улучшение приложения Enhance the app
Давайте расширим приложение. Теперь у пользователя будет запрашиваться имя, которое затем будет отображаться с датой и временем. Enhance the application to prompt the user for their name and display it along with the date and time.
Откройте файл Program.cs, щелкнув его. Open Program.cs by clicking on it.
Когда вы в первый раз открываете файл C# в Visual Studio Code, в редакторе загружается OmniSharp. The first time you open a C# file in Visual Studio Code, OmniSharp loads in the editor.
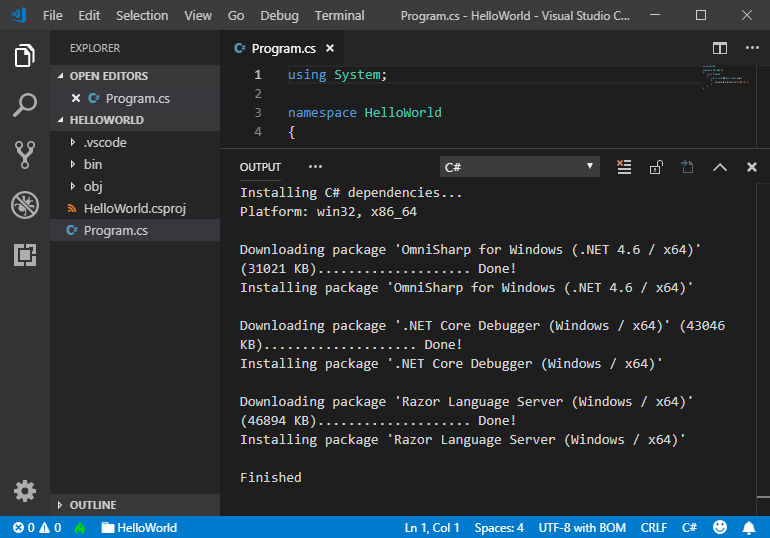
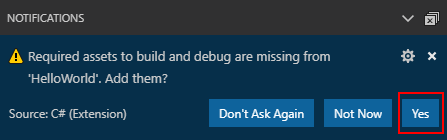
Когда в Visual Studio Code будет предложено добавить недостающие ресурсы для сборки и отладки приложения, выберите Да. Select Yes when Visual Studio Code prompts you to add the missing assets to build and debug your app.
В Program.cs замените содержимое метода Main (строка, вызывающая Console.WriteLine ) следующим кодом: Replace the contents of the Main method in Program.cs, which is the line that calls Console.WriteLine , with the following code:
Этот код отображает запрос в окне консоли и ожидает, чтобы пользователь ввел строку текста и нажал клавишу ВВОД . This code displays a prompt in the console window and waits until the user enters a string followed by the Enter key. Приложение сохраняет полученную строку в переменной с именем name . It stores this string in a variable named name . Оно также получает значение свойства DateTime.Now, которое содержит текущее локальное время, и присваивает его переменной с именем date . It also retrieves the value of the DateTime.Now property, which contains the current local time, and assigns it to a variable named date . Затем оно отображает эти значения в окне консоли. And it displays these values in the console window. Наконец, приложение выводит запрос в окне консоли и вызывает метод Console.ReadKey(Boolean) для ожидания ввода данных пользователем. Finally, it displays a prompt in the console window and calls the Console.ReadKey(Boolean) method to wait for user input.
NewLine — это независимый от платформы и языка способ для представления разрыва строки. NewLine is a platform-independent and language-independent way to represent a line break. Его альтернативами являются \n в C# и vbCrLf в Visual Basic. Alternatives are \n in C# and vbCrLf in Visual Basic.
Знак доллара ( $ ) перед строкой позволяет вставить такие выражения, как имена переменных, в фигурные скобки в строке. The dollar sign ( $ ) in front of a string lets you put expressions such as variable names in curly braces in the string. Значение выражения вставляется в строку вместо выражения. The expression value is inserted into the string in place of the expression. Такой синтаксис называется интерполированными строками. This syntax is referred to as interpolated strings.
Сохраните изменения. Save your changes.
В Visual Studio Code необходимо явно сохранить изменения. In Visual Studio Code, you have to explicitly save changes. В отличие от Visual Studio, изменения файлов не сохраняются автоматически при сборке и запуске приложения. Unlike Visual Studio, file changes are not automatically saved when you build and run an app.
Запустите программу еще раз: Run the program again:
В ответ на приглашение в командной строке введите имя и нажмите клавишу ВВОД . Respond to the prompt by entering a name and pressing the Enter key.

Нажмите любую клавишу для выхода из программы. Press any key to exit the program.
Дополнительные ресурсы Additional resources
Следующие шаги Next steps
В этом учебнике показано, как создать консольное приложение .NET. In this tutorial, you created a .NET console application. В следующем учебнике описывается отладка приложения. In the next tutorial, you debug the app.
Пошаговое руководство. создание традиционного классического приложения Windows (C++) Walkthrough: Create a traditional Windows Desktop application (C++)
В этом пошаговом руководстве показано, как создать традиционное классическое приложение Windows в Visual Studio. This walkthrough shows how to create a traditional Windows desktop application in Visual Studio. В примере приложения, которое вы создадите, будет использоваться API Windows для вывода «Hello, Windows Desktop!» The example application you’ll create uses the Windows API to display «Hello, Windows desktop!» «Hello, World!». in a window. Код, созданный в этом пошаговом руководстве, можно использовать в качестве шаблона для создания других классических приложений Windows. You can use the code that you develop in this walkthrough as a pattern to create other Windows desktop applications.
API Windows (также известный как API Win32, Windows Desktop API и Windows Classic API) — это платформа на основе языка C для создания приложений Windows. The Windows API (also known as the Win32 API, Windows Desktop API, and Windows Classic API) is a C-language-based framework for creating Windows applications. Он уже существует, так как 1980-х и использовался для создания приложений Windows в течение десятилетий. It has been in existence since the 1980s and has been used to create Windows applications for decades. Более сложные и удобные платформы были построены поверх Windows API. More advanced and easier-to-program frameworks have been built on top of the Windows API. Например, MFC, ATL, .NET Frameworks. For example, MFC, ATL, the .NET frameworks. Даже самый современный код среда выполнения Windows для приложений UWP и Store, написанных на C++/WinRT, использует API Windows под. Even the most modern Windows Runtime code for UWP and Store apps written in C++/WinRT uses the Windows API underneath. Дополнительные сведения об API Windows см. в разделе индекс Windows API. For more information about the Windows API, see Windows API Index. Существует множество способов создания приложений Windows, но описанный выше процесс был первым. There are many ways to create Windows applications, but the process above was the first.
Для краткости в тексте пропущены некоторые операторы кода. For the sake of brevity, some code statements are omitted in the text. В разделе Построение кода в конце документа показан полный код. The Build the code section at the end of this document shows the complete code.
Предварительные требования Prerequisites
Компьютер под управлением Microsoft Windows 7 или более поздних версий. A computer that runs Microsoft Windows 7 or later versions. Для обеспечения оптимальной среды разработки рекомендуется использовать Windows 10. We recommend Windows 10 for the best development experience.
Копия Visual Studio. A copy of Visual Studio. Сведения о скачивании и установке Visual Studio см. в этой статье. For information on how to download and install Visual Studio, see Install Visual Studio. Когда вы запускаете установщик, убедитесь, что установлена рабочая нагрузка Разработка классических приложений на C++ . When you run the installer, make sure that the Desktop development with C++ workload is checked. Не беспокойтесь, если вы не установили эту рабочую нагрузку при установке Visual Studio. Don’t worry if you didn’t install this workload when you installed Visual Studio. Вы можете снова запустить установщик и установить ее сейчас. You can run the installer again and install it now.
 
Базовые значения об использовании интегрированной среды разработки Visual Studio. An understanding of the basics of using the Visual Studio IDE. Если вы уже использовали классические приложения для Windows, вы, вероятно, справитесь. If you’ve used Windows desktop apps before, you can probably keep up. Общие сведения см. в обзоре возможностей интегрированной среды разработки Visual Studio. For an introduction, see Visual Studio IDE feature tour.
Основные навыки владения языком C++. An understanding of enough of the fundamentals of the C++ language to follow along. Не волнуйтесь, мы не будем делать ничего сложного. Don’t worry, we don’t do anything too complicated.
Создание проекта для настольных систем Windows Create a Windows desktop project
Выполните следующие действия, чтобы создать свой первый проект для настольных систем Windows. Follow these steps to create your first Windows desktop project. В процессе работы вы вводите код для рабочего приложения Windows. As you go, you’ll enter the code for a working Windows desktop application. Чтобы ознакомиться с документацией по предпочтительной версии Visual Studio, используйте селектор Версия . To see the documentation for your preferred version of Visual Studio, use the Version selector control. Он находится в верхней части оглавления на этой странице. It’s found at the top of the table of contents on this page.
Создание проекта для классических приложений Windows в Visual Studio 2019 To create a Windows desktop project in Visual Studio 2019
В главном меню выберите Файл > Создать > Проект , чтобы открыть диалоговое окно Создание проекта . From the main menu, choose File > New > Project to open the Create a New Project dialog box.
В верхней части диалогового окна задайте для параметра язык значение C++ , задайте для параметра платформа значение Windows и задайте для параметра тип проекта значение Рабочий стол . At the top of the dialog, set Language to C++ , set Platform to Windows , and set Project type to Desktop .
В отфильтрованном списке типов проектов выберите Мастер рабочего стола Windows , а затем нажмите кнопку Далее . From the filtered list of project types, choose Windows Desktop Wizard then choose Next . На следующей странице введите имя проекта, например десктопапп . In the next page, enter a name for the project, for example, DesktopApp .
Нажмите кнопку Создать , чтобы создать проект. Choose the Create button to create the project.
Откроется диалоговое окно проекта Windows Desktop . The Windows Desktop Project dialog now appears. В разделе Тип приложения выберите классическое приложение (. exe) . Under Application type , select Desktop application (.exe) . В поле Дополнительные параметры выберите Пустой проект . Under Additional options , select Empty project . Нажмите кнопку ОК , чтобы создать проект. Choose OK to create the project.
В Обозреватель решений щелкните правой кнопкой мыши проект Десктопапп , выберите Добавить , а затем выберите новый элемент . In Solution Explorer , right-click the DesktopApp project, choose Add , and then choose New Item .

В диалоговом окне Добавление нового элемента выберите Файл C++ (.cpp) . In the Add New Item dialog box, select C++ File (.cpp) . В поле имя введите имя файла, например хелловиндовсдесктоп. cpp . In the Name box, type a name for the file, for example, HelloWindowsDesktop.cpp . Выберите Добавить . Choose Add .
 Visual C плюс плюс, а также выбранный параметр C плюса/д файла.» title=»Добавить CPP файл в проект Десктопапп» data-linktype=»relative-path»> Visual C plus plus selected and the C plus plus File option highlighted.» title=»Add .cpp file to DesktopApp Project» data-linktype=»relative-path»>
Теперь проект создан и исходный файл открыт в редакторе. Your project is now created and your source file is opened in the editor. Чтобы продолжить, перейдите к созданию кода. To continue, skip ahead to Create the code.
Создание проекта для классических приложений Windows в Visual Studio 2017 To create a Windows desktop project in Visual Studio 2017
В меню Файл выберите команду Создать , а затем пункт Проект . On the File menu, choose New and then choose Project .
В левой области диалогового окна Новый проект разверните узел установленные > Visual C++ , а затем выберите пункт Windows Desktop . In the New Project dialog box, in the left pane, expand Installed > Visual C++ , then select Windows Desktop . В средней области выберите Мастер рабочего стола Windows . In the middle pane, select Windows Desktop Wizard .
В поле имя введите имя проекта, например десктопапп . In the Name box, type a name for the project, for example, DesktopApp . Нажмите кнопку ОК . Choose OK .
 Visual C плюсом > Windows Desktop, выбранный параметр «Мастер настольных систем Windows» и Десктопапп, введенное в текстовое поле «имя».» title=»Назовите проект Десктопапп.» data-linktype=»relative-path»> Visual C plus plus > Windows Desktop selected, the Windows Desktop Wizard option highlighted, and DesktopApp typed in the Name text box.» title=»Name the DesktopApp project» data-linktype=»relative-path»>
В диалоговом окне проект Windows Desktop в разделе Тип приложения выберите приложение Windows (. exe) . In the Windows Desktop Project dialog, under Application type , select Windows application (.exe) . В поле Дополнительные параметры выберите Пустой проект . Under Additional options , select Empty project . Убедитесь, что предварительно скомпилированный заголовок не выбран. Make sure Precompiled Header isn’t selected. Нажмите кнопку ОК , чтобы создать проект. Choose OK to create the project.
В Обозреватель решений щелкните правой кнопкой мыши проект Десктопапп , выберите Добавить , а затем выберите новый элемент . In Solution Explorer , right-click the DesktopApp project, choose Add , and then choose New Item .
В диалоговом окне Добавление нового элемента выберите Файл C++ (.cpp) . In the Add New Item dialog box, select C++ File (.cpp) . В поле имя введите имя файла, например хелловиндовсдесктоп. cpp . In the Name box, type a name for the file, for example, HelloWindowsDesktop.cpp . Выберите Добавить . Choose Add .
Visual C плюс плюс, а также выбранный параметр C плюса/д файла.» title=»Добавить CPP файл в проект Десктопапп» data-linktype=»relative-path»> Visual C plus plus selected and the C plus plus File option highlighted.» title=»Add .cpp file to DesktopApp Project» data-linktype=»relative-path»>
Теперь проект создан и исходный файл открыт в редакторе. Your project is now created and your source file is opened in the editor. Чтобы продолжить, перейдите к созданию кода. To continue, skip ahead to Create the code.
Создание проекта для классических приложений Windows в Visual Studio 2015 To create a Windows desktop project in Visual Studio 2015
В меню Файл выберите команду Создать , а затем пункт Проект . On the File menu, choose New and then choose Project .
В левой области диалогового окна Новый проект разверните узел установленные > шаблоны > Visual C++ , а затем выберите пункт Win32 . In the New Project dialog box, in the left pane, expand Installed > Templates > Visual C++ , and then select Win32 . В средней области выберите шаблон Проект Win32 . In the middle pane, select Win32 Project .
В поле имя введите имя проекта, например десктопапп . In the Name box, type a name for the project, for example, DesktopApp . Нажмите кнопку ОК . Choose OK .
 > Visual C плюсом > Win32, выделенным параметром проекта Win32 и Десктопапп, введенным в текстовом поле «имя».» title=»Назовите проект Десктопапп.» data-linktype=»relative-path»> Templates > Visual C plus plus > Win32 selected, the Win32 Project option highlighted, and DesktopApp typed in the Name text box.» title=»Name the DesktopApp project» data-linktype=»relative-path»>
На странице Обзор мастера приложений Win32 нажмите кнопку Далее . On the Overview page of the Win32 Application Wizard , choose Next .

На странице Параметры приложения в разделе Тип приложения выберите пункт приложение Windows . On the Application Settings page, under Application type , select Windows application . В разделе Дополнительные параметры снимите флажок предкомпилированный заголовок , а затем выберите пустой проект . Under Additional options , uncheck Precompiled header , then select Empty project . Чтобы создать проект, нажмите кнопку Готово . Choose Finish to create the project.
В Обозреватель решений щелкните правой кнопкой мыши проект десктопапп, выберите Добавить , а затем выберите новый элемент . In Solution Explorer , right-click the DesktopApp project, choose Add , and then choose New Item .

В диалоговом окне Добавление нового элемента выберите Файл C++ (.cpp) . In the Add New Item dialog box, select C++ File (.cpp) . В поле имя введите имя файла, например хелловиндовсдесктоп. cpp . In the Name box, type a name for the file, for example, HelloWindowsDesktop.cpp . Выберите Добавить . Choose Add .
 Visual C плюс плюс, а также выбранный параметр C плюса/д файла.» title=»Добавить CPP файл в проект Десктопапп» data-linktype=»relative-path»> Visual C plus plus selected and the C plus plus File option highlighted.» title=»Add .cpp file to DesktopApp Project» data-linktype=»relative-path»>
Теперь проект создан и исходный файл открыт в редакторе. Your project is now created and your source file is opened in the editor.
Создание кода Create the code
Далее вы узнаете, как создать код для классического приложения Windows в Visual Studio. Next, you’ll learn how to create the code for a Windows desktop application in Visual Studio.
Запуск классического приложения Windows To start a Windows desktop application
Точно так же, как каждое приложение C и приложение C++ должно иметь main функцию в качестве отправной точки, каждое классическое приложение Windows должно иметь WinMain функцию. Just as every C application and C++ application must have a main function as its starting point, every Windows desktop application must have a WinMain function. WinMain имеет следующий синтаксис: WinMain has the following syntax.
Сведения о параметрах и возвращаемом значении этой функции см. в разделе WinMain Entry Point. For information about the parameters and return value of this function, see WinMain entry point.
Что такое дополнительные слова, такие как, или CALLBACK HINSTANCE , или _In_ ? What are all those extra words, such as CALLBACK , or HINSTANCE , or _In_ ? Традиционные API Windows часто используют определения типов и макросов препроцессора для абстракции некоторых сведений о типах и кода для конкретной платформы, таких как соглашения о вызовах, __declspec объявления и директивы pragma компилятора. The traditional Windows API uses typedefs and preprocessor macros extensively to abstract away some of the details of types and platform-specific code, such as calling conventions, __declspec declarations, and compiler pragmas. В Visual Studio можно использовать функцию » быстрые сведения » IntelliSense, чтобы увидеть, что определяются этими определениями и макросами. In Visual Studio, you can use the IntelliSense Quick Info feature to see what these typedefs and macros define. Наведите указатель мыши на интересующую слово или выберите его и нажмите клавиши CTRL + K , CTRL + I для небольшого всплывающего окна, содержащего определение. Hover your mouse over the word of interest, or select it and press Ctrl+K , Ctrl+I for a small pop-up window that contains the definition. Дополнительные сведения см. в разделе Using IntelliSense. For more information, see Using IntelliSense. Параметры и возвращаемые типы часто используют аннотации SAL , чтобы помочь в перехвате ошибок программирования. Parameters and return types often use SAL Annotations to help you catch programming errors. Дополнительные сведения см. в разделе Использование аннотаций SAL для сокращения числа дефектов кода C/C++. For more information, see Using SAL Annotations to Reduce C/C++ Code Defects.
Для настольных программ Windows требуется <> Windows. h. Windows desktop programs require . определен TCHAR макрос, который в конечном итоге разрешается в, wchar_t Если в проекте ОПРЕДЕЛЕН символ Юникода, в противном случае — значение char . defines the TCHAR macro, which resolves ultimately to wchar_t if the UNICODE symbol is defined in your project, otherwise it resolves to char . Если вы всегда создаете Юникод с включенным параметром UNICODE, то не нужно использовать TCHAR и может быть просто использоваться wchar_t напрямую. If you always build with UNICODE enabled, you don’t need TCHAR and can just use wchar_t directly.
Наряду с WinMain функцией, каждое классическое приложение Windows также должно иметь функцию Window-PROCEDURE. Along with the WinMain function, every Windows desktop application must also have a window-procedure function. Эта функция обычно называется WndProc , но вы можете назвать ее по своему усмотрению. This function is typically named WndProc , but you can name it whatever you like. WndProc имеет следующий синтаксис: WndProc has the following syntax.
В этой функции вы пишете код для управления сообщениями , получаемыми приложением из Windows при возникновении событий . In this function, you write code to handle messages that the application receives from Windows when events occur. Например, если пользователь нажмет кнопку «ОК» в приложении, Windows отправит вам сообщение, и вы сможете написать код внутри WndProc функции, который подходит для любой работы. For example, if a user chooses an OK button in your application, Windows will send a message to you and you can write code inside your WndProc function that does whatever work is appropriate. Он называется обработкой события. It’s called handling an event. Вы обрабатываете только те события, которые относятся к вашему приложению. You only handle the events that are relevant for your application.
Дополнительные сведения см. в разделе Процедуры окна. For more information, see Window Procedures.
Добавление функциональных возможностей в функцию WinMain To add functionality to the WinMain function
В WinMain функции вы заполняете структуру типа вндклассекс. In the WinMain function, you populate a structure of type WNDCLASSEX. Структура содержит сведения о окне: значок приложения, цвет фона окна, имя, отображаемое в строке заголовка, помимо прочего. The structure contains information about the window: the application icon, the background color of the window, the name to display in the title bar, among other things. Важно, что он содержит указатель на функцию окна. Importantly, it contains a function pointer to your window procedure. В приведенном ниже примере показана типичная структура WNDCLASSEX . The following example shows a typical WNDCLASSEX structure.
Дополнительные сведения о полях приведенной выше структуры см. в разделе вндклассекс. For information about the fields of the structure above, see WNDCLASSEX.
Зарегистрируйте в WNDCLASSEX Windows, чтобы он знал о вашем окне и способах отправки в него сообщений. Register the WNDCLASSEX with Windows so that it knows about your window and how to send messages to it. Воспользуйтесь функцией RegisterClassEx и передайте структуру класса окна в качестве аргумента. Use the RegisterClassEx function and pass the window class structure as an argument. Этот _T макрос используется, так как мы используем TCHAR тип. The _T macro is used because we use the TCHAR type.
Теперь можно создать окно. Now you can create a window. Воспользуйтесь функцией CreateWindow . Use the CreateWindow function.
Эта функция возвращает объект HWND , который является обработчиком окна. This function returns an HWND , which is a handle to a window. Маркер похож на указатель, используемый Windows для наблюдения за открытыми окнами. A handle is somewhat like a pointer that Windows uses to keep track of open windows. Дополнительные сведения см. в разделе Типы данных Windows. For more information, see Windows Data Types.
На этом этапе окно было создано, но нам по-прежнему нужно сообщить Windows, что он стал видимым. At this point, the window has been created, but we still need to tell Windows to make it visible. Вот что делает этот код: That’s what this code does:
Отображаемое окно не содержит много содержимого, так как функция еще не реализована WndProc . The displayed window doesn’t have much content because you haven’t yet implemented the WndProc function. Иными словами, приложение еще не обрабатывает сообщения, отправляемые Windows в него. In other words, the application isn’t yet handling the messages that Windows is now sending to it.
Для обработки сообщений сначала нужно добавить цикл обработки сообщений для прослушивания сообщений, отправляемых Windows. To handle the messages, we first add a message loop to listen for the messages that Windows sends. Когда приложение получает сообщение, этот цикл отправляет его в вашу WndProc функцию для обработки. When the application receives a message, this loop dispatches it to your WndProc function to be handled. Цикл обработки сообщений напоминает приведенный ниже код. The message loop resembles the following code.
Дополнительные сведения о структурах и функциях, используемых в цикле обработки сообщений, см. в разделах, посвященных MSG, GetMessage, TranslateMessageи DispatchMessage. For more information about the structures and functions in the message loop, see MSG, GetMessage, TranslateMessage, and DispatchMessage.
На этом этапе функция WinMain должна напоминать приведенный ниже код. At this point, the WinMain function should resemble the following code.
Добавление функциональных возможностей в функцию WndProc To add functionality to the WndProc function
Чтобы включить обработку получаемых приложением сообщений функцией WndProc , реализуйте оператор switch. To enable the WndProc function to handle the messages that the application receives, implement a switch statement.
Одно важное сообщение для обработчика — WM_PAINT сообщение. One important message to handle is the WM_PAINT message. Приложение получает сообщение, WM_PAINT когда часть его отображаемого окна необходимо обновить. The application receives the WM_PAINT message when part of its displayed window must be updated. Это событие может возникать, когда пользователь перемещает окно перед окном, а затем снова перемещает его. The event can occur when a user moves a window in front of your window, then moves it away again. Приложение не знает, когда происходят эти события. Your application doesn’t know when these events occur. Только Windows знает, поэтому она уведомляет ваше приложение с WM_PAINT сообщением. Only Windows knows, so it notifies your app with a WM_PAINT message. При первом отображении окна его все должно быть обновлено. When the window is first displayed, all of it must be updated.
Для обработки сообщения WM_PAINT сначала вызовите метод BeginPaint, далее обработайте логику расположения текста, кнопок и других элементов управления в окне, а затем вызовите метод EndPaint. To handle a WM_PAINT message, first call BeginPaint, then handle all the logic to lay out the text, buttons, and other controls in the window, and then call EndPaint. Для приложения логика между начальным вызовом и завершающим вызовом отображает строку «Hello, Windows Desktop!» For the application, the logic between the beginning call and the ending call displays the string «Hello, Windows desktop!» «Hello, World!». in the window. В следующем коде функция Text используется для вывода строки. In the following code, the TextOut function is used to display the string.
HDC в коде — это обработчик контекста устройства, который используется для рисования в клиентской области окна. HDC in the code is a handle to a device context, which is used to draw in the window’s client area. Используйте BeginPaint функции и EndPaint для подготовки и завершения рисования в клиентской области. Use the BeginPaint and EndPaint functions to prepare for and complete the drawing in the client area. BeginPaint Возвращает маркер контекста устройства отображения, используемый для рисования в клиентской области. EndPaint завершает запрос на рисование и освобождает контекст устройства. BeginPaint returns a handle to the display device context used for drawing in the client area; EndPaint ends the paint request and releases the device context.
Приложение обычно обрабатывает много других сообщений. An application typically handles many other messages. Например, WM_CREATE при первом создании окна и WM_DESTROY при закрытии окна. For example, WM_CREATE when a window is first created, and WM_DESTROY when the window is closed. В приведенном ниже коде содержится базовое представление полной функции WndProc . The following code shows a basic but complete WndProc function.
Сборка кода Build the code
Как обещано, вот полный код для рабочего приложения. As promised, here’s the complete code for the working application.
Сборка примера To build this example
Удалите код, введенный в хелловиндовсдесктоп. cpp в редакторе. Delete any code you’ve entered in HelloWindowsDesktop.cpp in the editor. Скопируйте этот пример кода и вставьте его в хелловиндовсдесктоп. cpp : Copy this example code and then paste it into HelloWindowsDesktop.cpp :
В меню Построение выберите Построить решение . On the Build menu, choose Build Solution . Результаты компиляции должны отобразиться в окне вывод в Visual Studio. The results of the compilation should appear in the Output window in Visual Studio.

Чтобы запустить приложение, нажмите клавишу F5 . To run the application, press F5 . Окно, содержащее текст «Hello, Windows Desktop!» A window that contains the text «Hello, Windows desktop!» должно отображаться в левом верхнем углу экрана. should appear in the upper-left corner of the display.

Поздравляем! Congratulations! Вы выполнили это пошаговое руководство и создали традиционное классическое приложение для Windows. You’ve completed this walkthrough and built a traditional Windows desktop application.


