- Remote SSH: Tips and Tricks
- Connect using Remote SSH
- SSH configuration file
- ProxyCommand
- ControlMaster
- Offline remote machine
- Remote — SSH Nightly extension
- We’d like your feedback
- использование Visual Studio Code с Secure Shell (SSH) на удаленном узле
- Настройка локального компьютера
- Настройка удаленного компьютера
- Код на удаленном компьютере и устройстве на локальном компьютере
- Подключение на удаленный компьютер
- Сборка, развертывание на локальном устройстве и отладка
- Код и устройство на удаленном компьютере
- Подключение на удаленный компьютер и настроить параметры удаленного компьютера
- Сборка, развертывание на удаленном устройстве и отладка
- Закрытие подключения
- Remote Development with Linux
- Local Linux prerequisites
- Remote host / container / WSL Linux prerequisites
- Tips by Linux distribution
- Updating glibc and libstdc++ on RHEL / CentOS 6
Remote SSH: Tips and Tricks
October 3, 2019 by Sana Ajani, @sana_ajani
In a previous Remote SSH blog post, we went over how to set up a Linux virtual machine and connect to the VM using the Remote — SSH extension in Visual Studio Code. In this blog post, we’ll go into some tips and tricks that you can use to get the most out of your remote setup.
Connect using Remote SSH
The Visual Studio Code Remote — SSH extension allows you to connect to a remote machine or VM using SSH, all from inside VS Code. If you don’t already have the extension installed, you can search for «remote ssh» in the Extensions view ( ⇧⌘X (Windows, Linux Ctrl+Shift+X ) ).

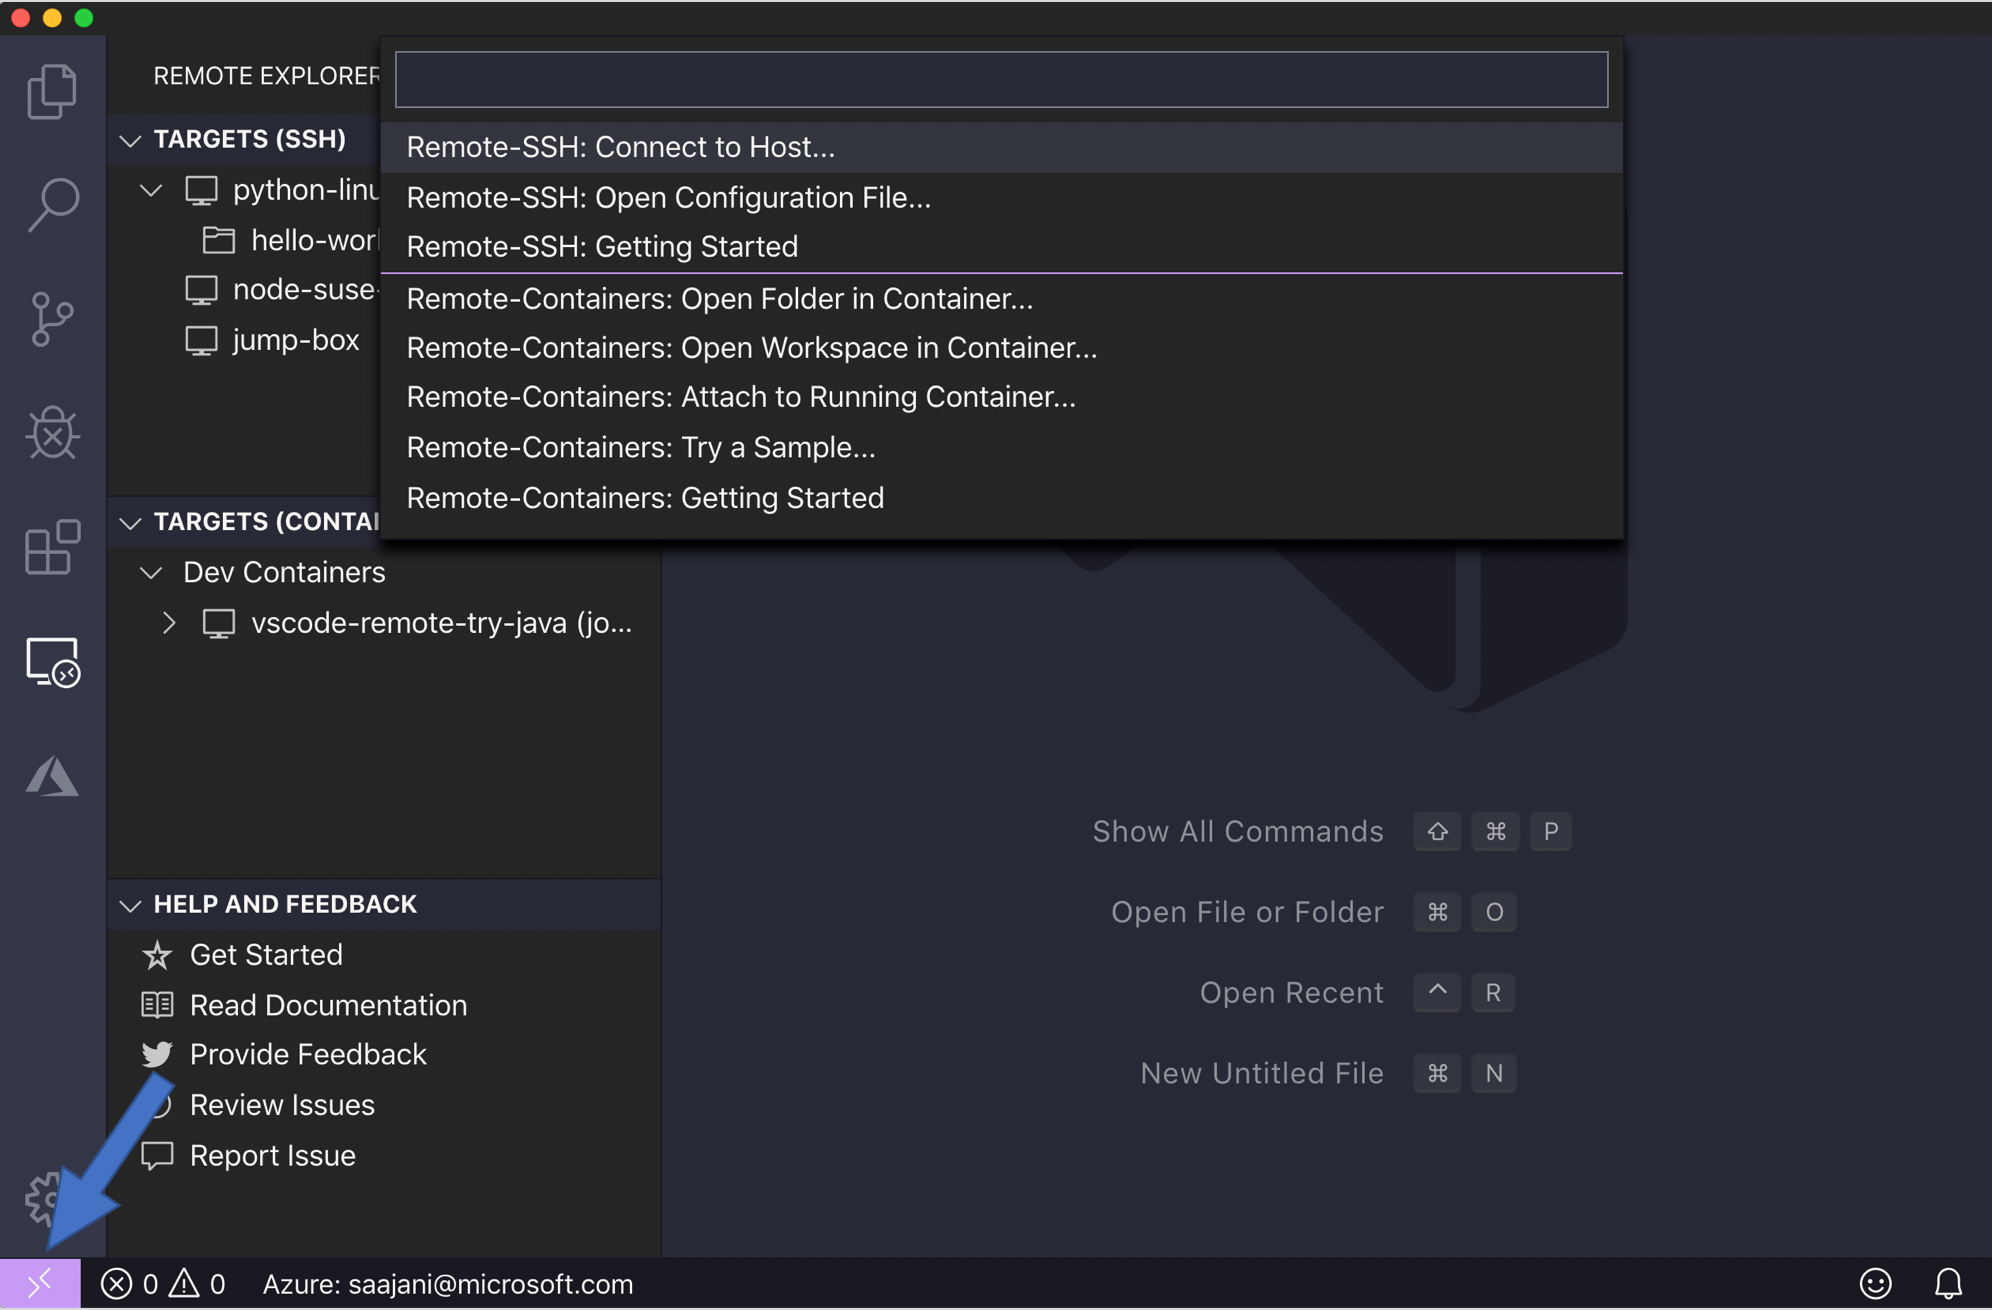
After you install the extension, you’ll notice an indicator on the bottom-left corner of the Status bar. This indicator tells you in which context VS Code is running (local or remote). Click on the indicator to bring up a list of Remote extension commands.
SSH configuration file
In the earlier Remote SSH blog post, we only connected to a single machine and did so by entering the «user@host» when prompted. If you log in to multiple remote servers or local virtual machines on a regular basis, there’s a better way to connect without having to remember all the usernames, addresses, and additional configuration options.
OpenSSH supports using a configuration file to store all your different SSH connections. To use an SSH config file, click on the remote indicator to bring up the remote commands, choose Open Configuration File, and select the file that follows the path «Users/

Here’s an example of an SSH config file:
There are many more configuration options you can specify in the SSH config file format. You’ll get completions and colorizations in this file and you can press ( ⌃Space (Windows, Linux Ctrl+Space ) ) for IntelliSense to learn more about the config options.
The options used above are:
| Option | Description |
|---|---|
| Host | An easy-to-remember alias for your host machine. |
| HostName | The hostname of server (you can use the IP address of the server). |
| User | The user you’ve specified to log in to the machine via SSH. |
| Port | The port used to connect via SSH. The default port is 22, but if you’ve specified a unique port, you can configure it here. |
| IdentityFile | The file location where you’ve stored your private key. |
You can add the information for all the hosts you have. Once you’ve saved the config file, you’ll be able to see those hosts in the Remote Explorer, as well as any folders you have opened on that host. You can select the icon next to each host or folder and it will launch a new VS Code window (instance) and connect you to that host. In the screenshot below, I’m connected to my remote machine «python-linux-vm» and the Remote Explorer shows me the folders I have connected to in the past, as well as any forwarded ports from the remote machine.

ProxyCommand
Sometimes you may need to connect from your desktop or laptop to a remote machine over your company’s Intranet or behind a firewall. In this case, you may be using an intermediate server or jump box. This kind of setup is useful if you are working within a secure system that is configured to only accept SSH connections from a fixed set of hosts.
To use a jump-box setup with the Remote — SSH extension, you can use the ProxyCommand config option. This configuration will open a background SSH connection to the jump box, and then connect via a private IP address to the target.
You can set the ProxyCommand config option in the SSH config file like this:
ControlMaster
If you are connecting to a remote SSH host using other authentication methods besides key-based authentication, such as two-factor, password-based, or an SSH key with a passphrase, you may have to enter the required information multiple times.
Instead of opening multiple SSH connections, you can use ControlMaster option (only on macOS/Linux clients) to reuse an existing connection and reduce the number of times you must enter your passphrase.
To use this feature, add the following to your SSH config file:
Offline remote machine
If you are restricted by a firewall or your company locks down your VMs and they cannot connect to the Internet, the Remote — SSH extension won’t be able to connect to your VM because VS Code needs to download a component called the VS Code Server to the remote machine.
However, you can now solve this issue by a new user setting in the Remote — SSH extension. If you enable the setting remote.SSH.allowLocalServerDownload , the extension will install the VS Code Server on the client first and then copy it over to the server via SCP.
Note: This is currently an experimental feature but will be turned on by default in the next release.
Remote — SSH Nightly extension
If you’re interested in testing new updates and experimental features as soon as they are available, install the Remote — SSH Nightly extension (uninstall the Remote-SSH stable extension first). This is the nightly build of the extension where we experiment with new features and settings before releasing them into the stable version.
We’d like your feedback
Thanks for trying out the Remote — SSH extension! If you run into any issues or would like to suggest new features or scenarios for us, please open an issue on our GitHub repo. If you want to see what features we’re currently working on or are upcoming, take a look at our Remote Development release notes and iteration plans. You can also try out the introductory Remote development over SSH tutorial, which walk you through using the other remote extensions to work inside Docker containers and the Window Subsystem for Linux (WSL).
Happy Remote Coding,
Sana Ajani, VS Code Program Manager @sana_ajani
Источник
использование Visual Studio Code с Secure Shell (SSH) на удаленном узле
Visual Studio Code можно использовать с пакетом SDK для Azure Sphere для создания и отладки кода на удаленном узле через Secure Shell (SSH). Поддерживаются два сценария:
Код на удаленном компьютере и устройстве на локальном компьютере.
Код и устройство на удаленном компьютере.
Третий сценарий — код на локальном компьютере и устройстве на удаленном компьютере — не поддерживается.
Настройка локального компьютера
установите расширение Azure Sphere, выполнив поиск Azure Sphere на панели расширений Visual Studio Code и нажав кнопку установить.
Существует два Azure Sphere расширения, и установка одного из них приведет к установке обоих компонентов: Azure-Sphere-Tools-UI для компонента пользовательского интерфейса и Azure-Sphere-Tools для компонента рабочей области.
установите расширение remote-ssh, выполнив поиск по имени remote-ssh на панели расширений Visual Studio Code и нажав кнопку установить .
Настройка удаленного компьютера
- Настоятельно рекомендуется настроить удаленный компьютер для проверки подлинности на основе ключей.
- установите пакет SDK для Azure Sphere для Windows или Linux.
Код на удаленном компьютере и устройстве на локальном компьютере
- Подключение устройство на локальный компьютер и, если локальный компьютер работает под управлением Linux, запустите сценарий azsphere_connect. sh.
- Если на удаленном компьютере еще нет проекта, можно клонировать репозиторий образцов или получить один проект из браузера примеров Майкрософт.
- откройте Visual Studio Code локально.
- только Visual Studio Code в первый раз: выполните команду командная палитра командное представление > >Remote-SSH: добавить новый узел ssh и введите сведения об узле ssh в ответ на запрос. (По умолчанию файл с именем config записывается в каталог. SSH в домашнем каталоге. Это иногда приводит к проблемам с разрешениями, если локальный компьютер Windows. возможно, потребуется переместить файл в другой каталог и указать абсолютный путь в файле >Preferences >Параметры >extensions >Remote-SSH: Config file.)
Подключение на удаленный компьютер
Подключение на удаленный компьютер, выполнив команду Visual Studio Code командная > палитра команды View > remote-SSH: Подключение на узел ( Shift+Ctrl+P ).
установите расширения Azure Sphere на удаленный компьютер, выполнив поиск Azure Sphere на панели Visual Studio Code расширение и нажав кнопку установить в SSH: [удаленный имя] . после установки может потребоваться перезапустить Visual Studio Code и повторно подключиться к удаленному компьютеру.
Чтобы проверить, правильно ли установлено расширение на удаленном компьютере, очистите поле поиска на панели расширений и убедитесь, что Azure Sphere расширения отображаются в представлении SSH: [удаленное имя] — установлено .
Откройте папку проекта или рабочую область, используя > папку открытия файлов или > откройте рабочую область открытие файла.
Сборка, развертывание на локальном устройстве и отладка
Нажмите клавишу F5 для сборки и отладки проекта. если проект не был создан ранее или если файлы были изменены и требуется перестроение, Visual Studio Code будет строить проект перед началом отладки.
подождите несколько секунд, пока Visual Studio Code создаст приложение, создайте пакет образа, разверните его на доске и запустите в режиме отладки. На панели вывода отобразятся обновления состояния.
Сначала CMak определяет, требуется ли сборка приложения. Если да, фокус перемещается в окно вывода, в котором отображаются выходные данные из CMak/Build.
Затем на панели вывода отображается результат, когда пакет образа развертывается на устройстве. Наконец, консоль отладки получает фокус и отображает выходные данные отладчика.
используйте отладчик Visual Studio Code , чтобы задать точки останова, приостановить, перейти к шагу, выполнить шаг с заходом, перезапустить или остановить приложение.
Код и устройство на удаленном компьютере
- Подключение устройство через USB к удаленному компьютеру и, если удаленный компьютер работает под управлением Linux, запустите сценарий azsphere_connect. sh.
- Если на удаленном компьютере еще нет проекта, можно клонировать репозиторий образцов или получить один проект из браузера примеров Майкрософт.
- откройте Visual Studio Code локально.
- только Visual Studio Code в первый раз: выполните команду командная палитра командное представление > >Remote-SSH: добавить новый узел ssh и введите сведения об узле ssh в ответ на запрос. (По умолчанию файл с именем config записывается в каталог. SSH в домашнем каталоге. Это иногда приводит к проблемам с разрешениями, если локальный компьютер Windows. возможно, потребуется переместить файл в другой каталог и указать абсолютный путь в файле >Preferences >Параметры >extensions >Remote-SSH: Config file.)
Подключение на удаленный компьютер и настроить параметры удаленного компьютера
Подключение на удаленный компьютер, выполнив команду VS Code командная > палитра команды View > remote-SSH: Подключение на узел ( Shift+Ctrl+P ).
добавьте удаленные параметры, выполнив команду VS Code представление команд > палитра команды > : открыть удаленный Параметры и добавить в объект JSON следующее поле (если это пустой файл, его необходимо заключить в оболочку <> ):
Этот параметр можно добавить в параметры пользователя или рабочей области, в зависимости от настроек проектов и команды.
установите расширения Azure Sphere на удаленный компьютер, выполнив поиск Azure Sphere на панели Visual Studio Code расширение и нажав кнопку установить в SSH: [удаленный имя] . после установки может потребоваться перезапустить Visual Studio Code и повторно подключиться к удаленному компьютеру.
Чтобы проверить, правильно ли установлено расширение на удаленном компьютере, очистите поле поиска на панели расширений и убедитесь, что Azure Sphere расширения отображаются в представлении SSH: [удаленное имя] — установлено .
Откройте папку проекта или рабочую область, используя > папку открытия файлов или файл > открыть рабочую область.
Сборка, развертывание на удаленном устройстве и отладка
Нажмите клавишу F5 для сборки и отладки проекта. если проект не был создан ранее или если файлы были изменены и требуется перестроение, Visual Studio Code будет строить проект перед началом отладки.
подождите несколько секунд, пока Visual Studio Code создаст приложение, создайте пакет образа, разверните его на доске и запустите в режиме отладки. На панели вывода отобразятся обновления состояния.
Сначала CMak определяет, требуется ли сборка приложения. Если да, фокус перемещается в окно вывода, в котором отображаются выходные данные из CMak/Build.
Затем на панели вывода отображается результат, когда пакет образа развертывается на устройстве. Наконец, консоль отладки получает фокус и отображает выходные данные отладчика.
используйте отладчик Visual Studio Code , чтобы задать точки останова, приостановить, перейти к шагу, выполнить шаг с заходом, перезапустить или остановить приложение.
Закрытие подключения
Чтобы завершить сеанс удаленной отладки, выберите файл > закрыть удаленное подключение.
Источник
Remote Development with Linux
Linux is a highly variable environment and the large number of server, container, and desktop distributions can make it difficult to know what is supported. Visual Studio Code Remote Development has prerequisites for the specific host / container / WSL distribution you will be connecting to.
The extensions are known to work when connecting to recent stable/LTS version of:
- Ubuntu 64-bit x86, ARMv8l (AArch64) (16.04+, IoT 18.04+)
- Debian 64-bit x86, ARMv8l (AArch64) (Stretch/9+)
- Raspbian ARMv7l (AArch32) 32-bit (Stretch/9+)
- CentOS / RHEL 64-bit x86 (7+)
- Alpine Linux 64-bit x86 containers or WSL hosts (3.9+) in Remote — Containers, Remote — WSL
The following non-Linux SSH hosts are also supported:
- Windows 10 / Server 2016/2019 SSH hosts (1803+) using the official OpenSSH Server and enabling remote.SSH.useLocalServer in VS Code settings.
- macOS 10.14+ (Mojave) SSH hosts with Remote Login enabled.
However, if you are using a non-standard configuration or downstream distribution of Linux, you may run into issues. This document provides information on requirements as well as tips to help you get up and running even if your configuration is only community-supported.
Note that other extensions may have dependencies beyond those listed here. Some extensions also contain compiled native code that may not work on Alpine Linux, or ARMv7 (AArch32), or ARMv8 (AArch64). These platforms are considered in «preview» for this reason. If you encounter an issue that only occurs with a particular extension, contact the extension authors for information on their native dependencies.
Local Linux prerequisites
If you are running Linux locally, the VS Code prerequisites drive most of the requirements.
In addition, specific Remote Development extensions have further requirements:
- Remote — SSH: ssh needs to be in the path. The shell binary is typically in the openssh-client package.
- Remote — Containers: Docker CE/EE 18.06+ and Docker Compose 1.21+. Follow the official install instructions for Docker CE/EE for your distribution. If you are using Docker Compose, follow the Install Docker Compose directions as well. (Note that the Ubuntu Snap package is not supported and packages in distributions may be out of date.) docker and docker-compose must also be in the path. However, Docker does not need to be running if you are using a remote host.
Remote host / container / WSL Linux prerequisites
Platform prerequisites are primarily driven by the version of the Node.js runtime (and by extension the V8 JavaScript engine) shipped in the server component automatically installed on each remote endpoint. This server also has a set of related native node modules that need to be compiled and tested for each target. 64-bit x86 glibc-based Linux distributions currently provide the best support given these requirements.
You may encounter issues with certain extensions with native dependencies with ARMv7l (AArch32) / ARMv8l (AArch64) glibc-based hosts, containers, or WSL and 64-bit x86 musl-based Alpine Linux. For ARMv7l/ARMv8l, extensions may only include x86_64 versions of native modules or runtimes in the extension. For Alpine Linux, included native code or runtimes may not work due to fundamental differences between how libc is implemented in Alpine Linux ( musl ) and other distributions ( glibc ). In both these cases, extensions will need to opt-in to supporting these platforms by compiling / including binaries for these additional targets. Please raise an issue with the appropriate extension author requesting support if you encounter an extension that does not work as expected.
| Distribution | Base Requirements | Remote — SSH Requirements | Notes | ||||
|---|---|---|---|---|---|---|---|
| General | kernel >= 3.10, glibc >=2.17, libstdc++ >= 3.4.18, Python 2.6 or 2.7, tar | OpenSSH server, bash , and curl or wget | Run ldd —version to check the glibc version. Run strings /usr/lib64/libstdc++.so.6 | grep GLIBCXX to see if libstdc++ 3.4.18 is available. | ||||
| Ubuntu 16.04+, Debian 8+, Raspbian Stretch/9+ and downstream distributions | libc6 libstdc++6 python-minimal ca-certificates tar | openssh-server bash and curl or wget | Requires kernel >= 3.10, glibc >= 2.17, libstdc++ >= 3.4.18. Debian glibc libgcc libstdc++ python ca-certificates tar | openssh-server bash and curl or wget | Requires kernel >= 3.10, glibc >= 2.17, libstdc++ >= 3.4.18. RHEL / CentOS musl libgcc libstdc++ . musl >= 1.1.18, glibc not required. | Not yet supported. | Supported in Remote — Containers and Remote — WSL. Extensions installed in the container may not work due to glibc dependencies in extension native code. |
| openSUSE Leap / SUSE Linux Enterprise 15+ | glibc libgcc_s1 libstdc++6 python ca-certificates gzip tar | curl or wget | Requires kernel >= 3.10, glibc, libstdc++6 |
Tips by Linux distribution
The following is a list of distributions and any base requirements that may be missing. End-of-life versions of distributions are not included.
- ✅ = Working
- ⚠️ = Working, but see note for limitations
- 🔬 = Experimental
- 🛑 = Unsupported, but has workaround
- ❌ = Unsupported
| Server Distribution | Docker Image | Missing libraries | Notes / additional steps |
|---|---|---|---|
| ⚠️ Alpine Linux 3.10 (64-bit) | alpine:3.10 | libgcc libstdc++ | Supported in Remote — Containers and Remote — WSL only. Some extensions installed in the container may not work due to glibc dependencies in extension native code. |
| ✅ CentOS 7 Server (64-bit) | centos:7 | ||
| 🛑 CentOS 6 Server (64-bit) | centos:6 | glibc >= 2.17, libstdc++ >= 3.4.18 | Requires a workaround. |
| ✅ Debian 10 Server (64-bit) | debian:10 | ||
| ✅ Debian 9 Server (64-bit) | debian:9 | ||
| ✅ openSUSE Leap Server 15 (64-bit) | opensuse/leap:15 | Docker image is missing tar and gzip . | |
| ✅ openSUSE Leap Server 42.3 (64-bit) | opensuse/leap:42.3 | Docker image is missing tar and gzip . | |
| ✅ Oracle Linux 7 (64-bit) | oraclelinux:7 | ||
| 🛑️ Oracle Linux 6 (64-bit) | oraclelinux:6 | glibc >= 2.17, libstdc++ >= 3.4.18. Docker image is missing tar . | Requires a workaround. |
| ⚠️ Raspbian Stretch/9 (ARMv7l 32-bit) | Some extensions may not work when installed on an ARMv7l host due to extension x86 native code. Remote — Containers does support connecting to containers on an ARM host. | ||
| ✅ RedHat Enterprise Linux 7 (64-bit) | |||
| 🛑 RedHat Enterprise Linux 6 (64-bit) | glibc >= 2.17, libstdc++ >= 3.4.18 | Requires a workaround. | |
| ✅ SUSE Linux Enterprise Server 15 (64-bit) | Docker image is missing tar and gzip . | ||
| ✅ SUSE Linux Enterprise Server 12 (64-bit) | Docker image is missing tar and gzip . | ||
| ❌ SUSE Linux Enterprise Server 11 (64-bit) | glibc >= 2.17, libstdc++ >= 3.4.18 | Might work compiling glibc from source, but untested. | |
| ⚠️ Ubuntu 18.04 IoT (ARMv8l 64-bit) | Some extensions may not work when installed on an ARMv8l host due to extension x86 native code. Remote — Containers does support connecting to containers on an ARM host. | ||
| ✅ Ubuntu Server 20.04 (64-bit) | ubuntu:20.04 | ||
| ✅ Ubuntu Server 19.04 (64-bit) | ubuntu:19.04 | ||
| ✅ Ubuntu Server 18.04 (64-bit) | ubuntu:18.04 | ||
| ✅ Ubuntu Server 16.04 (64-bit) | ubuntu:16.04 | ||
| ✅ Ubuntu Server 14.04 (64-bit) | ubuntu:14.04 |
Updating glibc and libstdc++ on RHEL / CentOS 6
RHEL / CentOS 6 ships with glibc 2.12 and libstdc++ 3.4.13. Unfortunately, this does not meet the requirements for Remote Development. RHEL / CentOS 6 goes out of support in 2020, so we strongly recommend upgrading to RHEL / CentOS 7 or higher.
However, as a workaround, you can either build glibc manually or use the following script to install updated binaries. The bash script below will upgrade these libraries without having to build them. It is adapted from information in this article, this gist, and this Fedora copr project. The article also includes instructions for manually building glibc if you would prefer not to use the binaries from the article.
Do not run this script on anything mission critical without a rollback strategy since it does update libraries that other applications depend on.
For servers, run the following script and restart the server so the updates take effect.
In a container environment, you can add similar contents to a Dockerfile:
Источник


