- Добро пожаловать в интегрированную среду разработки Visual Studio Welcome to the Visual Studio IDE
- Выпуски Editions
- Популярные средства повышения производительности Popular productivity features
- Установка интегрированной среды разработки Visual Studio Install the Visual Studio IDE
- Создание программы Create a program
- Использование рефакторинга и IntelliSense Use refactoring and IntelliSense
- Отладка кода Debug code
- Настройка Visual Studio Customize Visual Studio
- Следующие шаги Next steps
Добро пожаловать в интегрированную среду разработки Visual Studio Welcome to the Visual Studio IDE
Интегрированная среда разработки Visual Studio — это стартовая площадка для написания, отладки и сборки кода, а также последующей публикации приложений. The Visual Studio integrated development environment is a creative launching pad that you can use to edit, debug, and build code, and then publish an app. Интегрированная среда разработки (IDE) представляет собой многофункциональную программу, которую можно использовать для различных аспектов разработки программного обеспечения. An integrated development environment (IDE) is a feature-rich program that can be used for many aspects of software development. Помимо стандартного редактора и отладчика, которые существуют в большинстве сред IDE, Visual Studio включает в себя компиляторы, средства автозавершения кода, графические конструкторы и многие другие функции для упрощения процесса разработки. Over and above the standard editor and debugger that most IDEs provide, Visual Studio includes compilers, code completion tools, graphical designers, and many more features to ease the software development process.
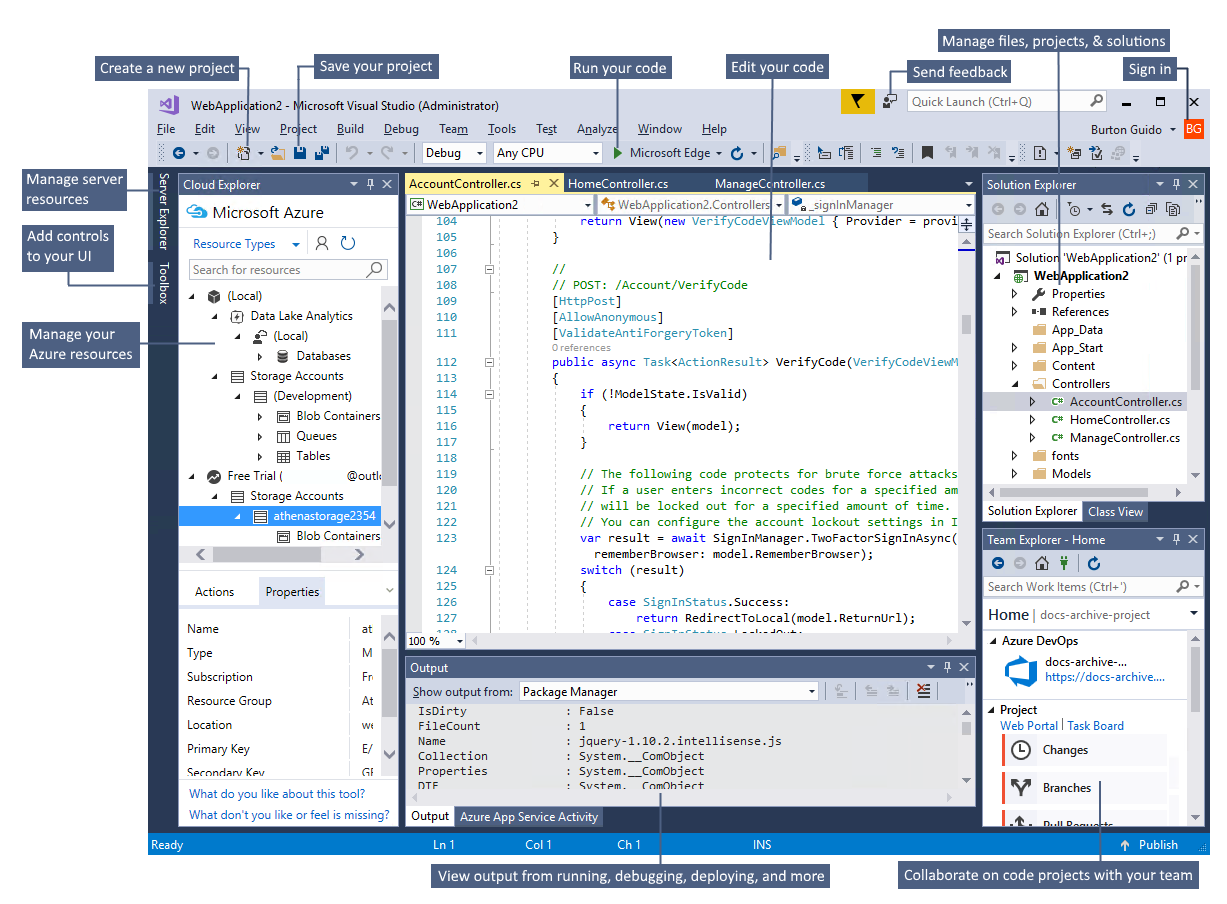
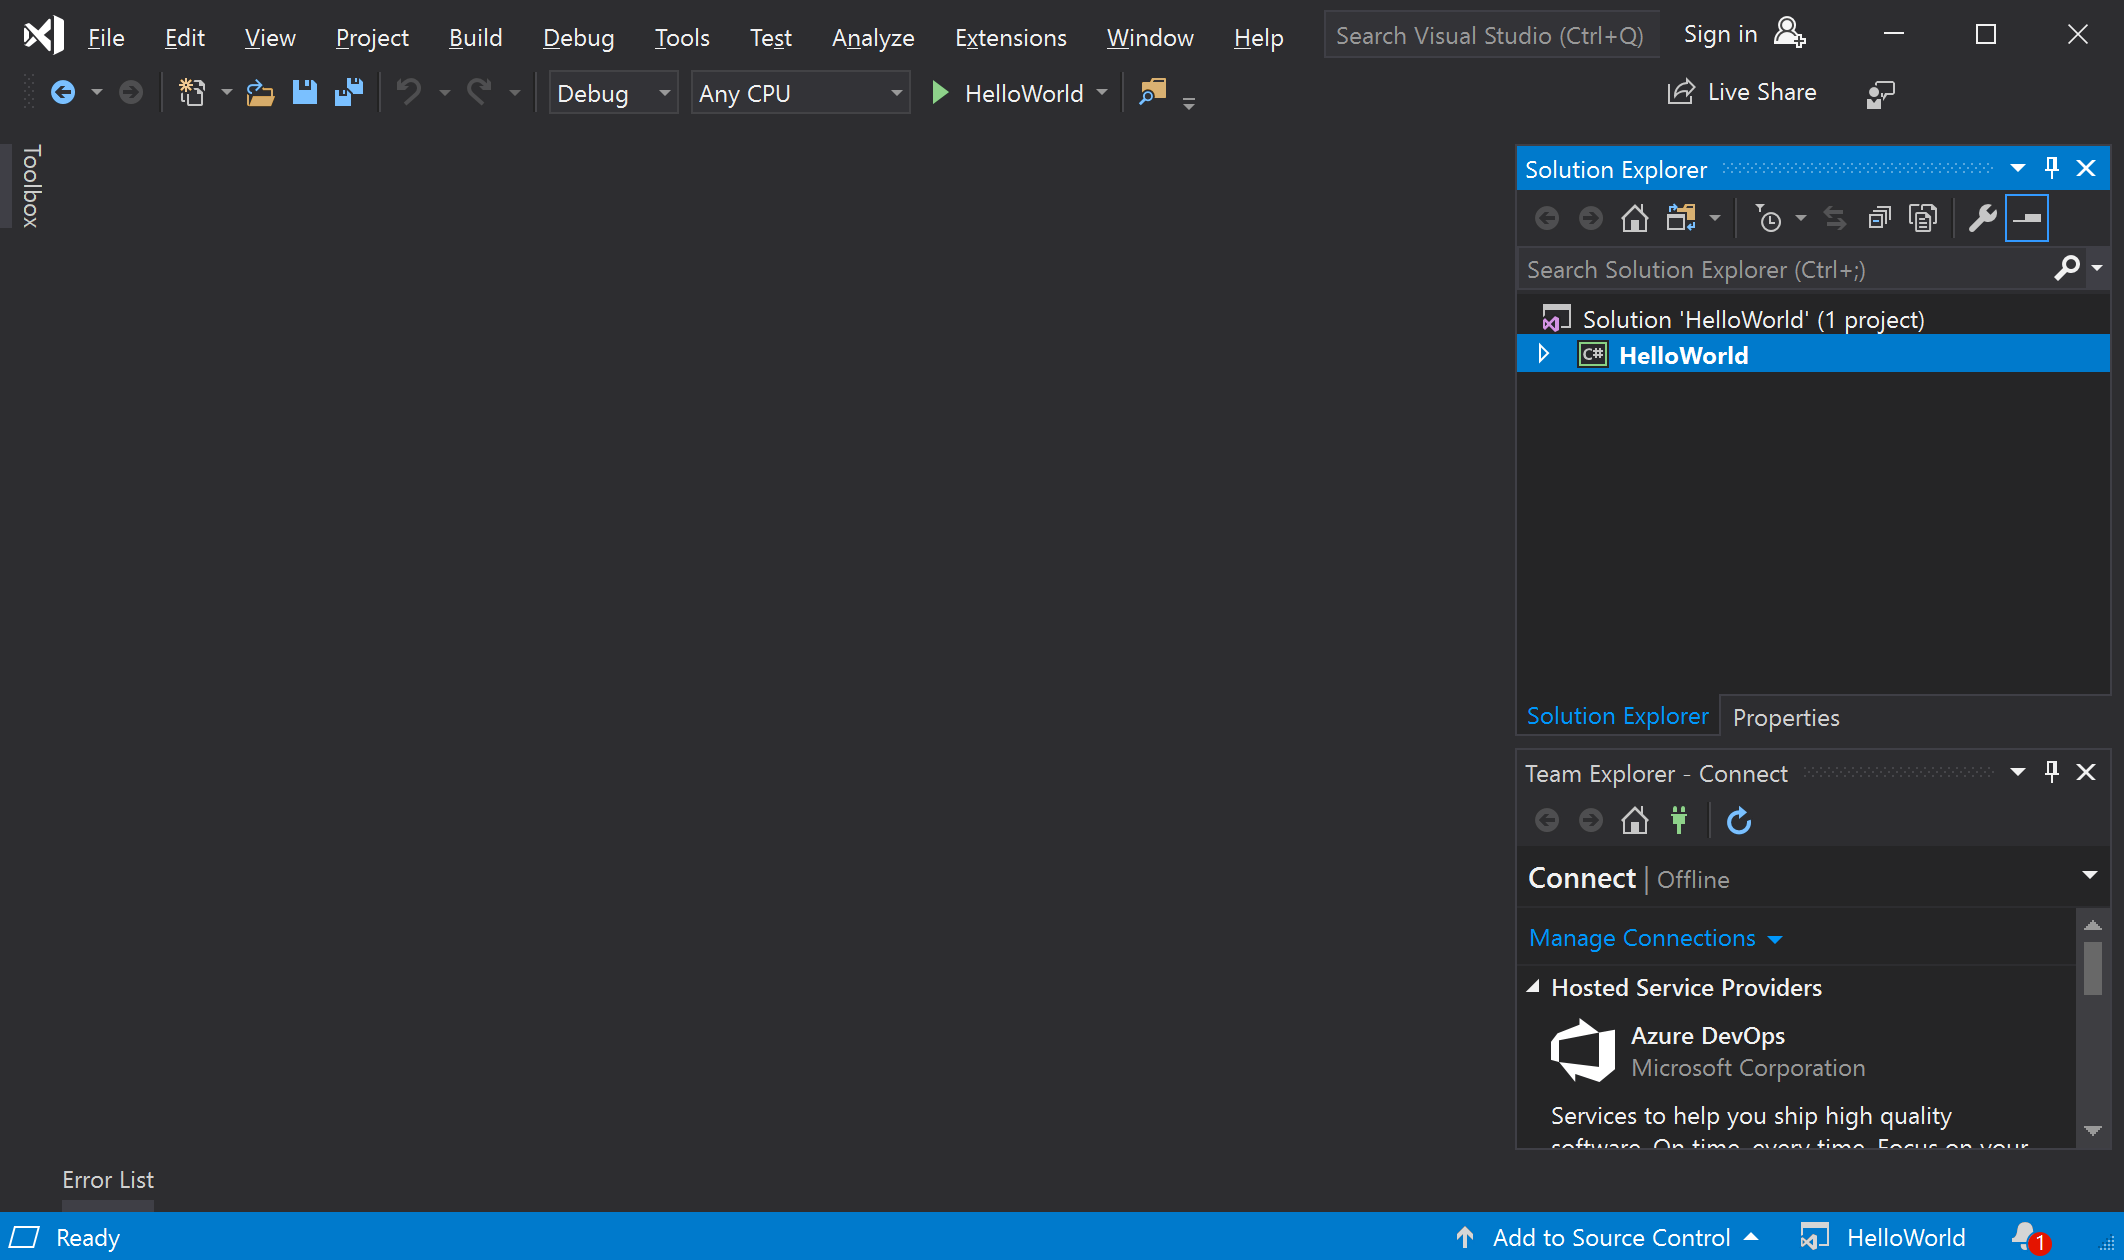
На рисунке показана среда Visual Studio с открытым проектом и несколькими окнами основных инструментов, которые вам, скорее всего, понадобятся: This image shows Visual Studio with an open project and several key tool windows you’ll likely use:
Обозреватель решений (вверху справа) позволяет просматривать файлы кода, перемещаться по ним и управлять ими. Solution Explorer (top right) lets you view, navigate, and manage your code files. Обозреватель решений позволяет упорядочить код путем объединения файлов в решения и проекты. Solution Explorer can help organize your code by grouping the files into solutions and projects.
В окне редактора (центр), где вы, скорее всего, будете проводить большую часть времени, отображается содержимое файла. The editor window (center), where you’ll likely spend a majority of your time, displays file contents. Здесь вы можете редактировать код или разрабатывать пользовательский интерфейс, например окно с кнопками или текстовые поля. This is where you can edit code or design a user interface such as a window with buttons and text boxes.
- В окно вывода (в центре внизу) Visual Studio отправляет уведомления, такие как сообщения об отладке и ошибках, предупреждения компилятора, сообщения о состоянии публикаций и многие другие. The Output window (bottom center) is where Visual Studio sends notifications such as debugging and error messages, compiler warnings, publishing status messages, and more. Каждый источник сообщений имеет собственную вкладку. Each message source has its own tab.
- Team Explorer (правый нижний угол) позволяет отслеживать рабочие элементы и использовать код совместно с другими пользователями с помощью технологий управления версиями, таких как Git и система управления версиями Team Foundation (TFVC). Team Explorer (bottom right) lets you track work items and share code with others using version control technologies such as Git and Team Foundation Version Control (TFVC).
Выпуски Editions
Среда Visual Studio доступна для Windows и Mac. Visual Studio is available for Windows and Mac. Функции Visual Studio для Mac аналогичны возможностям Visual Studio 2017 и оптимизированы для разработки кроссплатформенных и мобильных приложений. Visual Studio for Mac has many of the same features as Visual Studio 2017, and is optimized for developing cross-platform and mobile apps. Эта статья посвящена версии Visual Studio 2017 для Windows. This article focuses on the Windows version of Visual Studio 2017.
Существует три выпуска Visual Studio: Community, Professional и Enterprise. There are three editions of Visual Studio: Community, Professional, and Enterprise. Сведения о функциях, поддерживаемых в каждом выпуске, см. на странице Сравнение выпусков Visual Studio. See Compare Visual Studio editions to learn about which features are supported in each edition.
Среда Visual Studio доступна для Windows и Mac. Visual Studio is available for Windows and Mac. Функции Visual Studio для Mac во многом аналогичны возможностям Visual Studio 2019 и оптимизированы для разработки кроссплатформенных и мобильных приложений. Visual Studio for Mac has many of the same features as Visual Studio 2019, and is optimized for developing cross-platform and mobile apps. Эта статья посвящена версии Visual Studio 2019 для Windows. This article focuses on the Windows version of Visual Studio 2019.
Существует три выпуска Visual Studio 2019: Community, Professional и Enterprise. There are three editions of Visual Studio 2019: Community, Professional, and Enterprise. Сведения о функциях, поддерживаемых в каждом выпуске, см. на странице Сравнение выпусков Visual Studio. See Compare Visual Studio editions to learn about which features are supported in each edition.
Популярные средства повышения производительности Popular productivity features
Ниже перечислены некоторые популярные возможности Visual Studio, которые помогут вам повысить продуктивность разработки программного обеспечения. Some of the popular features in Visual Studio that help you to be more productive as you develop software include:
Волнистые линии и быстрые действия Squiggles and Quick Actions
Волнистые линии обозначают ошибки или потенциальные проблемы кода прямо во время ввода. Squiggles are wavy underlines that alert you to errors or potential problems in your code as you type. Эти визуальные подсказки позволяют устранять проблемы немедленно и не ждать, пока ошибка будет обнаружена во время сборки или запуска программы. These visual clues enable you to fix problems immediately without waiting for the error to be discovered during build or when you run the program. Если навести указатель мыши на волнистую линию, на экран будут выведены дополнительные сведения об ошибке. If you hover over a squiggle, you see additional information about the error. Кроме того, в поле слева может появляться значок лампочки с быстрыми действиями по устранению ошибки. A light bulb may also appear in the left margin with actions, known as Quick Actions, to fix the error.

Очистка кода Code Cleanup
Вы можете одним нажатием кнопки отформатировать код и применить к нему исправления, предложенные параметрами стиля кода, соглашениями в файле EditorConfig и (или) анализаторами Roslyn. With the click of a button, format your code and apply any code fixes suggested by your code style settings, .editorconfig conventions, and Roslyn analyzers. Очистка кода помогает устранить многие проблемы в коде еще до проверки кода. Code Cleanup helps you resolve issues in your code before it goes to code review. (Сейчас эта возможность доступна только для кода на C#.) (Currently available for C# code only.)

Рефакторинг включает в себя такие операции, как интеллектуальное переименование переменных, извлечение одной или нескольких строк кода в новый метод, изменение порядка параметров методов и многое другое. Refactoring includes operations such as intelligent renaming of variables, extracting one or more lines of code into a new method, changing the order of method parameters, and more.

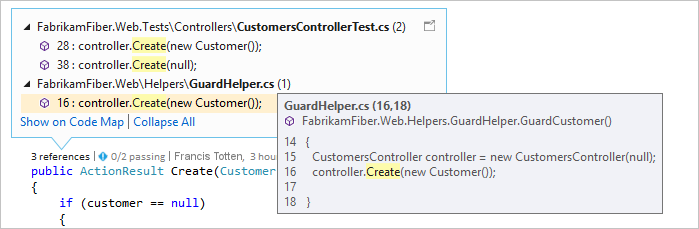
IntelliSense — это набор функций, отображающих сведения о коде непосредственно в редакторе и в некоторых случаях автоматически создающих небольшие отрывки кода. IntelliSense is a term for a set of features that displays information about your code directly in the editor and, in some cases, write small bits of code for you. По сути, это базовая документация, встроенная в редактор, с которой вам не приходится искать информацию где-то еще. It’s like having basic documentation inline in the editor, which saves you from having to look up type information elsewhere. Функции IntelliSense зависят от языка. IntelliSense features vary by language. Дополнительные сведения см. в руководствах по IntelliSense для C# , IntelliSense для Visual C++, IntelliSense для JavaScript и IntelliSense для Visual Basic. For more information, see C# IntelliSense, Visual C++ IntelliSense, JavaScript IntelliSense, and Visual Basic IntelliSense. На следующем рисунке показано, как IntelliSense отображает список членов типа: The following illustration shows how IntelliSense displays a member list for a type:

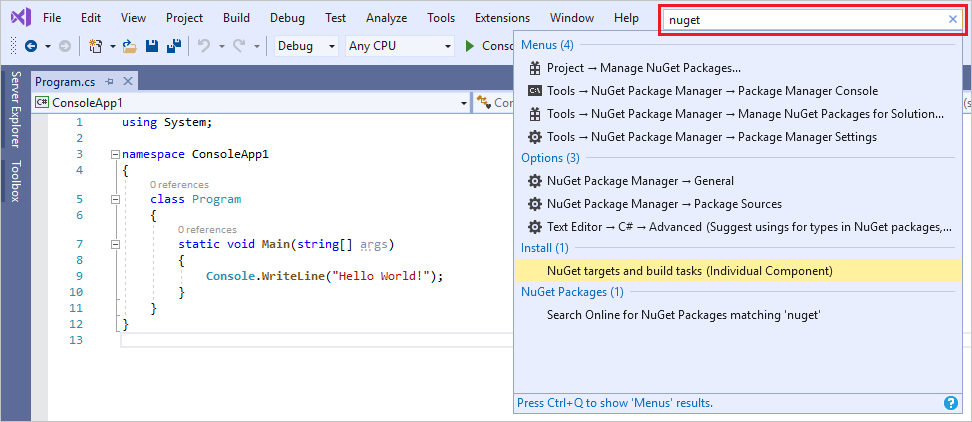
Среда Visual Studio может показаться сложной, ведь там столько разных меню, параметров и свойств. Visual Studio can seem overwhelming at times with so many menus, options, and properties. Чтобы быстро находить функции интегрированной среды разработки и элементы кода, в Visual Studio представлен единый компонент поиска (CTRL+Q). Visual Studio search (Ctrl+Q) is a great way to rapidly find IDE features and code in one place.

Дополнительные сведения см. в разделе Быстрый запуск. For more information, see Quick Launch.
Дополнительные сведения и советы по повышению производительности см. в разделе Практическое руководство. Поиск в Visual Studio. For information and productivity tips, see How to use Visual Studio search.
Предоставляет возможности совместного редактирования и отладки в реальном времени независимо от типа приложения или языка программирования. Collaboratively edit and debug with others in real time, regardless of what your app type or programming language. Вы можете мгновенно и безопасно поделиться своим проектом и, при необходимости, сеансами отладки, экземплярами терминалов, веб-приложениями localhost, голосовыми звонками и многим другим. You can instantly and securely share your project and, as needed, debugging sessions, terminal instances, localhost web apps, voice calls, and more.
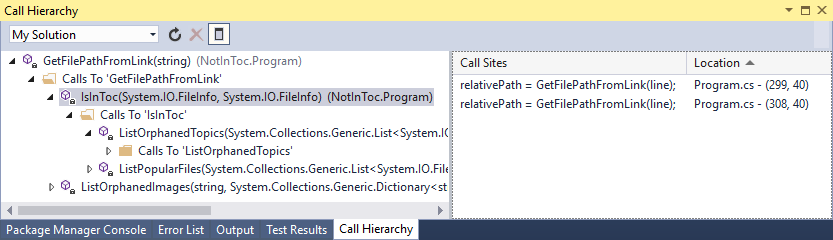
В окне Иерархия вызовов показаны методы, вызывающие выбранный метод. The Call Hierarchy window shows the methods that call a selected method. Это может быть полезно, если вы собираетесь изменить или удалить метод или хотите отследить ошибку. This can be useful information when you’re thinking about changing or removing the method, or when you’re trying to track down a bug.
CodeLens помогает находить ссылки на код, изменения кода, связанные ошибки, рабочие элементы, проверки кода и модульные тесты — все это не выходя из редактора. CodeLens helps you find references to your code, changes to your code, linked bugs, work items, code reviews, and unit tests, all without leaving the editor.
С функцией «Перейти к определению» вы напрямую переходите туда, где определена функция или тип. The Go To Definition feature takes you directly to the location where a function or type is defined.

В окне Просмотр определений показано определение метода или типа, при этом не нужно открывать отдельный файл. The Peek Definition window shows the definition of a method or type without actually opening a separate file.

Установка интегрированной среды разработки Visual Studio Install the Visual Studio IDE
В рамках этого раздела вы создадите простой проект для тестирования некоторых возможностей Visual Studio. In this section, you’ll create a simple project to try out some of the things you can do with Visual Studio. Вы примените IntelliSense в качестве вспомогательного средства для написания кода, выполните отладку приложения для просмотра значения переменной в процессе выполнения программы, а также измените цветовую тему. You’ll use IntelliSense as a coding aid, debug an app to see the value of a variable during the program’s execution, and change the color theme.
Чтобы начать работу, скачайте и установите Visual Studio. To get started, download Visual Studio and install it on your system. Этот модульный установщик позволяет выбрать и установить рабочие нагрузки, которые являются группами функций, необходимыми для предпочитаемого языка программирования или платформы. The modular installer enables you to choose and install workloads, which are groups of features needed for the programming language or platform you prefer. Выполните следующие инструкции по созданию программы и в процессе установки выберите рабочую нагрузку Кроссплатформенная разработка .NET Core. To follow the steps for creating a program, be sure to select the .NET Core cross-platform development workload during installation.
Чтобы начать работу, скачайте и установите Visual Studio. To get started, download Visual Studio and install it on your system. Этот модульный установщик позволяет выбрать и установить рабочие нагрузки, которые являются группами функций, необходимыми для предпочитаемого языка программирования или платформы. The modular installer enables you to choose and install workloads, which are groups of features needed for the programming language or platform you prefer. Выполните следующие инструкции по созданию программы и в процессе установки выберите рабочую нагрузку Кроссплатформенная разработка .NET Core. To follow the steps for creating a program, be sure to select the .NET Core cross-platform development workload during installation.

При первом запуске Visual Studio вы можете выполнить вход с использованием либо учетной записи Майкрософт, либо рабочей или учебной учетной записи. When you open Visual Studio for the first time, you can optionally sign in using your Microsoft account or your work or school account.
Создание программы Create a program
Давайте создадим простую программу. Let’s dive in and create a simple program.
Запустите Visual Studio. Open Visual Studio.
В строке меню щелкните Файл > Создать > Проект. On the menu bar, choose File > New > Project.
 «Новый» > «Проект».» data-linktype=»relative-path»>
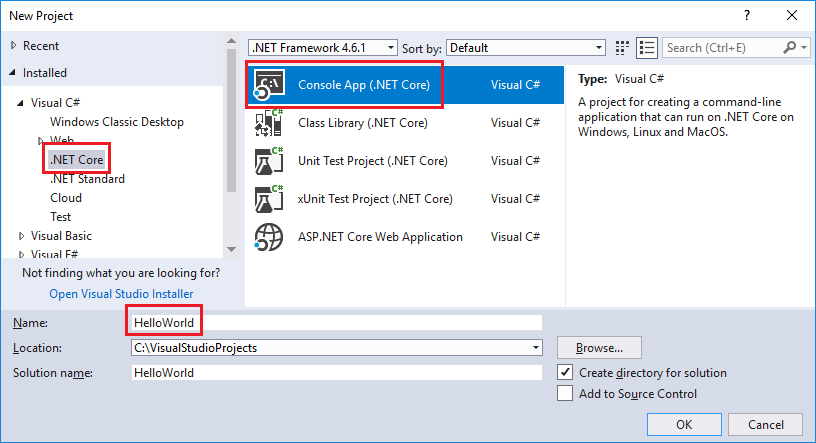
В диалоговом окне Создать проект отображается несколько шаблонов проекта. The New Project dialog box shows several project templates. Шаблон содержит основные файлы и параметры, необходимые для данного типа проекта. A template contains the basic files and settings needed for a given project type.
В разделе Visual C# выберите категорию шаблонов .NET Core и щелкните шаблон Консольное приложение (.NET Core). Choose the .NET Core template category under Visual C#, and then choose the Console App (.NET Core) template. В текстовом поле Имя введите HelloWorld, а затем нажмите кнопку ОК. In the Name text box, type HelloWorld, and then select the OK button.
Если категория .NET Core не отображается, необходимо установить рабочую нагрузку Кросс-платформенная разработка .NET Core. If you don’t see the .NET Core category, you need to install the .NET Core cross-platform development workload. Для этого щелкните ссылку Открыть Visual Studio Installer внизу слева в диалоговом окне Новый проект. To do this, choose the Open Visual Studio Installer link on the bottom left of the New Project dialog. Когда Visual Studio Installer откроется, прокрутите список вниз и выберите рабочую нагрузку Кроссплатформенная разработка .NET Core, а затем щелкните Изменить. After Visual Studio Installer opens, scroll down and select the .NET Core cross-platform development workload, and then select Modify.
Visual Studio создаст проект. Visual Studio creates the project. Это простейший вариант приложения «Hello World», в котором вызывается метод Console.WriteLine() для вывода литеральной строки «Hello World!» It’s a simple «Hello World» application that calls the Console.WriteLine() method to display the literal string «Hello World!» в окне консоли (выходных данных программы). in the console (program output) window.
Вы должны увидеть примерно следующее: Shortly, you should see something like the following:
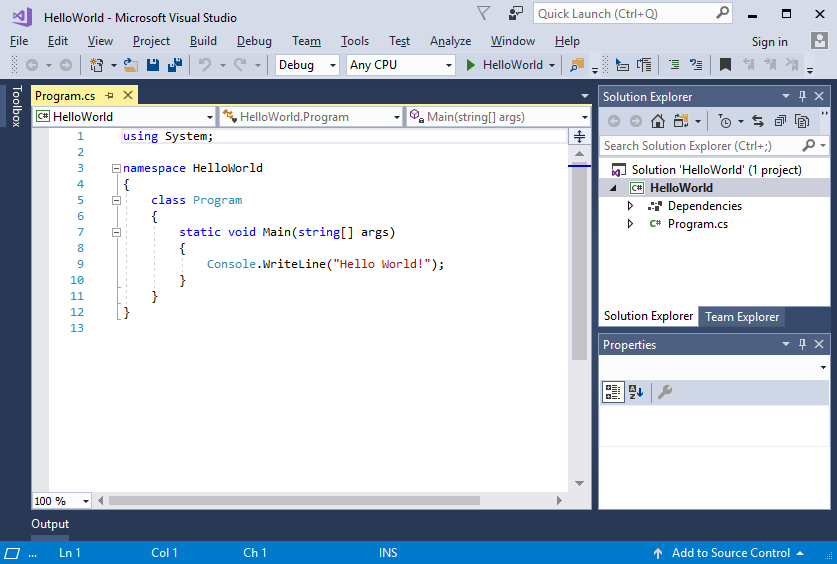
Код C# для вашего приложения отображается в окне редактора, который занимает большую часть пространства. The C# code for your application shows in the editor window, which takes up most of the space. Обратите внимание, что текст автоматически выделяется цветом для обозначения разных частей кода, таких как ключевые слова и типы. Notice that the text is automatically colorized to indicate different parts of the code, such as keywords and types. Кроме того, небольшие вертикальные штриховые линии кода указывают, какие фигурные скобки соответствуют друг другу, а номера строк помогут вам найти нужный код позже. In addition, small, vertical dashed lines in the code indicate which braces match one another, and line numbers help you locate code later. Чтобы свернуть или развернуть блоки кода, используйте небольшие рамки со знаком минус. You can choose the small, boxed minus signs to collapse or expand blocks of code. Эта функция структурирования кода позволяет скрыть ненужный код на экране. This code outlining feature lets you hide code you don’t need, helping to minimize onscreen clutter. Файлы вашего проекта перечислены в окне Обозревателя решений, которое находится справа. The project files are listed on the right side in a window called Solution Explorer.

Есть и другие доступные меню и окна инструментов, но об этом позже. There are other menus and tool windows available, but let’s move on for now.
Теперь запустите приложение. Now, start the app. Это можно сделать, выбрав Запуск без отладки в меню Отладка в строке меню. You can do this by choosing Start Without Debugging from the Debug menu on the menu bar. Можно также нажать клавиши CTRL+F5. You can also press Ctrl+F5.
 «Запустить без отладки»» data-linktype=»relative-path»>
Когда Visual Studio создаст приложение, откроется окно консоли с сообщением Hello World!. Visual Studio builds the app, and a console window opens with the message Hello World!. Теперь у вас есть выполняемое приложение. You now have a running app!

Чтобы закрыть окно консоли, нажмите любую клавишу. To close the console window, press any key on your keyboard.
Давайте добавим дополнительный код в приложение. Let’s add some additional code to the app. Перед строкой Console.WriteLine(«Hello World!»); добавьте следующий код C#: Add the following C# code before the line that says Console.WriteLine(«Hello World!»); :
Этот код отображается сообщение What is your name? (Введите имя) в окне консоли и ожидает, чтобы пользователь ввел текст и нажал клавишу ВВОД. This code displays What is your name? in the console window, and then waits until the user enters some text followed by the Enter key.
Измените строку с текстом Console.WriteLine(«Hello World!»); , указав следующий код: Change the line that says Console.WriteLine(«Hello World!»); to the following code:
Снова запустите приложение, выбрав пункты Отладка > Запуск без отладки или нажав клавиши CTRL+F5. Run the app again by selecting Debug > Start Without Debugging or by pressing Ctrl+F5.
Visual Studio выполнит повторную сборку приложения. В открывшемся окне консоли отобразится запрос на ввод имени. Visual Studio rebuilds the app, and a console window opens and prompts you for your name.
Введите свое имя в окне консоли и нажмите клавишу ВВОД. Enter your name in the console window and press Enter.

Нажмите любую клавишу, чтобы закрыть окно консоли и остановить выполняющуюся программу. Press any key to close the console window and stop the running program.
Запустите Visual Studio. Open Visual Studio.
Отображается начальное окно, где можно клонировать репозиторий, открыть недавно использованные проекты или создать проект. The start window appears with various options for cloning a repo, opening a recent project, or creating a brand new project.
Выберите Создать проект. Choose Create a new project.

Откроется окно Создание проекта с отображением нескольких шаблонов проектов. The Create a new project window opens and shows several project templates. Шаблон содержит основные файлы и параметры, которые требуются для определенного типа проекта. A template contains the basic files and settings required for a given project type.
Чтобы найти нужный шаблон, введите консоль .net core в поле поиска. To find the template we want, type or enter .net core console in the search box. Список доступных шаблонов автоматически отфильтруется по введенным словам. The list of available templates is automatically filtered based on the keywords you entered. Вы можете дополнительно отфильтровать результаты шаблона, выбрав C# в раскрывающемся списке Все языки, Windows в списке Все платформы и Консоль в списке Все типы проектов. You can further filter the template results by choosing C# from the All language drop-down list, Windows from the All platforms list, and Console from the All project types list .
Выберите шаблон Консольное приложение и щелкните Далее. Select the Console Application template, and then click Next.

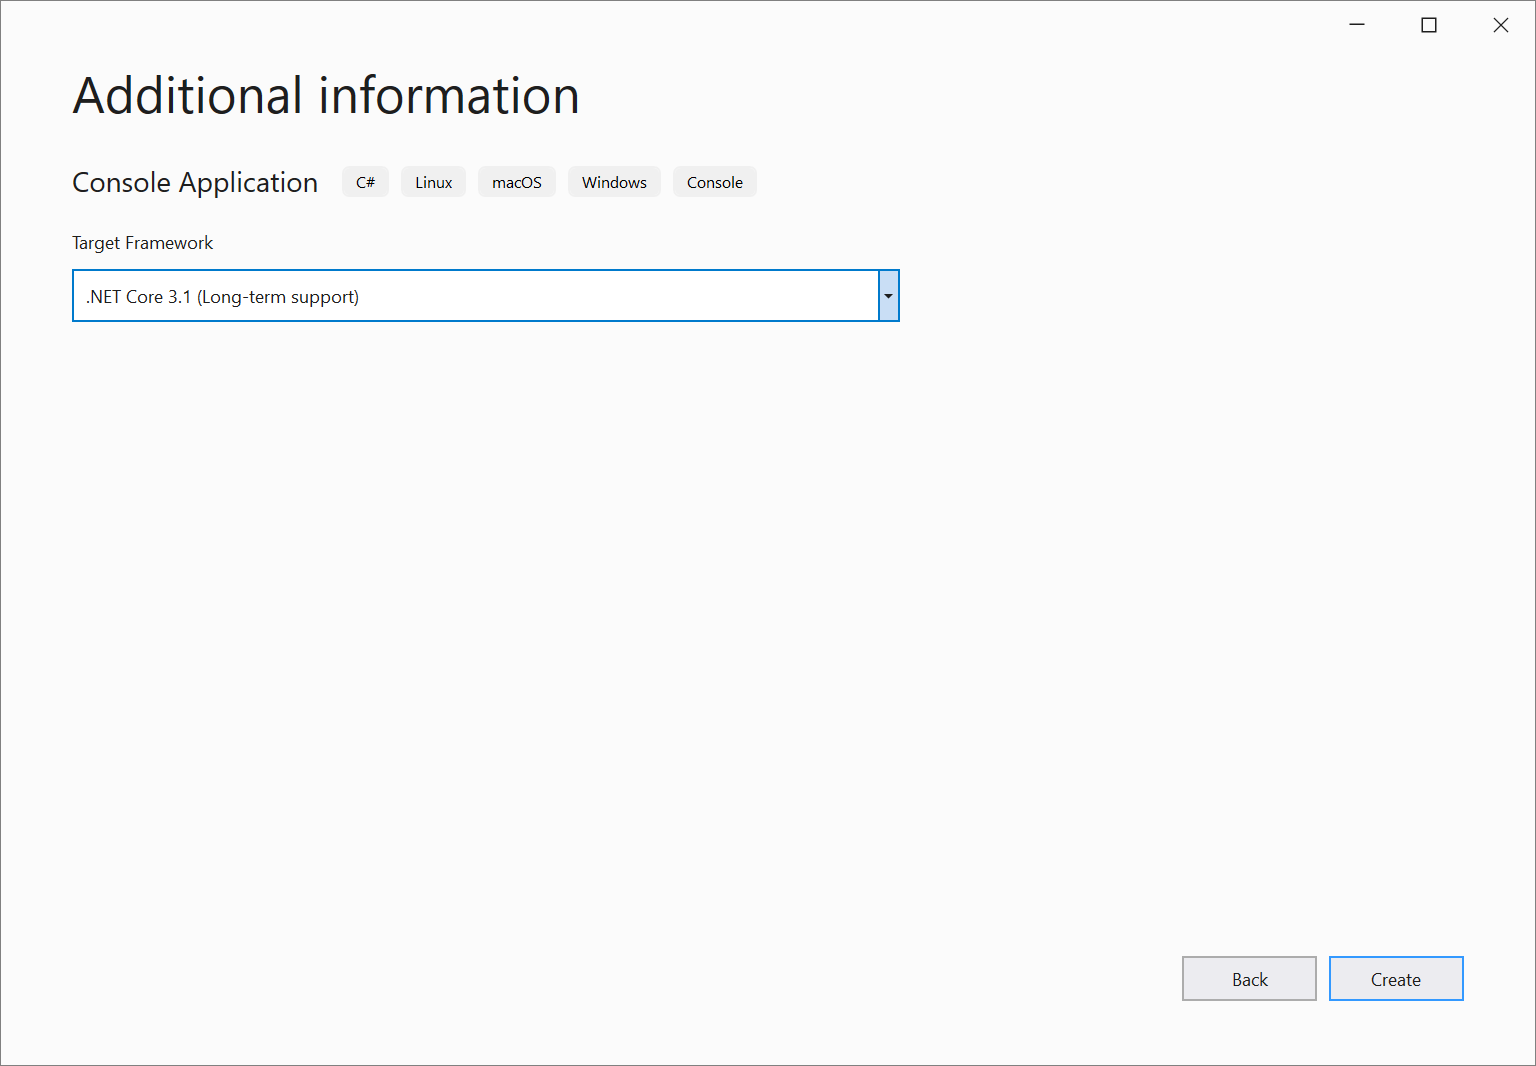
В окне Настройка нового проекта введите HelloWorld в поле Имя проекта, при необходимости измените расположение каталога для вашего проекта (по умолчанию используется путь C:\Users\ \source\repos ) и щелкните Далее. In the Configure your new project window, enter HelloWorld in the Project name box, optionally change the directory location for your project files (the default locale is C:\Users\ \source\repos ), and then click Next.

В окне Дополнительные сведения убедитесь, что в раскрывающемся меню Целевая платформа указано .NET Core 3.1, а затем щелкните Создать. In the Additional information window, verify that .NET Core 3.1 appears in the Target Framework drop-down menu, and then click Create.
Visual Studio создаст проект. Visual Studio creates the project. Это простейший вариант приложения «Hello World», в котором вызывается метод Console.WriteLine() для вывода литеральной строки «Hello World!» It’s a simple «Hello World» application that calls the Console.WriteLine() method to display the literal string «Hello World!» в окне консоли (выходных данных программы). in the console (program output) window.
Вы должны увидеть примерно следующее: Shortly, you should see something like the following:

Код C# для вашего приложения отображается в окне редактора, который занимает большую часть пространства. The C# code for your application shows in the editor window, which takes up most of the space. Обратите внимание, что текст автоматически выделяется цветом для обозначения разных частей кода, таких как ключевые слова и типы. Notice that the text is automatically colorized to indicate different parts of the code, such as keywords and types. Кроме того, небольшие вертикальные штриховые линии кода указывают, какие фигурные скобки соответствуют друг другу, а номера строк помогут вам найти нужный код позже. In addition, small, vertical dashed lines in the code indicate which braces match one another, and line numbers help you locate code later. Чтобы свернуть или развернуть блоки кода, используйте небольшие рамки со знаком минус. You can choose the small, boxed minus signs to collapse or expand blocks of code. Эта функция структурирования кода позволяет скрыть ненужный код на экране. This code outlining feature lets you hide code you don’t need, helping to minimize onscreen clutter. Файлы вашего проекта перечислены в окне Обозревателя решений, которое находится справа. The project files are listed on the right side in a window called Solution Explorer.
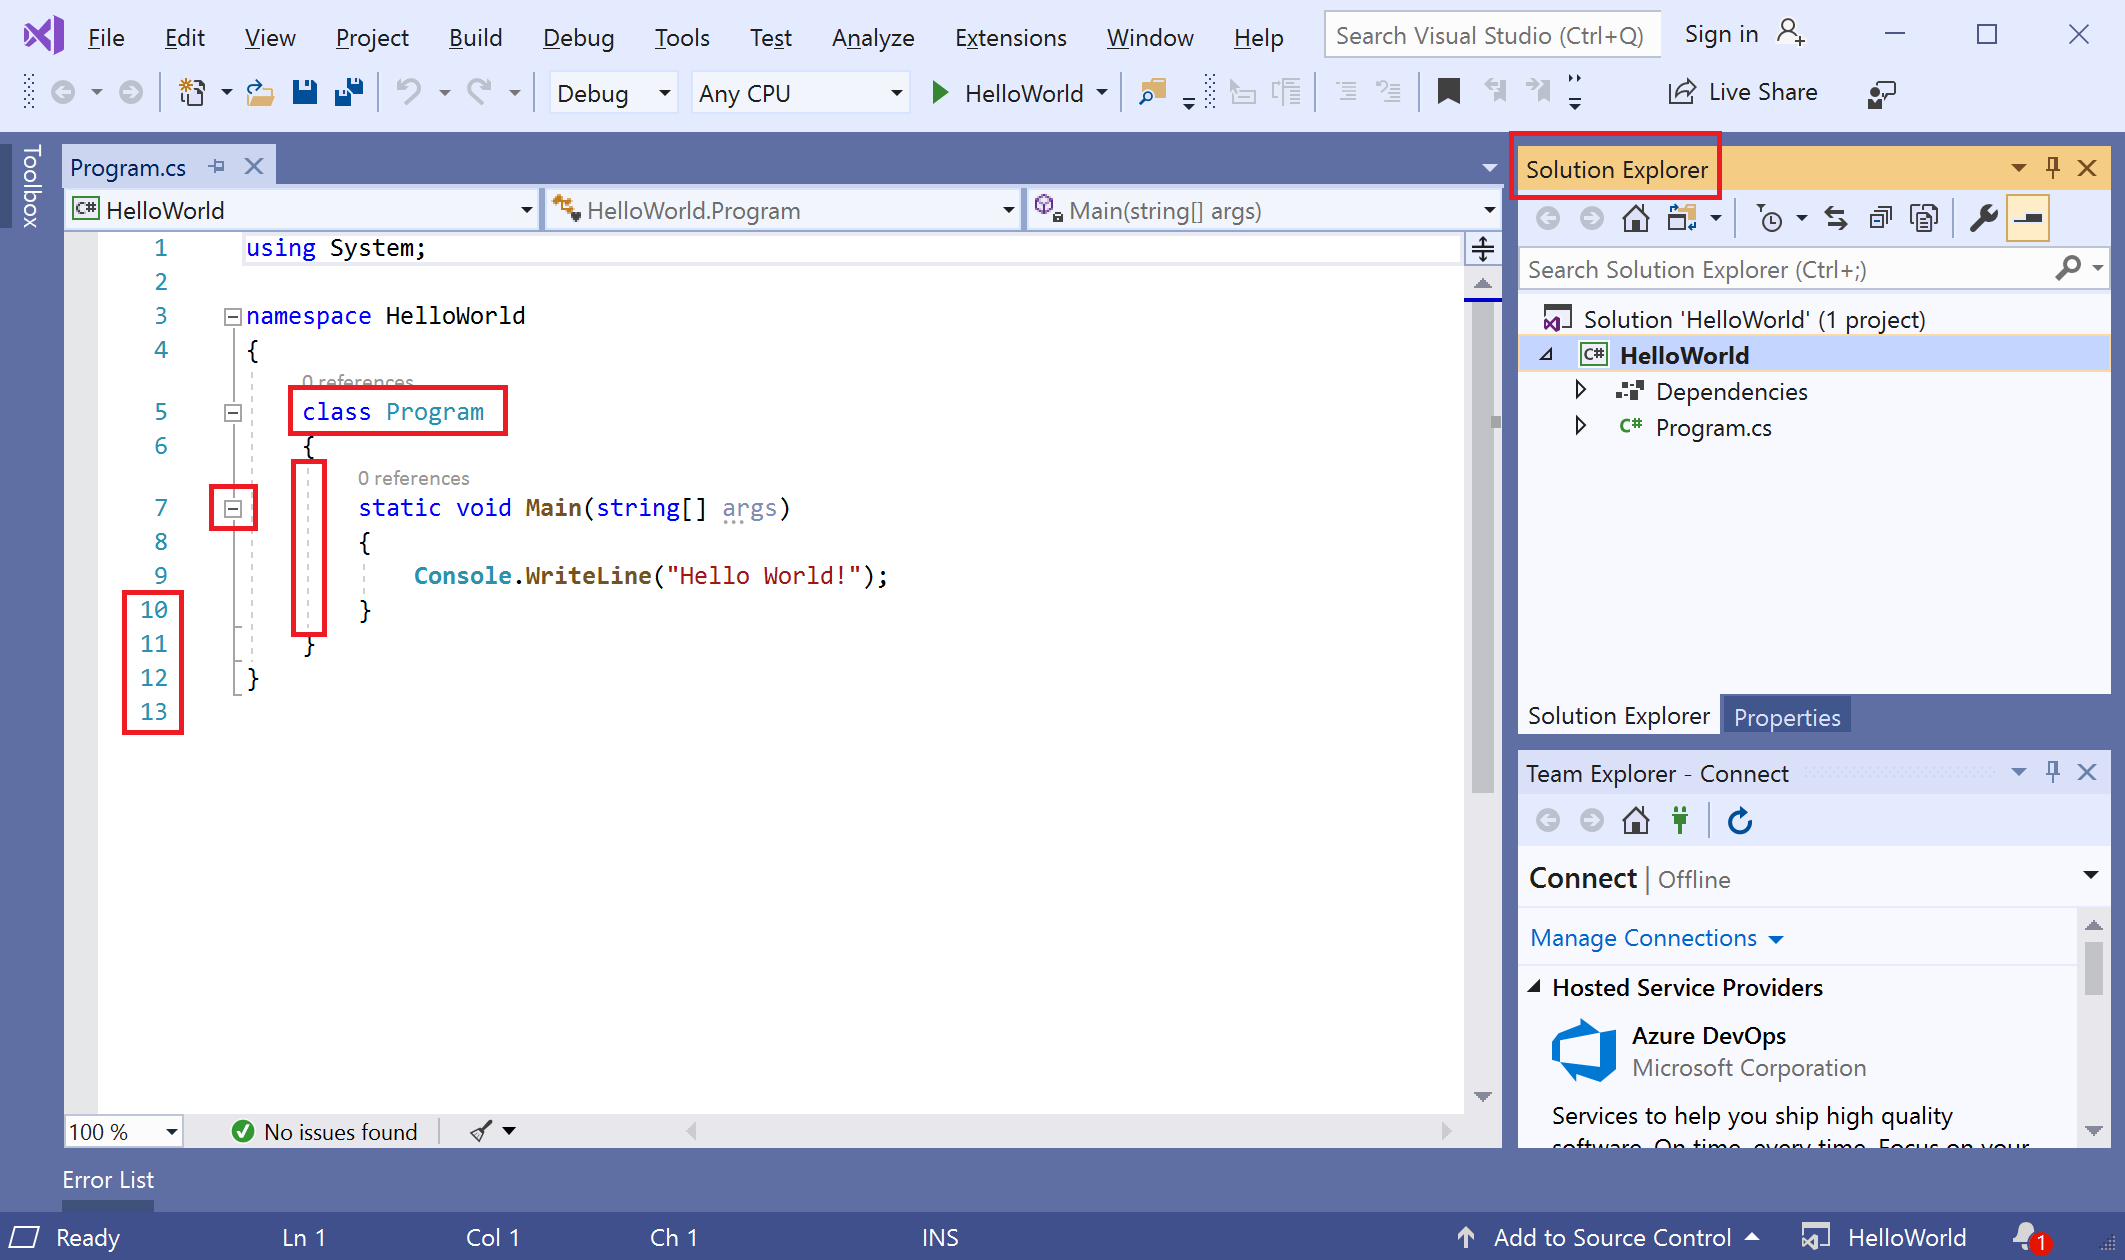
Есть и другие доступные меню и окна инструментов, но об этом позже. There are other menus and tool windows available, but let’s move on for now.
Теперь запустите приложение. Now, start the app. Это можно сделать, выбрав Запуск без отладки в меню Отладка в строке меню. You can do this by choosing Start Without Debugging from the Debug menu on the menu bar. Можно также нажать клавиши CTRL+F5. You can also press Ctrl+F5.
«Запустить без отладки»» data-linktype=»relative-path»>
Когда Visual Studio создаст приложение, откроется окно консоли с сообщением Hello World!. Visual Studio builds the app, and a console window opens with the message Hello World!. Теперь у вас есть выполняемое приложение. You now have a running app!

Чтобы закрыть окно консоли, нажмите любую клавишу. To close the console window, press any key on your keyboard.
Давайте добавим дополнительный код в приложение. Let’s add some additional code to the app. Перед строкой Console.WriteLine(«Hello World!»); добавьте следующий код C#: Add the following C# code before the line that says Console.WriteLine(«Hello World!»); :
Этот код отображается сообщение What is your name? (Введите имя) в окне консоли и ожидает, чтобы пользователь ввел текст и нажал клавишу ВВОД. This code displays What is your name? in the console window, and then waits until the user enters some text followed by the Enter key.
Измените строку с текстом Console.WriteLine(«Hello World!»); , указав следующий код: Change the line that says Console.WriteLine(«Hello World!»); to the following code:
Снова запустите приложение, выбрав пункты Отладка > Запуск без отладки или нажав клавиши CTRL+F5. Run the app again by selecting Debug > Start Without Debugging or by pressing Ctrl+F5.
Visual Studio выполнит повторную сборку приложения. В открывшемся окне консоли отобразится запрос на ввод имени. Visual Studio rebuilds the app, and a console window opens and prompts you for your name.
Введите свое имя в окне консоли и нажмите клавишу ВВОД. Enter your name in the console window and press Enter.

Нажмите любую клавишу, чтобы закрыть окно консоли и остановить выполняющуюся программу. Press any key to close the console window and stop the running program.
Использование рефакторинга и IntelliSense Use refactoring and IntelliSense
Рассмотрим несколько примеров того, как рефакторинг и IntelliSense помогают повысить эффективность кода. Let’s look at a couple of the ways that refactoring and IntelliSense can help you code more efficiently.
Во-первых, переименуем переменную name : First, let’s rename the name variable:
Дважды щелкните переменную name , чтобы выбрать ее. Double-click the name variable to select it.
Введите имя переменной, username. Type in the new name for the variable, username.
Обратите внимание, что вокруг переменной отображается серый прямоугольник, а в поле появляется значок лампочки. Notice that a gray box appears around the variable, and a light bulb appears in the margin.
Выберите значок лампочки для отображения доступных быстрых действий. Select the light bulb icon to show the available Quick Actions. Выберите Переименовать name в username. Select Rename ‘name’ to ‘username’.

Переменная переименовывается во всем проекте, то есть в нашем случае только в двух местах. The variable is renamed across the project, which in our case is only two places.
Теперь рассмотрим возможности IntelliSense. Now let’s take a look at IntelliSense. Под строкой Console.WriteLine($»\nHello
Появится поле с членами класса DateTime. A box displays the members of the DateTime class. Кроме того, в отдельном поле отображается описание выбранного элемента. In addition, the description of the currently selected member displays in a separate box.
Выберите член с именем Now, который является свойством класса, дважды щелкнув его или нажав клавишу TAB. Завершите строку кода, добавив в конце точку с запятой. Select the member named Now, which is a property of the class, by double-clicking on it or pressing Tab. Complete the line of code by adding a semi-colon to the end.
Ниже введите или вставьте следующие строки кода: Below that, type in or paste the following lines of code:
Console.Write будет немного отличаться от Console.WriteLine в том, что не добавляет знак завершения строки после ее вывода. Console.Write is a little different to Console.WriteLine in that it doesn’t add a line terminator after it prints. Это означает, что следующий фрагмент текста, отправляемый на вывод, будет выводиться в той же строке. That means that the next piece of text that’s sent to the output will print on the same line. Можно навести указатель мыши на каждый из этих методов в коде, чтобы просмотреть его описание. You can hover over each of these methods in your code to see their description.
Далее мы снова используем рефакторинг, чтобы сделать код более кратким. Next, we’ll use refactoring again to make the code a little more concise. Щелкните переменную now в строке DateTime now = DateTime.Now; . Click on the variable now in the line DateTime now = DateTime.Now; .
Обратите внимание, что на поле в этой строке отображается маленький значок отвертки. Notice that a little screwdriver icon appears in the margin on that line.
Щелкните значок отвертки, чтобы увидеть предложения Visual Studio. Click the screwdriver icon to see what suggestions Visual Studio has available. В этом случае отображается рефакторинг Встроенная временная переменная для удаления строки кода без изменения его общего поведения: In this case, it’s showing the Inline temporary variable refactoring to remove a line of code without changing the overall behavior of the code:

Щелкните Встроенная временная переменная, чтобы выполнить рефакторинг кода. Click Inline temporary variable to refactor the code.
Снова запустите программу, нажав клавиши Ctrl+F5. Run the program again by pressing Ctrl+F5. Выходные данные выглядят следующим образом: The output looks something like this:
!Снимок экрана: окно консоли cmd.exe с запросом имени, входных и выходных данных «Hello Georgette!» !Screenshot of the cmd.exe console window showing the prompt for a name, the input, and the output ‘Hello Georgette! День года: 151′.](../media/overview-console-final.png) Day of year: 151’.](../media/overview-console-final.png)
Снова запустите программу, нажав клавиши Ctrl+F5. Run the program again by pressing Ctrl+F5. Выходные данные выглядят следующим образом: The output looks something like this:

Отладка кода Debug code
При написании кода требуется запустить его и проверить на ошибки. When you write code, you need to run it and test it for bugs. Система отладки Visual Studio позволяет просматривать код с шагом в одну инструкцию, проверяя значения переменных. Visual Studio’s debugging system lets you step through code one statement at a time and inspect variables as you go. Можно задать точки останова, которые останавливают выполнение кода на определенной строке. You can set breakpoints that stop execution of the code at a particular line. Вы увидите, как значение переменной изменяется по мере выполнения кода, и многое другое. You can observe how the value of a variable changes as the code runs, and more.
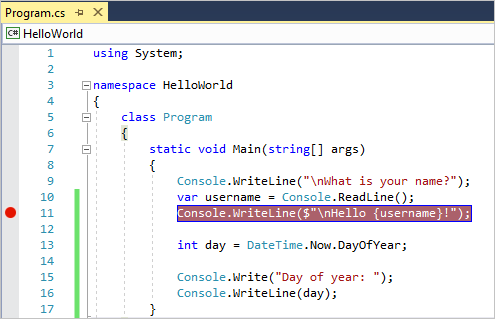
Зададим точку останова, чтобы увидеть значение переменной username во время выполнения программы. Let’s set a breakpoint to see the value of the username variable while the program is «in flight».
Найдите строку кода » Console.WriteLine($»\nHello
В крайнем левом поле отображается красный кружок, и код выделяется красным цветом. A red circle appears in the far left margin, and the code is highlighted in red.
Начните отладку, выбрав пункты Отладка > Начать отладку или нажав клавишу F5. Start debugging by selecting Debug > Start Debugging or by pressing F5.
Если появляется окно консоли с запросом имени, введите имя и нажмите клавишу ВВОД. When the console window appears and asks for your name, type it in and press Enter.
Фокус возвращается в редактор кода Visual Studio, и строка кода с точкой останова выделяется желтым. The focus returns to the Visual Studio code editor and the line of code with the breakpoint is highlighted in yellow. Это означает, что она является следующей строкой кода, которую будет выполнять программа. This signifies that it’s the next line of code that the program will execute.
Наведите указатель мыши на переменную username для просмотра ее значения. Hover your mouse over the username variable to see its value. Кроме того, можно щелкнуть username правой кнопкой мыши и выбрать пункт Добавить контрольное значение, чтобы добавить переменную в окно контрольных значений, где можно будет просмотреть ее значение. Alternatively, you can right-click on username and select Add Watch to add the variable to the Watch window, where you can also see its value.

Чтобы разрешить программе продолжить выполнение, нажмите клавишу F5 еще раз. To let the program run to completion, press F5 again.
Дополнительные сведения о выполнении отладки в Visual Studio см. в статье Обзор возможностей отладчика Visual Studio. To get more details about debugging in Visual Studio, see Debugger feature tour.
Настройка Visual Studio Customize Visual Studio
Вы можете настроить пользовательский интерфейс Visual Studio, в том числе изменить цветовую тему по умолчанию. You can personalize the Visual Studio user interface, including change the default color theme. Чтобы задать темную тему, выполните следующие действия. To change to the Dark theme:
- В строке меню выберите Сервис >Параметры, чтобы открыть диалоговое окно Параметры. On the menu bar, choose Tools >Options to open the Options dialog.
На странице параметров Среда > Общие измените значение параметра Цветовая тема на Темная и нажмите кнопку ОК. On the Environment > General options page, change the Color theme selection to Dark, and then choose OK.
Цветовая тема для всей интегрированной среды разработки изменится на тему Темная. The color theme for the entire IDE changes to Dark.
Дополнительные сведения о других способах персонализации интегрированной среды разработки см. в разделе Персонализация Visual Studio. To learn about other ways you can personalize the IDE, see Personalize Visual Studio.
Следующие шаги Next steps
Узнайте больше о Visual Studio, прочитав одну из следующих вводных статей: Explore Visual Studio further by following along with one of these introductory articles:
Познакомьтесь с редактором кода в статье Сведения об использовании редактора кода Get acquainted with the code editor in Learn to use the code editor
Узнайте, как Visual Studio упорядочивает код, в статье Сведения о проектах и решениях Learn how Visual Studio organizes code in Learn about projects and solutions
Если вы готовы к углубиться в вопросы написания кода, ознакомьтесь со следующими статьями о конкретных языках: If you’re ready to dive into more coding, one of the following language-specific quickstarts is a good next step:


