- Python in Visual Studio Code
- Install Python and the Python extension
- Insiders program
- Run Python code
- Autocomplete and IntelliSense
- Linting
- Debugging
- Environments
- Installing packages
- Jupyter notebooks
- Testing
- Configuration
- Other popular Python extensions
- Visual Studio Code on Linux
- Installation
- Debian and Ubuntu based distributions
- RHEL, Fedora, and CentOS based distributions
- openSUSE and SLE-based distributions
- AUR package for Arch Linux
- Nix package for NixOS (or any Linux distribution using Nix package manager)
- Installing .rpm package manually
- Updates
- Node.js
- Setting VS Code as the default text editor
- xdg-open
- Debian alternatives system
- Windows as a Linux developer machine
- Windows Subsystem for Linux
- Next steps
- Common questions
- Azure VM Issues
- Debian and moving files to trash
- Conflicts with VS Code packages from other repositories
- «Visual Studio Code is unable to watch for file changes in this large workspace» (error ENOSPC)
- I can’t see Chinese characters in Ubuntu
- Package git is not installed
- The code bin command does not bring the window to the foreground on Ubuntu
- Cannot install .deb package due to «/etc/apt/sources.list.d/vscode.list: No such file or directory»
- Cannot move or resize the window while X forwarding a remote window
- Using the custom title bar
- Broken cursor in editor with display scaling enabled
- Repository changed its origin value
Python in Visual Studio Code
Working with Python in Visual Studio Code, using the Microsoft Python extension, is simple, fun, and productive. The extension makes VS Code an excellent Python editor, and works on any operating system with a variety of Python interpreters. It leverages all of VS Code’s power to provide auto complete and IntelliSense, linting, debugging, and unit testing, along with the ability to easily switch between Python environments, including virtual and conda environments.
This article provides only an overview of the different capabilities of the Python extension for VS Code. For a walkthrough of editing, running, and debugging code, use the button below.
Install Python and the Python extension
The tutorial guides you through installing Python and using the extension. You must install a Python interpreter yourself separately from the extension. For a quick install, use Python from python.org and install the extension from the VS Code Marketplace.
Once you have a version of Python installed, activate it using the Python: Select Interpreter command. If VS Code doesn’t automatically locate the interpreter you’re looking for, refer to Environments — Manually specify an interpreter.
You can configure the Python extension through settings. Learn more in the Python Settings reference.
Windows Subsystem for Linux: If you are on Windows, WSL is a great way to do Python development. You can run Linux distributions on Windows and Python is often already installed. When coupled with the Remote — WSL extension, you get full VS Code editing and debugging support while running in the context of WSL. To learn more, go to Developing in WSL or try the Working in WSL tutorial.
Insiders program
The Insiders program allows you to try out and automatically install new versions of the Python extension prior to release, including new features and fixes.
If you’d like to opt into the program, you can either open the Command Palette ( ⇧⌘P (Windows, Linux Ctrl+Shift+P ) ) and select Python: Switch to Insiders Daily/Weekly Channel or else you can open settings ( ⌘, (Windows, Linux Ctrl+, ) ) and look for Python: Insiders Channel to set the channel to «daily» or «weekly».
Run Python code
To experience Python, create a file (using the File Explorer) named hello.py and paste in the following code:
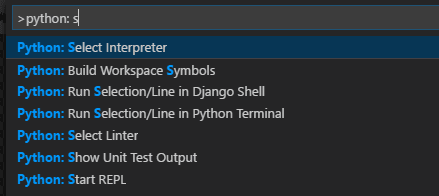
The Python extension then provides shortcuts to run Python code in the currently selected interpreter (Python: Select Interpreter in the Command Palette):
- In the text editor: right-click anywhere in the editor and select Run Python File in Terminal. If invoked on a selection, only that selection is run.
- In Explorer: right-click a Python file and select Run Python File in Terminal.
You can also use the Terminal: Create New Terminal command to create a terminal in which VS Code automatically activates the currently selected interpreter. See Environments below. The Python: Start REPL activates a terminal with the currently selected interpreter and then runs the Python REPL.
For a more specific walkthrough on running code, see the tutorial.
Autocomplete and IntelliSense
The Python extension supports code completion and IntelliSense using the currently selected interpreter. IntelliSense is a general term for a number of features, including intelligent code completion (in-context method and variable suggestions) across all your files and for built-in and third-party modules.
IntelliSense quickly shows methods, class members, and documentation as you type, and you can trigger completions at any time with ⌃Space (Windows, Linux Ctrl+Space ) . You can also hover over identifiers for more information about them.
Tip: Check out the IntelliCode extension for VS Code (preview). IntelliCode provides a set of AI-assisted capabilities for IntelliSense in Python, such as inferring the most relevant auto-completions based on the current code context.
Linting
Linting analyzes your Python code for potential errors, making it easy to navigate to and correct different problems.
The Python extension can apply a number of different linters including Pylint, pycodestyle, Flake8, mypy, pydocstyle, prospector, and pylama. See Linting.
Debugging
No more print statement debugging! Set breakpoints, inspect data, and use the debug console as you run your program step by step. Debug a number of different types of Python applications, including multi-threaded, web, and remote applications.
For Python-specific details, including setting up your launch.json configuration and remote debugging, see Debugging. General VS Code debugging information is found in the debugging document. The Django and Flask tutorials also demonstrate debugging in the context of those web apps, including debugging Django page templates.
Environments
The Python extension automatically detects Python interpreters that are installed in standard locations. It also detects conda environments as well as virtual environments in the workspace folder. See Configuring Python environments. You can also use the python.pythonPath setting to point to an interpreter anywhere on your computer.
The current environment is shown on the left side of the VS Code Status Bar:

The Status Bar also indicates if no interpreter is selected:

The selected environment is used for IntelliSense, auto-completions, linting, formatting, and any other language-related feature other than debugging. It is also activated when you use run Python in a terminal.
To change the current interpreter, which includes switching to conda or virtual environments, select the interpreter name on the Status Bar or use the Python: Select Interpreter command.
VS Code prompts you with a list of detected environments as well as any you’ve added manually to your user settings (see Configuring Python environments).
Installing packages
Packages are installed using the Terminal panel and commands like pip install
(Windows) and pip3 install
(macOS/Linux). VS Code installs that package into your project along with its dependencies. Examples are given in the Python tutorial as well as the Django and Flask tutorials.
Jupyter notebooks
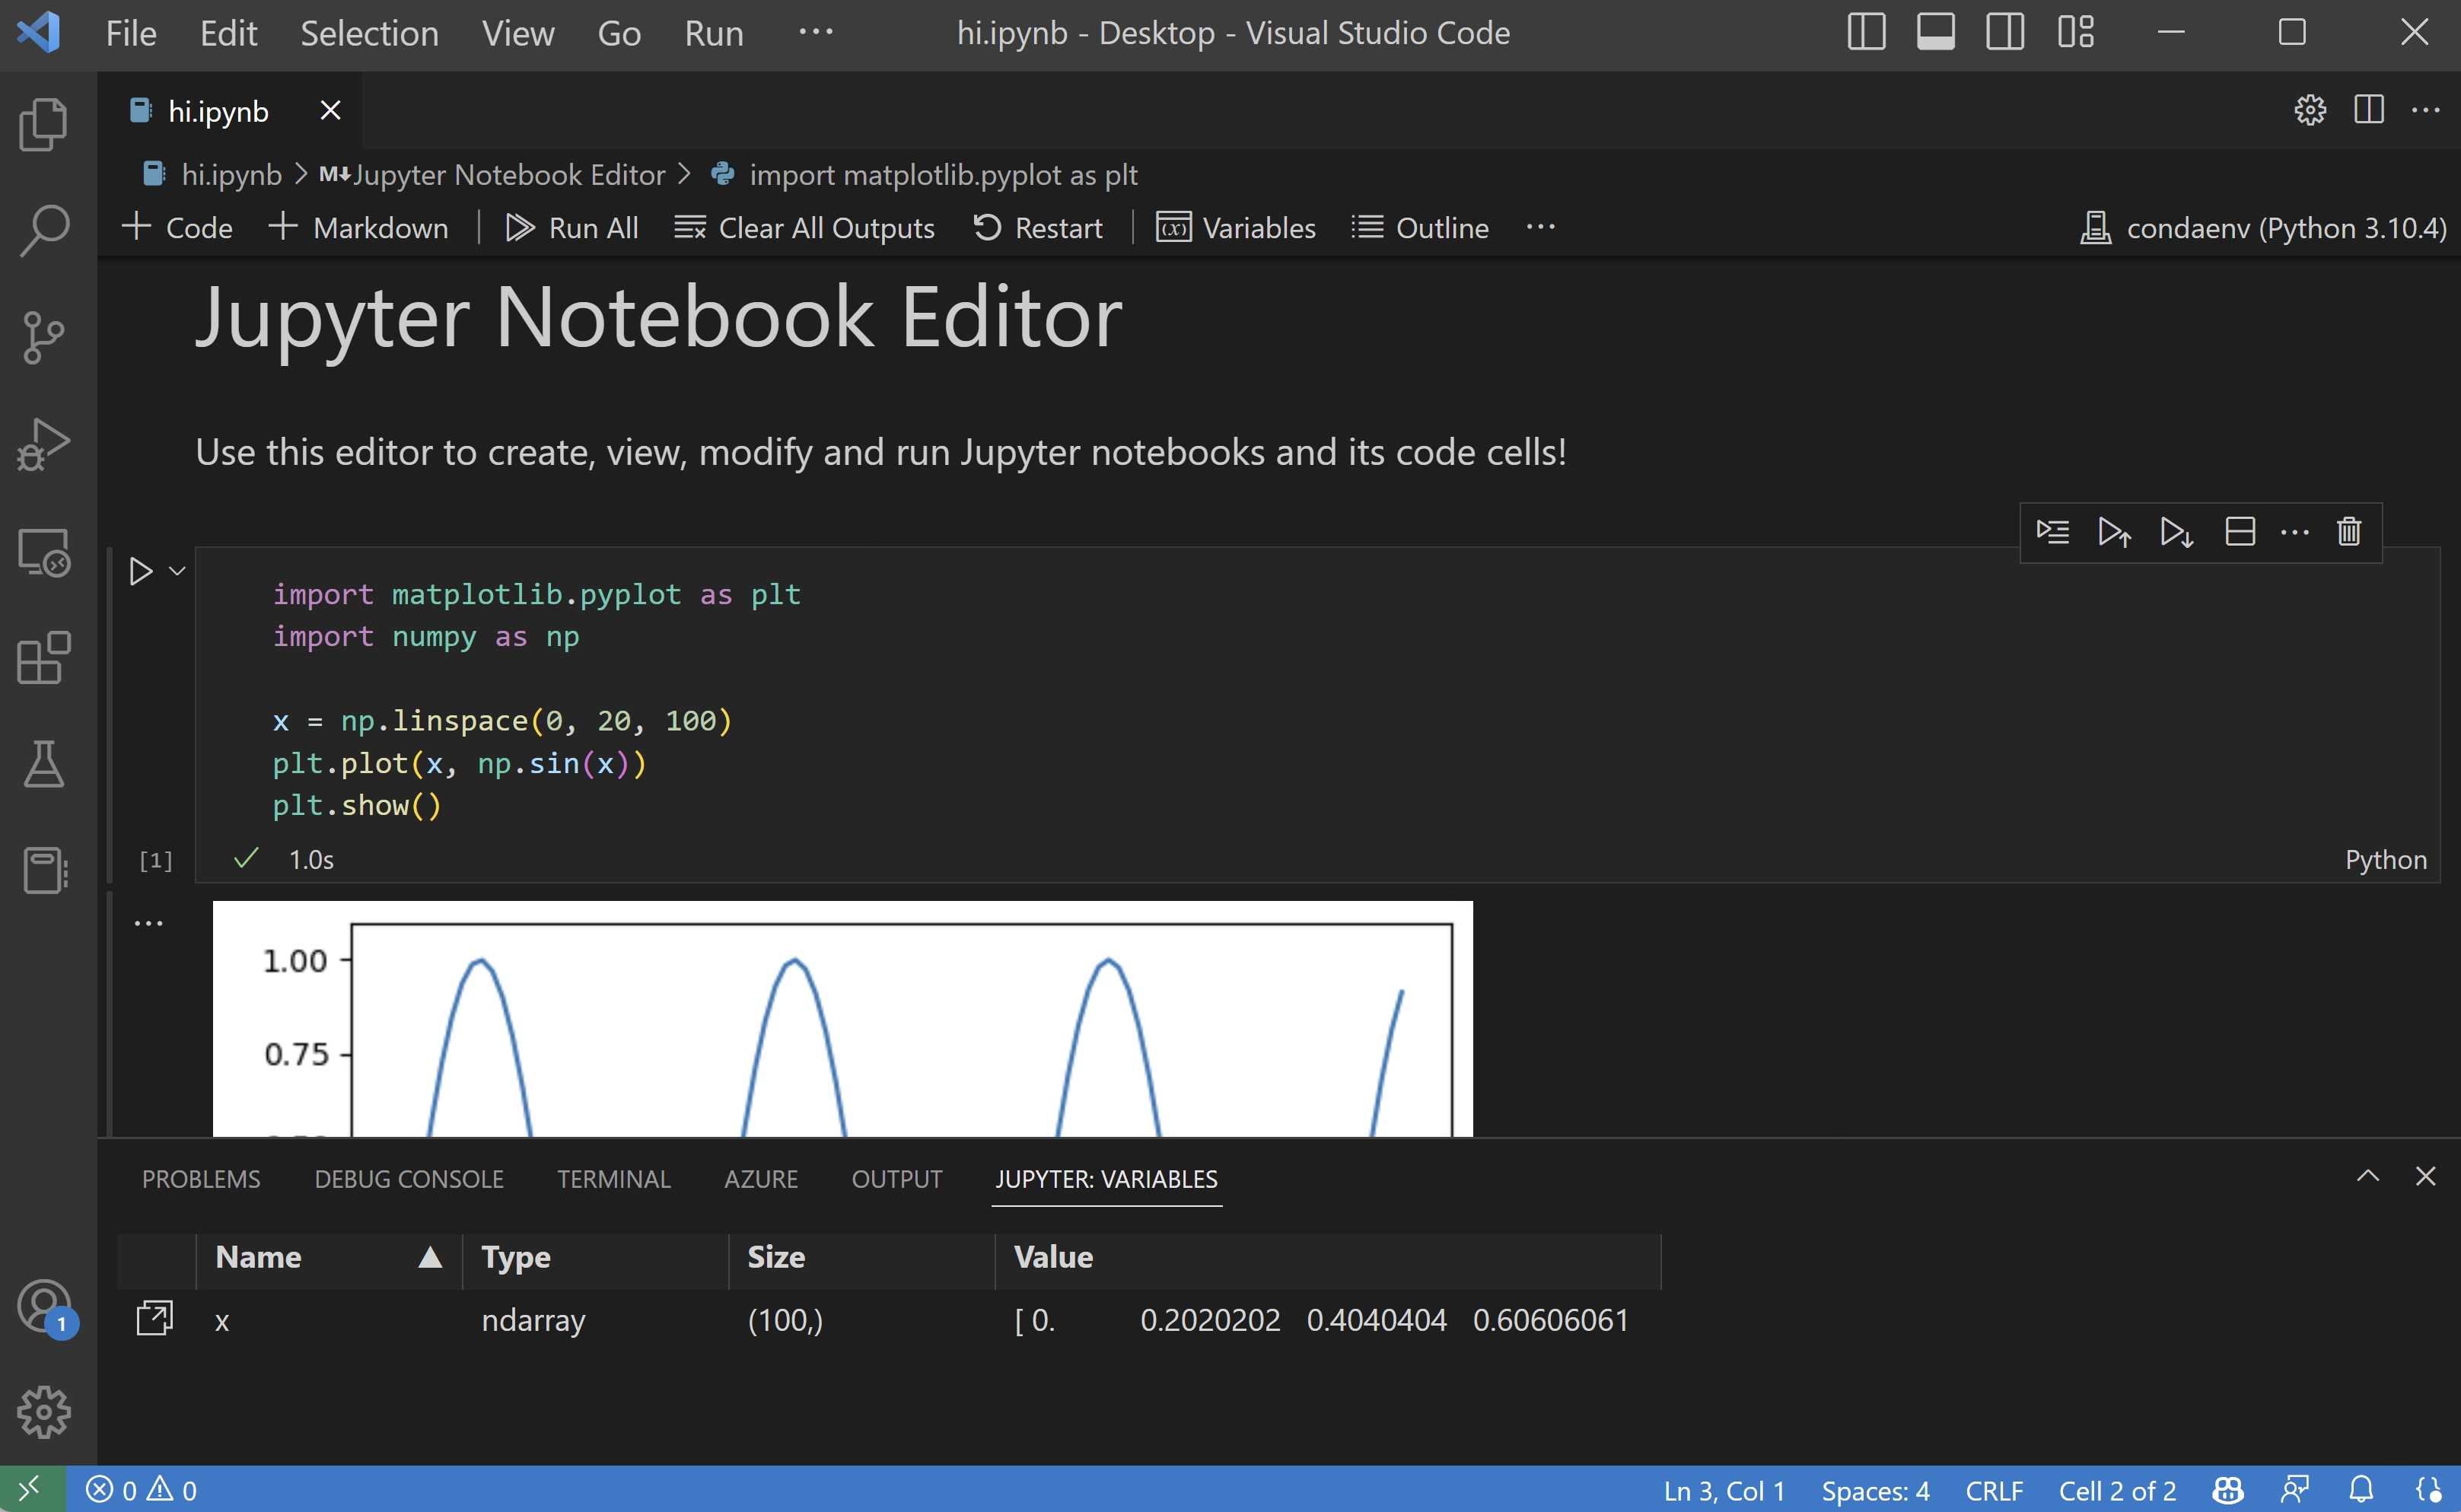
If you open a Jupyter notebook file ( .ipynb ) in VS Code, you can use the Jupyter Notebook Editor to directly view, modify, and run code cells.
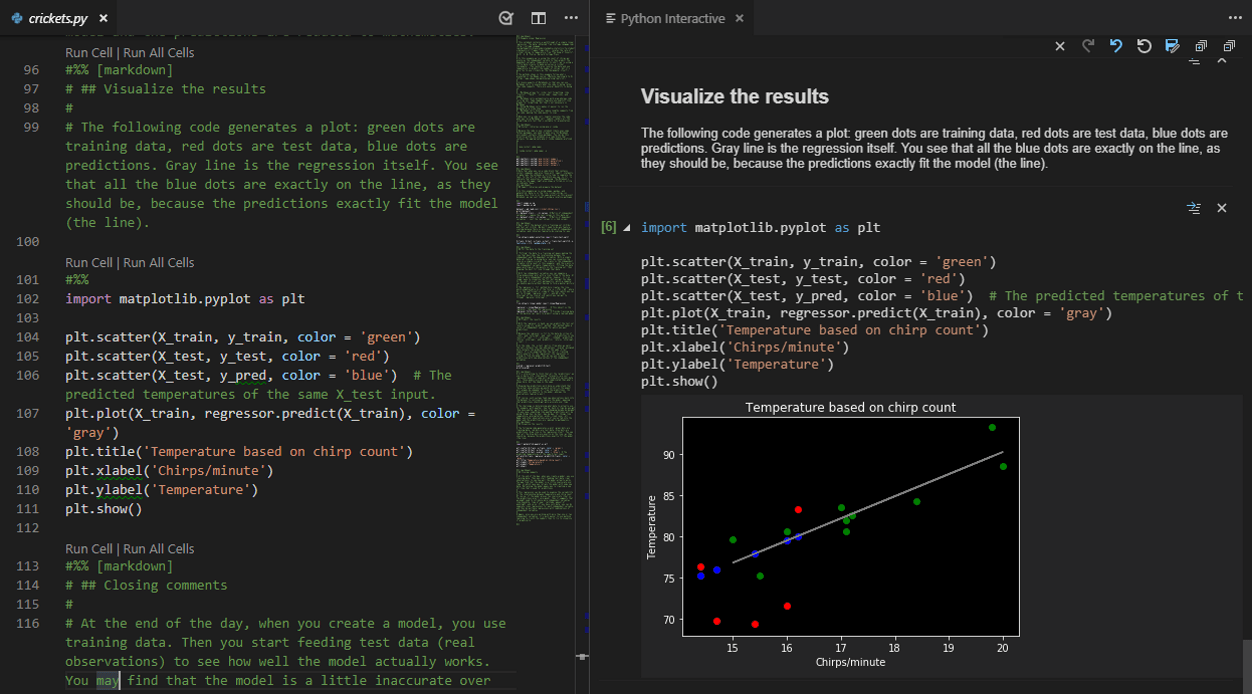
You can also convert and open the notebook as a Python code file. The notebook’s cells are delimited in the Python file with #%% comments, and the Python extension shows Run Cell or Run All Cells CodeLens. Selecting either CodeLens starts the Jupyter server and runs the cell(s) in the Python interactive window:
Opening a notebook as a Python file allows you to use all of VS Code’s debugging capabilities. You can then save the notebook file and open it again as a notebook in the Notebook Editor, Jupyter, or even upload it to a service like Azure Notebooks.
Using either method, Notebook Editor or a Python file, you can also connect to a remote Jupyter server for running the code. For more information, see Jupyter support.
Testing
The Python extension supports testing with unittest and pytest.
To run tests, you enable one of the frameworks in settings. Each framework also has specific settings, such as arguments that identify paths and patterns for test discovery.
Once discovered, VS Code provides a variety of commands (on the Status Bar, the Command Palette, and elsewhere) to run and debug tests, including the ability to run individual test files and individual methods.
Configuration
The Python extension provides a wide variety of settings for its various features. These are described on their relevant topics, such as Editing code, Linting, Debugging, and Testing. The complete list is found in the Settings reference.
Other popular Python extensions
The Microsoft Python extension provides all of the features described previously in this article. Additional Python language support can be added to VS Code by installing other popular Python extensions.
- Open the Extensions view ( ⇧⌘X (Windows, Linux Ctrl+Shift+X ) ).
- Filter the extension list by typing ‘python’.
The extensions shown above are dynamically queried. Click on an extension tile above to read the description and reviews to decide which extension is best for you. See more in the Marketplace.
Источник
Visual Studio Code on Linux
Installation
See the Download Visual Studio Code page for a complete list of available installation options.
By downloading and using Visual Studio Code, you agree to the license terms and privacy statement.
Debian and Ubuntu based distributions
The easiest way to install Visual Studio Code for Debian/Ubuntu based distributions is to download and install the .deb package (64-bit), either through the graphical software center if it’s available, or through the command line with:
Note that other binaries are also available on the VS Code download page.
Installing the .deb package will automatically install the apt repository and signing key to enable auto-updating using the system’s package manager. Alternatively, the repository and key can also be installed manually with the following script:
Then update the package cache and install the package using:
RHEL, Fedora, and CentOS based distributions
We currently ship the stable 64-bit VS Code in a yum repository, the following script will install the key and repository:
Then update the package cache and install the package using dnf (Fedora 22 and above):
Or on older versions using yum :
Due to the manual signing process and the system we use to publish, the yum repo may lag behind and not get the latest version of VS Code immediately.
Visual Studio Code is officially distributed as a Snap package in the Snap Store:

You can install it by running:
Once installed, the Snap daemon will take care of automatically updating VS Code in the background. You will get an in-product update notification whenever a new update is available.
Note: If snap isn’t available in your Linux distribution, please check the following Installing snapd guide, which can help you get that set up.
Learn more about snaps from the official Snap Documentation.
openSUSE and SLE-based distributions
The yum repository above also works for openSUSE and SLE-based systems, the following script will install the key and repository:
Then update the package cache and install the package using:
AUR package for Arch Linux
To get more information about the installation from the AUR, please consult the following wiki entry: Install AUR Packages.
Nix package for NixOS (or any Linux distribution using Nix package manager)
There is a community maintained VS Code Nix package in the nixpkgs repository. In order to install it using Nix, set allowUnfree option to true in your config.nix and execute:
Installing .rpm package manually
The VS Code .rpm package (64-bit) can also be manually downloaded and installed, however, auto-updating won’t work unless the repository above is installed. Once downloaded it can be installed using your package manager, for example with dnf :
Note that other binaries are also available on the VS Code download page.
Updates
VS Code ships monthly and you can see when a new release is available by checking the release notes. If the VS Code repository was installed correctly, then your system package manager should handle auto-updating in the same way as other packages on the system.
Note: Updates are automatic and run in the background for the Snap package.
Node.js
Node.js is a popular platform and runtime for easily building and running JavaScript applications. It also includes npm, a Package Manager for Node.js modules. You’ll see Node.js and npm mentioned frequently in our documentation and some optional VS Code tooling requires Node.js (for example, the VS Code extension generator).
If you’d like to install Node.js on Linux, see Installing Node.js via package manager to find the Node.js package and installation instructions tailored to your Linux distribution. You can also install and support multiple versions of Node.js by using the Node Version Manager.
To learn more about JavaScript and Node.js, see our Node.js tutorial, where you’ll learn about running and debugging Node.js applications with VS Code.
Setting VS Code as the default text editor
xdg-open
You can set the default text editor for text files ( text/plain ) that is used by xdg-open with the following command:
Debian alternatives system
Debian-based distributions allow setting a default editor using the Debian alternatives system, without concern for the MIME type. You can set this by running the following and selecting code:
If Visual Studio Code doesn’t show up as an alternative to editor , you need to register it:
Windows as a Linux developer machine
Another option for Linux development with VS Code is to use a Windows machine with the Windows Subsystem for Linux (WSL).
Windows Subsystem for Linux
With WSL, you can install and run Linux distributions on Windows. This enables you to develop and test your source code on Linux while still working locally on a Windows machine. WSL supports Linux distributions such as Ubuntu, Debian, SUSE, and Alpine available from the Microsoft Store.
When coupled with the Remote — WSL extension, you get full VS Code editing and debugging support while running in the context of a Linux distro on WSL.
See the Developing in WSL documentation to learn more or try the Working in WSL introductory tutorial.
Next steps
Once you have installed VS Code, these topics will help you learn more about it:
- Additional Components — Learn how to install Git, Node.js, TypeScript, and tools like Yeoman.
- User Interface — A quick orientation to VS Code.
- User/Workspace Settings — Learn how to configure VS Code to your preferences through settings.
Common questions
Azure VM Issues
I’m getting a «Running without the SUID sandbox» error?
You can safely ignore this error.
Debian and moving files to trash
If you see an error when deleting files from the VS Code Explorer on the Debian operating system, it might be because the trash implementation that VS Code is using is not there.
Run these commands to solve this issue:
Conflicts with VS Code packages from other repositories
Some distributions, for example Pop!_OS provide their own code package. To ensure the official VS Code repository is used, create a file named /etc/apt/preferences.d/code with the following content:
«Visual Studio Code is unable to watch for file changes in this large workspace» (error ENOSPC)
When you see this notification, it indicates that the VS Code file watcher is running out of handles because the workspace is large and contains many files. Before adjusting platform limits, make sure that potentially large folders, such as Python .venv , are added to the files.watcherExclude setting (more details below). The current limit can be viewed by running:
The limit can be increased to its maximum by editing /etc/sysctl.conf (except on Arch Linux, read below) and adding this line to the end of the file:
The new value can then be loaded in by running sudo sysctl -p .
While 524,288 is the maximum number of files that can be watched, if you’re in an environment that is particularly memory constrained, you may want to lower the number. Each file watch takes up 1080 bytes, so assuming that all 524,288 watches are consumed, that results in an upper bound of around 540 MiB.
Arch-based distros (including Manjaro) require you to change a different file; follow these steps instead.
Another option is to exclude specific workspace directories from the VS Code file watcher with the files.watcherExclude setting. The default for files.watcherExclude excludes node_modules and some folders under .git , but you can add other directories that you don’t want VS Code to track.
I can’t see Chinese characters in Ubuntu
We’re working on a fix. In the meantime, open the application menu, then choose File > Preferences > Settings. In the Text Editor > Font section, set «Font Family» to Droid Sans Mono, Droid Sans Fallback . If you’d rather edit the settings.json file directly, set editor.fontFamily as shown:
Package git is not installed
This error can appear during installation and is typically caused by the package manager’s lists being out of date. Try updating them and installing again:
The code bin command does not bring the window to the foreground on Ubuntu
Running code . on Ubuntu when VS Code is already open in the current directory will not bring VS Code into the foreground. This is a feature of the OS which can be disabled using ccsm .
Under General > General Options > Focus & Raise Behaviour, set «Focus Prevention Level» to «Off». Remember this is an OS-level setting that will apply to all applications, not just VS Code.
Cannot install .deb package due to «/etc/apt/sources.list.d/vscode.list: No such file or directory»
This can happen when sources.list.d doesn’t exist or you don’t have access to create the file. To fix this, try manually creating the folder and an empty vscode.list file:
Cannot move or resize the window while X forwarding a remote window
If you are using X forwarding to use VS Code remotely, you will need to use the native title bar to ensure you can properly manipulate the window. You can switch to using it by setting window.titleBarStyle to native .
Using the custom title bar
The custom title bar and menus were enabled by default on Linux for several months. The custom title bar has been a success on Windows, but the customer response on Linux suggests otherwise. Based on feedback, we have decided to make this setting opt-in on Linux and leave the native title bar as the default.
The custom title bar provides many benefits including great theming support and better accessibility through keyboard navigation and screen readers. Unfortunately, these benefits do not translate as well to the Linux platform. Linux has a variety of desktop environments and window managers that can make the VS Code theming look foreign to users. For users needing the accessibility improvements, we recommend enabling the custom title bar when running in accessibility mode using a screen reader. You can still manually set the title bar with the Window: Title Bar Style ( window.titleBarStyle ) setting.
Broken cursor in editor with display scaling enabled
Due to an upstream issue #14787 with Electron, the mouse cursor may render incorrectly with scaling enabled. If you notice that the usual text cursor is not being rendered inside the editor as you would expect, try falling back to the native menu bar by configuring the setting window.titleBarStyle to native .
Repository changed its origin value
If you receive an error similar to the following:
Use apt instead of apt-get and you will be prompted to accept the origin change:
Источник


