- Краткое руководство. Создание первого консольного приложения на Visual Basic в Visual Studio Quickstart: Create your first console app in Visual Studio with Visual Basic
- Создание проекта Create a project
- Создание приложения Create the application
- Добавление кода Add some code
- Выполнение приложения Run the application
- Дальнейшие действия Next steps
- Tutorial: Create a simple C# console app in Visual Studio
- Create a project
- Add a workload (optional)
- Option 1: Use the New Project dialog box
- Option 2: Use the Tools menu bar
- Create the app
- Explore integer math
- Add code to create a calculator
- Add functionality to the calculator
- Add decimals
- Debug the app
- Fix the «divide by zero» error
- Fix the «format» error
- Revise the code
- Close the app
- Code complete
Краткое руководство. Создание первого консольного приложения на Visual Basic в Visual Studio Quickstart: Create your first console app in Visual Studio with Visual Basic
В рамках этого краткого (на 5–10 минут) знакомства с возможностями интегрированной среды разработки Visual Studio (IDE) вы создадите простое приложение на Visual Basic, выполняющееся в консоли. In this 5-10 minute introduction to the Visual Studio integrated development environment (IDE), you’ll create a simple Visual Basic application that runs on the console.
Установите Visual Studio бесплатно со страницы скачиваемых материалов Visual Studio, если еще не сделали этого. If you haven’t already installed Visual Studio, go to the Visual Studio downloads page to install it for free.
Установите Visual Studio бесплатно со страницы скачиваемых материалов Visual Studio, если еще не сделали этого. If you haven’t already installed Visual Studio, go to the Visual Studio downloads page to install it for free.
Создание проекта Create a project
Сначала вы создадите проект приложения Visual Basic. First, you’ll create a Visual Basic application project. Для этого типа проекта уже имеются все нужные файлы шаблонов, что избавляет вас от лишней работы. The project type comes with all the template files you’ll need, before you’ve even added anything!
Откройте Visual Studio 2017. Open Visual Studio 2017.
В верхней строке меню последовательно выберите Файл > Создать > Проект. From the top menu bar, choose File > New > Project.
В левой области диалогового окна Новый проект разверните узел Visual Basic и выберите .NET Core. In the New Project dialog box in the left pane, expand Visual Basic, and then choose .NET Core. На средней панели выберите Консольное приложение (.NET Core) . In the middle pane, choose Console App (.NET Core). Назовите проект HelloWorld. Then name the project HelloWorld.

Если шаблон проекта Консольное приложение (.NET Core) отсутствует, выберите ссылку Открыть Visual Studio Installer в левой области диалогового окна Новый проект. If you don’t see the Console App (.NET Core) project template, click the Open Visual Studio Installer link in the left pane of the New Project dialog box.

Запускается Visual Studio Installer. The Visual Studio Installer launches. Выберите рабочую нагрузку Кроссплатформенная разработка .NET Core и затем элемент Изменить. Choose the .NET Core cross-platform development workload, and then choose Modify.

На некоторых снимках экрана в этом кратком руководстве используется темная тема. Some of the screenshots in this Quickstart use the dark theme. Если вы не используете темную тему, но хотите переключиться на нее, см. страницу Персонализация интегрированной среды разработки и редактора Visual Studio. If you aren’t using the dark theme but would like to, see the Personalize the Visual Studio IDE and Editor page to learn how.
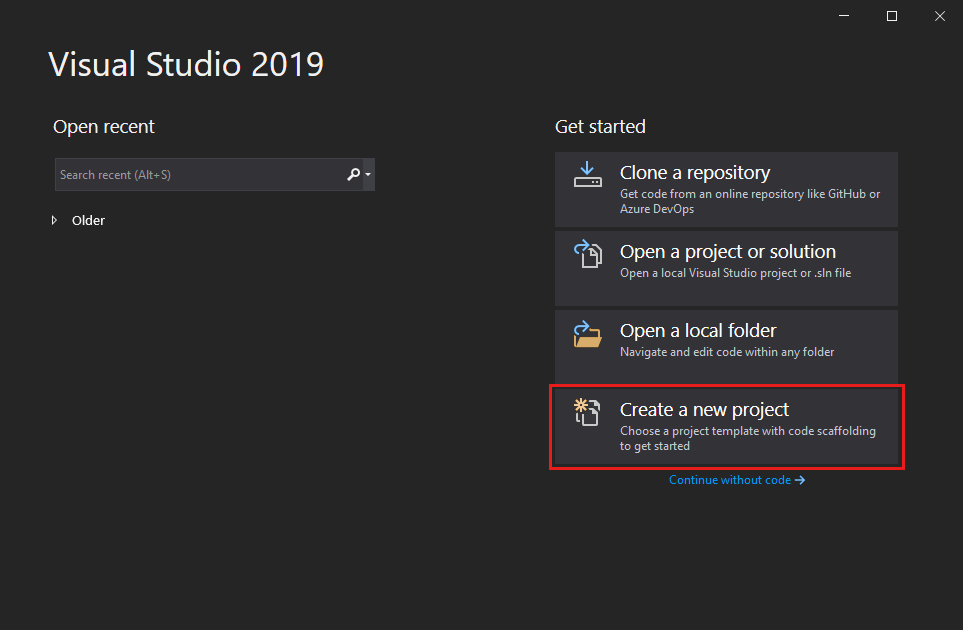
Запустите Visual Studio 2019. Open Visual Studio 2019.
На начальном экране выберите Создать проект. On the start window, choose Create a new project.

В окне Создание проекта выберите Visual Basic в списке языков. In the Create a new project window, choose Visual Basic from the Language list. Затем выберите Windows в списке платформ и Консоль в списке типов проектов. Next, choose Windows from the Platform list and Console from the project types list.
Применив фильтры по языку, платформе и типу проекта, выберите шаблон Консольное приложение и щелкните Далее. After you apply the language, platform, and project type filters, choose the Console Application template, and then choose Next.

Если шаблон Консольное приложение отсутствует, его можно установить в окне Создание проекта. If you do not see the Console Application template, you can install it from the Create a new project window. В сообщении Не нашли то, что искали? выберите ссылку Установка других средств и компонентов. In the Not finding what you’re looking for? message, choose the Install more tools and features link.

После этого в Visual Studio Installer выберите рабочую нагрузку Кроссплатформенная разработка .NET Core. Then, in the Visual Studio Installer, choose the .NET Core cross-platform development workload.

Затем нажмите кнопку Изменить в Visual Studio Installer. After that, choose the Modify button in the Visual Studio Installer. Вам может быть предложено сохранить результаты работы; в таком случае сделайте это. You might be prompted to save your work; if so, do so. Выберите Продолжить, чтобы установить рабочую нагрузку. Next, choose Continue to install the workload. После этого вернитесь к шагу 2 в процедуре Создание проекта. Then, return to step 2 in this «Create a project» procedure.
В поле Имя проекта окна Настроить новый проект введите WhatIsYourName. In the Configure your new project window, type or enter WhatIsYourName in the Project name box. Нажмите кнопку Далее. Then, choose Next.
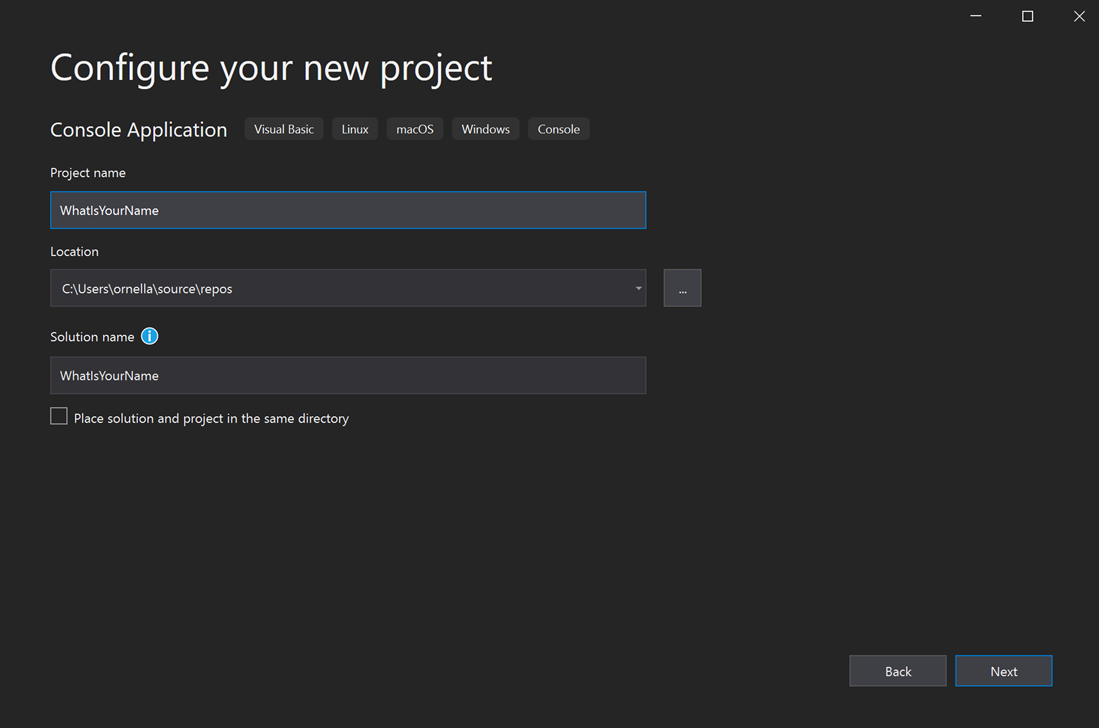
В окне Дополнительные сведения для целевой платформы должна быть указана версия .NET Core 3.1. In the Additional information window, .NET Core 3.1 should already be selected for your target framework. Если это не так, выберите .NET Core 3.1. If not, select .NET Core 3.1. Затем нажмите Создать. Then, choose Create.

Новый проект открывается в Visual Studio. Visual Studio opens your new project.
Создание приложения Create the application
Когда вы выберете шаблон проекта Visual Basic и зададите имя проекта, Visual Studio создает простое приложение «Hello World». After you select your Visual Basic project template and name your project, Visual Studio creates a simple «Hello World» application for you. Он вызывает метод WriteLine для отображения литеральной строки «Hello World!» It calls the WriteLine method to display the literal string «Hello World!» в окне консоли. in the console window.

Вы можете запустить программу в режиме отладки, нажав кнопку HelloWorld в интегрированной среде разработки. If you click the HelloWorld button in the IDE, you can run the program in Debug mode.
При этом окно консоли отображается на короткое время и затем сразу же закрывается. When you do this, the console window is visible for only a moment before it closes. Это происходит потому, что метод Main завершается после выполнения его единственного оператора, после чего завершается работа приложения. This happens because the Main method terminates after its single statement executes, and so the application ends.
Добавление кода Add some code
Давайте добавим код, чтобы приостановить выполнение приложения и запросить ввод данных пользователем. Let’s add some code to pause the application and then ask for user input.
Добавьте следующий код сразу после вызова метода WriteLine: Add the following code immediately after the call to the WriteLine method:
Это приостанавливает выполнение программы до нажатия клавиши. This pauses the program until you press a key.
В строке меню выберите Сборка > Собрать решение. On the menu bar, select Build > Build Solution.
При этом программа компилируется в промежуточный язык IL, который затем преобразуется в двоичный код JIT-компилятором. This compiles your program into an intermediate language (IL) that’s converted into binary code by a just-in-time (JIT) compiler.
Выполнение приложения Run the application
В панели инструментов нажмите кнопку HelloWorld. Click the HelloWorld button on the toolbar.
Для закрытия консольного окна нажмите любую клавишу. Press any key to close the console window.

Дальнейшие действия Next steps
Поздравляем с завершением этого краткого руководства! Congratulations on completing this Quickstart! Надеемся, что вы узнали нечто новое о Visual Basic и интегрированной среде разработки Visual Studio. We hope you learned a little bit about Visual Basic and the Visual Studio IDE. Для получения дополнительных сведений перейдите к следующему учебнику. To learn more, continue with the following tutorial.
Tutorial: Create a simple C# console app in Visual Studio
In this tutorial for C#, you’ll use Visual Studio to create and run a console app and explore some features of the Visual Studio integrated development environment (IDE) while you do so.
If you haven’t already installed Visual Studio, go to the Visual Studio downloads page to install it for free.
If you haven’t already installed Visual Studio, go to the Visual Studio downloads page to install it for free.
Create a project
To start, we’ll create a C# application project. The project type comes with all the template files you’ll need, before you’ve even added anything!
Open Visual Studio 2017.
From the top menu bar, choose File > New > Project. (Alternatively, press Ctrl+Shift+N).
In the left pane of the New Project dialog box, expand C#, and then choose .NET Core. In the middle pane, choose Console App (.NET Core). Then name the file Calculator.

Add a workload (optional)
If you don’t see the Console App (.NET Core) project template, you can get it by adding the .NET Core cross-platform development workload. Here’s how.
Option 1: Use the New Project dialog box
Choose the Open Visual Studio Installer link in the left pane of the New Project dialog box.

The Visual Studio Installer launches. Choose the .NET Core cross-platform development workload, and then choose Modify.

Option 2: Use the Tools menu bar
Cancel out of the New Project dialog box and from the top menu bar, choose Tools > Get Tools and Features.
The Visual Studio Installer launches. Choose the .NET Core cross-platform development workload, and then choose Modify.
Open Visual Studio 2019.
On the start window, choose Create a new project.
In the Create a new project window, choose C# from the Language list. Next, choose Windows from the Platform list and Console from the project types list.
After you apply the language, platform, and project type filters, choose the Console Application template, and then choose Next.

If you do not see the Console Application template, you can install it from the Create a new project window. In the Not finding what you’re looking for? message, choose the Install more tools and features link.

Then, in the Visual Studio Installer, choose the .NET Core cross-platform development workload.
After that, choose the Modify button in the Visual Studio Installer. You might be prompted to save your work; if so, do so. Next, choose Continue to install the workload. Then, return to step 2 in this «Create a project» procedure.
In the Configure your new project window, type or enter Calculator in the Project name box. Then, choose Next.

In the Additional information window, .NET Core 3.1 should already be selected for your target framework. If not, select .NET Core 3.1. Then, choose Create.

Visual Studio opens your new project, which includes default «Hello World» code.
Create the app
First, we’ll explore some basic integer math in C#. Then, we’ll add code to create a basic calculator. After that, we’ll debug the app to find and fix errors. And finally, we’ll refine the code to make it more efficient.
Explore integer math
Let’s start with some basic integer math in C#.
In the code editor, delete the default «Hello World» code.

Specifically, delete the line that says, Console.WriteLine(«Hello World!»); .
In its place, type the following code:
Notice that when you do so, the IntelliSense feature in Visual Studio offers you the option to autocomplete the entry.
The following animation isn’t intended to duplicate the preceding code. It’s intended only to show how the autocomplete feature works.

Choose the green Start button next to Calculator to build and run your program, or press F5.
A console window opens that reveals the sum of 42 + 119, which is 161.

(Optional) You can change the operator to change the result. For example, you can change the + operator in the int c = a + b; line of code to — for subtraction, * for multiplication, or / for division. Then, when you run the program, the result changes, too.
Close the console window.
Add code to create a calculator
Let’s continue by adding a more complex set of calculator code to your project.
Delete all the code you see in the code editor.
Enter or paste the following new code into the code editor:
Choose Calculator to run your program, or press F5.
A console window opens.
View your app in the console window, and then follow the prompts to add the numbers 42 and 119.
Your app should look similar to the following screenshot:

Add functionality to the calculator
Let’s tweak the code to add further functionality.
Add decimals
The calculator app currently accepts and returns whole numbers. But, it will be more precise if we add code that allows for decimals.
As in the following screenshot, if you run the app and divide number 42 by the number 119, your result is 0 (zero), which isn’t exact.

Let’s fix the code so that it handles decimals.
Press Ctrl + H to open the Find and Replace control.
Change each instance of the int variable to float .
Make sure that you toggle Match case (Alt+C) and Match whole word (Alt+W) in the Find and Replace control.

Run your calculator app again and divide the number 42 by the number 119.
Notice that the app now returns a decimal numeral instead of zero.

However, the app produces only a decimal result. Let’s make a few more tweaks to the code so that the app can calculate decimals too.
Use the Find and Replace control (Ctrl + H) to change each instance of the float variable to double , and to change each instance of the Convert.ToInt32 method to Convert.ToDouble .
Run your calculator app and divide the number 42.5 by the number 119.75.
Notice that the app now accepts decimal values and returns a longer decimal numeral as its result.

(We’ll fix the number of decimal places in the Revise the code section.)
Debug the app
We’ve improved on our basic calculator app, but it doesn’t yet have fail safes in place to handle exceptions, such as user input errors.
For example, if you try to divide a number by zero, or enter an alpha character when the app expects a numeric character (or vice versa), the app might stop working, return an error, or return an unexpected nonnumeric result.
Let’s walk through a few common user input errors, locate them in the debugger if they appear there, and fix them in the code.
For more information about the debugger and how it works, see the First look at the Visual Studio debugger page.
Fix the «divide by zero» error
When you try to divide a number by zero, the console app might freeze and then show you what’s wrong in the code editor.

Sometimes, the app doesn’t freeze and the debugger won’t show a divide-by-zero error. Instead, the app might return an unexpected nonnumeric result, such as an infinity symbol. The following code fix still applies.
Let’s change the code to handle this error.
Delete the code that appears directly between case «d»: and the comment that says // Wait for the user to respond before closing .
Replace it with the following code:
After you add the code, the section with the switch statement should look similar to the following screenshot:

Now, when you divide any number by zero, the app will ask for another number. Even better: It won’t stop asking until you provide a number other than zero.

Fix the «format» error
If you enter an alpha character when the app expects a numeric character (or vice versa), the console app freezes. Visual Studio then shows you what’s wrong in the code editor.

To fix this error, we must refactor the code that we’ve previously entered.
Revise the code
Rather than rely on the program class to handle all the code, we’ll divide our app into two classes: Calculator and Program .
The Calculator class will handle the bulk of the calculation work, and the Program class will handle the user interface and error-capturing work.
Let’s get started.
Delete everything in the Calculator namespace between its opening and closing braces:
Next, add a new Calculator class, as follows:
Then, add a new Program class, as follows:
Choose Calculator to run your program, or press F5.
Follow the prompts and divide the number 42 by the number 119. Your app should look similar to the following screenshot:

Notice that you have the option to enter more equations until you choose to close the console app. And, we’ve also reduced the number of decimal places in the result.
Close the app
If you haven’t already done so, close the calculator app.
Close the Output pane in Visual Studio.

In Visual Studio, press Ctrl+S to save your app.
Close Visual Studio.
Code complete
During this tutorial, we’ve made a lot of changes to the calculator app. The app now handles computing resources more efficiently, and it handles most user input errors.
Here’s the complete code, all in one place:


