- Zone PC
- Настройка vlan в linux
- Настройка VLAN Debian, Ubuntu
- Настройка VLAN в CentOS, Red Hat
- Настройка VLAN в Gentoo
- Проверка настроек
- How to configure a VLAN in Linux
- More Linux resources
- Simple example
- Complex example
- Wrapping up
- Настройка VLAN интерфейса в Linux CentOS/Fedora/RHEL
- Создаем VLAN через subinterface
- Настройка VLAN через отдельный файл vlanXX
- Используем NetworkManager для настройки VLAN интерфейса
- Настройка временного VLAN с помощью утилиты vconfig
- Red Hat Customer Portal
- Log in to Your Red Hat Account
- Red Hat Account
- Customer Portal
- Select Your Language
- Red Hat Training
- Chapter 10. Configuring VLAN tagging
- 10.1. Configuring VLAN tagging using nmcli commands
- 10.2. Configuring VLAN tagging using nm-connection-editor
- 10.3. Configuring VLAN tagging using nmstatectl
- 10.4. Configuring VLAN tagging using System Roles
Zone PC

Настройка vlan в linux
В больших компьютерных сетях обычно используется несколько изолированных подсетей. Для маршрутизации между сетями можно использовать дорогие маршрутизаторы третьего уровня (L3) или обойтись компьютером с несколькими сетевыми картами. Но гораздо удобней и выгоднее взять управляемый свитч второго уровня (L2) с поддержкой VLAN, настроить на нём транковый порт (trunk port) и воткнуть в одну сетевую карту на компьютере. Это позволяет маршрутизировать трафик между несколькими VLAN (сетями) или обеспечить присутствие сервера в нескольких VLAN (сетях) одновременно.
И так нам необходим настроенный свитч с транковым портом и поддержка 802.1Q на уровне ядра Linux. Рассмотрим как это делается в разных дистрибутивах.
Настройка VLAN Debian, Ubuntu
Для начала нужно установить пакет с утилитами для поддержки vlan
Настройки новых VLAN интерфейсов необходимо добавить в файл /etc/network/interfaces
Например:
Или можно использовать другое именование интерфейсов вида eth0.100, а не vlan100:
Параметр vlan_raw_device указывает, на каком сетевом интерфейсе должны создаваться новый интерфейс vlan100.
Настройка VLAN в CentOS, Red Hat
Для каждого VLAN нужно создавать отдельный файл. В зависимости от системы наименования интерфейсов, есть два варианта.
Первый вариант файл /etc/sysconfig/network-scripts/ifcfg-eth0.100
И второй вариант файл /etc/sysconfig/network-scripts/ifcfg-vlan100
При этом переменные VLAN_NAME_TYPE и PHYSDEV задаются только во втором варианте для интерфейсов вида vlan100, а при использовании имени вида eth0.100 их значения вычисляются автоматически из имени интерфейса.
Настройка VLAN в Gentoo
Ниже кусок файла /etc/conf.d/net, отвечающий за настройку VLAN. В данном случае настраивается 2 vlan-интерфейса на интерфейсе eth0, создание и удаление данных интерфейсах происходит в скрипте /etc/init.d/net.eth0
Проверка настроек
После того как прописали новые настройки нужно перезапустить сетевые настройки локально это делается так:
Но если вы сидите удаленно то лучше просто поднять новые интерфейсы командой:
Проверить поднялся ли VLAN можно командой:
Вывод должен выглядеть так:
Дальше можно работать с новым интерфейсом как с обычным сетевым интерфейсом. Кроме того к VLAN интерфейсам также можно делать алиасы ip адресов которые были в статье, имена у таких интерфейсов удобно использовать в таком виде vlan100:0, vlan100:1.
Источник
How to configure a VLAN in Linux

All but the smallest networks are typically split into Virtual Local Area Networks (VLANs, for short), and I discussed VLAN basics a the previous article. Understanding how to properly configure and troubleshoot VLANs can save you hours of back-and-forth with your network team. In this article, cover VLAN configuration in Red Hat Enterprise Linux (RHEL) systems. By the end of this article, you should be pretty comfortable configuring VLANs on RHEL.
More Linux resources
With the background knowledge out of the way, It’s time to get your hands dirty with configuration. I’ll start with the most basic VLAN configuration: no VLAN.
Simple example
One of the most common topologies that you will encounter as a sysadmin is a host connected to a switch’s access port. VLAN configuration is handled on the switch, and you configure the interface without any regard for the underlying network topology.
In the simple topology without VLANs that I discussed previously, your hosts are on the same VLAN and IP subnet. The interface configuration is a simple, static IP address:

The above configuration is probably familiar to most who have administered a Linux server. There isn’t any VLAN configuration on the host, but the switch is likely configured to place the host on a particular VLAN.
Complex example
Next, take a look at a more complex topology. In the topology below, you can see a host (A KVM hypervisor, for example) connected to a switch’s trunk port with three VLANs involved. The first is VLAN 100, which is carried untagged across the port because it’s the native VLAN. The second and third VLAN (200 and 300) are carried across the trunk with an 802.1Q tag. Therefore, you need to configure your host to recognize that VLANs are involved here:

First, ensure that the 802.1Q kernel module is loaded. In practice, this module is automatically loaded if you configure a VLAN subinterface. However, I’ll manually enable it for the sake of demonstration:
Like most network configurations, you set up VLANs in the appropriate /etc/sysconfig/network-scripts interface configuration file. This network configuration looks like any other interface with a few important distinctions. First, specify the interface name in the form of parentInterface.vlanID . This practice associates the VLAN with the appropriate parent interface. Second, use the VLAN=yes directive to configure this subinterface as a VLAN.
You already saw the configuration necessary for the untagged (native) VLAN: It’s the same configuration that used above for eth0. The output below shows the configuration that is needed for VLANs 200 and 300:
Once your VLANs have been configured, perform a quick restart of the network service to bring up the interfaces. You should then be able to see your new VLAN interfaces:
The output above clearly shows that you have two new interfaces: eth0.200 and eth0.300. These interfaces correspond to the VLANs that you configured, and any packets sent out of these interfaces will be tagged with the appropriate VLAN ID on the trunk.
Recall that trunks add an 802.1Q field to the Ethernet header to provide the upstream device with the appropriate VLAN ID. Now that you have some VLANs configured, you can see the 802.1Q field in a packet capture, as shown below. Notice that the VLAN ID of 200 corresponds to your configured VLAN subinterface:

Wrapping up
That’s really all there is to configuring VLANs in Red Hat Enterprise Linux, at least on the server side. Your network team also needs to create the VLANs on the upstream switch and ensure that the port is correctly configured for trunking. If you need more VLANs (and you probably will), then you can create additional interface files.
[Want to try out Red Hat Enterprise Linux? Download it now for free.]
Источник
Настройка VLAN интерфейса в Linux CentOS/Fedora/RHEL
В этой статье мы покажем, как настроить тегированный интерфейс VLAN (виртуальной локальной сети) встроенными программными средствами Linux в операционных системах CentOS/Fedora/RedHat. Рассмотим настройку через subinterface, отдельный файл vlanX, а также с помощью инстументов NetworkManager и vconfig.
В операционных системах CentOS/Fedora/RedHat, есть два варианта настройки VLAN:
- Использование subinterface (например eth12.7);
- Использование отдельного файла vlanXX(vlan7).
- Сегментирование сети (разделение устройств на изолированные группы);
- Уменьшение количества сетевого оборудования;
- Снижение нагрузки на сеть для уменьшения широковещательного трафика;
- Улучшение безопасности и управляемости сети.
Создаем VLAN через subinterface
Для настройки тегированного интерфейса, на сервере должен быть загружен модуль ядра Linux — 8021q. Для загрузки модуля, выполните:
Если модуль уже загрузен, появится ошибка: modprobe: ERROR: could not insert ‘8021q’: Module already in kernel .
Проверим, загрузился ли модуль:
# lsmod | grep 8021q
Все ок, модуль 8021q имеется.
Так же нужно добавить данный модуль в автозагрузку при рестарте системы:
# echo 8021q >> /etc/modules-load.d/8021q.conf
Создадим VLAN c ID 7 для сетевого интерфейса eth0. Добавляем конфигурационный файл ifcfg-eth0.7 (7 после точки это назначаемый номер VLAN). В этом файле содержится описание подинтерфейса VLAN.
И вписываем следующее содержимое:
Данный файл конфигурации связывает виртуальный интерфейс eth0.7 с физическим интерфейсом eth0. После создания файла конфигурации, нужно перезапустить сервис network:
# systemctl restart network

Проверим сетевые настройки:
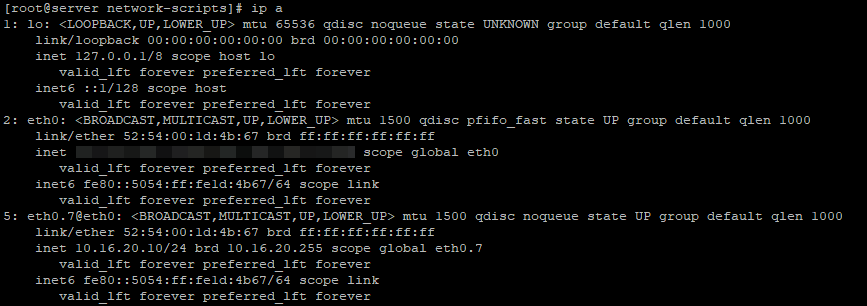
Как видим, сабинтерфейс с нужным нам VLAN7 добавлен.
Статистику интерфейса можно получить так (с помощью счетчиков пакетов можно убедиться, что VLAN интерфейс получает маркированный трафик) :
Чтобы выполнить ping с определенного интерфейса VLAN, используйте формат команды:
# ping -I eth0.7 192.168.1.22
Настройка VLAN через отдельный файл vlanXX
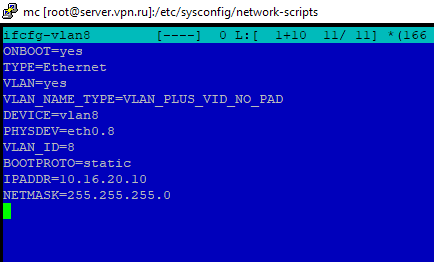
Теперь попробуем создать VLAN с ID 8 через отдельный файл конфигурации:
Добавим в него следующие строки:
Обратите внимание, что файл конфигурации немного отличается от предыдущего. В данной настройке, нужно указывать строку «PHYSDEV», которая направляет конфигурационный файл на физический сетевой интерфейс.
После всех настроек, так же требуется перезагрузка сервиса network:
# systemctl restart network
Нужный сетевой интерфейс с VLAN8 так же доступен.
Используем NetworkManager для настройки VLAN интерфейса
Начиная с 8 версии CentOS/RedHat по умолчанию сетью на сервере управляет NetworkManager. Ранее это инструмент так же был доступен, но большинство аминистраторов использовали привычный network.
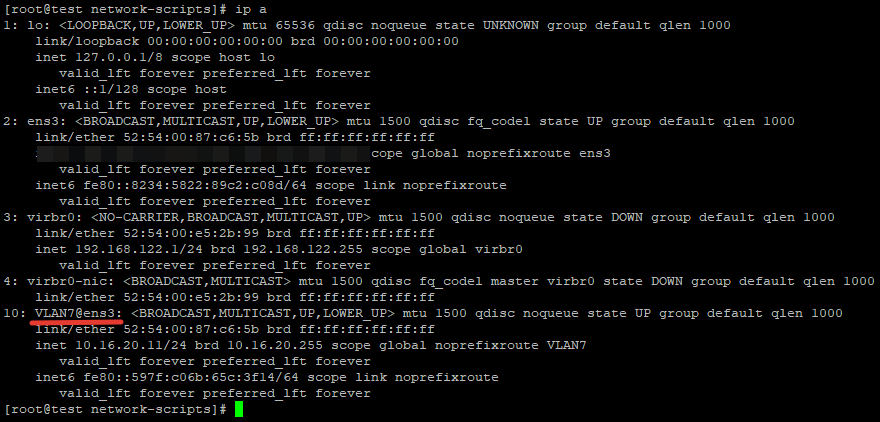
Рассмотрим вариант настройки VLAN через NM. Создадим виртуальный интерфейс ens3.7 для VLAN 7 на физическом интерфейсе ens3 и зададим IP:
# nmcli con add type vlan con-name ens3.7 ifname VLAN7 id 7 dev ens3 ip4 15.12.10.11/24 gw4 15.12.10.254
Чтобы проверить сетевые интерфейсы на сервере, используйте команду:
После настройки, выполните перезагрузку NetworkManager:
# systemctl restart NetworkManager
После перезапуска сервиса NM, интерфейс не пропал.
 Вывести текущие настройки созданного VLAN интерфейса можно так:
# nmcli connection show ens3.7
Настройка временного VLAN с помощью утилиты vconfig
Для тестовых настроек лучше использовать утилиту vconfig. Ее особенность — после перезагрузки сервера все настройки сети возвращаются к исходному состоянию. Vconfig очень полезная утилита на этапах тестирования или обучения, так как если вы потеряете доступ к серверу из-за неправильных сетевых настроек, можно вернуться к начальной конфигурации простой перезагрузкой. Данная утилита доступна в репозитории EPEL, установим ее:
# yum install epel-release-y && yum install vconfig
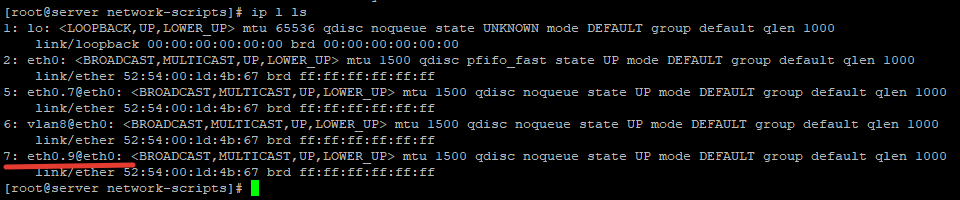
Создадим интерфейс с VLAN9:
# vconfig add eth0 9
# ifconfig eth0.9 10.18.0.15 netmask 255.255.255.0 up
Временный интерфейс c VLAN был создан.
Не забывайте, что кроме настройки VLAN на сервере для обеспечения сетевой связанности, вам нужно настроить соответствующие VLAN на сетевом оборудовании.
Источник
Red Hat Customer Portal
Log in to Your Red Hat Account
Your Red Hat account gives you access to your profile, preferences, and services, depending on your status.
If you are a new customer, register now for access to product evaluations and purchasing capabilities.
Need access to an account?
If your company has an existing Red Hat account, your organization administrator can grant you access.
Red Hat Account
Customer Portal
For your security, if you’re on a public computer and have finished using your Red Hat services, please be sure to log out.
Select Your Language
Red Hat Training
A Red Hat training course is available for RHEL 8
Chapter 10. Configuring VLAN tagging
This section describes how to configure Virtual Local Area Network (VLAN). A VLAN is a logical network within a physical network. The VLAN interface tags packets with the VLAN ID as they pass through the interface, and removes tags of returning packets.
You create a VLAN interface on top of another interface, such as an Ethernet, bond, team, or bridge device. This interface is called the parent interface .
10.1. Configuring VLAN tagging using nmcli commands
This section describes how to configure Virtual Local Area Network (VLAN) tagging using the nmcli utility.
Prerequisites
- The interface you plan to use as a parent to the virtual VLAN interface supports VLAN tags.
If you configure the VLAN on top of a bond interface:
- The ports of the bond are up.
- The bond is not configured with the fail_over_mac=follow option. A VLAN virtual device cannot change its MAC address to match the parent’s new MAC address. In such a case, the traffic would still be sent with the then incorrect source MAC address.
- The bond is usually not expected to get IP addresses via DHCP or IPv6 autoconfiguration. Ensure it by setting ipv4.method=disable and ipv6.method=ignore options while creating a bond; otherwise if DHCP/IPv6-autoconf fails after some time, the interface might be brought down.
Procedure
Display the network interfaces:
Create the VLAN interface. For example, to create a VLAN interface named vlan10 that uses enp1s0 as its parent interface and that tags packets with VLAN ID 10 , enter:
Note that the VLAN must be within the range from 0 to 4094 .
By default, the VLAN connection inherits the maximum transmission unit (MTU) from the parent interface. Optionally, set a different MTU value:
Configure the IP settings of the VLAN device. Skip this step if you want to use this VLAN device as a port of other devices.
Configure the IPv4 settings. For example, to set a static IPv4 address, network mask, default gateway, and DNS server to the vlan10 connection, enter:
Configure the IPv6 settings. For example, to set a static IPv6 address, network mask, default gateway, and DNS server to the vlan10 connection, enter:
Activate the connection:
Verification steps
Verify the settings:
Additional resources
- ref:testing-basic-network-settings_configuring-and-managing-networking[Testing basic network settings].
- Configuring NetworkManager to avoid using a specific profile to provide a default gateway.
- nmcli-examples(7) man page
- The vlan setting section in the nm-settings(5) man page
10.2. Configuring VLAN tagging using nm-connection-editor
This section describes how to configure Virtual Local Area Network (VLAN) tagging using the nm-connection-editor application.
Prerequisites
- The interface you plan to use as a parent to the virtual VLAN interface supports VLAN tags.
If you configure the VLAN on top of a bond interface:
- The ports of the bond are up.
- The bond is not configured with the fail_over_mac=follow option. A VLAN virtual device cannot change its MAC address to match the parent’s new MAC address. In such a case, the traffic would still be sent with the then incorrect source MAC address.
Procedure
Open a terminal, and enter nm-connection-editor :
On the VLAN tab:
- Select the parent interface.
- Select the VLAN id. Note that the VLAN must be within the range from 0 to 4094 .
- By default, the VLAN connection inherits the maximum transmission unit (MTU) from the parent interface. Optionally, set a different MTU value.
Optionally, set the name of the VLAN interface and further VLAN-specific options.

Configure the IP settings of the VLAN device. Skip this step if you want to use this VLAN device as a port of other devices.
- On the IPv4 Settings tab, configure the IPv4 settings. For example, set a static IPv4 address, network mask, default gateway, and DNS server:

- On the IPv6 Settings tab, configure the IPv6 settings. For example, set a static IPv6 address, network mask, default gateway, and DNS server:


Verification steps
Verify the settings:
Additional resources
10.3. Configuring VLAN tagging using nmstatectl
This section describes how to use the nmstatectl utility to configure a VLAN with ID 10 that uses an Ethernet connection. As the parent device, the VLAN connection contains the IP, default gateway, and DNS configurations.
Depending on your environment, adjust the YAML file accordingly. For example, to use a bridge, or bond device in the VLAN, adapt the base-iface attribute and type attributes of the ports you use in the VLAN.
Prerequisites
- To use Ethernet devices as ports in the VLAN, the physical or virtual Ethernet devices must be installed on the server.
- The nmstate package is installed.
Procedure
Create a YAML file, for example
/create-vlan.yml , with the following contents:
Apply the settings to the system:
Verification steps
Display the status of the devices and connections:
Display all settings of the connection profile:
Display the connection settings in YAML format:
Additional resources
- nmstatectl(8) man page
- /usr/share/doc/nmstate/examples/
10.4. Configuring VLAN tagging using System Roles
You can use the networking RHEL System Role to configure VLAN tagging. This procedure describes how to add an Ethernet connection and a VLAN with ID 10 that uses this Ethernet connection. As the parent device, the VLAN connection contains the IP, default gateway, and DNS configurations.
Depending on your environment, adjust the play accordingly. For example:
- To use the VLAN as a port in other connections, such as a bond, omit the ip attribute, and set the IP configuration in the parent configuration.
- To use team, bridge, or bond devices in the VLAN, adapt the interface_name and type attributes of the ports you use in the VLAN.
Prerequisites
- The ansible and rhel-system-roles packages are installed on the control node.
- If you use a different remote user than root when you run the playbook, this user has appropriate sudo permissions on the managed node.
Procedure
If the host on which you want to execute the instructions in the playbook is not yet inventoried, add the IP or name of this host to the /etc/ansible/hosts Ansible inventory file:
/vlan-ethernet.yml playbook with the following content:
The parent attribute in the VLAN profile configures the VLAN to operate on top of the enp1s0 device.
Run the playbook:
To connect as root user to the managed host, enter:
To connect as a user to the managed host, enter:
The —ask-become-pass option makes sure that the ansible-playbook command prompts for the sudo password of the user defined in the -u user_name option.
If you do not specify the -u user_name option, ansible-playbook connects to the managed host as the user that is currently logged in to the control node.
Источник


