- Unick-soft
- Категории
- Использование командной строки VLC
- Как получить справку о командах консоли VLC?
- Получение обычной справки
- Получение справки по VLC и модулям
- Получение полной справки, также справки по модулям
- Как получить информацию отладки в VLC?
- Как запустить VLC в полноэкранном режиме?
- Как запустить VLC с возможностью удалённого управления?
- Управление VLC через веб-браузер
- Управление VLC через RC
- Где log файл VLC?
- Как запустить vlc с определенного интерфейса?
- Параметры командной строки в VLC Media Player
- Запуск и справка
- Пример использования
- Documentation:Command line
- Contents
- Use the command line
- Getting help
- Opening streams
- Opening a file
- Opening a DVD or VCD, or an audio CD
- Receiving a network stream
- Modules selection
- Stream Output
- Other Options
- Audio options
- Video options
- Desktop/Screen grab options
- Playlist options
- Network options
- CPU options
- Miscellaneous options
- Item-specific options
- Filters
- Deinterlacing video filter
- Invert video filter
- Image properties filter
- Wall video filter
- Video transformation filter
- Distort video filter
- Clone video filter
- Crop video filter
- Motion blur filter
- Video pictures blending
- Video scaling filter
- Subpictures Filters
- Marquee display sub filter
- Logo video filter
Unick-soft
Категории
- В статье описана реализация метода отражения Фонга и анизотропной модели Варда с использованием OpenGL 3. Также приводится пример использования карты с коэфициентами для анизотропной модели. читать.
- В статье описан метод создания статической библиотеки lib по dll. Вам не нужны исходники dll файла для создания lib-ы. читать.
- В статье описан метод удалённого управления VLC плеером и использования RC интерфейса. Также приведён пример кода на C#. читать.
Использование командной строки VLC
Как получить справку о командах консоли VLC?
Для получения доступных команд есть несколько команд консоли, рассмотрим их ниже
Получение обычной справки
В результате будет создан файл: vlc-help.txt
Получение справки по VLC и модулям
В результате будет создан файл: vlc-help.txt
Получение полной справки, также справки по модулям
В результате будет создан файл: vlc-help.txt
Протестировано на версии VLC 1.0.0
Как получить информацию отладки в VLC?
Информация отладки выводит много дополнительной информации, в том числе ошибки, дополнительную информация о файлах. Это очень удобно для выявления причин, вызывающих ошибку.
Для получения отладочной информации необходимо набрать команду:
Стоит отметить, что в данном случае VLC запустится и также запустится окно консоли с информацией об отладке, но вся отладочная информация будет дублироваться в файл vlc-log.txt. Файл vlc-log.txt должен быть в кодировке UTF8. Также поддерживается разный уровень детальности:
- —verbose=2 — значит, что будет выводиться вся информация отладки.
- —verbose=1 — значит, что будут выводиться предупреждения и ошибки.
- —verbose=0 — значит, что будут выводиться только ошибки.
Протестировано на версии VLC 1.0.0
Как запустить VLC в полноэкранном режиме?
Для запуска в полноэкранном режиме необходимо набрать команду:
Протестировано на версии VLC 1.0.0
Как запустить VLC с возможностью удалённого управления?
Удалённое управление позволяет делать несколько интерфейсов управления.
Управление VLC через веб-браузер
Для запуска VLC плеера необходимо набрать команду:
После запуска необходимо открыть в браузере страницу:
Через эту страницу можно управлять работой плеера.
Управление VLC через RC
Данное управление очень удобно для создания программы, которая будет управлять VLC плеером, так как управление осуществляется отправкой простых команд. Для запуска плеера необходимо набрать команду:
Для управления необходима программа, которая может передавать бинарные команды. Для этого подойдёт команда putty. Запускаем программу и выбираем протокол RAW, IP адрес 127.0.0.1 и порт 4444. Стоит отметить, что если установлен русский язык, то на вкладке Windows->Translation необходимо установить UTF-8.
После жмём Open.
Если сообщений об ошибке не было, то можете набирать команду help и нажимать Enter, тогда вы увидите справку о доступных командах. Команд там много. Например, чтобы заставить ролик играть, необходимо набрать команду
Протестировано на версии VLC 1.0.0
Где log файл VLC?
Обычно лог файл VLC расположен там, где находится сам исполняемый файл, то есть в C:\Program Files\VideoLAN\VLC\. Если там файла нет, то он может быть в директории, в которой находится файл, который вы запускали.
Протестировано на версии VLC 1.0.0
Как запустить vlc с определенного интерфейса?
VLC включает в себя много различных интерфейсов, как стандартных, так и специфических. Например, управление им через браузер или управление удалённо. Также возможен запуск сразу с несколькими интерфейсами. Для того, чтобы запустить VLC с определённым интерфейсом, необходимо набрать в командной строке команду:
В данном случае dummy — название интерфейса, вместо ИМЯ_ФАЙЛА следует написать файл, который вы хотите запустить, в принципе его можно и не указывать. Кроме него там могут быть и другие названия, которые приведены ниже:
- dummy — интерфейс без ничего, то есть полное отсутствие всех элементов управления.
- http — интерфейс управления через веб-браузер.
- telnet — управление через Telnet.
- skins2 — графические скины. Для запуска с определённым скином необходимо выполнять следующую команду:
- blackpearl.vlt — название файла скина, который расположен в папке skins.
logger — интерфейс лога, подробнее читайте в разделе [[#debuginf | получение информации об отладке в VLC.
- qt4 — стандартный интерфейс под Windows.
- rc — интерфейс удалённого управления.
- ntservice — запуск как служба, может и не сработать. Возможно необходимы дополнительные параметры.
- lua — для запуска необходимо задать дополнительные параметры.
- gestures — управление мышью.
Также вместо -I можно использовать —extraintf, при этом интерфейс будет не основным, а добавочным. Команда может выглядит так:
Параметры командной строки в VLC Media Player

Далеко не все функциональные возможности медиакомбайна VLC Media Player доступны при использовании графического интерфейса программы. Для многих пользователей плеера весьма полезным может оказаться знание команд, расширяющих перечень возможных действий с медиафайлами и сетевыми мультимедиапотоками. О параметрах командной строки VLC и не совсем стандартных способах взаимодействия с проигрывателем пойдет речь в статье.
Запуск и справка
Для того чтобы осуществлять взаимодействие с функциями плеера путем ввода указаний консоль, необходимо осуществить вызов этого программного модуля.
Запуск средства производится пошаговым входом в:
- Меню «Вид»;
- Пункт «Добавить интерфейс»;
- «Консоль».
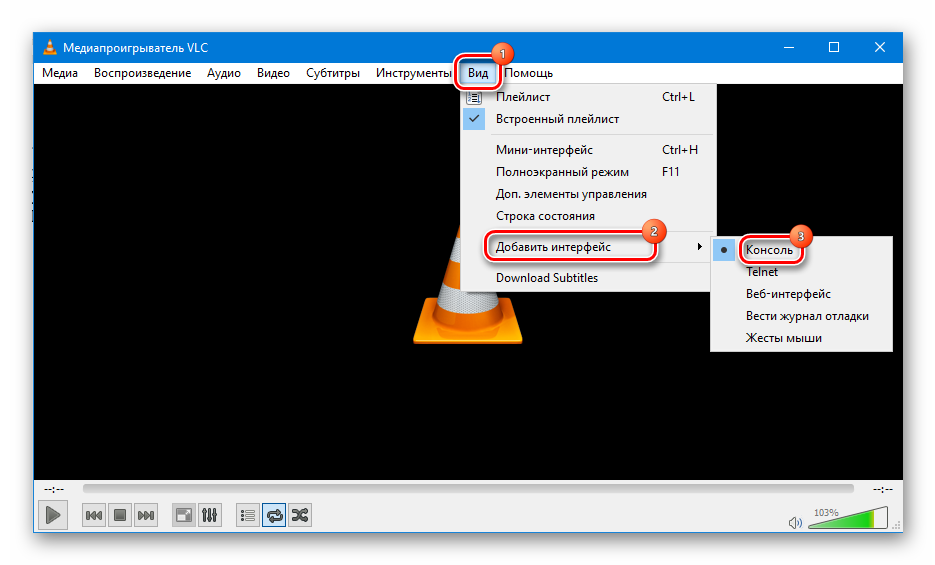
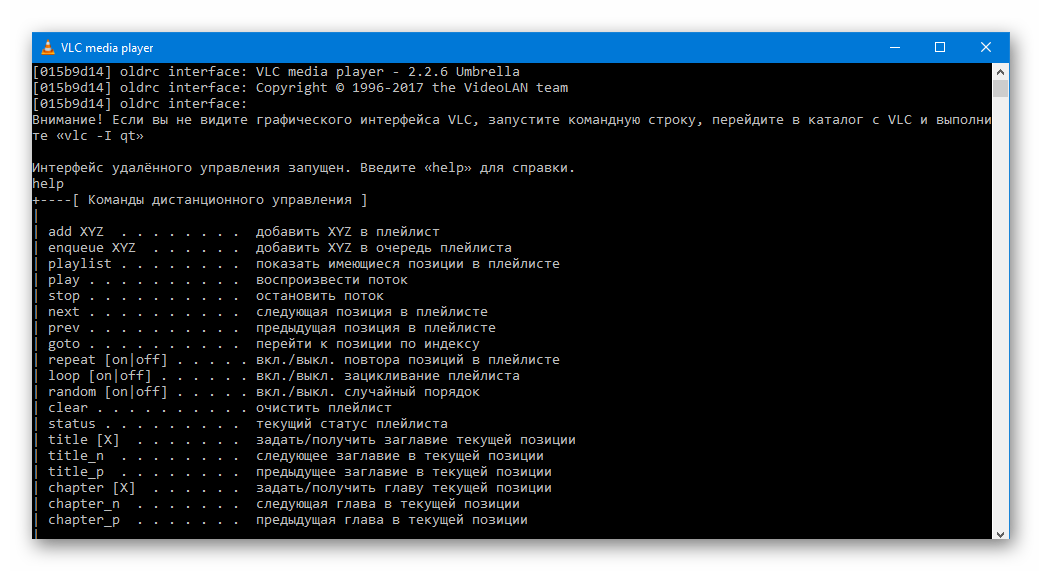
Таким образом, открывается знакомое опытным пользователям аскетичное окно, сразу же готовое к приему команд.
Первым указание, которое следует осуществить, это вызов справки, демонстрирующей многие доступные пользователю VLC параметры командной строки и синтаксис вводимого. Набираем help и нажимаем «Enter».
Пример использования
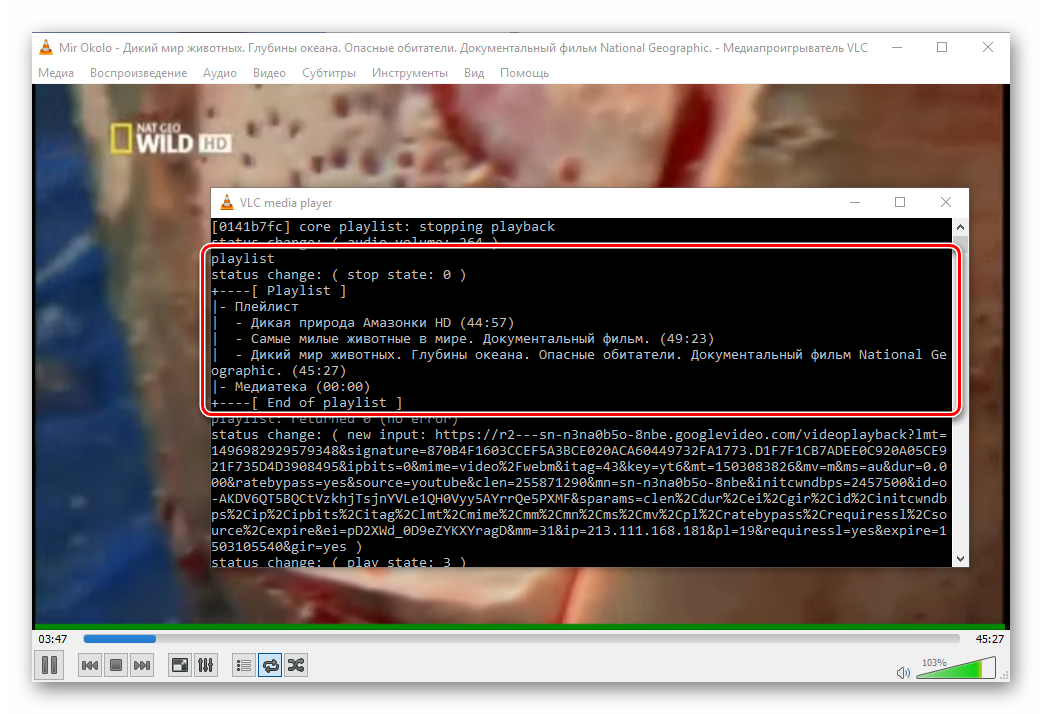
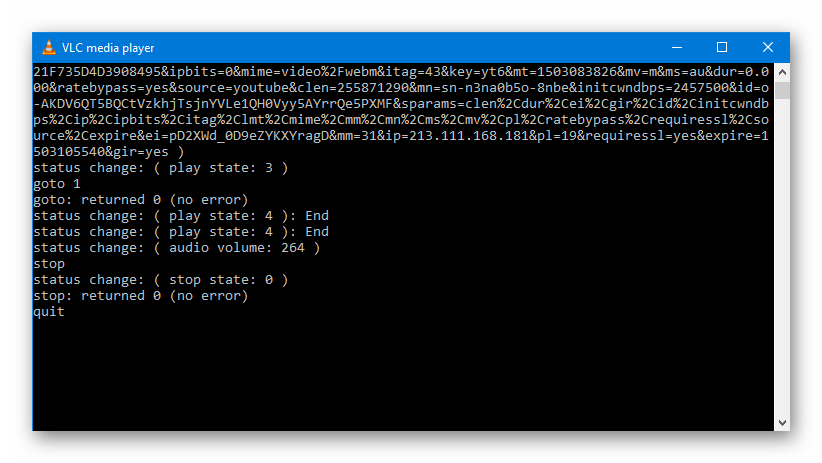
В большинстве случаев рассматриваемый способ взаимодействия используется для удаленного управления функциями приложения. При этом следует отметить, командная строка способна заменить графический интерфейс практически полностью. Пошлем несколько указаний плееру, просматривая медиапоток из Интернета, чтобы продемонстрировать возможности инструмента.
- Добавим несколько роликов с YouTube. Синтаксис: add» src=»https://vlc-mediaplayer.ru/wp-content/uploads/2017/10/interfejs-udalennogo-upravleniya-zapushhen.png» alt=»Синтаксис add » width=»1070″ height=»713″ srcset=»https://vlc-mediaplayer.ru/wp-content/uploads/2017/10/interfejs-udalennogo-upravleniya-zapushhen.png 1070w, https://vlc-mediaplayer.ru/wp-content/uploads/2017/10/interfejs-udalennogo-upravleniya-zapushhen-768×512.png 768w» sizes=»(max-width: 1070px) 100vw, 1070px»/>
- Просмотрим перечень добавленного в плей-лист: playlist

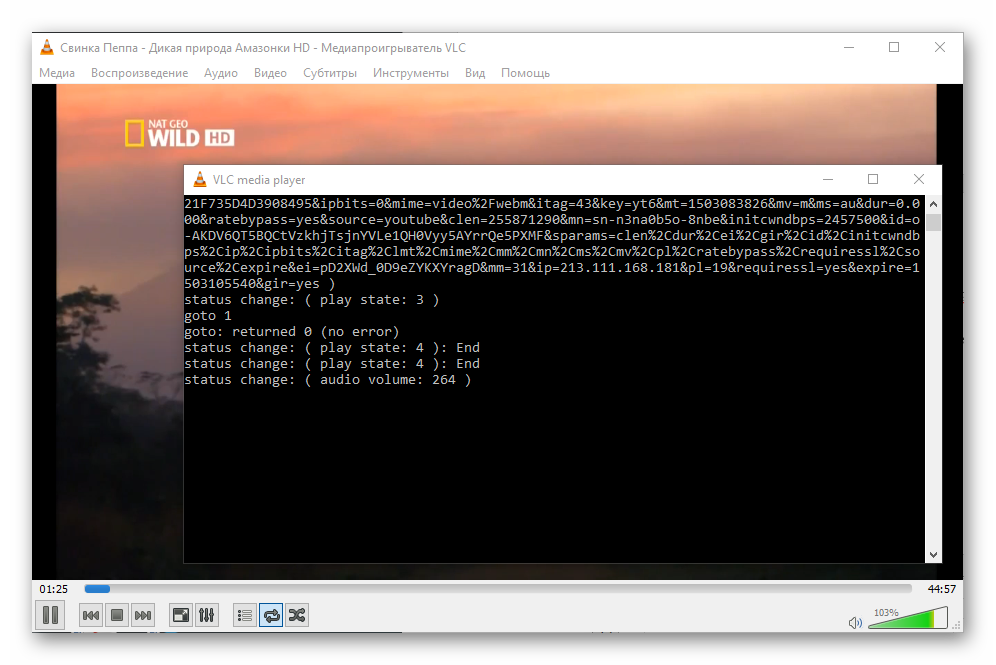
- Переключим проигрыватель на воспроизведение первой позиции из плей-листа: goto
- Остановим воспроизведение: stop
- И закроем плеер: quit
Точно таким же образом осуществляется управлением массой других функций. Некоторые возможности доступны исключительно из консоли, поэтому изучение команд инструмента является необходимым для использования приложения в профессиональной сфере.
Documentation:Command line
 | This page is outdated and information might be incorrect. Create an account to start editing, and then click here to update this article. |
|
Contents
Use the command line
TODO: completely outdated
You need to be quite comfortable with command line usage to use this.
Getting help
VLC uses a modular structure. The core mainly manages communication between modules. All the multimedia processing is done by modules. There are input modules, demultiplexers, decoders, video output modules, .
This chapter will only describe the «general» options, i.e., the core options. Each module adds new options. For example, the HTTP input module will add options for caching, proxy, authentication, .
By using vlc —help, you will get the basic core options. vlc —longhelp will give all the basic options (core + modules). Adding —advanced will give the «advanced options» (for advanced users). So vlc —longhelp —advanced will give you all options. You can also append —help-verbose if you want more detailed help.
Also, you might want to get debug informations. To do this, use -v or -vv (this will show lower severity messages). If your console supports it, you can add —color to get messages in color.
Opening streams
The following commands start VLC and start reading the given element(s):
Opening a file
VLC should be able to recognize the file type. If it does not, you can force demultiplexer and decoder (see below).
A list of all video and audio codecs supported by VLC is available on the VLC features list.
Opening a DVD or VCD, or an audio CD
In most cases, vlc dvd:// or vlc dvd://[device] will do.
- On GNU/Linux [device] is the path to the block device: e.g., vlc dvd:///dev/dvd.
- On Windows, [device] is the drive letter with / and :/: e.g., vlc dvd:///D:/.
Receiving a network stream
To receive an unicast RTP/UDP stream (sent by VLC’s stream output), start VLC with:
If 5004 is the port to which packets are sent. 1234 is another commonly used port number. you use the default port (1234), vlc rtp:// will do. For more information, look at the Streaming Howto.
To receive an multicast UDP/RTP stream (sent by VLC’s stream output), start VLC with:
To receive a SSM (source specific multicast) stream, you can use:
This only works on OSs that support SSM (Windows XP and Linux).
To receive a HTTP stream, start VLC with:
To receive a RTSP stream, start VLC with:
Modules selection
VLC always tries to select the most appropriate interface, input and output modules, among the ones available on the system, according to the stream it is given to read. However, you may wish to force the use of a specific module with the following options.
- —intf allows you to select the interface module.
- —extraintf allows you to select extra interface modules that will be launched in addition to the main one. This is mainly useful for special control interfaces, like HTTP, RC (Remote Control), . (see below)
- —aout allows you to select the audio output module.
- —vout allows you to select the video output module.
- —memcpy allows you to choose a memory copy module. You should probably never touch that.
You can get a listing of the available modules by using vlc -l
Stream Output
The Stream output system allows vlc to become a streaming server.
For more details on the stream output system, please have a look at the Streaming HowTo.
Other Options
Audio options
Note that in recent versions (3.x.x branch, possibly earlier):
- —mono no longer exists: use —stereo-mode=0 instead
- —volume no longer exists but —volume-step and —gain may be used
- —aout-rate no longer exists: —audio-resampler might be equivalent?
- —desync no longer exists: use —audio-desync instead
- —audio, —no-audio disables audio output. Note that if you are streaming (ex: to a file) this has no effect (streaming copies the audio verbatim). Use —sout-xxx instead (ex: —no-sout-audio)
- —gain audio gain (between 0 and 8)
- —volume-step audio output volume step (between 1 and 256)
- —volume-save, —no-volume-save remember the volume (default enabled)
- —spdif, —no-spdif Force S/PDIF support (default disabled)
- —force-dolby-surround<0 (auto), 1 (on), 2 (off)>Force detection of Dolby Surround
- —stereo-mode<0 (unset), 1 (stereo), 2 (reverse stereo), 3 (left), 4 (right), 5 (dolby surround), 6 (headphones)>Stereo audio output mode
- —audio-desync Audio desynchronization compensation
- —audio-replay-gain-mode
- —audio-replay-gain-preamp Replay preamp
- —audio-replay-gain-default Default replay gain
- —audio-replay-gain-peak-protection, —no-audio-replay-gain-peak-protection Peak protection (default enabled)
- —audio-time-stretch, —no-audio-time-stretch Enable time stretching audio (default enabled)
- -A, —aout
- —role
- —audio-filter adds audio filters to the processing chain. Available filters are visual (visualizer with spectrum analyzer and oscilloscope), headphone (virtual headphone spatialization) and normalizer (volume normalizer)
- —audio-visual
- —audio-resampler
Video options
- —no-video disables video output.
- —grayscale turns video output into grayscale mode.
- —fullscreen ( or -f) sets fullscreen video.
- —nooverlay disables hardware acceleration for the video output.
- —width, —height sets the video window dimensions. By default, the video window size will be adjusted to match the video dimensions.
- —start-time starts the video here; the integer is the number of seconds from the beginning (e.g. 1:30 is written as 90)
- —stop-time stops the video here; the integer is the number of seconds from the beginning (e.g. 1:30 is written as 90)
- —zoom adds a zoom factor.
- —aspect-ratio forces source aspect ratio. Modes are 4×3, 16×9, .
- —spumargin forces SPU subtitles postion.
- —video-filter adds video filters to the processing chain. You can add several filters, separated by commas
- —video-splitter adds video splitters to the processing chain. (wall, panoramix, clone)
- —sub-filter adds video subpictures filter to the processing chain.
Desktop/Screen grab options
You can see the various options for «grabbing the desktop» (VLC’s built-in screen grabber capture device) by using the GUI. See http://forum.videolan.org/viewtopic.php?f=4&t=46971
Playlist options
- —random plays files randomly forever.
- —loop loops playlist on end.
- —repeat repeats current item until another item is forced
- —play-and-stop stops the playlist after each played item.
- —no-repeat —no-loop prevents the video from being executed again. (Useful when want to encode a file)
Network options
- —server-port sets server port.
- —iface specifies the network interface to use.
- —iface-addr specifies your network interface IP address.
- —mtu specifies the MTU of the network interface.
- —ipv6 forces IPv6.
- —ipv4 forces IPv4.
CPU options
You should probably not touch these options unless you know what you are doing.
- —nommx disables the use of MMX CPU extensions.
- —no3dn disables the use of 3D Now! CPU extensions.
- —nommxext disables the use of MMX Ext CPU extensions.
- —nosse disables the use of SSE CPU extensions.
- —noaltivec disables the use of Altivec CPU extensions.
Miscellaneous options
- —quiet deactivates all console messages.
- —color displays color messages.
- —search-path specifies interface default search path.
- —plugin-path specifies plugin search path.
- —no-plugins-cache disables the plugin cache (plugins cache speeds up startup)
- —dvd specifies the default DVD device.
- —vcd specifies the default VCD device.
- —program specifies program (SID) (for streams with several programs, like satellite ones).
- —audio-type specifies the default audio type to use with dvds.
- —audio-channel specifies the default audio channel to use with dvds.
- —spu-channel specifies the default subtitle channel to use with dvds.
- —version gives you information about the current VLC version.
- —module displays help about specified module. (Shortcut: -p)
Item-specific options
There are many options that are related to items (like —novideo, —codec, —fullscreen).
For all of these, you have the possibility to make them item-specific, using «:» instead of «—» and putting the option just after the concerned item.
will play file1.mpg in fullscreen mode and file2.mpg in the default mode (which is generally no fullscreen), whereas
will play both files in fullscreen mode
will play file1.mpg in windowed (no-fullscreen) mode with the subtitles file file1.srt and will play file2.mpg with video filter distort enabled in fullscreen mode (item-specific options override global options).
Filters
These are the old style VLC filters. They only apply to on screen display and thus cannot be streamed. However, on version 1.1.11 you are still able to apply these filters in transcode module using parameter vfilter. More information can be found on Advanced Streaming Using the Command Line.
Deinterlacing video filter
Module name: deinterlace
- sout-deinterlace-mode : Streaming deinterlace mode. Deinterlace method to use for streaming
- sout-deinterlace-phosphor-chroma : Phosphor chroma mode for 4:2:0 input. Choose handling for colours in those output frames that fall across input frame boundaries.
- Latest (1): take chroma from new (bright) field. Good for interlaced input, such as videos from a camcorder
- AltLine (2): take chroma line 1 from top field, line 2 from bottom field, etc. Default, good for NTSC telecined input (anime DVDs, etc.)
- Blend (3): average input field chromas. May distort the colours of the new (bright) field, too
- Upconvert (4): output in 4:2:2 format (independent chroma for each field). Best simulation, but requires more CPU and memory bandwidth default value: 2
- sout-deinterlace-phosphor-dimmer : Phosphor old field dimmer strength: 1 (Off), 2 (Low), 3 (Medium), 4 (High). This controls the strength of the darkening filter that simulates CRT TV phosphor light decay for the old field in the Phosphor frameratedefault value: 2
Invert video filter
Module name: invert
Image properties filter
Module name: adjust
- contrast : Contrast default value: 1.0
- brightness : Brightness default value: 1.0
- hue : Hue default value: 0
- saturation : Saturation default value: 1.0
- gamma : Gamma default value: 1.0
- brightness-threshold : When this mode is enabled, pixels will be shown as black or white. Also may invert the brightness value. The threshold value will be the brightness defined below default value: disabled
Wall video filter
Module name: wall
This filter splits the output in several windows.
- wall-cols : Number of horizontal windows in which to split the video default value: 3
- wall-rows : Number of vertical windows in which to split the video default value: 3
- wall-active : Comma-separated list of active windows, defaults to all default value: NULL
- wall-element-aspect : Aspect ratio of the individual displays building the wall default value: 4:3
Note: for —wall-active , to select windows 2 and 4 you would write —wall-active 2,4. When this option isn’t specified, all windows are displayed.
Video transformation filter
Module name: transform
- transform-type : Transformation type default value: «90»
Distort video filter
Module name: distort
Clone video filter
This filter clones the output window.
Module name: clone
- clone-count : Number of video windows in which to clone the video. default value: 2
- clone-vout-list : You can use specific video output modules for the clones. Use a comma-separated list of modules. default value: «»
Crop video filter
Module name: crop
- crop-geometry : Set the geometry of the zone to crop. This is set as × + +
- autocrop : Automatically detect black borders and crop them default value: disabled
- autocrop-ratio-max : Maximum image ratio. The crop plugin will never automatically crop to a higher ratio (ie, to a more «flat» image). The value is ×1000: 1333 means 4⁄3 default value: 2405
- crop-ratio : Force a ratio (0 for automatic). Value is ×1000: 1333 means 4⁄3 default value: 0
- autocrop-time : The number of consecutive images with the same detected ratio (different from the previously detected ratio) to consider that ratio changed and trigger recrop default value: 25
- autocrop-diff : The minimum difference in the number of detected black lines to consider that ratio changed and trigger recrop default value: 16
- autocrop-non-black-pixels : The maximum of non-black pixels in a line to consider that the line is black default value: 3
- autocrop-skip-percent : Percentage of the line to consider while checking for black lines. This allows skipping logos in black borders and crop them anyway default value: 17
- autocrop-luminance-threshold : Maximum luminance to consider a pixel as black (0-128) default value: 40
Motion blur filter
Module name: motionblur
- motionblur-factor : The bluring factor (1 to 127). Higher values mean more blurring default value: 80
Video pictures blending
Module name: blend
Video scaling filter
Module name: scale
Subpictures Filters
These are the new VLC filters. They can be streamed.
Marquee display sub filter
Module name: marq
- marq-marquee : Marquee text to display. default value: VLC
- marq-file : File to read the marquee text from. default value: NULL
- marq-x : X offset, from the left screen edge. default value: 0
- marq-y : Y offset, down from the top. default value: 0
- marq-position : Marquee position: 0=center, 1=left, 2=right, 4=top, 8=bottom, you can also use combinations of these values, eg 6 = top-right. default value: -1
- marq-opacity : Opacity (inverse of transparency) of overlaid text. 0 = transparent, 255 = totally opaque. default value: 255
- marq-color : Color of the text that will be rendered on the video. This must be an hexadecimal (like HTML colors). The first two chars are for red, then green, then blue. default value: 0xFFFFFF
- marq-size : Font size, in pixels. 0 uses the default font size. default value: 0
- marq-timeout : Number of milliseconds the marquee must remain displayed. 0 means forever. default value: 0
- marq-refresh : Number of milliseconds between string updates. This is mainly useful when using meta data or time format string sequences. default value: 1000
The time sub filter was merged into this module.
Logo video filter
Module name: logo
This filter can be used both as an old style filter or a subpictures filter.
Note: You can move the logo by left-clicking on it.


