- Documentation:Streaming HowTo New
- Contents
- Introduction
- Transcoding
- Transcoding using the GUI
- Using the commandline
- Windows-based systems
- Unix systems
- Transcoding commandline string structure
- Example commandline: Converting an audio file to a MP3 file
- Other examples commandline strings
- Streaming
- Streaming using the GUI
- Streaming using the command line interface
- Documentation:Streaming HowTo/Easy Streaming
- Contents
- Intro
- Streaming using the Wizard
- Launching the wizard
- Wizard dialog
- Input selection
- Streaming methods
- Transcoding options
- Encapsulation method
- Streaming options
- Save to file destination
- Streaming using the GUI
- Introduction
- The Stream Output dialog
- Stream Output MRL
- Output methods
- Encapsulation method
- Transcoding options
- Miscellaneous options
Documentation:Streaming HowTo New
This documentation explains how to stream, transcode and save streams using VLC media player.
NOTE: This is work in progress. For a more complete, yet outdated, documentation on Streaming with VLC please see the old Streaming HowTo.
Contents
Introduction
VLC media player is able to stream, transcode and save different media streams. For more information about the formats and codecs supported please see the VideoLAN Streaming Features list.
Transcoding
Transcoding is the process of taking a media file or stream and converting it to a different format or bitrate.
There are two methods for transcoding in VLC: via the GUI (VLC’s default interface) or via the commandline. The term transcode by itself normally refers to converting one media format to another and saving the output to a file (i.e. no streaming involved).
Transcoding using the GUI
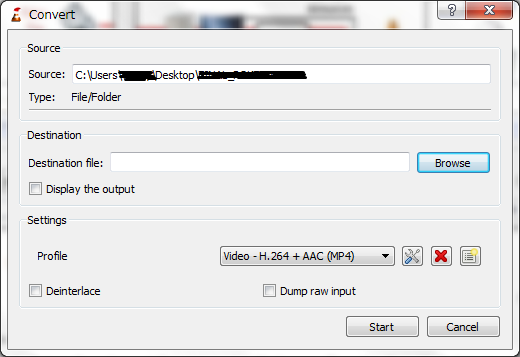
One of the methods of transcoding is via the GUI. To access this:
- In VLC, go to «Media >> Convert / Save. » (Ctrl+R).
- Add the input file(s) or stream(s) you want to transcode. Press «Convert / Save».
- In the «Convert» windows specify the destination file name (including file extension — e.g. on Windows «C:\out.mp3»).
- Select the desired codec from the profile list. To check/edit the settings of a given profile press the «Edit selected profile» button. Profiles can also be added/deleted.
- Press «Start».
If the profile settings were compatible and transcoding was successful, a playable destination file should be created.
Using the commandline
Another method of transcoding is via the commandline. This is more flexible than via the GUI as it enables full usage of the modules and options available in VLC.
To use the VLC’s commandline you need to have access to the commandline interface, for example via a shell.
Windows-based systems
On Windows-based systems the Command Prompt can be used. This can be found in the «Accessories» folder of the Start menu. Alternatively by going to «Start >> Run. » or pressing «Windows key + R», entering «cmd» into the text field and press «OK» or Enter.
Once the Command Prompt window is opened navigating to the folder/directory where VLC is located is easiest for using the commandline as only «vlc.exe» or «vlc» (as the .exe part is assumed) needs to entered to run VLC. If VLC is installed in the default location (on a 32-bit system) running:
Should change to the directory where vlc.exe is located.
Unix systems
On Unix-based system (such as Linux and macOS) a terminal window can be opened. Running «vlc» should be all that is needed to open VLC:
Transcoding commandline string structure
A typical commandline string for converting a file to another format is:
Where INPUT is the input stream, [TRANSCODE_OPTIONS] are the options set for the desired output format, codecs, bitrate etc. and [OUTPUT_OPTIONS] are the option set for the output type. —sout is the stream output commandline option.
Example commandline: Converting an audio file to a MP3 file
An example usage might be converting an audio file to a MP3 file:
Where INPUT is the input file and OUTPUT is the destination file (for example «C:\out.mp3» on Windows or «/home/username/out.mp3» on a *nix system). The above sout string is the default «Audio — MP3» profile setting accessible via the GUI. It will convert an audio input to a 128kbps CBR MP3 file (sample rate 44100Hz, 2 channels).
Other examples commandline strings
Convert an audio input to an uncompressed WAVE (*.wav) file:
Convert an audio input to an AAC file (MP4 container):
Streaming
Streaming using the GUI
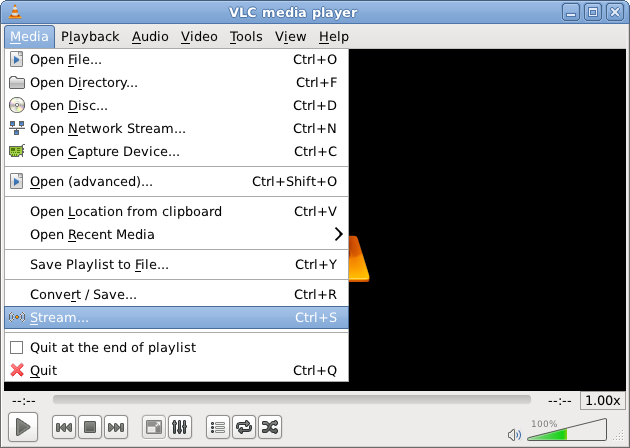
Streaming using the GUI is only available on the Qt interface. To stream using the GUI, open VLC, then Media [menu] -> Stream:
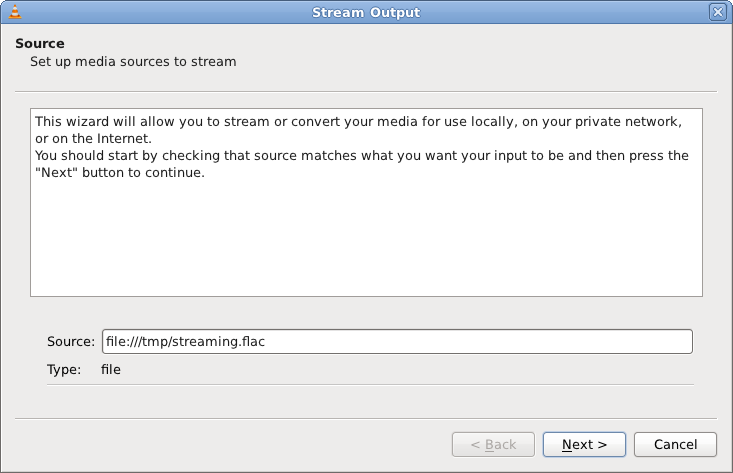
Select a stream (such as a file, a network stream, a disk, a capture device . ) from the «Open Media» dialogs that pops up.
The following streaming methods are available for use with VLC:
- Display locally: display the stream on your screen. This allows you to display the stream you are actually streaming. Effects of transcoding, rescaling, etc. can be monitored locally using this function.
- File: Save the stream to a file.
- HTTP: Use the HTTP streaming method. Specify the TCP port number on which to listen.
- MS-WMSP (MMSH): This access method allows you to stream to Microsoft Windows Media Player. Specify the IP address and TCP port number on which to listen. Note: This will only work with the ASF encapsulation method.
- UDP: Stream in unicast by providing an address in the 0.0.0.0 — 223.255.255.255 range or in multicast by providing an address in the 224.0.0.0 — 239.255.255.255 range. It is also possible to stream to IPv6 addresses. Note: This will only work with the TS encapsulation method.
- RTP: Use the Real-Time Transfer Protocol. Like UDP, it can use both unicast and multicast addresses.
- IceCast: Stream to an IceCast server. Specify the address, port, mount point and authentication of the IceCast server to stream to.
The most common way is via HTTP. To stream via HTTP, click on «Destinations», choose HTTP from the drop down as a «New Destination» and click add. Now if you are streaming video, you will want to stream to something like «/go.mpg.» Now hit stream, and you should be able to use a different instance of VLC as a client, and listen to that stream now (ex: on the same computer it would be «Media» [menu] -> Open Network Stream -> «http://localhost:8080/go.mpg» and it should work.

- even though you click on «enable transcoding» and specify some other container type, it will give you the flv container type unless you use a suffix, like «.mpg» ref
- VLC client cannot receive a stream at less than 5 fps, though it can stream it alright for those speeds (and other players can receive it). ref.
- NB that *many* times when using the GUI to stream it will choose the wrong thing. For example, if you give a path of «/» it will use FLV container type (which you probably didn’t want, and which overrides your transcoding settings’ container type *silently*), and if you give it «/go.mp4» it will *silently* fail (you can look at the log messages to see what the error is—it says «mp4 type is not supported except for files»). It is tricky to get it set up. It’s like the GUI sets it up wrong most times. Here is a laundry list.
Select a transcoding profile that fits the codecs and access method of your stream, such as MPEG-TS, MPEG-PS, MPEG-1, Ogg, Raw, ASF, AVI, MP4 and MOV. You can also create or modify profiles by clicking the «Edit selected profile» button next to the selection combobox.
![]()
Select methods to announce your stream. You can use SAP (Service Announce Protocol) or SLP (Service Location Protocol). You must also specify a channel name. The macOS interface also allows you to export the description (SDP) file of a RTP session using the internal HTTP or RTSP server of VLC, or as a file. This can be done using the according checkboxes. The SDP URL text box allows to give the url or destination where the SDP file will be available. There is a text box displays the Stream Output MRL (Media Resource Locator). This is updated as you change options in the Stream output dialog, and can be tweaked by hand if necessary.
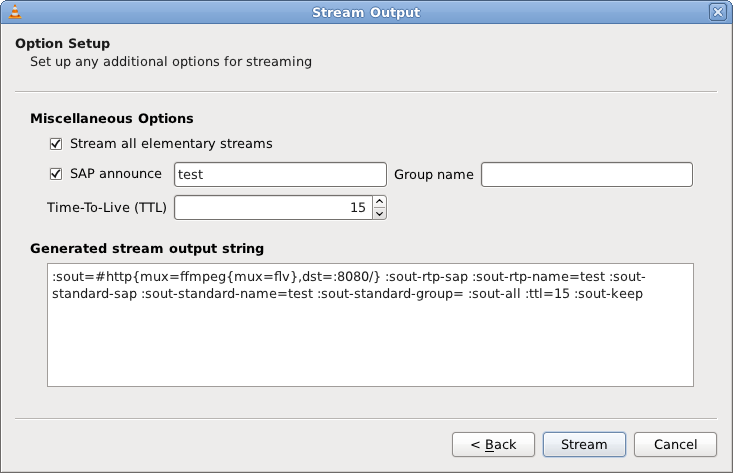
Click «Stream» to start streaming.
Streaming using the command line interface
If you want to stream using the command line interface instead of the GUI (more control, for example you can specify your own container), you can «sniff» the options the GUI is using by opening up the logger (Tools menu -> message) and setting verbosity level to «2» then doing a stream. It will output debug messages that basically tell you what it is using for command line parameters, then you will take those same parameters and use them on the command line (you may need to add quotation marks around words that have spaces in them, and you may need to add —‘s).
Источник
Documentation:Streaming HowTo/Easy Streaming
ContentsIntroThe easier way to start streaming with VLC is by using one of the graphical user interfaces. These are the wxWindows and skinnable interfaces for Windows and GNU/Linux and the Mac OS X native interface. Streaming using the WizardThe Streaming/Transcoding Wizard leads you step by step through the process of streaming your media on a network or saving it to your hard drive. This Wizard offers easy to use menus but provides a restricted set of options. Note: The wizard is only available on the wxWindows interface. Launching the wizardTo launch the Streaming/Transcoding Wizard open the «File» menu, and select the Wizard menu item. Wizard dialogFirst select the type of task:
Input selectionSelect a stream (such as a file, a network stream, a disk, a capture device . ) by selecting the Choose. dialog or an existing item in your playlist, using the Existing playlist item option. Partial Extract: To read only part of the stream, check the «Enable» checkbox and choose a start and end date (in seconds). This option should only be used with streams you can control such as files or discs but not network streams or capture devices. Streaming methodsIf you chose Stream to network option, you can now specify the streaming method. Available methods are:
Transcoding optionsIf you chose the Transcode/Save to file option, you can now specify the new audio and video codecs and bitrates you want you input converted to. Encapsulation methodChoose the method format. The UDP streaming methods require MPEG TS encapsulation. The HTTP streaming method can be used with the MPEG PS, MPEG TS, MPEG 1, OGG, RAW or ASF encapsulation. Saving to a file can be done using any encapsulation format compatible with the chosen codecs. Streaming optionsIf you chose to Stream to network you can now specify several options.
Save to file destinationIf you chose Transcode/Save to file you can now specify the file you want to save the stream to. You can now select the Finish button to start streaming/converting the source. Streaming using the GUIIntroductionA second way to set up a streaming instance using VLC is using Stream Output panel in the Open. dialog of the wxWindows (Windows / GNU Linux), skinnable (Windows / GNU Linux) and MacOS X interfaces. Streaming methods and options used 99% of time should be available in this panel. To stream the opened media, check the «Stream output» or «Stream/Save» checkbox in the «Open File/Disc/Network Stream/Capture Device» dialog and click on the «Settings» button. Note that «Capture» is not available as an option in Mac OSX because VLC does not support live streaming of audio or video under Mac OSX. The Stream Output dialog Stream Output MRLOn the wxWindows interface, a text box displays the Stream Output MRL (Media Resource Locator). This is updated as you change options in the Stream output dialog. For more information on how to edit the Stream Output MRL read . Output methods
Note: UDP, HTTP, MMSH, and RTP methods require you to select the Stream option on the MacOS X interface. Encapsulation methodSelect an encapsulation method that fits the codecs and access method of your stream, among MPEG TS, MPEG PS, MPEG 1, OGG, Raw, ASF, AVI, MP4 and MOV. (See ) Transcoding optionsEnable video transcoding by checking the «Video Codec» checkbox. Choose a codec from the list. You can also specify an average bitrate and scale the input. (See ) Enable audio transcoding by checking the «Audio Codec» checkbox. Choose a codec from the list. You can also specify an average bitrate and the number of audio channels to encode. (See ) Miscellaneous optionsSelect methods to announce your stream. You can use SAP (Service Announce Protocol) or SLP (Service Location Protocol). You must also specify a channel name. The Mac OS X interface also allows you to export the description (SDP) file of a RTP session using the internal HTTP or RTSP server of VLC, or as a file. This can be done using the according checkboxes. The SDP URL text box allows to give the url or destination where the SDP file will be available. Источник |
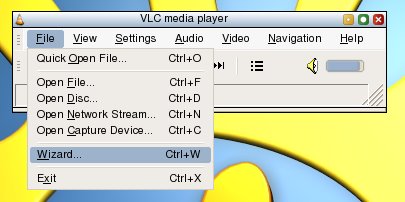 Launching the Wizard
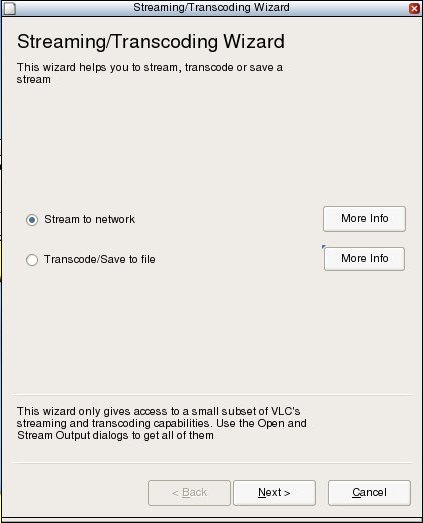 The Wizard Dialog
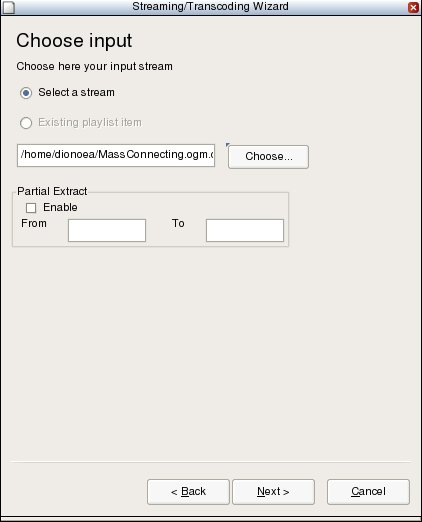 Wizard input selection
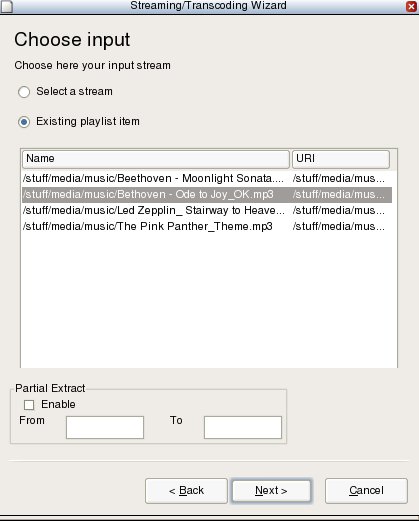 Wizard input selection from playlist
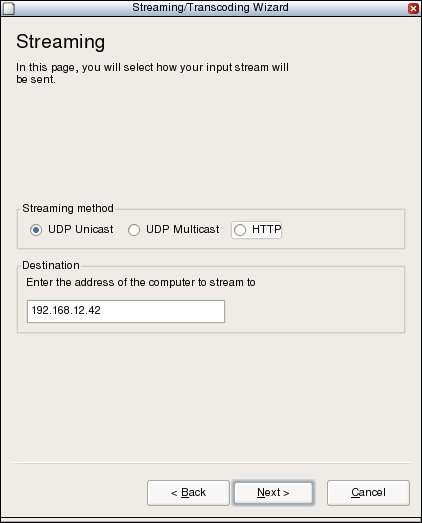 Wizard streaming method
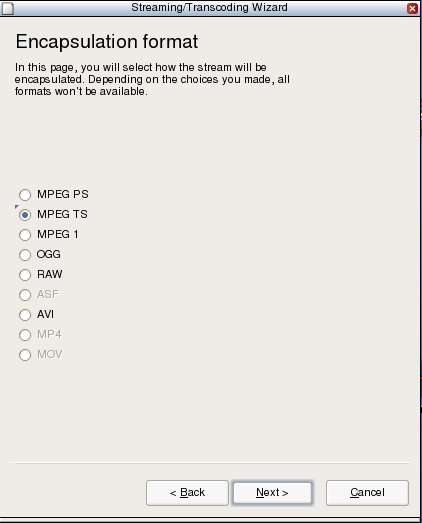 Wizard encapsulation method
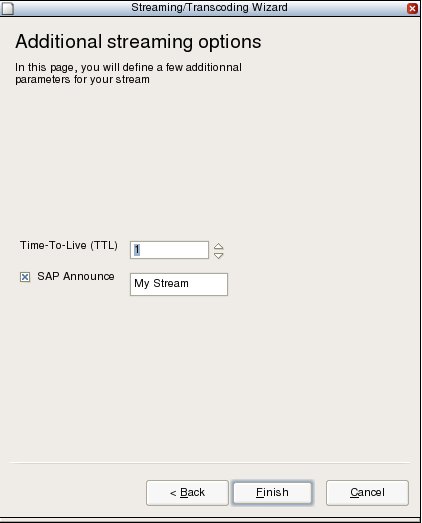 Wizard streaming options
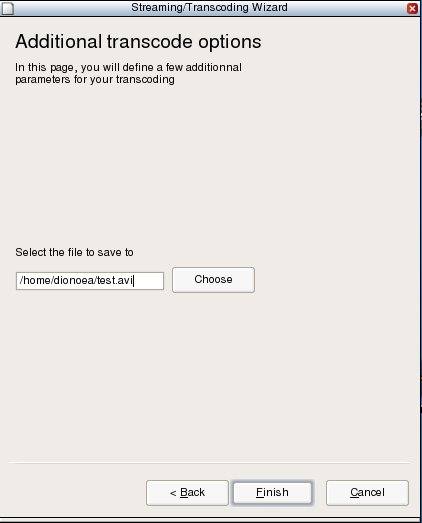 Wizard save file — wxWindows interface
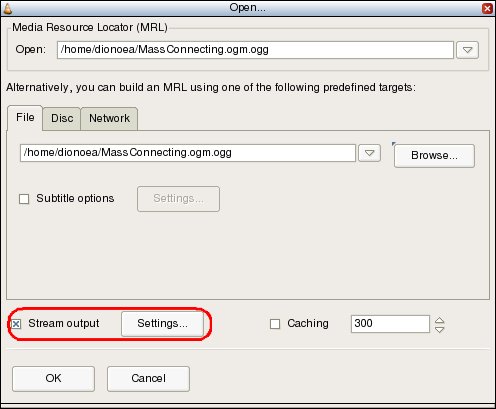 Open file dialog — wxWindows interface
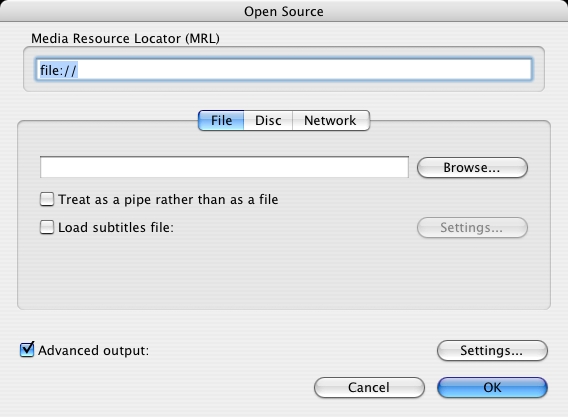 Open file dialog — Mac OS X interface
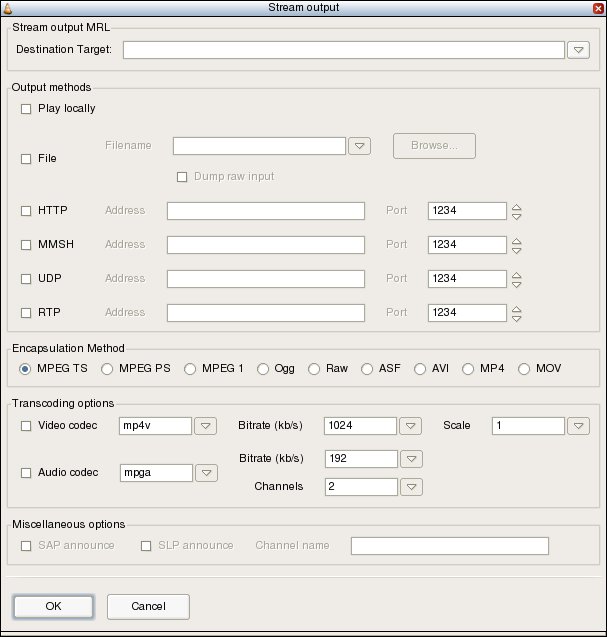 Stream output dialog — wxWindows interface
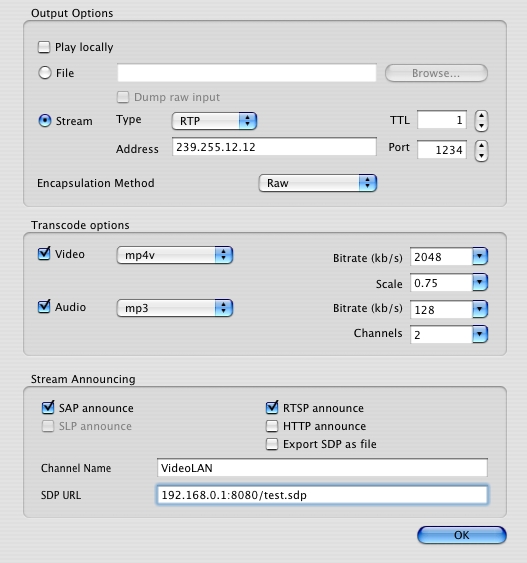 Stream output dialog — wxWindows interface


