- Install Mac OS X 10.6 Snow Leopard on VMware with Pre Installed Image
- Why Pre Installed Mac Snow Leopard Image?
- My PC Configuration;
- Required Products: Mac 10.6.4 Snow Leopard on VMware
- Products Needed for this method:
- Installation Steps
- Установка Mac OS X Snow Leopard на виртуальную машину VMware
- Что нам надо для установки?
- Начинаем установку
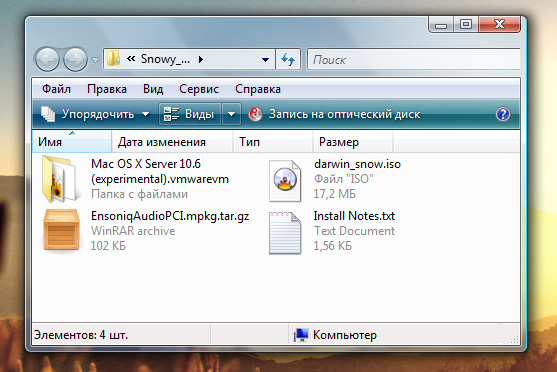
- Распаковка архива “Snowy_VM”
- Password Recovery
- Установка Mac OS X Snow Leopard на виртуальную машину VMware в Windows
- Что нам потребуется?
- Установка
- Запуск и тестирование
Install Mac OS X 10.6 Snow Leopard on VMware with Pre Installed Image
If you are looking for the pre-installed Mac OS X 10.6 Snow Leopard VMware image, then this post will be useful to find out the correct image and show the steps to install it on VMware Player or Workstation. In this guide, we discuss the 10.6.4 version which can be upgraded to a certain level in VMWare on your Windows computer.
The following method is completely for testing and learning purpose only. Do not use in the production or permanent use. Obviously, we can’t expect a good performance inside the VM, but overall it will be a good experience to learn and test macOS on Windows computer.
We have already mentioned several guides to install Mac on Windows computer by using virtualization technology, you can check them here to find out the latest version.
Installing the Mac OS on VMware which is based in Intel-based is not straight forward. You need to prepare the installation medium on a real Mac computer (or in a working Mac OS X VM), setup the proper boot loader, patch the software, and modify the VMX configuration file. To avoid these all steps, we can use the preinstalled image as shown in this guide.
Why Pre Installed Mac Snow Leopard Image?
- Easy to import in VMware and start using it.
- Mac Installation already is done, DVD or ISO not required.
- Saves your time by avoiding installation and patching for x86 computers.
- Drivers already installed. Sound, Network and Screen resolution working fine in this image.
- Updating to other versions working well.
- Not required to install any boot loaders.
My PC Configuration;
I have done the below demonstration on my Intel computer which has the following configuration.
- Intel Core2Duo 2.66GHz
- 3GB DDR2 RAM
- Intel P35 Chipset
- Windows 7 32 Bit Host
Required Products: Mac 10.6.4 Snow Leopard on VMware
I’m going to install and use this image on VMware Player, you can try on the VMware workstation as well. I have published similar posts about installing OS X 10.5 Leopard on VMware and Oracle VirtualBox with a pre-installed image earlier, you can check the links below.
Products Needed for this method:
- Latest VMware Player or Workstation.
- Snow Leopard VMware Image (It’s a torrent download. Size is approximately 2.3GB with 7z compressed format.)
- Read this post and make sure VT is enabled on host computer BIOS.
Installation Steps
1) Extract the image. It contains VMX, VMDK and other tools required.
2) Make sure hardware VT is enabled.
3) Open Mac OS Snow Leopard.vmx file in VMware Player.
Edit virtual machine settings as you like. I suggest increasing the RAM and number of Processor Cores. If Mac OS stuck with any kernel errors, then change processor core to 1. Do not change any more settings in virtualization engine under processors.
4) Power on the virtual machine. I’m sure you will get Snow Leopard desktop without any problems. Do not worry about the language you see on the screen. I already changed it to English. Follow the steps below to change the language inside the virtual machine.
5) Click on Preferences icon on the desktop.
6) Click Languages icon.
7) Press Edit List button and remove unwanted language and leave U.S English. Also, go to Formats and change the region that matches your location.
Log off and log in, you will see the U.S English desktop and menus.
8) Admin Password for Image
Admin user name for this image is svp and the password is 123. You can use this 123 password to reset a new password for root.
9) USB devises Access
Yes, it worked. My external USB hard disk and flash disks worked inside Mac Virtual machine without any glitches. I had to mount the external hard disk in disk utility to make it work.
10) Network
Bridged and NAT network worked out-of-the-box without any patches in this image.
11) Multiple Screen resolutions and Wide Screen support available on this VM. The best part is, if you change the VMware Player screen size, Snow Leopard screen size also changes according it to fit the screen.
Check my earlier post here to learn how to install multiple screen resolutions in Mac OS X virtual machines.
12) Sound
For some reasons, the sound did not work for me straight away. If it doesn’t work for you, go to the extracted folder (from the download) and locate the SVP folder. Install EnsoniqAudioPCI.mpkg in Mac virtual machine. Restart the machine, the sound will work after it.
13) Software update
This image is having updates up to 10.6.2. Software update to 10.6.4 worked without any issues. I downloaded 10.6.4 combo updates from Apple site and updated successfully.
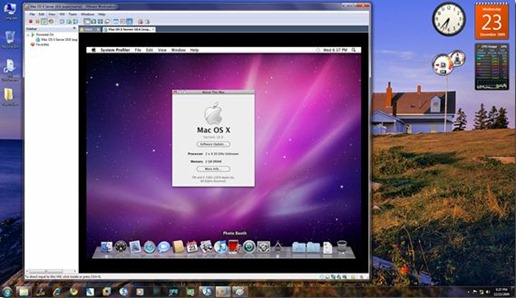
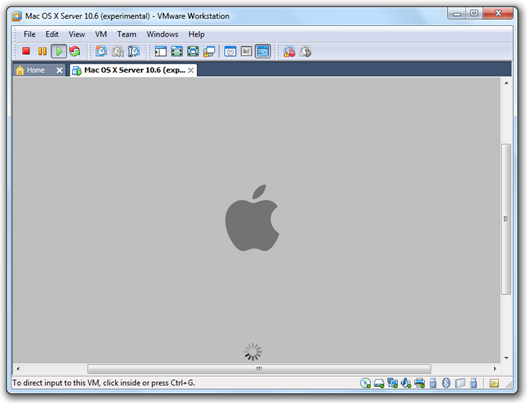
There you go, you are having a working Mac OS X 10.6 Snow Leopard on VMware with your normal Intel PC. I’m sure this will work on the all latest Intel processors as long as hardware virtualization (VT) support available.
Here is a screenshot of a working virtual machine with this pre-installed VMDK image. If you are using it on VMware workstation, you will be able to take snapshots. That will be helpful to revert back the VM state if anything goes wrong.
14) Booting Issues
If the booting process stuck with the Apple logo, you can try this method.
Shut down the VM completely, open Mac OS Snow Leopard.vmx file in a text editor, look for smc.present=”TRUE” line. Change this value to FALSE. So, it should be smc.present=”FALSE”.
This step may solve any booting issues and keyboard, mouse delay. We have published a new guide on using macOS Bug Sur on VMware.
Dinesh
Dinesh is the founder of Sysprobs and written more than 400 articles. Enthusiast in Microsoft and cloud technologies with more than 15 years of IT experience.
Источник
Установка Mac OS X Snow Leopard на виртуальную машину VMware
Доброго времени суток.
Сегодня я опишу установку Mac OS X Leopard/Snow Leopard Retail на виртуальную машину Windows/Linux
Устанавливать я буду Mac OS X Snow Leopard на VMware Player в Windows. Забегая вперёд, хочу сказать, что Mac OS X не предназначена для полноценной работы в виртуалке. Однако познакомиться с ОС или, к примеру разрабатывать приложения на iPhone/iPod Touch можно.
Что нам надо для установки?
Перед тем, как начать установку, Вам нужно достать эти “кусочки пазла”:
- Компьютер PC с желательно 2-х ядерным процессором, поддерживающим виртуализацию и инструкции SSE3 (не знаю насчёт AMD, но на Intel всё отлично установилось)(скачайте Securable, чтобы проверить комп на поддержку виртуалы, он лежит в прикреплённых файлах)
- µTorrent для скачивания Mac OS X (Есть в прикреплённых файлах).
- UltraISO для просмотра файлов .dmg и конвертирования в .iso
- Минимум 2 ГБ ОЗУ
- Общие CD/DVD с Bonjour, чтобы макось увидела ваши компьютеры в локальной сети (Есть в прикреплённых файлах)
- VMware Player или Workstation (особых различий нет, просто VMware Workstation платная)
- Образ виртуальной машины (13 МБ) (Есть в прикреплённых файлах)
- Архиватор для Windows, к примеру WinRAR (Есть в прикреплённых файлах)
Начинаем установку
Если у Вас всё это уже есть можно на начинать установку.
Распаковка архива “Snowy_VM”
 Хотите купить Mac Pro, но для Вас это дорого? Предлагаем аналоги Мак. Компьютеры полностью готовы к установке Mac OS X или Windows. Производительность и надежность, как у Mac. Bizon – отличный способ купить Mac Pro или iMac дешевле. Источник Password RecoveryThe following step by step guide will help you in installing Mac OS X 10.6 Snow Leopard as a guest virtual machine in Windows 7. You’ll need to have a system with an Intel processor which supports hardware virtualization, original OS X Snow Leopard retail disk, VMware Workstation 7 and Windows 7, Vista or XP installed as host operating system. If you meet all these requirements, you can then install OS X Snow Leopard in VMware under Windows and can enjoy the best of both worlds.
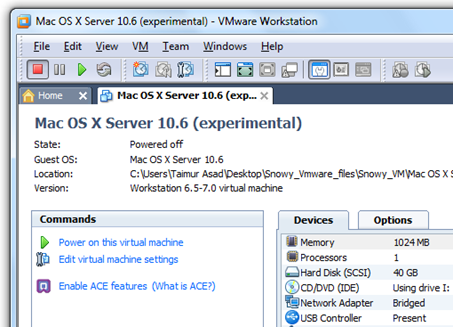
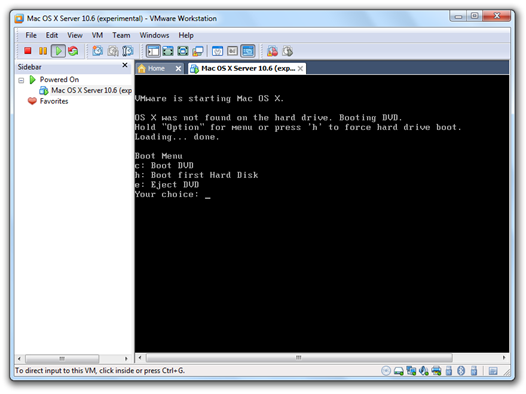
Step 1: Download and install VMware Workstation 7. Step 2: Click here to download pre-made modified version of Snow Leopard.vmdk and darwin_snow.iso files required to get this thing to work. Step 3: Start VMware Workstation and open up “Mac OS X Server 10.6 (experimental).vmx” file which you downloaded in Step 2. Step 7: Now go back and select “c” option (Boot DVD) from the prompt which you got in Step 5 to boot from the OS X retail DVD. OS X boot screen with Apple logo should now appear. If the boot screen doesn’t appear for you, try booting it in verbose mode by pressing “F8” key after selecting “c” option, and then enter “-v” (without quotes). This will enable the system to boot OS X DVD using verbose mode. Step 9: Once the installation is completed. System will automatically reboot. At this point, close your guest virtual machine and change your CD/DVD option again like you did in Step 2 to point it to “darwin_snow.iso”. Step 10: Start the virtual machine again. Press “F8” key and select “h” option to “Boot first hard disk”. Voila! Snow Leopard should now be running live under Windows 7! Источник Установка Mac OS X Snow Leopard на виртуальную машину VMware в Windows
Забегая вперед, хочу сказать, что виртуальная система не предназначена для полноценной «жизни» в Mac OS X, но познакомиться с ОС или, к примеру, разрабатывать приложения для iPhone можно без особых проблем. Что нам потребуется?Перед тем, как приступить к самой установке нам надобно раздобыть вот такие «кусочки паззла»:
После того, как вы достанете все необходимые компоненты, можно приступать к самому процессу установки. УстановкаПервым делом, нам требуется поставить на компьютер программное обеспечение от VMware и распаковать скачанный архив Snowy_Vmware_files.tbz2 , содержащий вот такую структуру:
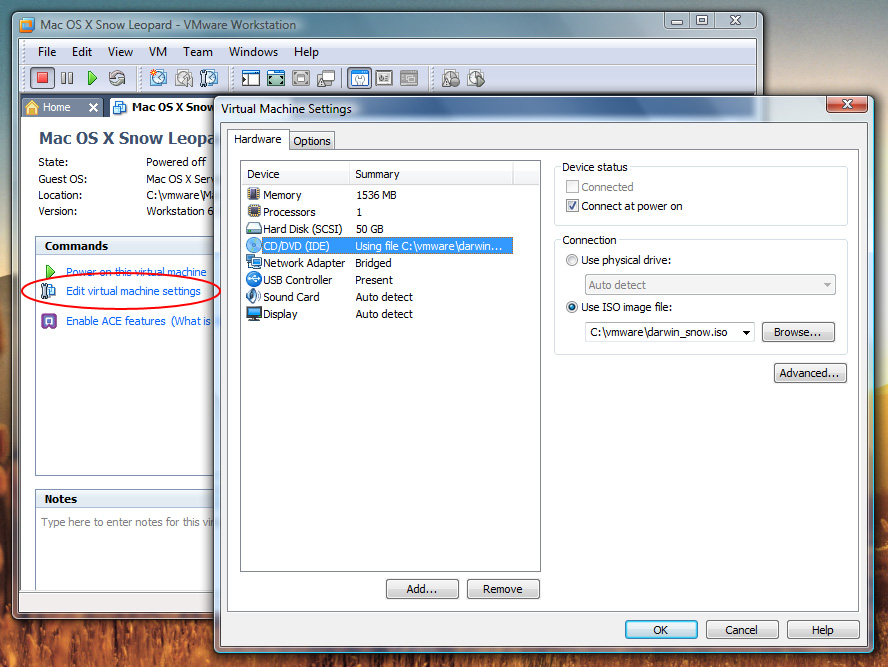
Теперь мы должны запустить VMware Workstation (или Player) и через меню File->Open (или через иконку в главном окне программы) добавить нашу созданную виртуальную машину из каталога Mac OS X Server 10.6 (experimental).vmwarevm .
Далее следует перейти на закладку с появившейся виртуалкой и найти среди команд «Edit virtual machine settings» (изменить настройки). В зависимости от конфигурации компьютера, вы можете выбрать объем виртуальной памяти, места для жесткого диска, количество процессоров и ядер, тип локальной сети, звуковую карту и так далее*.
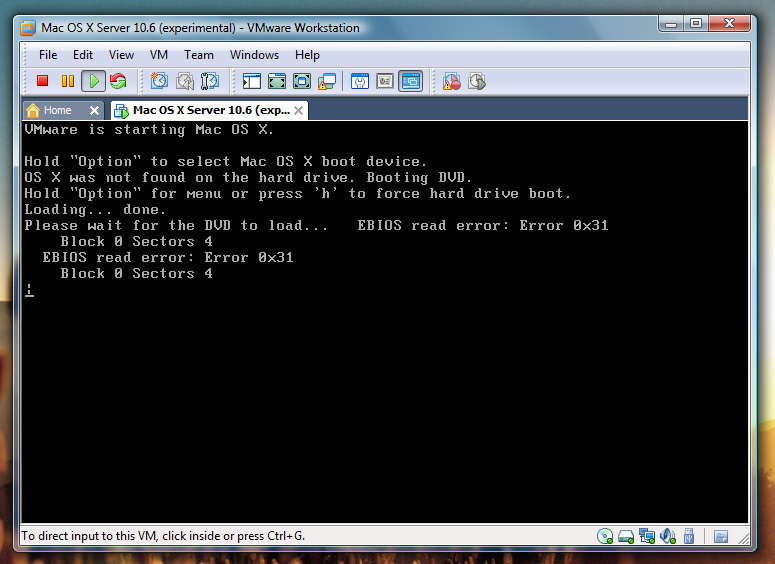
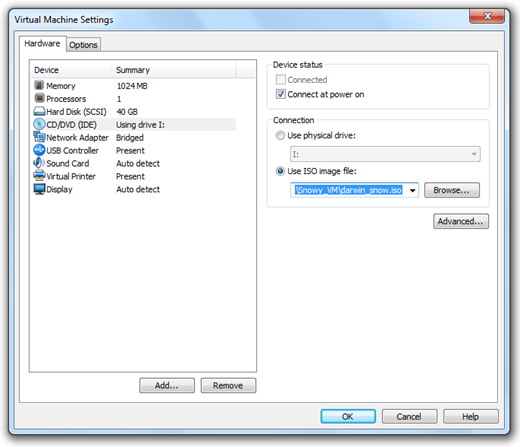
Помните, в распакованном архиве у нас был файл darwin_snow.iso ? Именно его нужно использовать в виртуальном CD/DVD-приводе. Обязательно установите галочку на пункте «Connect at power on», чтобы образ автоматически подключался при старте системы. Все, мы полностью готовы к установке системы, можно включать виртуальный компьютер. При включении система может перейти в одно из трех состояний:
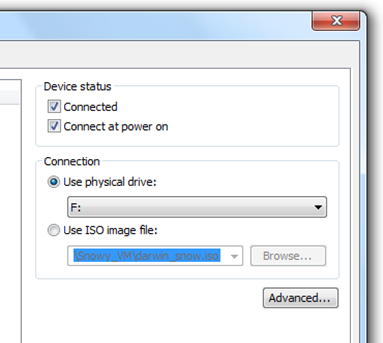
Не стоит обращать на это внимание, потому что сейчас нужно заменить darwin_snow.iso, находящийся в виртуальном дисководе, на образ Snow Leopard. Для этого можно нажать Ctrl+D (или меню VM->Settings) и выбрать в списке CD/DVD, после чего указать путь к образу Макоси и обязательного поставить еще одну галочку «Connecter» (она будет снята). Если на экране было меню загрузки, то следует нажать на клавиатуре клавишу с латинской буквой «c», в остальных случаях виртуалка задумается на несколько секунд и перейдет к загрузке установочного диска без чье-то помощи. Уже через минуту-полторы на экране появится окно выбора языка и можно будет приступить к инсталляции системы. Осталось принять лицензионное соглашение и выбрать опции для установки. К примеру, мне не нужны драйверы для принтера и дополнительные локализации, поэтому я убрал лишние галочки из списка.
Далее нажимаем кнопку Install и откидываемся на спинку кресла на 20 минут, хотя процесс может пройти чуть быстрее. Запуск и тестированиеОтлично, как я и говорил, все закончилось быстрее — прошло ровно 16 минут. Перезагружаем виртуальную машину (не обращаем внимание на Kernel Panic) и проходим процесс регистрации системы. Я не буду останавливаться на этом, потому что там все очень легко. Если система не запустится с первого раза — ничего страшного, и у меня раз на раз не приходится, а некоторые вообще перезагружают VMware по 5-10 раз, пока не добьются положительного результата. По окончанию регистрации (когда на экране появился рабочий стол) замените образ Snow Leopard обратно на darwin_snow.iso , т.к. на нем лежат VMware Tools, их тоже нужно установить, благодаря чему станет возможным, к примеру, поменять разрешение экрана или обмениваться файлами между двумя ОС.
Все. Теперь у нас есть готовая и практически полностью «рабочая» система. Почему я взял слово «рабочая» в кавычки? Потому что проблема с зависаниями на этапе загрузки может поджидать вас даже сейчас: не забывайте монтировать образ darwin_snow.iso при каждом включении виртуально машины. Также не совсем правильно работает ACPI (я бы даже сказал, что из рук вон плохо работает 🙂 ). В общем, таким нехитрым образом я поставил Snow Leopard на VMware, не выплясывая при этом шаманские танцы с бубном, хакинтошем и т.п. P.S. Забыл добавить вот еще что. Естественно, было бы наивно полагать, что гостевая система (да еще и на таком не супер-мощном компьютере) будет адекватной заменой полноценному Макинтошу. Однако, любой пользователь сможет «пощупать» OSX, оценить её сильные и слабые стороны и сделать для себя какие-то выводы. Источник |
 Вчера вечером в нашем твиттере я пообещал как можно скорее опубликовать статью с руководством по установке Snow Leopard на виртуальную машину VMware (хотя я думаю, что и обычный Leopard тоже нормально станет). Поэтому не откладывая обещания в долгий ящик, постараюсь достаточно подробно описать весь процесс от начала и до конца.