- Mac OS X Yosemite 10.10.4 образ для VMware
- How to Install Mac OS X Yosemite 10.10 on VMware?
- Install Mac OS X Yosemite 10.10 on VMware
- Minimum System Requirments
- Setting up Mac OS X Yosemite on VMware
- Download macOS X Yosemite 10.10 VirtualBox & VMware Image
- Download macOS X Yosemite 10.10 Image
- System Equipment to install macOS X Yosemite
- Install macOS X Yosemite on VirtualBox & VMware
- Download macOS X Yosemite 10.10 Image for VMware & VirtualBox
- Conclusion
- How to Install Mac OS X Yosemite on VMware on Windows
- Install Mac OS X Yosemite on VMware-Requirements?
- Mac OS X Yosemite on VMware
- Create a New Virtual Machine
- Mac OS X Yosemite settings on VMware Workstation
- Have a clean install of Mac OS X Yosemite
- Conclusion
Mac OS X Yosemite 10.10.4 образ для VMware

OS X Yosemite продолжает направление, которое было задано с запуском прошлогодней OS X Mavericks, предлагая пользователям ещё более ясный дизайн и ещё больше функций, воодушевлённых iOS. Если в Mavericks появились привычные iOS-приложения Maps и iBooks, то на этот раз Apple обещают, что обе системы созданы для максимально удобной совместной работы.
Перед началом работы с машиной обязательно примените от имени администратора VMware Unlocker.
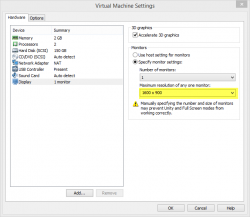
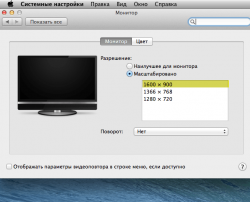
Для выбора нужного разрешения экрана установите его сначала в настройках виртуальной машины в разделе Монитор (Display), а затем в настройках самой Mac OS X в Системных настройках — Монитор. Сейчас установлено разрешение 1600×900. Остальные параметры (количество ядер ЦП, памяти и прочее) также выбирайте согласно своему оборудованию.
Способ установки
- Устанавливаем VMware Workstation или VMware Player. Распаковываем архив OS X Yosemite.7z
- Применяем от имени администратора патч из папки VMware Unlocker, находящийся по пути VMware Unlocker — Mac OS X Guest\VMware x.x.x\
- Если ваш компьютер не поддерживает виртуализацию, попробуйте применить от имени администратора патч из папки VMware Unlocker из папки VMware Unlocker — Hardware Virtualization Bypasser
- Открываем файл OS X Yosemite.vmx через File->Open
- Настраиваем виртуальную машину под свое железо.
- Запускаем
Установленные программы
- Mware Tools — доступы общие папки, общий буфер обмена и прочее
- Beamoff — уменьшает количество графических тормозов
- Процессор Intel с поддержкой VT-x и SSE3 технологии (i3, i5, i7 и другие), VMware Workstation 10 и выше,
- WinRar 4.0 и выше / 7-Zip 7.2 и выше
- 1 ГБ оперативной памяти (рекомендуется 2 ГБ и более)
ПАРОЛЬ АДМИНИСТРАТОРА: 123
Для запуска машины процессор должен поддерживать виртуализацию
Если она отключена, ее необходимо включить в BIOS
Для уменьшения тормозов рекомендуется запускать в VMware Player
Источник
How to Install Mac OS X Yosemite 10.10 on VMware?
By Karar
Post date
If you’re trying to try some amazing and interesting platform to capture the most or if you’ve been tired of your operating system you’re using then it’s much easy to do something more means you can install Mac OS X Yosemite on VMware virtualization software. No worries, you have the option to do it on a virtualization machine and even without dual boot or install it on PC just by following the steps. The Mac OS X Yosemite is the eleventh major release of OS X Apple Inc’s desktop and server operating system. It is also one of the most incredible interesting operating system and ease of work. To try this great operating system, follow the steps below:
Install Mac OS X Yosemite 10.10 on VMware
Minimum System Requirments
Before getting started, towards installing mac, let’s take a look at system requirements.
- 2.3 GHZ System
- 2 to 8 GB Ram
- 40 GB Storage
Ok, now that you’ve known and fulfill the system requirements, download the files from below and extract them when the download completed.
1. Open Unlocker 204 then navigate to win-install and Run as Administrator. It will start and add Apple Mac OS installation option on VMware services.
 open win-install with administrator
2. Now Open Vmware and create New Virtual Machine(Ctrl+N) and let it by default just click Next.
 New Virtual Machine Wizard
2. On this page, just select I will install the operating system later and click Next.
 Install OS later
3. Here you’ve to select Apple Mac OS X and choose Mac OS X 10.7 from version then click Next.
 Select a Guest OS
4. At this point, just describe the virtual machine and browse the location then click Next.
 Name the Virtual Machine
5. Now on this step, first you’ve to specify disk capacity (recommended 40 GB) and click Next then on the next page review the settings and customize it if needed and click Finish.
 Ready to Install
6. When the settings finished, click on Edit Virtual Machine and select the hard disk then click Remove.
 Remove-Hard-Disk
7. Now just click on Add and select hard disk then click Next.
 Add Hard Disk
8. On this page, let the disk type by default and just click Next.
9. On the first page, select Use an existing virtual disk then click Next and on the next page browse the extracted Mac OS X Yosemite VMware image and click Finish. When you’ve clicked finish, you’ll be asked to convert virtual disk to newer format, select keep existing format and click Ok on virtual machine settings.
10. Now power on the virtual machine and it will run successfully.
Setting up Mac OS X Yosemite on VMware
1. When the virtual machine started, choose your country, if it wasn’t there then click on show all and select your country then click Continue.
2. Now select a keyboard layout, and click Continue.
 choose keyboard layout
3. Choose Don’t transfer any information now then click Continue.
![]() Transfer Information
Transfer Information
4. Sign in with your Apple ID to use iCloud, iTunes, App Store, iMessage etc or choose don’t sign in then click Continue.
 Sign in with Apple ID
5. Read the terms and conditions of using Mac and click Agree.
 Terms & Conditions
6. Now setup your Mac by filling out the details according to yourself then click Continue. Also mark the set time zone based on current location.
 Create a Computer Account
7. Click Continue to send diagnostics and usage data to Apple automatically.
 Diagnostic & Usage
After continuing, wait a moment to set up your account then it will be started like the shot below.
 Mac OS X Yosemite Installed
Now that you’ve finished installing Mac OS X Yosemite 10.10 on VMware, its time to do inital configuration of your Mac, to do that just click on :- Perform Post-Installation Tasks on Mac OS X Yosemite.
Ok, that’s it. We are ready for any feedback and love you all for sharing it with us.
Источник
Download macOS X Yosemite 10.10 VirtualBox & VMware Image
Welcome! Do you know what is macOS? macOS is an operating system which we can use only and only for Macintosh computers. And Mac computers are one of the most famous popular computers in the current era. Therefore, Mac computers are having great quality and nice performance more than other computers. However, most of the people those who are in touch with computers they are preferring Macintosh computers. From that time that Apple build a Mac computer and released for the public. From that time till now Apple is developing a great operating system for Mac. Download macOS X El Capitan, then macOS X Yosemite, macOS Sierra, macOS High Sierra, and macOS Mojave. One of the most later updated operating systems of Apple company is macOS Mojave. That everyone like it due to its great features. Download macOS X Yosemite Virtualbox & VMware.

Download macOS X Yosemite 10.10
Table of Contents
Download macOS X Yosemite 10.10 Image
Apple introduced macOS X Yosemite 10.10 for the public. While all the companies were coming together and introducing new things. Therefore, Apple company introduced macOS X Yosemite there in the worldwide conference. By the passage of time, the worked on macOS Yosemite. And they brought some changes added some new features in macOS X Yosemite. Now macOS X Yosemite is the 11th major release of Apple. And macOS X Yosemite is the best developers for Mac users. Therefore, macOS X Yosemite was announced in 2014 at WWDC and released the beta tester for the public.
Still, macOS X Yosemite is one of the best-operating systems among the macOS. Due to having some cool features that other macOS operating systems don’t have. Let’s know about some features of macOS X Yosemite the first one is Handoff, Safari, Keynote, and some more features it has. Like New user interface, Notification Center, and Spotlight.
System Equipment to install macOS X Yosemite
To install macOS X Yosemite in Mac computers. You should know that which computer is better to install macOS X Yosemite on it. Therefore, below you can have a better introduction to the Mac computer. Which can more suitable for macOS X Yosemite.
- iMac (Mid 2007 or later)
- MacBook (Almunium late 2008 and early 2009 or later than that)
- MacBook Pro (130-inch, Mid 2009 or later) – MacBook Air (Late 2008 or later)
- Mac Mini (2009 or later)
- Mac Pro (Early 2008 or later)
- Xserver (2009)
- There is some more latest version of Mac computers. That you can install macOS X Yosemite on it.
Install macOS X Yosemite on VirtualBox & VMware
While you are installing macOS X Yosemite on your PC. But you don’t know that there are other platforms also which you can install macOS X Yosemite on that. Therefore, you can install macOS X Yosemite on VMware & VirtualBox If you are a heavy user of macOS operating system. But you don’t have any Macintosh computer. In this case, you can easily install any kind of macOS operating system on your Windows computer. It is totally simple just download any of Virtualization Box and install it on your computer. Then simply create a Virtual machine on any platform of Virtualization Box. Again if you don’t know that way of installation. I will provide you below the separate of installing macOS X Yosemite on VMware & VirtualBox. One thing more installing macOS X Yosemite on VMware is better and easy than installing on VirtualBox.
Download macOS X Yosemite 10.10 Image for VMware & VirtualBox
The image file of macOS X Yosemite is created only to install in VMware and VirtualBox. Therefore, the file is completely compressed with Winrar and 7Zip. Which voluntarily you can install it on VMware or VirtualBox. And the image file of macOS X Yosemite is uploaded on Google Drive and MediaFire. Therefore, Google Drive and MediaFire is a safe place for this. We uploaded the file of macOS X Yosemite in Google Drive for the purpose. That you should download it easily with some few clicks.
Conclusion
That’s all about macOS X Yosemite and some information about. Therefore, if have something to share about this feel free and share your points. And don’t forget to give us feedback for your more support and subscribe to our website. To get notification about our latest post updates.
Источник
How to Install Mac OS X Yosemite on VMware on Windows
Install Mac OS X Yosemite on VMware, and it is the 11th major release of Mac, Apple company. Therefore, this version of Mac OS X Yosemite is 10.10 and it was the old version of macOS operating system among the other operating systems. You can recognize that Mac OS X Yosemite is older than the current macOS version. However, Mac OS X Yosemite is right now one of the most interesting operating systems. Because of it’s some outstanding and cool features, Somehow, Mac OS X Yosemite was announced by WWDC in 2014 for developers. Therefore, and the latest version of Mac was released on October-16-2014. Moreover, this operating system has a server and a Macintosh version. And Mac OS X Yosemite has one of the greatest graphic features, and many more features like using the Apps like, Safari, Keynote, Notification bar, and Calendar feature.
Table of Contents
Install Mac OS X Yosemite on VMware-Requirements?
To install Mac OS X Yosemite operating system on Macintosh and VMware. You need some requirements for example if you want to install macOS Mountain Lion on Mac, and computer. Therefore, you need 4GB of RAM, 20GB of available storage. Above all, the system requirements below I will talk about that, just follow the article.
- iMac
- MacBook
- MacBook Pro, MacBook Air, Mac Mini
- Mac Pro
- Xserver
After this all, if you are ready to install Mac OS X Yosemite on VMware. Then you need a good PC and 4GB of RAM, 20GB of Hard Drive space and your processor core should be i3 or later for better performance. Therefore, you need Mac OS X Yosemite 10.10 DMG file. Here I will provide you the download link. And download VMware Player also, then download Unlocker from below-given link.
Mac OS X Yosemite on VMware
Before going to create a VMware virtual machine. firstly, you need to download the Mac OS X Yosemite DMG file, then after the downloading is done, therefore, you will see that the file is compressed. For that you need to download and install WinRar, then Extract the DMG file just right click>Extract Here all the file will be unpacked from compress.

Extract Mac OS X Yosemite
Now after you extracted the DMG file, here you need to install Unlocker tool on VMware. However, you can download Unlocker tool from the above link. You might have information about Unlocker tool, that unlocker is a light tool which allows or appear macOS operating system on VMware list. Therefore, for that select Win-Install then select Run As Administrator and wait for some seconds to install the requirement on VMware Workstation.

Create a New Virtual Machine
Step #1. Above all, now you need to create a new virtual machine for Mac OS X Yosemite, for that launch VMware Workstation and click on Create a new virtual machine.

Create a New Virtual Machine
Step #2. In the welcome wizard, select Typical(Recommended) and click Next. Or you can select Custom (Advanced) also but that can be a bit complicated for you.
Select TypicalStep #3. In this step, you need to select the installation type, whether that is installer disc, installer disc image file (ISO). But I recommend you to select the third option I will install the operating system later, and click Next.

Select the operating system type
Step #4. In this step, I told you that unlocker will unlock Apple Mac OS X on the list, in here select Mac OS and select the version then click Next.

Select the operating system version
Step #5. In this step, rename the Virtual machine whatever you want you can give the name. Then click Next.

Rename the virtual machine
Step #6. In this step, you need to specify the disk capacity. Therefore, as I think 20GB is enough for this installation, then select Store virtual disk as a single file and click Next.

Specify disk capacity
Mac OS X Yosemite settings on VMware Workstation
After that, you are completely done with creating a new virtual machine for Mac OS X Yosemite, therefore, you need some more settings in VMware Workstation. To have better performance and clean installation of Mac OS X Yosemite on it, at the first, open VMware then click on the operating system which was created by you. Then click on Settings, and in the first step select the memory from the left-handed side then increase the size of memory.

Increase memory size
Step #7. In this step, select processors and increase the number of processors, and the number of cores per processor. Then check to mark the Virtualize Intel VT-x/EPT or AMD-V/RVI.

Increase processor core
Step #8. In this step, select Hard Disk (SATA) click remove, then click on Add go furthermore.

Remove the hard disk and add new
Step #9. In this step, select the Hardware type, select Hard Disk and click Next.

Add hardware type
Step #10. In this step, select the third option and click Next.

Select a Disk Type
Step #11. In this step, select a disk the second option Use an existing virtual disk and click Next.

Step #12. In this step, browse for Mac OS X Yosemite and click Open.

Browse for DMG file
Step #13. Now go to documents and Virtual machine. Then Mac OS X Yosemite folder and select the below file, Open with Notepad.

Install the code
Step #14. In this step, while notepad launched just type smc.version = 0 and save the notepad file.

Have a clean install of Mac OS X Yosemite
Step #1. Now you are ready to install Mac OS X Yosemite on VMware Workstation. Therefore, launch VMware while it launched click on power on this virtual machine.

Power on this virtual machine
Step #2. While the virtual machine opened, on the welcome screen choose your country then click Continue.

select your country
Step #2. In this step, select your keyboard and click Continue.

Select your keyboard
Step #3. Select Don’t transfer any information now and click Continue.

Step #4. Select Don’t Sign in, then click Continue and click Skip. Therefore, if you have Apple ID you can Sign with your Apple ID.

Step #5. Read carefully the terms and condition of Mac, then click Agree.

Terms and condition
Step #6. In here, fill out the following information to create your computer account. Therefore, you need to fill the Full name, Account name, Password, and Hint and mark the Time zone. Then click Continue.

Create a computer account
Step #7. In this step, click Continue to send Diagnostics and usages to Apple.

Step #8. In this step, wait for some seconds to set up your Mac.

Setting Up your Mac
Step #10. Now you are successfully done with the installation of Mac OS X Yosemite 10.10 on VMware. However, enjoy this operating system as a second operating system on your Windows 10 or any other Windows.

install Mac OS X Yosemite
Conclusion
That’s all about How to install Mac OS X Yosemite 10.10 on VMware on Windows. Therefore, I hope that you enjoyed the installation process for this operating system. Then if you faced any kind of problem feel free and comment on below comment box, and share your suggestion, ideas about this article. Don’t forget to give us feedback for your more support.
Источник


